
Categorías populares
¿Buscas un hilo?


Comentarios / Preguntas (34)
![]() Ulla escribió:
Ulla escribió:
Men hvorfor skal der kun være 5 masker i den først skonning og 6 i den anden.
01.03.2026 - 20:58DROPS Design respondió:
Hei Ulla. Tenker du på diagram M.1A og M.2A som starter med 5 masker, men som på 4. pinne øker med 1 maske pr gang diagrammene strikkes? Snonningene trekker arbeidet sammen og for at det skal bli en pen overgang mellom snoningene og glattstrikk, må det økes noen masker. M. A diagrammene strikkes bare 1 gang i høyden, mens M.B diagrammene gjentas i høyden. mvh DROPS Design
03.03.2026 - 13:04
![]() Ulla escribió:
Ulla escribió:
Hvor mange masker skal der være imellem hver snoning??
29.12.2025 - 19:43DROPS Design respondió:
Hei Ulla. Kommer an på hvilken str. du strikker. Det er enten 2 eller 3 masker. 1 kantm, * 3(S)-2(M)-2(L)-3(XL)-2(XXL)-2(XXXL) m ret fra vrangen/vrang fra retten, M.1A (= 5 m) *, gjenta fra *-* totalt 6-8-8-8-10-10 ganger, avslutt med 3(S)-2(M)-2(L)-3(XL)-2(XXL)-2(XXXL) m ret fra vrangen/vrang fra retten, 1 kantm. mvh DROPS Design
12.01.2026 - 12:53
![]() Sharon Hunt escribió:
Sharon Hunt escribió:
I would like to make this two inches larger than the pattern calls for. Would adding 12 sts. and following the pattern as written make up my sts deficit. Am trying for the easiest and pain free way to make this a bit larger. Thank you.
11.10.2024 - 21:27DROPS Design respondió:
Dear Sharon, we don't make custom patterns. When you add up stitches, you will be modifying the pattern in the row as well, so you need to take that into account when you modify the pattern. The piece is worked from the bottom up so, to lengthen the pattern, the easiest way is to add more cm in stocking stitch before the decreases or to spread the decreases apart slightly, so that you can add more cm to the piece while working the same number of decreases as required. To widen the piece, you need to make a rule of three; you can see an example on how to calculate this here: https://www.garnstudio.com/lesson.php?id=25&cid=19. Happy knitting!
13.10.2024 - 20:57
![]() Gillian Hendry escribió:
Gillian Hendry escribió:
Am I right in thinking that at the beginning of the cable panel, worked from WS, that it should be knit 3/2 between each cable not purl?
30.08.2019 - 20:08DROPS Design respondió:
Dear Mrs Hendry, you are right, the stitches between cables should be P from RS and K from WS. Happy knitting!
09.09.2019 - 12:45
![]() Susan escribió:
Susan escribió:
Got another one for you - once you do add the YO where ever it goes the stitch count increases from 60 to 68 per the instructions. However where do the extra stitches go? The instuction calls for only P2 (med size) before the pattern starts, which would leave the extra 8 at the end of the row, which pushes the cable pattern way off on the next row.
18.03.2018 - 23:04DROPS Design respondió:
Dear Susan, the number of sts will increased due to the inc in M.1A, ie: Continue in pattern and inc in cables acc to diagram (= 59-68-68-77-84-84 sts ..., you are working M.1A a total of 8 times in width = 8 sts will be increased on row 4 in M.1A = 68 sts in size M. Happy knitting!
19.03.2018 - 11:13
![]() Susan escribió:
Susan escribió:
I have knitted cables before but I am totally mystified by the description of M1.A where is the YO made, in the front of the 3 on the needle, in the middle, at the end. Is the YO on the same row or before it, after? I have tested a small piece for two days now, I don't understand what is happening.
18.03.2018 - 21:33DROPS Design respondió:
Dear Susan, the Yo in M.1A is made on 4th row, ie K2, YO, K3 ( = there are now 6 sts in M.1A). On next row, P YO twisted to avoid a hole. On 6th row work the cable as explained under diagram. Happy knitting!
19.03.2018 - 11:10
![]() Dagmar escribió:
Dagmar escribió:
Ich würde mir manchmal etwas einfachere Anleitungen wünschen, wie sie in den strickheften stehen, bin KEINE Anfängern, aber mit euren Anleitungen manchmal sehr verwirrt..es ist eine Anregung, und ich spreche damit vielen meiner Freunde aus der Seele.Danke von einer begeisterten Strickerin😃
19.02.2016 - 17:10
![]() Dagmar escribió:
Dagmar escribió:
HILFE 😌 bitte, Wie lese ich das Diagramm richtig? man sieht es nur von der Vorderseite, der MS besteht aus 10glatten Reihen, das würde bedeuten, eine linke reihe ist gleichzeitig meine nächste Rechte Reihe, ODER werden die linken Reihen NICHT mitgezählt, dann würde aber der MS doppelt so lang??? Bin sehr verwirrt.bitte um baldige Antwort.danke😃
19.02.2016 - 17:04DROPS Design respondió:
Die Diagramme zeigen stets alle Reihen, also Hin- und Rück-R. Sie fangen unten rechts an zu lesen und lesen nach links, das ist die Hin-R, dann lesen Sie die Rück-R von rechts nach links usw.
24.02.2016 - 19:47
![]() Annelie Sörslätt escribió:
Annelie Sörslätt escribió:
Nu vill jag veta hur jag ska börja vad menas med3-2-2-3-2-2am,M,1A(=5m)*_*
15.12.2012 - 17:40
![]() Margretha escribió:
Margretha escribió:
Dank voor de reactie. Maar ik snap eigenlijk nog steeds niet hoe ik voor het linker voorpand aan de goede kant vanaf de schouder richting de hals steken af moet kanten. Dit kan toch niet? En wordt de kraag in tricotsteek gebreid?
09.10.2012 - 10:17DROPS Design respondió:
Dit staat er in het patroon: Kant in de volgende nld aan de goede kant 18-21-21-26-28-28 st af vanaf de schouder richting de hals. De goede kant van het linker voorpand begint bij het armsgat richting middenvoor. De kraag wordt in ribbelst gebreid net zoals de rand middenvoor.
09.10.2012 - 20:44
|
|||||||||||||
Manifesting Winter#manifestingwinterjacket |
|||||||||||||
|
|
|||||||||||||
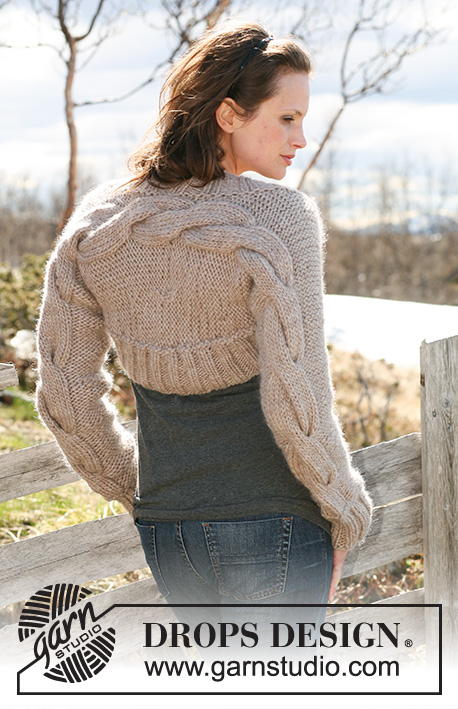
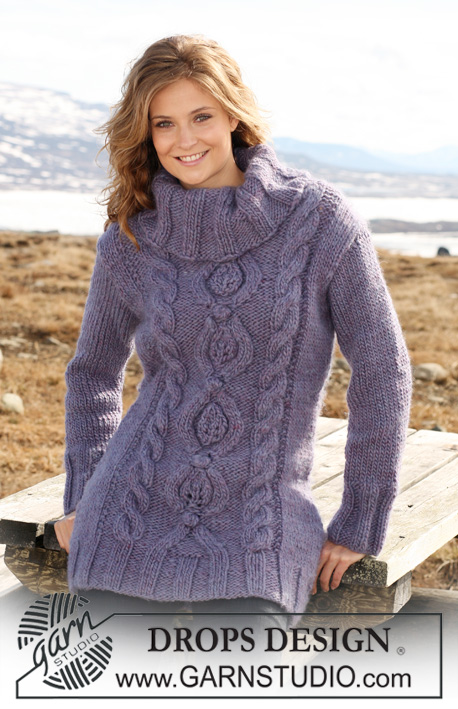
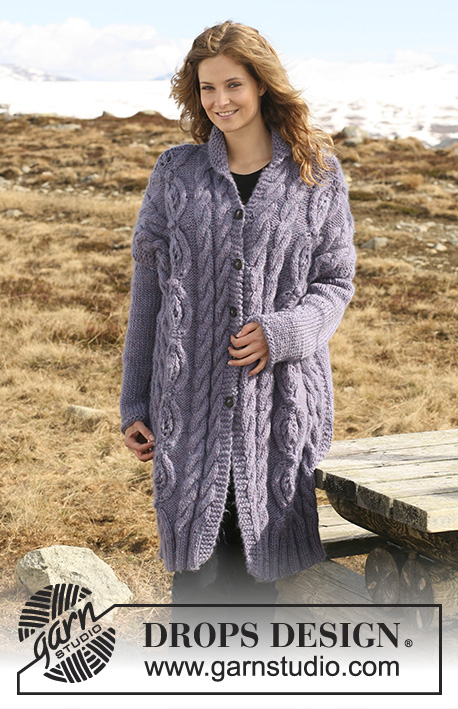
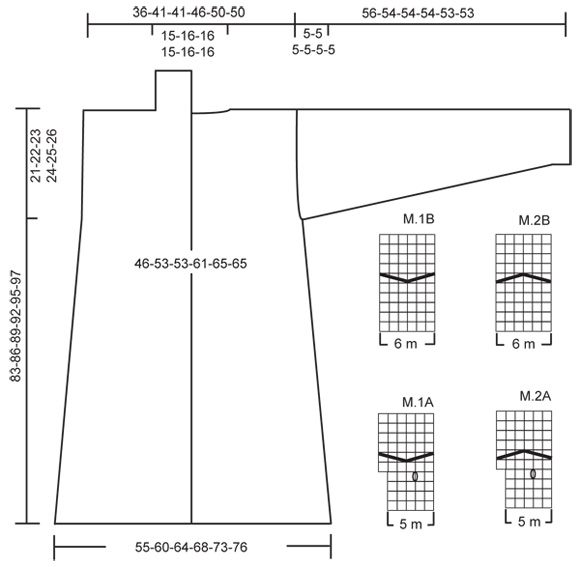
Saco de punto DROPS con torsadas / trenzas en “Snow”. Talla S – XXXL.
DROPS 117-22 |
|||||||||||||
|
PT MUSGO (de ida y vuelta en ag): Todas las vtas de derecho. TIP PARA TOMAR LAS MEDIDAS: Debido al peso de la lana, todas las medidas deberán ser tomadas con la pieza suspendida, de lo contrario quedará muy larga al usarla. PATRON: Ver M.1A, M.1B, M.2A y M.2B. El diagrama muestra el patrón por el LD. OJALES: Tejer los ojales en el borde delantero derecho. 1 ojal = rem el 4º pt a partir del centro del frente y hacer 1 HEB (lazada). Tejer los ojales cuando la pieza mida: Talla S: 28, 36, 44, 52, 60 y 68 cm. Talla M: 30, 38, 46, 54, 62 y 70 cm. Talla L: 32, 40, 48, 56, 64 y 72 cm. Talla XL: 34, 42, 50, 58, 66 y 74 cm. Talla XXL: 28, 36, 44, 52, 60, 68 y 76 cm. Talla XXXL: 30, 38, 46, 54, 62, 70 y 78 cm. ESPALDA: Se teje de ida y vuelta en ag circular. Mon 63-68-72-77-82-86 pts (incl 1 pt de orillo de cada lado) en ag circular tamaño 8 mm con Snow. Tejer 10 vtas en PT MUSGO – ver arriba, 2 vtas en pt jersey, y luego 2 vtas en pt musgo. Cont en pt jersey. Cuando la pieza mida 12 cm, dism 1 pt de cada lado. Repetir la dism cada 8-12-8-12-12-8 cm un total de 5-4-6-4-4-6 veces = 53-60-60-69-74-74 pts. RECUERDE MANTENER LA MISMA TENSIÓN DE TEJIDO DE LA MUESTRA! Ver TIP PARA TOMAR LAS MEDIDAS! Cuando la pieza mida 46-49-52-48-51-53 cm, tejer el PATRON en la vta sig por el LR, como sigue – ver arriba: 1 pt de orillo, * 3-2-2-3-2-2 derechos (reveses por el LD), M.1A (= 5 pts) *, repetir de *a* un total de 6-8-8-8-10-10 veces, terminar con 3-2-2-3-2-2 derechos (reveses por el LD), 1 pt de orillo. Cont en el patrón y aum en las torsadas de acuerdo con el diagrama (= 59-68-68-77-84-84 pts – tejer de derecho los pts del LR que son reveses por el LD). Después de 1 repetición vertical de M.1A, continuar en M.1B con los pts restantes como antes. Tejer un total de 4-4-4-5-5-5 repeticiones verticales de M.1B. AL MISMO TIEMPO, después de la vta de torsadas en la última repetición, dism 1 pt por el LR en cada torsada = 53-60-60-69-74-74 pts. La pieza mide ahora aprox 79-82-85-88-91-93 cm. Tejer 2 vtas en pt musgo en todos los pts. AL MISMO TIEMPO, cuando la pieza mida 81-84-87-90-93-95 cm, rem los 15-16-16-15-16-16 pts centrales para el cuello y completar cada lado por separado. Rem 1 pt en la línea del escote en la vta sig = 18-21-21-26-28-28 pts restantes en el hombro. Cont en pt jersey hasta que la pieza mida 83-86-89-92-95-97 cm. Rem. DELANTERO IZQUIERDO: Mon 39-41-45-45-48-52 pts (incl 1 pt de orillo en el lado) en ag circular tamaño 8 mm. Tejer 10 vtas en pt musgo, 2 vtas en pt jersey con 2 pts musgo de lado del centro del frente, y 2 vtas en pt musgo. Ahora continuar en pt jersey con 2 pts musgo de lado del centro del frente. Cuando la pieza mida 12 cm, dism 1 pt en el lado. Repetir la dism en el lado y junto a los 2 pts musgo de lado del centro del frente, de forma alterna, cada 4-6-4-6-6-4 cm, un total de 9-7-11-7-7-11 veces = 30-34-34-38-41-41 pts. Cuando la pieza mida 46-49-52-48-51-53 cm, tejer el patrón en la vta sig por el LR como sigue: 1 pt de orillo, * 3-2-2-3-2-2 reveses, M.1A (= 5 pts) *, repetir de *a* un total de 3-4-4-4-5-5 veces, terminar con 3 reveses y 2 pts musgo. Cont en el patrón y aum en las torsadas de acuerdo con el diagrama (= 33-38-38-42-46-46 pts). Después de 1 repetición vertical de M.1A, continuar en M.1B con los pts restantes como antes. Tejer un total de 4-4-4-5-5-5 repeticiones verticales de M.1B. AL MISMO TIEMPO, después de la vta de torsadas en la última repetición, dism 1 pt por el LR en cada torsada = 30-34-34-38-41-41 pts. Tejer 2 vtas en pt musgo en todos los pts, luego continuar en pt jersey con 2 pts musgo de lado del centro del frente, hasta que la pieza mida 83-86-89-92-95-97 cm. En la vta sig por el LD, rem 18-21-21-26-28-28 pts a partir del hombro en dirección a la línea del escote = 12-13-13-12-13-13 pts restantes en la ag para el cuello. En la vta sig (por el LR) tejer vtas cortas, de ida y vuelta en la ag, en el cuello, como sigue: * 2 vtas en todos los pts, 2 vtas en los 7 pts de lado del cuello únicamente *, repetir de *a*. Rem cuando el cuello mida 8 cm (medido en el lado más corto) a partir del hombro. DELANTERO DERECHO: Como el delantero izquierdo, pero a la inversa. NOTA! Tejer M.2A y M.2B en vez de M.1A y M.1B. AL MISMO TIEMPO, cuando la pieza mida 28-30-32-34-28-30 cm, tejer el primer OJAL – ver arriba! MANGA: Se teje de ida y vuelta en ag circular. Mon 30-31-32-33-34-35 pts (incl 1 pt de orillo de cada lado) en ag circular tamaño 8 mm. Tejer 10 vtas en pt musgo, 2 vtas en pt jersey y 2 vtas en pt musgo. Cont en pt jersey. Cuando la pieza mida 8 cm, aum 1 pt de cada lado. Repetir el aum cada 8-6-5-5-4.5-4 cm un total de 6-7-8-8-9-10 veces = 42-45-48-49-52-55 pts. Cuando la pieza mida 51-49-49-49-48-48 cm (menos para las tallas más grandes por copete de manga más largo y mayor anchura de hombros) rem para el copete de manga en cada lado, al inicio de cada vta: 4 pts 1 vez, luego 2 pts de cada lado hasta que la pieza mida 55-53-53-53-52-52 cm. Ahora rem 4 pts 1 vez de cada lado y rem los pts restantes. La pieza mide aprox 56-54-54-54-53-53 cm. TERMINACION: Hacer las costuras de los hombros. Unir el cuello con una costura en el centro de la parte de atrás y coser a la línea del escote. Hacer las costuras de los lados a 1 pt del pt de orillo, dejando 21-22-23-24-25-26 cm en la parte de arriba para la sisa. Hacer las costuras de las mangas a 1 pt del pt de orillo. Montar las mangas. Coser los botones. Si desea que el borde delantero quede ligeramente más firme, trabajar una vuelta de p.b. con ag de ganchillo tamaño 8 mm a lo largo del borde delantero de cada lado. |
|||||||||||||
Explicaciones del diagrama |
|||||||||||||
|
|||||||||||||
 |
|||||||||||||
¿Terminaste este patrón?Entonces, etiqueta tus fotos con #dropspattern #manifestingwinterjacket o envíalas a la galería #dropsfan. ¿Necesitas ayuda con este patrón?Encontrarás 22 videos tutoriales, un espacio para comentarios/preguntas y más visitando la página del patrón en garnstudio.com © 1982-2026 DROPS Design A/S. Todos los derechos reservados. Este documento, incluyendo todas sus sub-secciones, está protegido por los derechos de autor (copyright). Lee más acerca de lo que puedes hacer con nuestros patrones en la parte de abajo de cada patrón de nuestro sitio. |
|||||||||||||


Con más de 40 años en el diseño de modelos de punto y de ganchillo, DROPS Design ofrece una de las más vastas colecciones de patrones gratuitos en el internet - traducidos en 17 idiomas. Al día de hoy, contamos con 324 catálogos y 12290 patrones - de los cuales 11685 están traducidos en español.
Nosotros trabajamos con mucho esmero para brindarte lo mejor que las labores de punto y ganchillo tienen para ofrecer,inspiración y consejos, así como hilos de magnífica calidad a precios increíbles! Te gustaría usar nuestros patrones para otro fin además del uso personal? Puedes leer acerca de lo que estás permitida a hacer en el texto de Copyright en la parte de abajo de todos nuestros patrones. Felices labores!
Escribe un comentario sobre DROPS 117-22
¡Nos encantaría saber qué piensas acerca de este patrón!
Si quieres escribir una pregunta referente al patrón, por favor asegúrate de elegir la categoría correcta en el formulario debajo, para acelerar el proceso de respuesta. Los campos obligatorios están marcados con un *.