
Categorías populares
¿Buscas un hilo?


Comentarios / Preguntas (97)
![]() Christiane Boos escribió:
Christiane Boos escribió:
Hallo, kann ich die Ärmel auch verlängern? Ich hätte gerne Ärmel bis ca. Ellenbogen. Oder stricke ich einfach den Ärmelteil länger? Danke, Christiane
24.06.2022 - 14:56DROPS Design respondió:
Liebe Frau Boos, vielleicht könnte Ihnen dieses Modell damit inspirieren. Viel Spaß beim stricken!
27.06.2022 - 07:51
![]() Anita escribió:
Anita escribió:
Hello Jeanette,Doing XL. On Line 17 from top, of your pattern, I do not understand: slip sts on a new stich holder,*** How many?*** & slip sts from 1st stch holder back on the needle 38. Not clearly explained!!!
04.09.2021 - 23:16DROPS Design respondió:
Dear Anita, you slip all of the sts you have been working now on a new stitch holder and then you slip back to the needle the 38 stitches you had in the first stitch holder. Happy knitting!
05.09.2021 - 17:12
![]() Giulia escribió:
Giulia escribió:
Ho ricevuto la sua risposta, io ho già fatto altri lavori coi Ferri accorciati, ma non capisco le misure , come faccio ad avere cm 7,5 dalla parte del collo che è la parte dei ferri accorciati e quindi viene lavorata di più e avere 20,5 cm nella parte bassa che è la parte che ho lavorato di meno , non mi tornano queste misure .Dovrei avere meno cm nella parte bassa rispetto alla parte vicino al collo, spero di essermi spiegata meglio, grazie
22.04.2021 - 07:40DROPS Design respondió:
Buonasera Giulia, prosegua con la lavorazione, e piano piano si chiarirà la direzione del lavoro. Buon lavoro!
24.04.2021 - 21:57
![]() Giulia escribió:
Giulia escribió:
Non capisco abbastanza all’inizio, dopo aver eseguito i ferri accorciati, io ho taglia L , dove dice fino a quando il lavoro misura 7,5 cm in alto vicino al collo e 20,5 cm in basso . I cm vengono misurati come ? Poi se dalla parte del collo in alto ho 7,5 cm come faccio ad avere in basso 20,5 cm ? Mi può rispondere abbastanza in fretta e magari farmi uno schema perché non riesco a continuare , la ringrazio infinitamente , perche voglio anche capire bene
21.04.2021 - 21:21DROPS Design respondió:
Buonasera Giulia, le misure diverse sono dovute al fatto che si lavorano i ferri accorciati, per cui si lavora solo su una parte delle maglie e non su tutte le maglie presenti sul ferro. Buon lavoro!
21.04.2021 - 22:57
![]() Hanneke Goumare escribió:
Hanneke Goumare escribió:
Ik wil graag dit model voor mijn dochger breien maar ook voor haar dochtertje in maat 104. Hoe bereken ik het patroon voor maat 104? I would like to knit this patern for my daughter in size M and for her daughter in size 104 - childrensize. How can I convert the patern in this small size?
23.03.2021 - 22:27DROPS Design respondió:
Dag Hanneke,
Dit patroon is er alleen in damesmaten. Het is voor ons helaas niet mogelijk om een patroon aan te passen naar persoonlijke wensen. Wellicht kun je een patroon vinden uit onze selectie kinderpatronen en die eventueel aanpassen om bijvoorbeeld zonder mouwen te breien en met een korter lijf.
26.03.2021 - 16:00
![]() Brigitte escribió:
Brigitte escribió:
Gibt es diese Anleitung auch auf Deutsch?
12.03.2021 - 13:53DROPS Design respondió:
Liebe Brigitte, alle unsere Modellen sind auch auf Deutsch erhältlick; klicken Sie auf das Dropsdown-Menü unter dem Foto und so wählen Sie Ihre Sprache. Viel Spaß beim stricken!
15.03.2021 - 09:53
![]() Marion escribió:
Marion escribió:
Thank you for your earlier help. I've now reached the part where I need to slip stitches onto a new stitch holder and to slip stitches from first stitch holder back onto needle and to continue knitting garter stitch. Do I start with new yarn on the 32 stitches from the stitch holder (I'm making the second size) or do I continue with the working yarn which will make circle for the sleeve? - I can't see how this would work though.
13.10.2019 - 16:00Marion respondió:
I've continued knitting and now I've added all stitches back onto the needle the shape is now clear.
13.10.2019 - 19:55
![]() Marion escribió:
Marion escribió:
Help please - I am ready to slip stitches onto a stitch holder but I am confused as my working yarn is at the bottom end of the row and so I will not have the yarn to continue knitting the shortened rows. Do I need to join in new working yarn? Or do I knit the stitches before slipping them onto the stitch holder so the yarn is in the middle ready to knit the shortened rows?
11.10.2019 - 23:39DROPS Design respondió:
Dear Marion, it would be simpler (as less ends to weave in) to knit the stitches before you slip them on a stitch-holder, or a piece of yarn. Happy Knitting!
12.10.2019 - 01:20
![]() Annette escribió:
Annette escribió:
Hallo Liebes Drops-Team, ich verstehe nicht, wie ich oben 2 Reihen und unten 6 Reihen stricken kann. Bei meinen Versuchen wächst nur die obere Hälfte mit den verkürzten Reihen und unten wächst die Strickarbeit nicht. Was mache ich falsch ? Vielen Dank und liebe Grüße Annette
28.10.2018 - 12:43DROPS Design respondió:
Liebe Annette, bein den verkürzten Reihen stricken Sie: 2 Reihe über die Maschen bis zur 1. Markierung, 2 Reihe über die Maschen bis zur 2. Markierung und 2 Reihen über alle Maschen = Sie haben 6 Reihen über die ersten Maschen (= rechten Seite) und nur 2 Reihen über die letzten Maschen (= linken Seite) gestrickt. Diese 6 Reihe so wiederholen, Strickstück wächst mehr auf der rechten Seite (untere Kante der Jacke) als auf den linken Seite (obere Kante = am Hals). Viel Spaß beim stricken!
29.10.2018 - 08:25
![]() Abbie escribió:
Abbie escribió:
I have completed my first set of short rows and I’m rady to put my stitches on a stitch holder. Which is the top and which is the bottom? I’m not visualizing the sweater yet? And am I supposed to move my markers to new spots now, after I place my stitches on the stitch holder? Thanks for any help given!
19.10.2017 - 22:35DROPS Design respondió:
Dear Abbie, the bottom of the jacket is towards the longest side (where piece measures 16-23.5 cm, see size) and the top side is towards 1st makrer, where piece measures approx. 6-8.5 cm on the top towards neckline. Short rows are also worked on the sleeve cap, but there will be now only 17-19 sts before 1st marker. Happy knitting!
20.10.2017 - 09:11
|
|
Helena#helenavest |
|
|
|
|
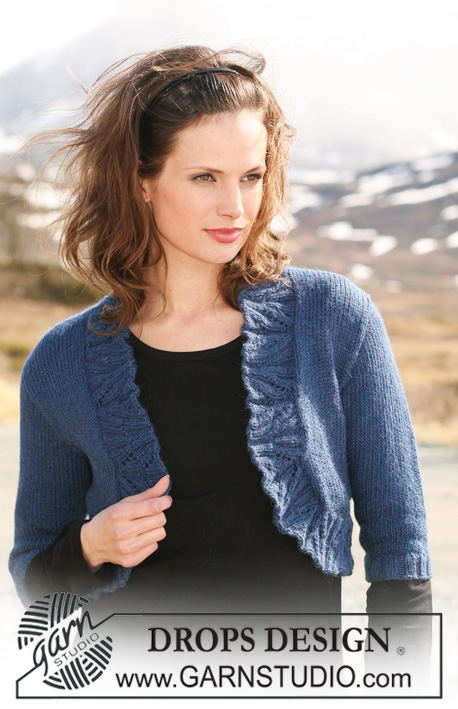
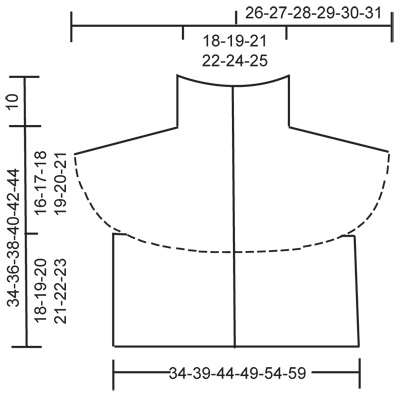
Saco DROPS corto, con mangas cortas, tejido de lado a lado en 2 hilos “Alpaca”. Talla: XS – XXL.
DROPS 117-43 |
|
|
VUELTAS CORTAS: * Tejer la vta hasta el primer marcapuntos (MP), virar, tensar el hilo y tejer la vta de regreso, tejer la vta hasta el segundo MP, virar, tensar el hilo y tejer la vta de regreso, tejer todos los pts, virar y tejer la vta de regreso *, repetir de *a*. 1 repetición = 2 vtas en la parte de arriba y 6 vtas en la parte de abajo. ------------------------------------------------------ SACO: Tejido de ida y vuelta en la ag, a partir del lado izquierdo, en pt musgo; es decir, todas las vtas de derecho. Mon 75-78-82-85-88-92 pts en ag tamaño 5 mm con 1 hilo de cada color. Tejer 4 vtas de derecho en todos los pts (primera vta = LD). Insertar 2 MP en la pieza, por el LD, de la manera sig: Primer MP: después de 47-49-52-54-56-59 pts. Segundo MP: después de un total de 57-60-64-67-70-74 pts. = 18 pts después del último MP = cuello. Continuar con VUELTAS CORTAS – ver arriba – hasta que la pieza mida 6-6.5-7-7.5-8-8.5 cm en la parte de arriba (= cuello) y aprox 16-17.5-19-20.5-22-23.5 cm en la parte de abajo. Insertar un MP en la parte de arriba junto al escote – AHORA MEDIR LA PIEZA DESDE AQUÍ! Deslizar los 30-32-34-36-38-40 pts inferiores en un gancho o seguro aux = 45-46-48-49-50-52 pts restantes en la ag para la manga. Continuar con vueltas cortas como antes (mas ahora tenemos solamente 17-17-18-18-18-19 pts antes del primer MP) hasta que la pieza mida aprox 7-7.5-8-8.5-9-9.5 cm a partir del MP del escote y aprox 21-22.5-24-25.5-27-28.5 cm en la parte de abajo (= sobre la manga). Deslizar los pts en un nuevo gancho o seguro aux y desl los pts del primer gancho o seguro aux de regreso en la ag = 30-32-34-36-38-40 pts. Tejer pt musgo de ida y vuelta en estos pts por 4-6-8-10-12-14 cm. Ahora desl todos los pts de regreso en la ag = 75-78-82-85-88-92 pts. Mover el MP de la parte de arriba del escote para donde está, ahora, y pasar a medir la pieza a partir de aquí! Tejer vueltas cortas como antes hasta que la pieza mida aprox 10-11-12-13-14-15 cm a partir del MP del escote y aprox 30-33-36-39-42-45 cm en la parte de abajo. Mover el MP de la parte de arriba del escote para donde está, ahora, y pasar a medir la pieza a partir de aquí! Deslizar los 30-32-34-36-38-40 pts inferiores en un gancho o seguro aux = 45-46-48-49-50-52 pts restantes en la ag para la manga. Continuar con vueltas cortas como antes hasta que la pieza mida aprox 7-7.5-8-8.5-9-9.5 cm a partir del MP del escote y aprox 21-22.5-24-25.5-27-28.5 cm en la parte de abajo (= sobre la manga). Deslizar los pts en un nuevo gancho o seguro aux y desl los pts del otro gancho o seguro aux de regreso en la ag = 30-32-34-36-38-40 pts. Tejer pt musgo de ida y vuelta en estos pts por 4-6-8-10-12-14 cm. Ahora desl todos los pts de regreso en la misma ag = 75-78-82-85-88-92 pts. Mover el MP de la parte de arriba del escote hasta donde está, ahora, y pasar a medir la pieza desde aquí! Continuar con vueltas cortas en todos los pts hasta que la pieza mida aprox 5-5.5-6-6.5-7-7.5 cm a partir del MP del escote y aprox 15-16.5-18-19.5-21-22.5 cm en la parte de abajo. En la vta sig, por el LD, hacer 3 ojales de la manera sig: * 9d, 2 pjd, 1 HEB (lazada) *, repetir de *a* un total de 3 veces, tejer los pts restantes en la vta de derecho. Tejer 3 vtas en pt musgo en todos los pts y rem flojamente. TERMINACIÓN: Coser los botones. |
|
 |
|
¿Terminaste este patrón?Entonces, etiqueta tus fotos con #dropspattern #helenavest o envíalas a la galería #dropsfan. ¿Necesitas ayuda con este patrón?Encontrarás 13 videos tutoriales, un espacio para comentarios/preguntas y más visitando la página del patrón en garnstudio.com © 1982-2026 DROPS Design A/S. Todos los derechos reservados. Este documento, incluyendo todas sus sub-secciones, está protegido por los derechos de autor (copyright). Lee más acerca de lo que puedes hacer con nuestros patrones en la parte de abajo de cada patrón de nuestro sitio. |


Con más de 40 años en el diseño de modelos de punto y de ganchillo, DROPS Design ofrece una de las más vastas colecciones de patrones gratuitos en el internet - traducidos en 17 idiomas. Al día de hoy, contamos con 324 catálogos y 12290 patrones - de los cuales 11679 están traducidos en español.
Nosotros trabajamos con mucho esmero para brindarte lo mejor que las labores de punto y ganchillo tienen para ofrecer,inspiración y consejos, así como hilos de magnífica calidad a precios increíbles! Te gustaría usar nuestros patrones para otro fin además del uso personal? Puedes leer acerca de lo que estás permitida a hacer en el texto de Copyright en la parte de abajo de todos nuestros patrones. Felices labores!
Escribe un comentario sobre DROPS 117-43
¡Nos encantaría saber qué piensas acerca de este patrón!
Si quieres escribir una pregunta referente al patrón, por favor asegúrate de elegir la categoría correcta en el formulario debajo, para acelerar el proceso de respuesta. Los campos obligatorios están marcados con un *.