
Categorías populares
¿Buscas un hilo?


Comentarios / Preguntas (153)
![]() Émilie Bosquart escribió:
Émilie Bosquart escribió:
Bonjour! Je voudrais tricoter ce modèle pour mon bébé et je remarque que les patrons sont tous 1/3 mois ou 6/9 mois, que me conseillez-vous pour faire le modèle en 3/6 mois? Si j'utilise une aiguille un peu plus grosse peut-être? Merci beaucoup
20.07.2021 - 20:11DROPS Design respondió:
Bonjour Emilie, cela depend en fait de la taille de l'enfant. Regardez la lecon DROPS ICI pour decider quelle taille choisir. Bon tricot!
20.07.2021 - 21:39
![]() Francine escribió:
Francine escribió:
-Bonjour,lorsque je monte les mailles pour les manches en fin de rang,je le fait à chaque rang ou un rang sur deux sur l’endroit? -Lorsque c’est écrit commencer par le côté gauche pour le dos-devant,c’est la jambe gauche?(ça veut direcque le rang 4est sur l’envers?) Merci beaucoup!
18.07.2021 - 17:30DROPS Design respondió:
Bonjour Francine, tu le fais a la fin de chaque rang (sur l'endroit et sur l'envers). Bon tricot!
18.07.2021 - 21:10
![]() Julee escribió:
Julee escribió:
I am starting to work the body in the round. It seems that I am to do a setup round and then cable rounds; however, the written instructions don’t say how frequent the cable runs should be. In looking through the comments, there are references to a chart. My instructions do not include a chart. How can I get one?
12.07.2021 - 05:41DROPS Design respondió:
Dear Julee, you will find both charts M.1 and M.2 just next to the chart with measureements, cables are worked on the 4th row in diagram then on every 6th row. Happy knitting!
12.07.2021 - 08:14
![]() Berbett escribió:
Berbett escribió:
Bonjour, Concerne le béret au moment de la répartition des 5 marqueurs que j'ai placé comme indiqué sur l'endroit mon tricot présente une pointe de côté droit correspondant aux augmentations et aux diminutions au final. Résultat je ne parviens pas à coudre ensemble puisque l'autre côté est droit. Serait-il possible de tricoter le béret en rond à l'aide d'une aiguille circulaire ? En vous remerciant d'avance. Pia.
22.05.2021 - 11:06DROPS Design respondió:
Bonjour Mme Berbett, la forme est normale, c'est dû aux diminutions qui sont faites d'un côté au tout début du rang, vous pouvez simplement coudre les côtés tout du long dans le brin le plus à l'extérieur des mailles pour que la couture ne soit pas épaisse. Vous pouvez aussi choisir de le tricoter en rond (pensez bien à alterner 1 tour endroit, 1 tour envers pour tricoter le point mousse). Bon tricot!
25.05.2021 - 07:38
![]() Felicia escribió:
Felicia escribió:
Hej, stickade baskern och blev jättenöjd! Men nu när jag tvättat den mkt försiktigt förhand i ulltvättmedel (utan att vrida osv) så har den blivit alldeles för stor och töjt sig mycket, varför?
08.03.2021 - 18:31DROPS Design respondió:
Hej Felicia, har du vasket ifølge vaskeanvisningen på banderolen og på farvekortet. DROPS Merino Extra Fine - tvätt
09.03.2021 - 12:05
![]() Liane escribió:
Liane escribió:
Beide Beine auf eine nadel dann 24 M stricken und mit dem Zopf beginnen. Dann ist mein zopf auf dem linken Bein und nicht im Vorderteil. Was mache ich denn falsch? Lg Liane
19.11.2020 - 19:41DROPS Design respondió:
Liebe Liane, nach dem 2. Bein sollen Sie den Faden abschneiden, die Maschen von beiden Beine zusammen legen und jetzt ab die linke Seite (= in der Mitte von den linken Bein) müssen jetzt die Runden beginnen: 18-21-24 (27-30) M. glatt, 2 li., 2 re. in jede der 2 nächsten M. (= 4 re.), 2 li., 2 re. in jede der 2 nächsten M. (= 4 re.), 2 li. und glatt über die restlichen M. stricken = 96-108-120 (132-144) M. Viel Spaß beim stricken!
20.11.2020 - 08:33
![]() Martine escribió:
Martine escribió:
Ben aan voorpand voor maat 6/9 maar begrijp niet hoe ik moet starten _ de 1ste markeerder is op de 27 st - start ik van daaruit en dan 56 stn? kan toch niet want dan heb ik niet genoeg voor achterpand. Sorry ik snap het niet goed.(( ter info, ik werk met 2 breinldn
02.09.2020 - 19:05DROPS Design respondió:
Dag Martine,
Na het verdelen van het werk heb je voor het achterpand heb je 52 steken op de naald en voor het voorpand heb je 56 steken op de naald. Je breit dan alleen over de 56 steken van het voorpand, dus tussen de 2 markeerdraden en met de kabels in het midden van het werk). Je begint dus aan een van de zijkanten, je breit 56 steken en zet aan het einde steeds steken op voor de aangebreide mouw.
03.09.2020 - 12:43
![]() Carla escribió:
Carla escribió:
Wat wordt er bedoeld met" alle 25 steken 2 aan 2 samen breien"
02.09.2020 - 17:29DROPS Design respondió:
Dag Carla,
Je breit over de hele naald steeds 2 steken samen, waardoor je na die naald ongeveer 13 steken op de naald hebt.
03.09.2020 - 12:44
![]() Kerry escribió:
Kerry escribió:
If I start my cable row at the center of the left leg, my cables will be on the back of the piece. I have my legs positioned on circular needles with my bottonhole edges in the middle of my row. Therefore, to make sure my cables are on the front piece, I would have to begin my round on the right leg?
22.04.2020 - 15:18DROPS Design respondió:
Dear Kerry, yes correct, round starts on the middle of left side = left leg so that you then work some stitches in stocking st, P2, increase the next 2 sts to 4 sts, P2 and finish with stocking st (back piece is worked without cables). Happy knitting!
22.04.2020 - 15:40
![]() Kerry escribió:
Kerry escribió:
I have just put both legs on circular needle, am I right to position them so that the buttonhole edges of each leg are in the center of my needles? I’m coming to knot from the strut here marker on the left leg and that would mean I would put cables on the back piece. Please help.
22.04.2020 - 15:05DROPS Design respondió:
Dear Kerry, the buttonholes should be on next to each other and towards mid front (beg of row on right leg + end of row on left leg). The markers should be in the middle of each leg, rounds will now start on the side and not on mid front/mid back.
22.04.2020 - 15:38
|
||||||||||
Little Lamb#littlelambset |
||||||||||
|
|
||||||||||
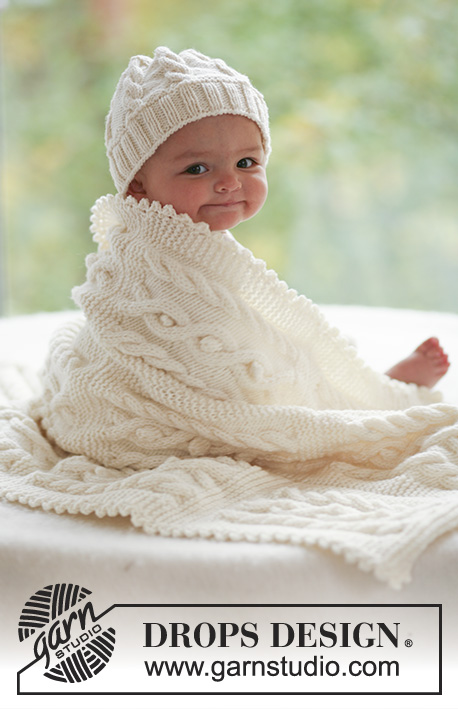
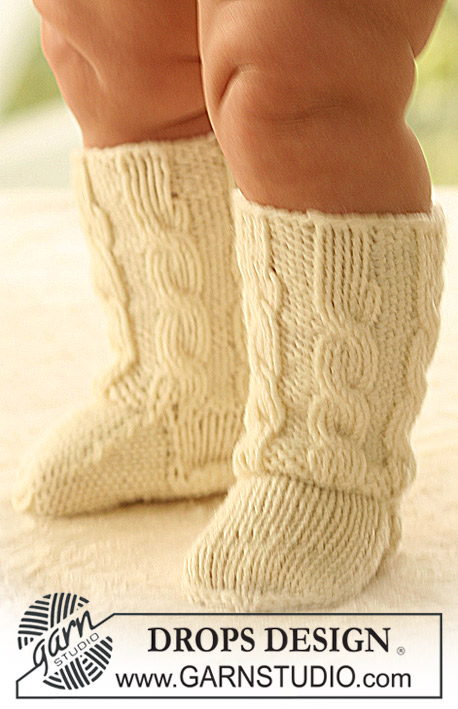
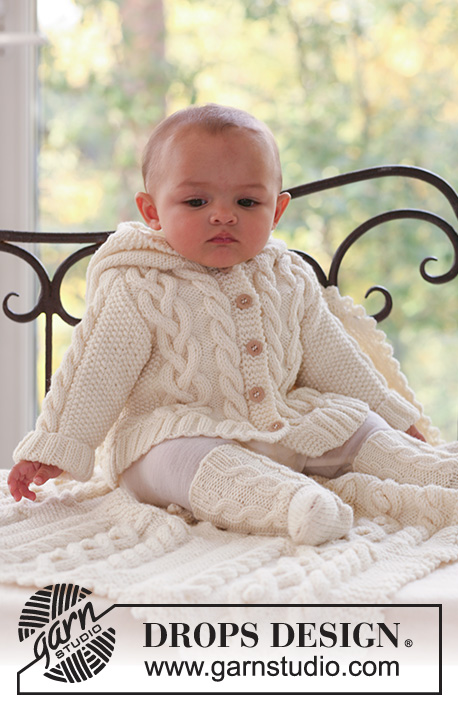
Boina y mameluco de mangas largas DROPS con torsadas al centro del frente, en “Merino Extra Fine”.
DROPS Baby 16-2 |
||||||||||
|
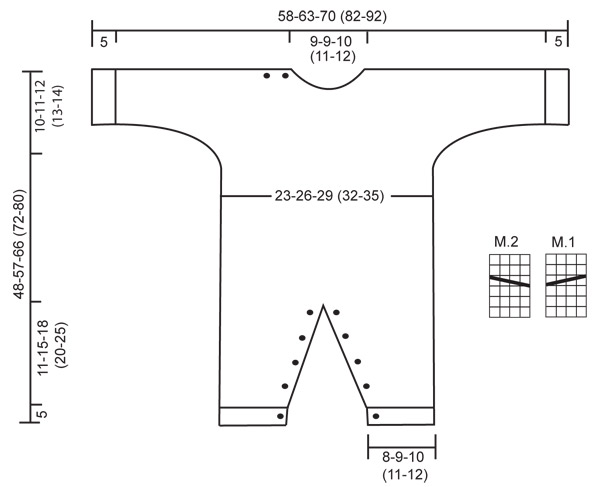
MAMELUCO: PT MUSGO (de ida y vuelta en la ag): Tejer todas las hileras de derecho. PATRÓN: Ver diagrama M.1 y M.2. Los diagramas muestran el patrón por el LD. OJALES: Hacer los ojales en la orilla para los ojales en el frente de la pierna. En la pierna derecha hacer los ojales por el LD y en la pierna izquierda hacer los ojales por el LR. 1 ojal = tejer juntos de derecho el 2º y el 3º pt a partir de la orilla y hacer 1 HEB (lazada). Hacer los ojales cuando la pierna mida: TALLA 1/3 meses: 2, 5, 8, 11 y 14 cm. TALLA 6/9 meses: 2, 6, 10, 14 y 18 cm. TALLA 12/18 meses: 2, 6, 11, 16 y 21 cm. TALLA 2 años: 2, 6, 10, 14, 18 y 23 cm. TALLA 3/4 años: 2, 7, 12, 17, 22 y 28 cm. ------------------------------------------------------ PIERNA DERECHA: Tejida de ida y vuelta en ag circular. Mon 47-53-53 (59-65) pts en ag circular tamaño 3.5 mm con Merino Extra Fine. Tejer 1 hilera de revés por el LR y continuar de la manera sig por el LD: 4 pts en pt musgo (orilla para los ojales), resorte 3d/3r en los 36-42-42 (48-54) pts sig y terminar la hilera con 3d y 4 pts en pt musgo (= orilla para los ojales). Continuar en resorte con 4 pts en pt musgo en cada lado y, AL MISMO TIEMPO, cuando la pieza mida 2 cm hacer un ojal – VER ARRIBA. Cuando la pieza mida 5 cm, tejer 2 hileras de derecho en todos los pts y, AL MISMO TIEMPO, dism 11-13-9 (11-13) pts distribuidos equitativamente en la primera hilera = 36-40-44 (48-52) pts. Cambiar a ag tamaño 4.5 mm y continuar en pt jersey con 4 pts en pt musgo en cada lado. AL MISMO TIEMPO, cuando la pieza mida 6 cm, aum 1 pt en cada lado en el interior de los 4 pts en pt musgo, a cada 3-3-4 (4-4) hileras, un total de 9-10-11 (12-13) veces = 54-60-66 (72-78) pts. RECUERDE MANTENER LA MISMA TENSIÓN DE TEJIDO DE LA MUESTRA! Cuando la pieza mida 16-20-23 (25-30) cm, rem 4 pts en cada lado = 46-52-58 (64-70) pts. Dejar la pieza a un lado y tejer la otra pierna. PIERNA IZQUIERDA: Como la pierna derecha, pero hacer los ojales en el lado opuesto. CUERPO: Deslizar ambas piernas en la misma ag circular = 92-104-116 (128-140) pts. Insertar 1 marcapuntos en cada lado = 46-52-58 (64-70) pts entre los marcapuntos. Tejer la vta sig de la manera sig – empezar en el lado izquierdo de la pieza: 18-21-24 (27-30) pts en pt jersey, 2r, 2d en cada uno de los 2 pts sig (= 4d), 2r, 2d en cada uno de los 2 pts sig (= 4d), 2r y tejer los pts restantes en pt jersey = 96-108-120 (132-144) pts. Tejer la vta sig de la manera sig: 18-21-24 (27-30) pts en pt jersey, 2r, M.1, 2r, M.2, 2r y tejer los pts restantes en pt jersey. Continuar de esta manera hasta que la pieza mida 38-46-54 (59-66) cm. Ahora dividir la pieza en los marcapuntos de los lados y completar las piezas del frente y espalda por separado – NOTA: Asegurarse de dividir la pieza para que la hilera de la torsada de M.1 y de M.2 sea una hilera por el LD. FRENTE: = 50-56-62 (68-74) pts. Continuar en pt jersey con las torsadas como antes y, AL MISMO TIEMPO, mon nuevos pts en cada lado para las mangas. Mon los pts al final de cada hilera en los lados: 4 pts 2-1-1 (1-1) veces, 6 pts 0-1-1 (2-1) veces, 8 pts 1-1-1 (1-2) veces y 9-9-13 (16-21) pts 1 vez = 100-110-124 (148-168) pts – tejer los pts aum en pt jersey. Cuando la pieza mida 44-53-61 (67-75) cm, tejer 2 pjd en las 2 torsadas = 96-106-120 (144-164) pts. En la hilera sig, deslizar los 10-10-12 (14-16) pts centrales a un gancho o seguro aux para el escote y completar cada lado por separado. HOMBRO DERECHO/MANGA: Continuar como antes y, AL MISMO TIEMPO, rem para formar la línea del escote, al inicio de cada hilera a partir del centro del frente: 2 pts 1 vez y 1 pt 2 veces = 39-44-50 (61-70) pts restantes en el hombro/manga. AL MISMO TIEMPO, cuando la pieza mida 46-55-64 (70-78) cm, tejer en pt musgo en los primeros 12-13-14 (15-16) pts del centro del frente (tejer los pts restantes como antes). Después de 4 hileras en pt musgo, hacer 2 ojales de la manera sig, por el LD: Tejer 2 pjd, 1 HEB, tejer 5-6-7 (8-9) pts, tejer 2 pjd, 1 HEB, tejer los pts restantes de la hilera. Continuar en pt jersey con pt musgo en los primeros 12-13-14 (15-16) pts del centro del frente hasta que la pieza mida 48-57-66 (72-80) cm, rem. HOMBRO IZQUIERDO/MANGA: Como el hombro derecho/manga, pero en sentido inverso = 39-44-50 (61-70) pts en el hombro/manga. Continuar en pt jersey hasta que la pieza mida 48-57-66 (72-80) cm, rem. ESPALDA: = 46-52-58 (64-70) pts. Mon nuevos pts en cada lado para las mangas, como se describe para la pieza del frente = 96-106-120 (144-164) pts. Cuando la pieza mida 46-55-64 (70-78) cm, rem los 16-16-18 (20-22) pts centrales para el escote y completar cada lado por separado. HOMBRO DERECHO/MANGA: = 40-45-51 (62-71) pts. Rem 1 pt en la línea del escote en la hilera sig = 39-44-50 (61-70) pts. Cuando la pieza mida 48-57-66 (72-80) cm, rem los primeros 27-31-36 (46-54) pts a partir de la orilla de la manga. Tejer otro 1.5 cm en pt jersey con 1 pt en pt musgo en cada lado en los 12-13-14 (15-16) pts restantes (= orilla para los ojales). Tejer 1 hilera de derecho por el LR y rem todos los pts por el LD. HOMBRO IZQUIERDO/MANGA: Continuar y rem como se describe para el hombro derecho/manga, pero en sentido inverso = 39-44-50 (61-70) pts restantes en el hombro/manga. Continuar en pt jersey hasta que la pieza mida 48-57-66 (72-80) cm, rem. TERMINACIÓN: Hacer las costuras de la parte de arriba de las mangas, orilla con orilla, para evitar que se forme una costura abultada – en el hombro derecho únicamente hacer la costura hasta la orilla para los ojales. PUÑO: Levantar 38-44-50 (50-56) pts en ag tamaño 3.5 mm a lo largo de la orilla de la manga. Tejer 2 hileras de derecho y continuar en resorte, 3d/3r, con 1 pt de orillo en cada lado. Rem cuando el resorte mida 5 cm. Repetir a lo largo de la orilla de la otra manga. Hacer las costuras bajo las mangas a 1 pt del pt de orillo. CUELLO: Levantar aprox 48 a 64 pts alrededor de la línea del escote (incl los pts en los ganchos o seguros aux) en ag tamaño 4.5 mm. Tejer 3 hileras de derecho y rem. Unir con una costura las orillas para los ojales en la parte de arriba del frente de las piernas y unir con una costura las orillas para los ojales en la parte de arriba de la parte posterior de las piernas. Coser los botones para que coincidan con los ojales de las piernas y del hombro. ------------------------------------------------------ BOINA: Circunferencia de la cabeza: 40/42 – 44/46 – 46/48 (48/50 – 50/52) cm TIP PARA AUMENTO: Aum 1 pt haciendo 1 HEB. En la hilera sig, tejer la HEB retorcida (es decir, insertar la ag por atrás del pt en vez de por delante) para evitar que se forme un agujero. ------------------------------------------------------ BOINA: Tejida de ida y vuelta en ag rectas. Mon 90-92-94 (96-98) pts en ag tamaño 4 mm con Merino Extra Fine. Tejer 2 cm en resorte, 1d/1r. Continuar en pt musgo – VER ARRIBA – y, AL MISMO TIEMPO, dism 5-7-4 (6-3) pts distribuidos equitativamente en la primera hilera = 85-85-90 (90-95) pts. Insertar 5 marcapuntos en la pieza, de la manera sig, por el LD: El primer marcapuntos después de 1 pt, y los 4 marcapuntos restantes con 17-17-18 (18-19) pts entre cada uno = 16-16-17 (17-18) pts restantes después del último marcapuntos. En la hilera sig, por el LD, aum 1 pt a la izquierda de todos los marcapuntos – VER TIP PARA AUMENTO – y repetir el aum a cada 2 hileras un total de 6-7-8 (9-10) veces = 115-120-130 (135-145) pts. RECUERDE MANTENER LA MISMA TENSIÓN DE TEJIDO DE LA MUESTRA! Cuando la pieza mida 6.5-7-7.5 (8-8.5) cm, dism 1 pt a la izquierda de todos los marcapuntos tejiendo 2 pjd, y repetir la dism a cada 2 hileras un total de 18-19-20 (21-22) veces = 25-25-30 (30-35) pts. Ahora tejer 2 pjd a lo largo de toda la hilera. Cortar el hilo, pasarlo a través de los pts restantes, fruncir y asegurar. Unir la boina con una costura al centro de la parte de atrás en la hebra externa de los pts. La boina mide aprox 15-16-17 (18-19) cm. |
||||||||||
Explicaciones del diagrama |
||||||||||
|
||||||||||
 |
||||||||||
¿Terminaste este patrón?Entonces, etiqueta tus fotos con #dropspattern #littlelambset o envíalas a la galería #dropsfan. ¿Necesitas ayuda con este patrón?Encontrarás 16 videos tutoriales, un espacio para comentarios/preguntas y más visitando la página del patrón en garnstudio.com © 1982-2026 DROPS Design A/S. Todos los derechos reservados. Este documento, incluyendo todas sus sub-secciones, está protegido por los derechos de autor (copyright). Lee más acerca de lo que puedes hacer con nuestros patrones en la parte de abajo de cada patrón de nuestro sitio. |
||||||||||


Con más de 40 años en el diseño de modelos de punto y de ganchillo, DROPS Design ofrece una de las más vastas colecciones de patrones gratuitos en el internet - traducidos en 17 idiomas. Al día de hoy, contamos con 324 catálogos y 12290 patrones - de los cuales 11681 están traducidos en español.
Nosotros trabajamos con mucho esmero para brindarte lo mejor que las labores de punto y ganchillo tienen para ofrecer,inspiración y consejos, así como hilos de magnífica calidad a precios increíbles! Te gustaría usar nuestros patrones para otro fin además del uso personal? Puedes leer acerca de lo que estás permitida a hacer en el texto de Copyright en la parte de abajo de todos nuestros patrones. Felices labores!
Escribe un comentario sobre DROPS Baby 16-2
¡Nos encantaría saber qué piensas acerca de este patrón!
Si quieres escribir una pregunta referente al patrón, por favor asegúrate de elegir la categoría correcta en el formulario debajo, para acelerar el proceso de respuesta. Los campos obligatorios están marcados con un *.