
Categorías populares
¿Buscas un hilo?


Comentarios / Preguntas (55)
![]() Judy Caudill escribió:
Judy Caudill escribió:
I'm almost done with my Coletta sweater and noticed a few ugly mistakes in the bottom band of one front piece, so I ripped out only the band. Then I knit the band by picking up the stitches and knit down making the garter rows . It doesn't look right. How should I have done it?
22.10.2021 - 21:38DROPS Design respondió:
Dear Judy, the buttonband of this piece is knitted at the same time the fronts are knitted (8 stitches of garter stitch toward the mid-front). Happy Knitting!
24.10.2021 - 02:53
![]() Judy Caudill escribió:
Judy Caudill escribió:
Hi, I know how to decrease, but what does it mean to decrease inside 8 garter stitches and decrease before 8 garter stitches?
13.09.2021 - 21:50Judy Caudill respondió:
Hi, Just wanted to let you know a lightbulb went off in my brain and I figured out what is meant by dec. before the garter stiches and after the garter stitches. So you don't need to answer my previous question. By the way, my sweater is going to look great🤗
13.09.2021 - 23:53
![]() Judy Caudill escribió:
Judy Caudill escribió:
It sure would be helpful to see a back view. It sounds like the garter stitch is in the middle of the top back instead of going across the back like the lower garter section. I just can't picture it.
28.07.2021 - 04:21DROPS Design respondió:
Dear Mrs Caudill, when back piece and front pieces measure 26-26-27-28-29-30 cm, you work 4 cm garter stitch over all stitches, then continue with stocking stitch. Hope this can help. Happy knitting!
28.07.2021 - 08:23
![]() MJ escribió:
MJ escribió:
After calculating and charting the Coletta pattern, and coming up with very odd numbers, I decided there was something seriously wrong with the gauge given. I looked up the original yarn, which has been discontinued, and when I used the original yarn gauge your pattern finally calculated correctly. No wonder I was having such difficulty with the pattern as written!!! Thought you would like to know in the event others are having difficulties with the incorrect gauge.
05.07.2021 - 04:05
![]() MJ escribió:
MJ escribió:
Thank you for your response. However, you did not tell me what the GARTER gauge for the Coletta pattern is. That information would be very helpful.
04.07.2021 - 17:46DROPS Design respondió:
Dear MJ, find the needles that gives you the gauge given for the stockinett and use that for the piece. Garter stitch gauge is not given because they are only used in small parts of the piece. Also this pattern is an older one, we have written patterns somewhat differently back then. Happy Stitching!
05.07.2021 - 02:27
![]() MJ escribió:
MJ escribió:
Thank you for your reply. I do have a comment about the gauge for garter stitch you gave. I have found that the row gauge for garter stitch is much greater than the row gauge for stockinette. Are you certain about the numbers you gave me? Thank you for your time and attention to my comment. Have a great day... KNITTING!
01.07.2021 - 01:23DROPS Design respondió:
Dear MJ, you should need the same number of stitches in garter stitch as in stocking stitch to get the same width, but you will need more rows garter stitch than stocking stitch to get the same height. Read more here. Happy knitting!
01.07.2021 - 09:19
![]() MJ escribió:
MJ escribió:
If gauge is so important, why is the Garter gauge not included where needed? I have multiple fitting problems, myself, and I knit and sew for others who have fitting problems, too. I realize this may be an inconvenience, but I also know that I am not the only one with this fitting situation. Thank you for your time and attention to my query.
28.06.2021 - 23:08DROPS Design respondió:
Dear MJ, if your gauge in stocking stitch (= 20 sts x 26 rows = 10 x10 cm/4"x4") is correct, then your gauge with garter stitch should be also the same. Read more about tension here. Happy knitting!
29.06.2021 - 09:04
![]() Ginette Laroche escribió:
Ginette Laroche escribió:
Que faire?la bordure au point mousse se soulève et reste comme ca,pour le bas du corps mais pas des manches.que puis -je faire pour lui faire reytrouver sa bonne forme??
13.01.2021 - 19:30DROPS Design respondió:
Bonjour Mme Laroche, lavez ou humidifiez le gilet et laissez -le sécher bien à plat, avec des épingles si besoin. Renouvelez à chaque lavage si besoin. Bon tricot!
14.01.2021 - 07:34
![]() MJ escribió:
MJ escribió:
Thank you for your response. However, I find the United States is not in the 'Choose your language' drop down box. Thank you for your time though. Have a great day KNITTING!!!
04.12.2020 - 20:50
![]() MJ escribió:
MJ escribió:
Is this pattern available in American English? Hopefully it is, because there are so many CM's to convert to inches it would certainly make my brain Jello. Thank you for you time and attention to my query. Have a wonderful day, KNITTING!
01.12.2020 - 05:47DROPS Design respondió:
Hi MJ, Yes, you can change the language to US English if you click on the language box under the photograph. Happy crocheting!
01.12.2020 - 07:32
|
|
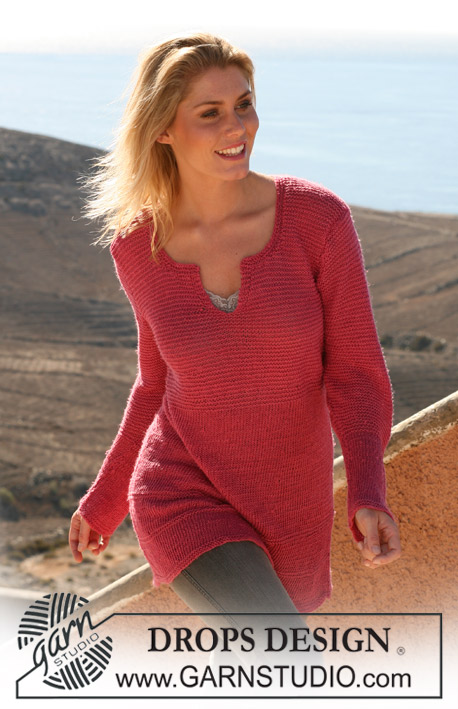
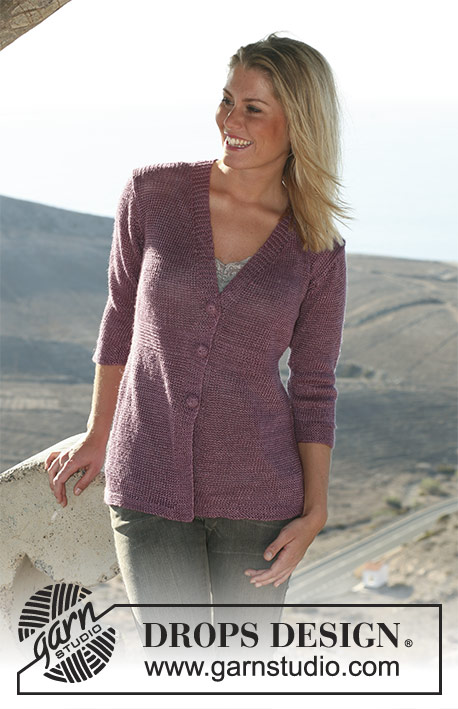
Coletta |
|
 |
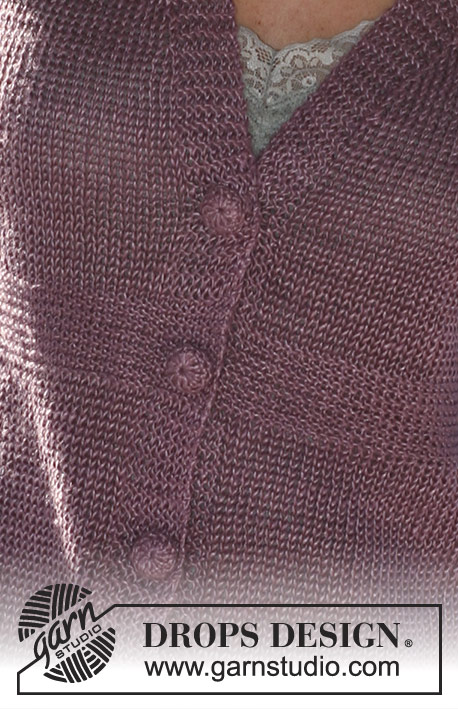 |
Chaqueta DROPS con manga 3/4 y fundas de botones a ganchillo en “Lin”. Talla S – XXXL
DROPS 105-39 |
|
|
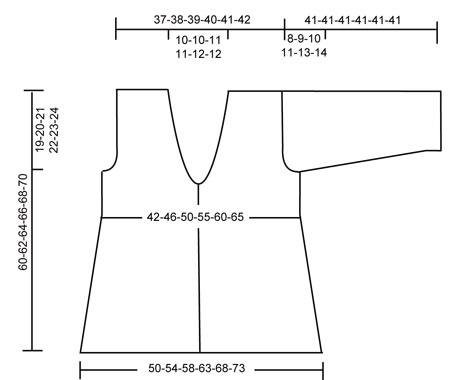
PUNTO MUSGO (de ida y vta en ag): Trabajar todas las filas de derecho. TIP PARA LAS DISMINUCIONES (se aplica al escote): Dism dentro de 8 pts en pt musgo. Trabajar todas las dism por el LD! Dism como sigue después de 8 pts en pt musgo: desl 1 pt como de derecho, 1 d., pasar el pt desl por encima. Dism como sigue antes de 8 pts en pt musgo: 2 pjd. Ojales: Trabajar los ojales en el delantero derecho. 1 ojal = cerrar el 4º y 5º pt desde el centro del delantero, mont 2 pts nuevos en la fila de vta. Trabajar los ojales cuando la labor mida: Talla S: 17,25 y 33 cm. Talla M:18,26 y 34 cm Talla L: 19,27 y 35 cm. Talla XL: 20, 28 y 36 cm. Talla XXL: 21, 29 y 37 cm. Talla XXXL: 22, 30 y 38 cm. ---------------------------------------------------------------------------------------------------------------------------------------------- ESPALDA: Mont flojo 102-110-118-128-138-148 pts (incl 1 pt orillo a cada lado) con ag tamaño 4 mm. Trabajar 8 filas en pt musgo y continuar en pt jersey. RECUERDE MANTENER LA MISMA TENSIÓN DE LA MUESTRA! Cuando la labor mida 4-4-5-5-6-6 cm dism 1 pt a cada lado cada 3 cm un total de 8 vcs = 86-94-102-112-122-132 pts. Cuando la labor mida 26-26-27-28-29-30 cm, trabajar 4 cm en pt musgo y después continuar en pt jersey. Cuando la labor mida 41-42-43-44-45-46 cm cerrar para la sisa a cada lado cada 2ª fila: 4 pts 1-1-1-2-2-2 vcs, 2 pts 0-1-2-2-4-6 vcs y 1 pt 2-3-4-4-4-4 vcs = 74-76-78-80-82-84 pts.- Cuando la labor mida 57-59-61-63-65-67 cm trabajar 8 filas en pt musgo en los 36-36-38-38-40-40 pts centrales con el resto de los pts en pt jersey. Ahora cerrar los 20-20-22-22-24-24 pts centrales para el escote = 27-28-28-29-29-30 pts restantes para cada hombro. Continuar en pt jersey con 8 pts en pt musgo hacia el escote hasta que la labor mida 60-62-64-66-68-70 cm. Rematar flojo. DELANTERO IZQUIERDO: Mont 55-59-63-68-73-78 pts (incl 1 pt oprillo en el lado y 8 pts de la cenefa hacia el centro del delantero) con ag tamaño 4 mm. Trabajar 8 filas en pt musgo y continuar en pt jersey con 8 pts de la cenefa en pt musgo. Dism en el lado como se describe para la espalda. Cuando la labor mida 26-26-27-28-29-30 cm, trabajar 4 cm en pt musgo en todos los pts y después continuar en pt jersey con los pts de la cenefa en pt musgo como antes. Cuando la labor mida 35-36-37-38-39-40 cm dism para la forma del escote - ver TIP PARA LAS DISMINUCIONES - como sigue: 1 pt cada 2ª fila 5-5-6-6-7-7 vcs, 1 pt cada 4ª fila 5 vcs y 1 pt cada 6ª fila 4 vcs. Al mismo tiempo cuando la labor mida 41-42-43-44-45-46 cm cerrar para la sisa como se describe para la espalda. Después de completar todos las dism para el escote y la sisa quedan 27-28-28-29-29-30 pts para el hombro. Rematar flojo cuando la labor mida 60-62-64-66-68-70 cm. DELANTERO DERECHO: Mont los pts y trabajar de la misma manera que el delantero izquierdo, pero a la inversa. Recuerde los ojales!. MANGA: Mont flojo 50-52-54-56-60-62 pts (incl 1 pt orillo a cada lado) con ag tamaño 4 mm. Trabajar 8 filas en pt musgo y continuar en pt jersey. Al mismo tiempo cuando la labor mida 4-5-6-6-5-4 cm aum 1 pt a cada lado cada 3-2.5-2-1.5-1.5-1.5 cm un total de 10-11-12-14-14-15 vcs = 70-74-78-84-88-92 pts. Cuando la labor mida 33-32-31-30-28-27 cm (medidas más cortas en las tallas más grandes debido a una mayor largura de la copa de la manga) cerrar para la copa de la manga cada 2ª fila: 3 pts 1 vez, 2 pts 3 vcs, 1 pt 2-4-5-6-9-10 vcs, después 2 pts a cada lado hasta que la labor mida 40 cm, dism 3 pts a cada lado 1 vez y rematar los pts restantes. La manga mide aprox 41 cm. TERMINACIÓN: Hacer la costura de los hombros. Montar las mangas y coser las mangas y los lados dentro de 1 pt orillo. FUNDAS PARA LOS BOTONES: Trabajar 3 fundas con ganchillo tamaño 3 mm como sigue: 2 p.de cad., 12 p.a. en el primer p.de cad., finalizar con 1 p.e. en la parte de arriba del primer p.a. (= vta 1) VUELTA 2: 1 p.b. en cada p.a. y finalizar con 1 p.e. en el primer p.b. del inicio de la vta. VUELTA 3: 1 p.a (sustituir el primer p.a. por 3 p.de cad.) en cada 2º p.b. y finalizar con 1 p.e. en el primer p.a. del inicio de la vta Colocar el botón dentro de la funda, coser alrededor del borde de la funda y fruncir. Coser los botones a la altura de los ojales. |
|
 |
|
¿Terminaste este patrón?Entonces, etiqueta tus fotos con #dropspattern o envíalas a la galería #dropsfan. ¿Necesitas ayuda con este patrón?Encontrarás 21 videos tutoriales, un espacio para comentarios/preguntas y más visitando la página del patrón en garnstudio.com © 1982-2026 DROPS Design A/S. Todos los derechos reservados. Este documento, incluyendo todas sus sub-secciones, está protegido por los derechos de autor (copyright). Lee más acerca de lo que puedes hacer con nuestros patrones en la parte de abajo de cada patrón de nuestro sitio. |
|


Con más de 40 años en el diseño de modelos de punto y de ganchillo, DROPS Design ofrece una de las más vastas colecciones de patrones gratuitos en el internet - traducidos en 17 idiomas. Al día de hoy, contamos con 324 catálogos y 12290 patrones - de los cuales 11681 están traducidos en español.
Nosotros trabajamos con mucho esmero para brindarte lo mejor que las labores de punto y ganchillo tienen para ofrecer,inspiración y consejos, así como hilos de magnífica calidad a precios increíbles! Te gustaría usar nuestros patrones para otro fin además del uso personal? Puedes leer acerca de lo que estás permitida a hacer en el texto de Copyright en la parte de abajo de todos nuestros patrones. Felices labores!
Escribe un comentario sobre DROPS 105-39
¡Nos encantaría saber qué piensas acerca de este patrón!
Si quieres escribir una pregunta referente al patrón, por favor asegúrate de elegir la categoría correcta en el formulario debajo, para acelerar el proceso de respuesta. Los campos obligatorios están marcados con un *.