
Categorías populares
¿Buscas un hilo?


Comentarios / Preguntas (238)
![]() Andrea escribió:
Andrea escribió:
Hallo, eine Frage: Wenn ich mit den verkürzten Reihen fertig bin, muss ich dann direkt wieder über alle 124M (Gr.xxl) stricken, oder nach dem selben Schema wie beim verkürzen die Reihen wieder verlängern? LG
23.02.2026 - 16:37DROPS Design respondió:
Liebe Andrea, Sie beginnen erneut mit den verkürzten Reihen (die ersten 2 Runden stricken Sie über alle Maschen) , um den Kreis weiter zu erweitern. Viel Spaß beim Stricken!
24.02.2026 - 09:02
![]() Lotta escribió:
Lotta escribió:
Äh glöm min fråga, repar upp & använder ett för mig mer begripligt mönster.
27.11.2025 - 17:23
![]() Lotta escribió:
Lotta escribió:
Hej igen! Storlek XL/XXL totalt antal maskor 124 st och märktråden sitter på maska 73. Just nu är stickningen bananformad, maska 73 sitter närmare innercirkeln och fattar att det är från den jag ska mäta. Men hur ska jag mäta, mot vad? Ska fortsätta med att minska med 8 maskor för första gången. Vi hörs!
25.11.2025 - 16:04DROPS Design respondió:
Hei Lotta. Da har vi "glemt" ditt spørsmål og ønsker deg lykke til på ditt neste prosjekt :) mvh DROPS Design
01.12.2025 - 11:27
![]() Lotta escribió:
Lotta escribió:
Begriper inte hur jag ska mäta från märktråden för ärmhål!? Skickar gärna en bild men det går ju inte i detta formulär. Kontakta gärna mig via e-post. Tack på förhand!
24.11.2025 - 18:29DROPS Design respondió:
Hej Lotta, skriv hvilken størrelse du strikker. Skriv hvor mange masker og cm du har og skriv den sætning du ikke forstår, så skal vi prøve at hjælpe dig her :)
25.11.2025 - 13:58
![]() Lisa escribió:
Lisa escribió:
Hi, Just trying to clarify; on the second row, do I leave 2 stitches on needle and turn, work 14 stitches then turn and work 16 stitches? Then repeat row 1 and do I leave 4 stitches unworked or just 2 again?
11.11.2025 - 19:16
![]() Lisa escribió:
Lisa escribió:
Pattern instructions far too difficult. I love the jacket and I love a challenge but this? What happened to row 1 all the way through to last row with specific instructions such as ask or dec or s1k1. Etc? I give up😞
27.07.2025 - 20:09
![]() Lisa escribió:
Lisa escribió:
So, am I leaving the the uncorked stitches on the needle or just not knitting them?
27.07.2025 - 19:38DROPS Design respondió:
Dear Lisa, work the first 2 rows over all 112 stitches. In the 3rd row work only over the first 16 sts of the row. Now, start working the next row over all stitches but turn when you have worked 110 stitches. Work the next row back over all stitches, but turn when you have worked 108; so you work 2 less stitches on each side. Repeat rows 3 and 4 exactly as before. Continue working 2 less stitches on each side on the "long" rows 9 more times, then 4 less stitches 9 times and 8 less stitches 5 times. The stitches are simply left unworked until we "start at the beginning" the short rows technique. Happy knitting!
27.07.2025 - 20:36
![]() Lisa escribió:
Lisa escribió:
Where do I start the pattern? At the top of page or where it says circle? Also, what does it mean under the short row section to start again from beginning over all stitches? How many sections is this piece? I’m reading cast on 112 sts. Twice and under short row section start over from beginning? So, cast on another 112sts?
27.07.2025 - 19:06DROPS Design respondió:
Dear Lisa, yes, the written instructions start at "Circle"; all of the instructions above are tips for when you are crochetting. In the short rows you work by turning the piece (but not decreasing) in order to get the correct circle shape. After reaching the remaining 18-16-20-20 outermost sts of circle, you will now work over all stitches again (not the pattern from the beginning); they were not decreased, just left behind. You work a single circle: you cast on 112 stitches, over which you will work the chart and short rows. Then you work the armholes, and continue working the other half-circle on the other side. Then you work the sleeves. Happy knitting!
27.07.2025 - 19:25
![]() Lisa escribió:
Lisa escribió:
Is there a row by row instruction for this pattern (ie, row 1, row 2 etc)? I find this really confusing
27.07.2025 - 15:44DROPS Design respondió:
Dear Lisa, this is the only version of the pattern available, with both charts and written instructions. If you have any doubts as you read and work the pattern you can write us a comment here and we will try to answer all of your questions as clearly as possible. Happy knitting!
27.07.2025 - 18:59
![]() Patricia Alexandra Caruso Reis escribió:
Patricia Alexandra Caruso Reis escribió:
Caros, os diagramas M1 já não estão nítidos. Existe alguma nova versão desses diagramas que possam ser melhor vistos? Está tudo opaco, talvez pelo tempo. Grata
07.06.2024 - 03:36DROPS Design respondió:
Bom dia, Vamos comunicar à equipa de web design. Obrigado!
07.06.2024 - 09:17
|
||||||||||||||||
Blue Moon |
||||||||||||||||
 |
 |
|||||||||||||||
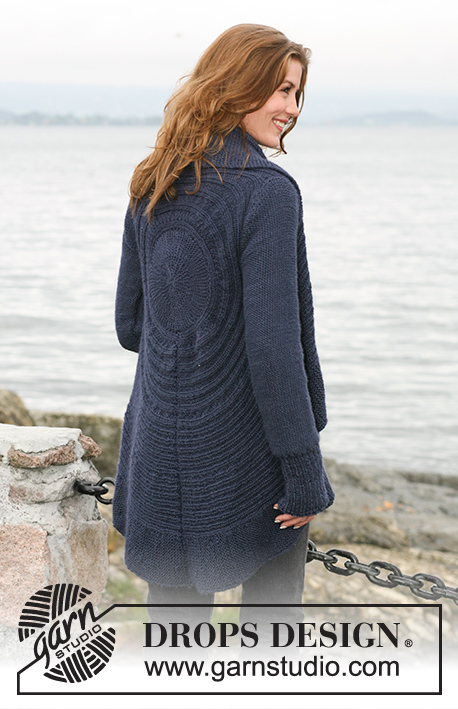
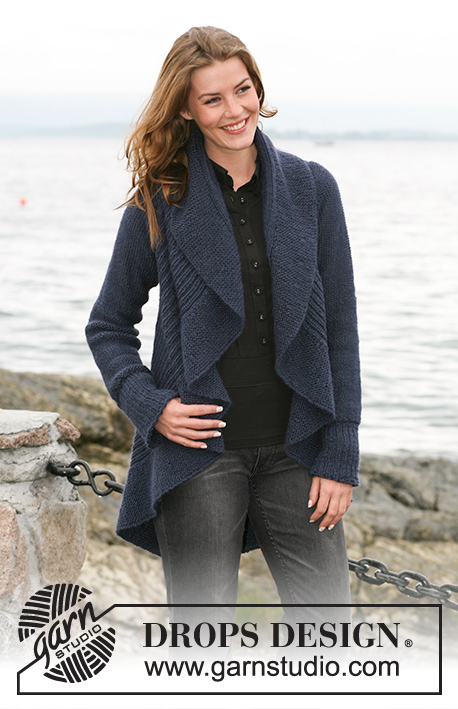
Saco DROPS tejido en un círculo, con patrón texturado, en “Silke-Alpaca” o “Air”. Talla: S a XXXL.
DROPS 102-6 |
||||||||||||||||
|
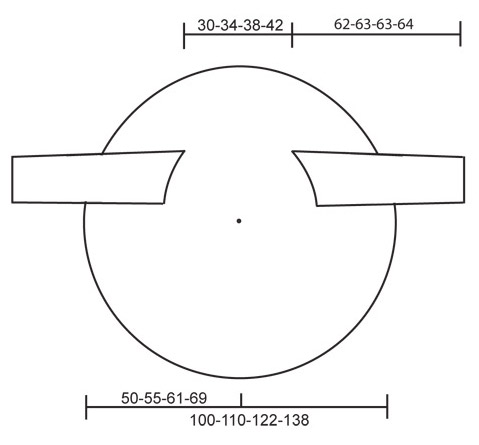
Muestra: 17 pts x 22 vtas pt jersey = 10 x 10 cm Patrón: Ver diagrama M.1. Los diagramas son vistos por el LD. NOTA: Cada talla tiene su propio diagrama. Vueltas cortas: Se tejen vueltas cortas para asegurarse de obtener la forma circular de la pieza. Tejer vueltas cortas de la manera sig: 1ª/2ª vuelta: Tejer 102-112-124-140 pts, virar la pieza y tejer de regreso. 3ª/4ª vuelta: Tejer de ida y vuelta sobre los primeros 18-16-20-20 en la vta (estos pts = pts más externos en el círculo) – leer Tip-1 para la elaboración del tejido abajo. Repetir vueltas 1ª a 4ª, mas reducir el número de pts por 2 pts en cada 1ª/2ª vta antes de virar la pieza – repetir esto 10-10-12-12 veces en total, luego reducir el número de pts tejidos por 4 pts antes de virar la pieza – repetir esto 6-9-8-12 veces en total y, a partir de este punto reducir el número de pts por 8 pts antes de virar la pieza – repetir 5-5-6-6 veces en total. Los 18-16-20-20 pts restantes son los pts más externos del círculo. Empezar nuevamente desde el inicio sobre todos los pts. Leer Tip-2 para la elaboración del tejido. Tip-1 para la elaboración del tejido: Al virar la pieza, desl el primer pt del derecho y apretar la lana antes de continuar tejiendo. Esto se hace para evitar que se formen agujeros. Esto no aplica para los 20-20-24-24 pts más internos del círculo – al virar la pieza tejer todos los pts normalmente. Tip-2 para la elaboración del tejido: En la vta donde se tejen todos los pts, tejer del revés los 20-20-24-24 pts más internos en el círculo (visto por el LD). Después continuar como antes con M.1. Tip para tomar las medidas: Hacer todas las mediciones en el círculo con la pieza colocada horizontalmente. No medir de un lado a otro! Las medidas siguen la curva hasta el 63º-69-73º-81º pt. Círculo: Tejer la pieza de ida y vuelta en la ag para que haya espacio suficiente para todos los pts. Mon 102-112-124-140 pts en ag circular tamaño 4.5 mm con Silke-Alpaca. Colocar 1 hilo marcapuntos (HMP) o marcapuntos (MP) después de 63-69-73-81 pts, hacer todas las mediciones a partir de este punto. Tejer M.1 (consultar el diagrama para su talla) de derecha a izquierda (es decir, de afuera hacia adentro en el círculo) la 1ª vta = LD. Al mismo tiempo que M.1 tejer vueltas cortas – ver explicación arriba – para dar la forma circular. Cuando la pieza mida 37-40-49-57 cm a partir del HMP o MP – leer Tip para tomar las medidas – tejer las sisas. Sisa: Desl los 63-69-73-81 pts más externos en una ag adicional tamaño 4.5 mm (ag circular para que haya espacio suficiente para todos los pts). Continuando, rem los 2 pts sig (= sisa). Colocar 1 HMP o MP entre los 2 pts rem. Dejar los pts restantes en la ag. Continuando, tejer 2 partes (pts antes y después de la sisa) por separado, mas tejerlos al mismo tiempo en ag separadas con ovillos separados de lana. Esto se hace para que las vueltas cortas queden correctamente en ambos lados de la sisa. Cont con el patrón y vueltas cortas como antes. Cuando la sisa mida 18-21-23-25 cm mon 2 nuevos pts sobre la sisa (es decir, entre las 2 partes). Continuando, desl todos los pts en una sola aguja nuevamente = 102-112-124-140 pts. Colocar 1 HMP o MP después de 63-69-73-81 pts. Continuando, medir la pieza a partir de este punto. Ahora tejer M.1 y vueltas cortas en todos los pts. Cont así hasta que la pieza mida aprox 15-17-19-21 cm, esto equivale a la mitad del círculo. Cont hasta que la pieza mida aprox 30-34-38-42 cm a partir del HMP – leer Tip para tomar las medidas. Ahora hacer las sisas en la misma manera. Cuando todos los pts estén de regreso en una ag, nuevamente colocar 1 HMP o MP después de 63-69-73-81 pts. Cont midiendo desde aquí. Cont con M.1 y vueltas cortas hasta que la pieza mida aprox 37-40-49-57 cm a partir del HMP o MP (ajustar a 1 repetición completa con vueltas cortas). Rem pts flojamente. Manga: Tejer la pieza de ida y vuelta en ag circular. Mon 56-59-65-68 pts (incl 1 pt de orillo delantero en cada lado) en ag tamaño 4.5 mm con Silke-Alpaca. Tejer 1 vta del revés por el LR. Cont con resorte 2d/1r y 1 pt de orillo en cada lado. Cuando el resorte mida 13-13-14-14 cm tejer 1 vta del derecho por el LR, al mismo tiempo dism 10-11-13-14 pts distribuidos equitativamente = 46-48-52-54 pts. Cont en pt jersey con el LR hacia afuera hasta completar la medida. Cuando la pieza mida 16 cm aum 1 pt en cada lado, en cada 9-4.5-3.5-3 cm 5-9-11-13 veces en total = 56-66-74-80 pts. Cuando la pieza mida 56 cm rem pts para formar el copete de manga, en cada lado, en vtas alternas: 4 pts 1-2-2-2 veces. Continuando, rem 2 pts en cada lado hasta que la pieza mida aprox 61-62-62-63 cm. Después rem 4 pts 1 vez en cada lado. La pieza mide aprox 62-63-63-64 cm. Rem los pts restantes. Terminación: Unir el círculo con una costura en la orilla externa de los pts de montaje y orilla de rem. Montar las mangas de manera que las costuras debajo de la manga queden a nivel del HMP o MP colocado debajo de la sisa y, el centro del copete de manga quede a nivel del HMP o MP colocado arriba de la sisa. Coser las costuras de las mangas. |
||||||||||||||||
Explicaciones del diagrama |
||||||||||||||||
|
||||||||||||||||
 |
||||||||||||||||
 |
||||||||||||||||
¿Terminaste este patrón?Entonces, etiqueta tus fotos con #dropspattern o envíalas a la galería #dropsfan. ¿Necesitas ayuda con este patrón?Encontrarás 15 videos tutoriales, un espacio para comentarios/preguntas y más visitando la página del patrón en garnstudio.com © 1982-2026 DROPS Design A/S. Todos los derechos reservados. Este documento, incluyendo todas sus sub-secciones, está protegido por los derechos de autor (copyright). Lee más acerca de lo que puedes hacer con nuestros patrones en la parte de abajo de cada patrón de nuestro sitio. |
||||||||||||||||


Con más de 40 años en el diseño de modelos de punto y de ganchillo, DROPS Design ofrece una de las más vastas colecciones de patrones gratuitos en el internet - traducidos en 17 idiomas. Al día de hoy, contamos con 324 catálogos y 12290 patrones - de los cuales 11673 están traducidos en español.
Nosotros trabajamos con mucho esmero para brindarte lo mejor que las labores de punto y ganchillo tienen para ofrecer,inspiración y consejos, así como hilos de magnífica calidad a precios increíbles! Te gustaría usar nuestros patrones para otro fin además del uso personal? Puedes leer acerca de lo que estás permitida a hacer en el texto de Copyright en la parte de abajo de todos nuestros patrones. Felices labores!
Escribe un comentario sobre DROPS 102-6
¡Nos encantaría saber qué piensas acerca de este patrón!
Si quieres escribir una pregunta referente al patrón, por favor asegúrate de elegir la categoría correcta en el formulario debajo, para acelerar el proceso de respuesta. Los campos obligatorios están marcados con un *.