
Categorías populares
¿Buscas un hilo?


Comentarios / Preguntas (180)
![]() Lydia Havenaar escribió:
Lydia Havenaar escribió:
Hallo, Een vraag, valt dit model erg groot?
15.07.2013 - 09:07DROPS Design respondió:
Hoi Lydia. Zie de afmetingen in cm per maat onderaan het patroon.
15.07.2013 - 20:24
![]() Elaine Sue escribió:
Elaine Sue escribió:
I wonder if there are directions in place of the charts. For me it is difficult to follow the charts M1 and M2. I would appreciate any help with this. Thank you
02.07.2013 - 03:57DROPS Design respondió:
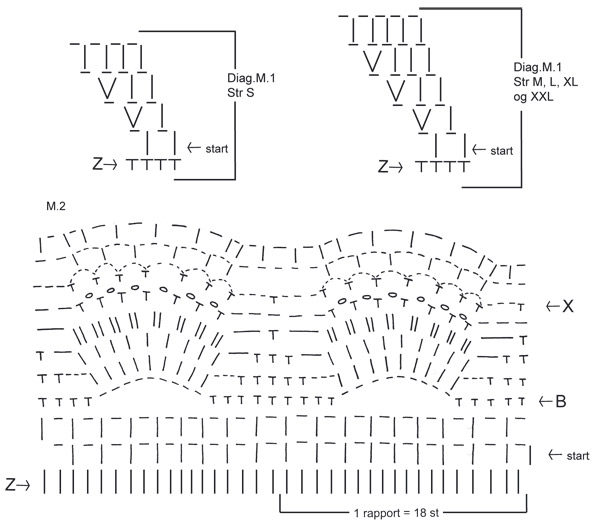
Dear Mrs Sue, you will find at the end of the written pattern and just above the measurement charts all text to diagrams. Choose M.1 for your size and start diagrams at the arrow or as stated, repeat diagrams all the round. Happy crocheting!
02.07.2013 - 08:44
![]() Karen Hartigan escribió:
Karen Hartigan escribió:
Mussel pattern. What does the large B indicate? Am I misinterpreting the two rows above the B to be two rows of tr with the next row being to tr in each tr below it? In looking closely at the photo, it appears that there are not two rows of tr and then two tr in each tr below it. It appears to be a row of tr, a row of dc and chain and then two tr in stitches below. Any clarification would be greatly appreciated. Perhaps you have the pattern written in stich format rather than the diagram?
24.06.2013 - 18:19DROPS Design respondió:
Dear Mrs Hartigan, the arrow B in M.2 is used when you repeat the diagram, you then start at this arrow. You first work M.2 starting on the arrow "start", then repeat from arrow B. Happy crocheting!
10.07.2013 - 09:43Pnina escribió:
It`'s beautiful dress. but the direction is wrong. it's decreasing even in the diagram
01.06.2013 - 20:22DROPS Design respondió:
Dear Pnina, diagram is correct, you start reading it at the bottom corner right and then will work 2 tr (UK english) / 2 dc (US english) regularly in diag M.1 to inc. Happy crocheting!
03.06.2013 - 09:55
![]() Ank escribió:
Ank escribió:
Ik heb deze nu 3x gehaakt en kom steeds niet uit .in het begin is het al fout je moet de lus maken voor de armsgaten en dan nog een tour en dan moet je al al op een hoogte zijn van 23 cm dat kan nooit en als je het patroon van m2 moet gaan doen dan kom ik uit op 21 lussen het gevolg is dat hij heel wijd is als een soort tafel kleed ,er staat ook steeds dat je moet meerderen maar nooit dat je moet minderen iemand nog een tip of ook deze fout ondekt heeft of doe ik het echt helemaal fout
21.04.2013 - 13:08DROPS Design respondió:
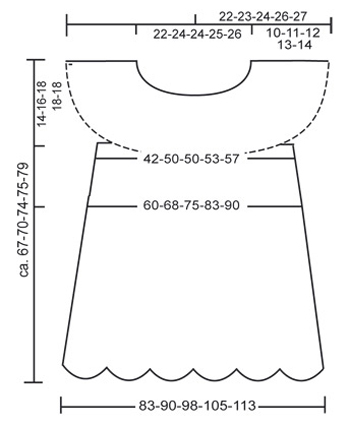
Beste Ank. Het patroon is correct. De hoogte van 23 cm klopt als u meerdert volgens het patroon. Het is niet helemaal duidelijk wat u bedoelt met de 21 lussen na 23 cm. Wij raden u aan de stekenverhouding goed te controleren. Het model heeft een A-lijn, zie ook de tekening. U hoeft inderdaad niet te minderen. Wij vermoeden dat u maat L haakt. De onderbreedte is dan inderdaad 98 cm aan het einde = 196 cm rondom. Als u dat te wijd vindt, raden we u aan een ander maat of model te maken.
16.05.2013 - 13:28
![]() Irina escribió:
Irina escribió:
Jeg kan simpel ikke finde ud af det .Videre hækles der 1 omg med lm-buer samtidig med at der tages 4-2-2-14-14 st ud jævnt fordelt – læs Udtagningstips 2 - = 144-162-180-198-216 st/lm. Jeg kan ikke finde ud af om det skal være 198 st. Der skal være eller om lm også skal tælles med har nu pillet der op så mange gange
04.04.2013 - 10:32DROPS Design respondió:
Det er totalt 198 masker st og lm til sammen
04.04.2013 - 17:27
![]() Teri escribió:
Teri escribió:
I love this pattern. I am used to working crochet charts, although I am not an expert. In M2 chart, row Z, supposedly the last row in the written pattern consists of all dc. However the last written row is in 1 dc 1 ch loops. What am I missing? I understand the row that I am supposed to start with in the chart where it says "start" just not understanding row Z
28.03.2013 - 15:15DROPS Design respondió:
Dear Teri, row Z in diagram M.2 shows the number of sts on previous round to let you see how to work 1st row (arrow start). Happy crocheting!
02.04.2013 - 10:09
![]() Bettina Hornscheidt escribió:
Bettina Hornscheidt escribió:
Liebes Team, habe dieses wunderschöne Modell angefangen zu häkeln und bin nun an der Stelle, wo die Markeirungsfäden eingezogen werden. Mir ist nicht genau klar, wo genau und warum ist das notwendig.Oder dient das nur dazu, um klar zu haben, was ist Vorderteil und was Rückenteil ist ? Vielen Dank für Eure Hilfe... L.G. Bettina Hornschiedt
18.03.2013 - 17:54DROPS Design respondió:
Liebe Bettina, die Markierungsfäden kennzeichnen die Stelle, an der aufgenommen wird.
19.03.2013 - 07:41
![]() Becky escribió:
Becky escribió:
Nevermind I figured out the arm shaping. I forgot what the ch-loop meant lol but I have it now. I do have another question though. I was wondering am I allowed to sell any of the finished products I make from here on my shop website as long as I put that it was made from DROPS DESIGNS patterns?
24.02.2013 - 00:29DROPS Design respondió:
Dear Becky, you will find all relevant informations at the very bottom of the page. Happy crocheting !
25.02.2013 - 10:54
![]() Becky escribió:
Becky escribió:
I am confused on the first round of the underarm where you chain. I got the skip 17 ch-loops and chain 8. I attached it in the 18th chain but I don't know what crochet to do in the next 21 stitches. Is it single or double crochet or am I supposed to do something else?
23.02.2013 - 23:11DROPS Design respondió:
Dear Becky, you work ch-loops as before (1 ch-loop = 1 dc + 1 ch) on sts for front piece and back piece. Happy crocheting!
25.02.2013 - 10:03
|
||||||||||||||||||||||
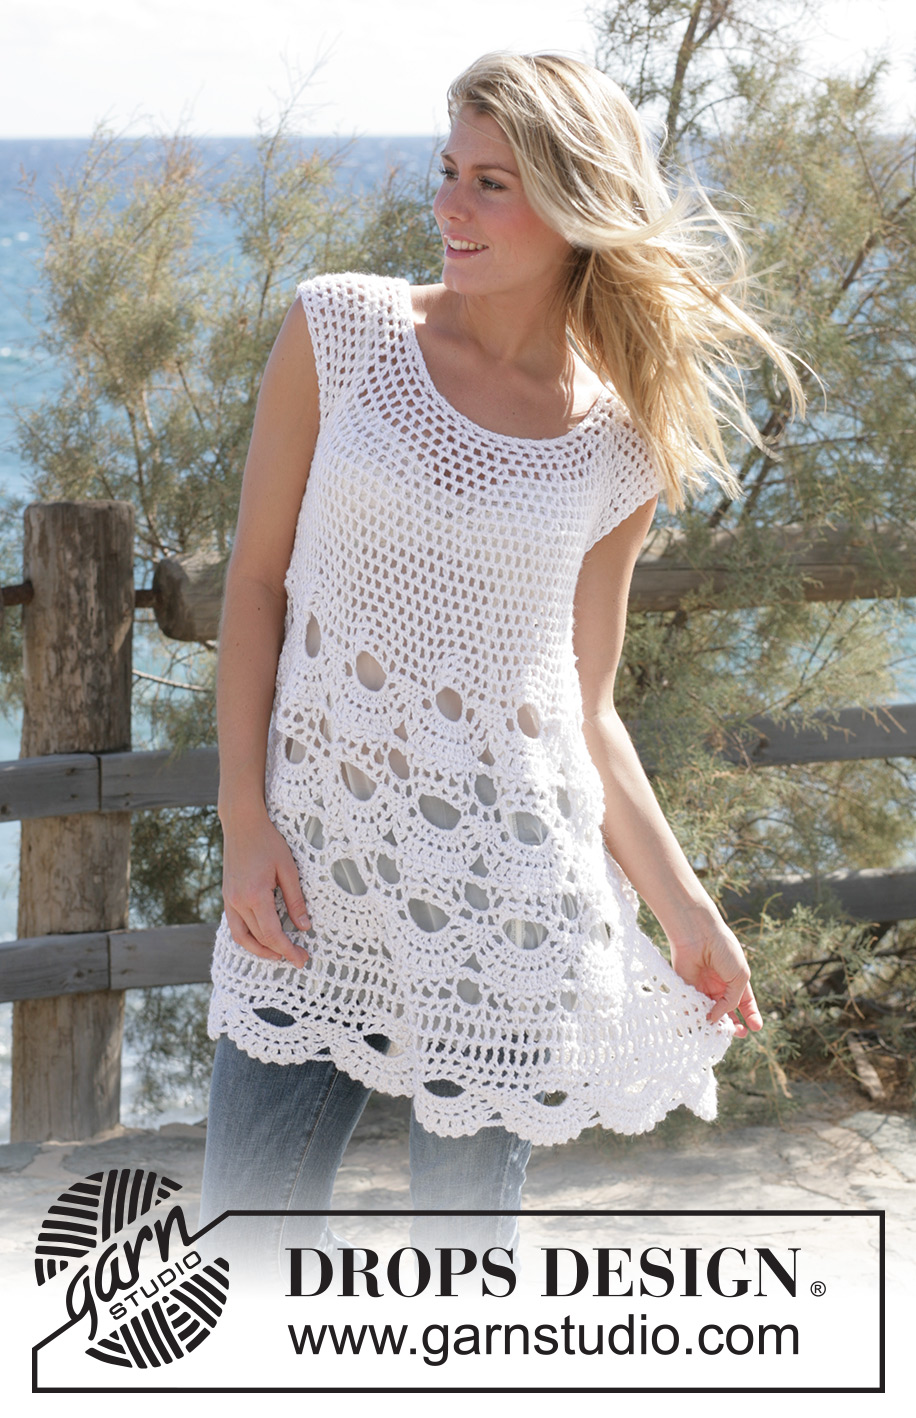
Breath of Summer#breathofsummertunic |
||||||||||||||||||||||
|
|
||||||||||||||||||||||
Túnica a ganchillo DROPS con patrón de mejillón en “Alpaca” y “Cotton Viscose”. Talla S - XXL
DROPS 99-4 |
||||||||||||||||||||||
|
Tensión: 12 p.a. x 7 filas con 1 hilo de cada calidad = 10 x 10 cm. 1 repetición del patrón de mejillón = ancho aprox 12 cm. Tip para los aumentos -1: para aum 1 p.b.: trabajar 2 p.b. en 1 p.b. Tip para los aumentos -2: para aum 1 p.a.: trabajar 2 p.a. en 1 p.a. ( no trabajar p.de cad. entre ellos). Tip para los aumentos -3: para aum 1 arco: trabajar 2 arcos en el mismo pt. Tip para la realización del trabajo: Al comienzo de cada vuelta sustituir el 1er p.a. por 3 p.de cad. Sustituir el 1er p.a.d. por 4 p.de cad. Finalizar cada vuelta con 1 p.e. en el 3er/4º p.de cad del inicio de la vta. Patrón: ver los diagramas M.1 y M.2. El diagrama se muestra por el LD. Tip para las medidas: Debido al peso de la lana todas las medidas deben ser hechas con la prenda suspendida. Espalda y delantero: La túnica se trabaja en redondo de arriba abajo. Trabajar flojo 71-75-75-79-83 p.de cad. con ag de ganchillo tamaño 5 mm con 1 hilo Drops Alpaca y 1 hilo Drops Cotton Viscose (doble hilo). Formar un anillo con 1 p.e. en el 1er p.de cad. Trabajar la sig vta como sigue: 1 p.b. en cada uno de los primeros 3 p.de cad., *saltar 1 p.de cad., 1 p.b. en cada uno de los sig 3 p.de cad.*, repetir de * a * = 54-57-57-60-63 p.b. Ahora trabajar una vta de p.b., al mismo tiempo aum 22-15-19-20-21 p.b. repartidos - ver Tip para los aumentos -1 = 76-72-76-80-84 p.b. Continuar con M.1 - ver Tip para la realización del trabajo. Después de M.1 hay 76-90-95-100-105 arcos en la vta ( 1 arco = 1 p.a. + 1 p.de cad.). Continuar con p.a. sobre p.de cad. y p.de cad. sobre p.a. hasta que la labor mida 10-11-12-13-14 cm. Trabajar la sig vta como sigue: Saltar 17-19-21-22-22 arcos de la vta anterior (= manga derecha), trabajar 8 p.de cad. (= bajo manga), trabajar 21-26-26-28-30 arcos (= delantero), saltar 17-19-21-22-22 arcos de la vta anterior (= manga izquierda), trabajar 8 p.de cad. (= bajo manga), trabajar 21-26-27-28-31 arcos (= espalda). Insertar un marcapuntos (MP) a cada lado, en el centro de los 8 p.de cad. trabajados bajo la manga. Continuar con los arcos. Atención! En la primera vta trabajar los 8 p.de cad. bajo cada manga como sigue: 1 p.a. en el 1er p.de cad., 1 p.de cad., saltar 1 p.de cad., 1 p.a. en el sig p.de cad., 1 p.de cad., 1 p.a. en el mismo p.de cad., 1 p.de cad., saltar 1 p.de cad., 1 p.a. en el sig p.de cad., 1 p.de cad., 1 p.a. en el mismo p.de cad., 1 p.de cad., saltar 1 p.de cad., 1 p.a. en el sig p.de cad., 1 p.de cad y saltar 1 p.de cad. (= 6 arcos bajo cada manga) = un total de 54-64-65-68-73 arcos en la vta. Continuar trabajando con arcos en redondo, al mismo tiempo aum 1 arco - ver Tip para los aumentos - 3 - en cada lado de ambos MP en cada vta un total de 4-4-6-6-7 vcs = 70-80-89-92-101 arcos. Después de todos los aum la labor mide aprox 19-20-23-24-27 cm medido desde la cadeneta del escote (ahora ha llegado a la mitad del pecho, si desea ajustar aquí, trabajar vtas adicionales de arcos después de los aum). Ahora trabajar 1 vta con arcos, al mismo tiempo aum 4-2-2-14-14 p.a. repartidos en la vta - ver Tip para los aumentos -2 = 144-162-180-198-216 p.a./ p.de cad. Ahora continuar con el patrón de mejillón M.2 (comenzar en la flecha del diagrama) = 8-9-10-11-12 repeticiones en horizontal en la vta. Trabajar 3 repeticiones en vertical de M.2, pero comenzar la 2ª y 3ª repetición en la flecha-B del diagrama. Después de M.2 trabajar 2-3-3-3-4 vtas en p.a.d. como sigue: Vuelta 1: Recuerde el Tip para la realización del trabajo! Trabajar 1 p.a.d. en cada arco con 1 p.de cad. entre cada uno y finalizar con 1 p.a.d. en el último p.a. = 72-81-90-99-108 p.a.d. Vuelta 2: Trabajar 1 p.a.d. en cada p.a.d. de la vta anterior con 2 p.de cad. entre cada p.a.d. (en lugar de 1) - finalizar la talla S aquí antes de al última repetición del patrón de mejillón = 72 p.a.d Vuelta 3: Trabajar 1 p.a.d. en cada p.a.d. de la vta anterior con 3 p.de cad. entre cada p.a.d. - finalizar las tallas M, L y XL aquí antes de la última repetición del patrón de mejillón = 81-90-99 p.a.d. Vuelta 4: Trabajar 1 p.a.d. en cada p.a.d. de la vta anterior con 3 p.de cad. entre cada p.a.d. - finalizar la talla XXL aquí antes de la última repetición del patrón de mejillón = 108 p.a.d. Ahora trabajar en redondo con arcos como sigue: 1 p.a. y 1 p.de cad. (= 1 arco) en cada p.a.d. de la vta anterior, al mismo tiempo aum 1 arco - ver Tip para los aumentos -3 - en cada 3-3-4-4-4 p.a.d. Atención! Para las tallas L y XL finalizar con 1 p.a. y 1 p.de cad. en cada uno de los últimos 2-3 p.a.d. = 96-108-112-123-135 arcos. Continuar con 1 vta con arcos, al mismo tiempo aum 6-0-10-6-0 p.a. - ver Tip para los aumentos -2 = 198-216-234-252-270 p.a./p.de cad. Ahora trabajar otra vez M.2 (comenzar en la flecha del diagrama), pero finalizar el patrón después de la fila 7. |
||||||||||||||||||||||
Explicaciones del diagrama |
||||||||||||||||||||||
|
||||||||||||||||||||||
 |
||||||||||||||||||||||
 |
||||||||||||||||||||||
¿Terminaste este patrón?Entonces, etiqueta tus fotos con #dropspattern #breathofsummertunic o envíalas a la galería #dropsfan. ¿Necesitas ayuda con este patrón?Encontrarás 7 videos tutoriales, un espacio para comentarios/preguntas y más visitando la página del patrón en garnstudio.com © 1982-2026 DROPS Design A/S. Todos los derechos reservados. Este documento, incluyendo todas sus sub-secciones, está protegido por los derechos de autor (copyright). Lee más acerca de lo que puedes hacer con nuestros patrones en la parte de abajo de cada patrón de nuestro sitio. |
||||||||||||||||||||||


Con más de 40 años en el diseño de modelos de punto y de ganchillo, DROPS Design ofrece una de las más vastas colecciones de patrones gratuitos en el internet - traducidos en 17 idiomas. Al día de hoy, contamos con 324 catálogos y 12290 patrones - de los cuales 11675 están traducidos en español.
Nosotros trabajamos con mucho esmero para brindarte lo mejor que las labores de punto y ganchillo tienen para ofrecer,inspiración y consejos, así como hilos de magnífica calidad a precios increíbles! Te gustaría usar nuestros patrones para otro fin además del uso personal? Puedes leer acerca de lo que estás permitida a hacer en el texto de Copyright en la parte de abajo de todos nuestros patrones. Felices labores!
Escribe un comentario sobre DROPS 99-4
¡Nos encantaría saber qué piensas acerca de este patrón!
Si quieres escribir una pregunta referente al patrón, por favor asegúrate de elegir la categoría correcta en el formulario debajo, para acelerar el proceso de respuesta. Los campos obligatorios están marcados con un *.