
Categorías populares
¿Buscas un hilo?


Comentarios / Preguntas (186)
![]() Blandine escribió:
Blandine escribió:
Bonjour. Je ne comprends pas bien comment suivre le diagramme M2 pour les augmentations des manches. Comment bien garder le diagramme ? Merci pour votre retour
30.08.2025 - 14:12DROPS Design respondió:
Bonjour Blandine, tant que vous n'aurez pas le bon nombre de mailles correspondant au motif, le diagramme ne se suivra pas tout le tour - au début du tour, tricotez les augmentations comme une nouveau motif en lisant le diagramme de gauche à droite et à la fin du tour, tricotez les augmentations en lisant le diagramme de droite à gauche; ainsi, vous créez un nouveau motif en début/fin de rang, mais au milieu sous la manche, le motif ne tombera pas juste. Bon tricot!
01.09.2025 - 16:26
![]() Rannveig escribió:
Rannveig escribió:
Kann ikkje finnaM4
20.07.2025 - 16:10DROPS Design respondió:
Hei Rannveig, M4 er siste rad i det store diagrammet. Vennlig hilsen, Drops Team.
29.07.2025 - 05:55
![]() Benedikte Havndrup escribió:
Benedikte Havndrup escribió:
Hej igen 😃 Kan I forklare det med vendestrik og at de forreste halsmaskerne skal sættes på en pind for sig? Jeg kan strikke German short rows men ikke hvis halsmakerne er isolerede På forhånd tak
19.07.2025 - 19:35DROPS Design respondió:
Hei Benedikte. Det settes x antall masker på en tråd og det strikkes nå frem og tilbake over de resterende maskene, samtidig som det felles masker mot halsen. Det snus ikke ikke i arbeidet for å strikke vendepinner (der man kunne ha brukt German Short Rows, men det felles 1 maske på hver 2. pinne 1 eller 2 ganger). mvh DROPS Design
11.08.2025 - 09:12
![]() Benedikte escribió:
Benedikte escribió:
Jeg strikker xxl. Jeg ved ikke hvordan jeg fordeler raglanindtagningerne? 24 gange på hveranden omgang og 6 gange på hver omgang?
28.06.2025 - 08:25DROPS Design respondió:
Hej Benedikte, ja det stemmer du tager ind til raglan på hver 2. omgang, det gør du 24 gange først og når du har gjort det, tager du ind til raglan på hver omgang 6 gange :)
01.07.2025 - 08:48
![]() Aud escribió:
Aud escribió:
Jeg får ikke maskeantallet til å stemme: 183 masker: Strikkes 5 rette i siden, 6vr/r, deretter 30 vr/r, 26 masker i mønster, 6r/vr, deretter 30r/vr, 5rett i siden og så 6 vr/r. Så skal det fortesettes med vrangbord over 84 neste masker - men jeg har bare 75 igjen. Er det noe feil i antallet her? 183-5-6-30-26-6-30-5= 75
07.05.2025 - 13:18DROPS Design respondió:
Hei Aud, I din størrelse: 5 rette, 30 masker vrangbord, M.1 =26m, 30 masker vrangbord, 5 rette, 84 masker vrangbord, 3 vrange = 183 masker. God fornøyelse!
08.05.2025 - 17:47
![]() Aud escribió:
Aud escribió:
Hei! Det står at det skal felles 2 m på bakstykket samtidig med at det økes 4 på forstykket; hvilke to masker bak skal felles av?
26.04.2025 - 10:31DROPS Design respondió:
Hei Aud. Du har x antall masker på bakstykket (avhengig av hvilken str. du strikker). Da skal du fell 2 masker jevnt fordelt over disse maskene. Så fra 2. merke (i siden) strikk x antall masker, fell 1 maske, strikk x antall masker, fell 1 maske, strikk frem til 1. merke (starten av omgangen). mvh DROPS Design
05.05.2025 - 08:19
![]() PERARD VALERIE escribió:
PERARD VALERIE escribió:
Bonjour quelle est la taille d’aiguille pour le col 4 ou 5 ? Merci
26.03.2025 - 16:35DROPS Design respondió:
Bonjour Mme Perard, on relève les mailles du col et on le tricote avec les aiguilles doubles pointes 4 (mention ajoutée, merci pour votre retour). Bon tricot!
27.03.2025 - 08:03
![]() Lone Kok Olsen escribió:
Lone Kok Olsen escribió:
Hej Jeg kan ikke få maskefordelingen til at passe i mønster M1, jeg slår 159 masker op. Kan der være en fejl i opskriften
14.03.2025 - 13:20DROPS Design respondió:
Hei Lone. LItt usikker på hva du mener. Du legger opp 159 masker og så strikkes det slik: 5 rett + * 3 vr, 3 r * over 24 masker + M.1 (= 26 masker) + * 3 r, 3 vr * over 24 + 5 rett + * 3 vr, 3 r * over 72 masker + 3 vr = 5+24+26+24+5+72+3= 159 masker. mvh DROPS Design
17.03.2025 - 11:49
![]() Olimpia escribió:
Olimpia escribió:
Non ho capito come eseguire l’ultima parte dello sprone, viene indicato di lasciare in sospeso la parte centrale e continuare aventi e indietro, ma quindi non posso continuare in tondo ?
11.03.2025 - 12:23DROPS Design respondió:
Buonasera Olimpia, da quel punto si prosegue in piano. Buon lavoro!
18.03.2025 - 22:03
![]() Jisu escribió:
Jisu escribió:
Hello, in the end of the york part it says “Join and P 1 row, then K 1 row, decreasing evenly distributed to 83-89-89-95-95 sts. ” Does that mean to decrease the stitches across 2 rows? Thank you!
26.02.2025 - 23:20DROPS Design respondió:
Dear Jisu, no you should decrease evenly only on the round knitting, ie on 2nd of these both rounds. Happy knitting!
27.02.2025 - 11:12
|
||||||||||||||||||||||||||||
To the Sea |
||||||||||||||||||||||||||||
|
|
||||||||||||||||||||||||||||
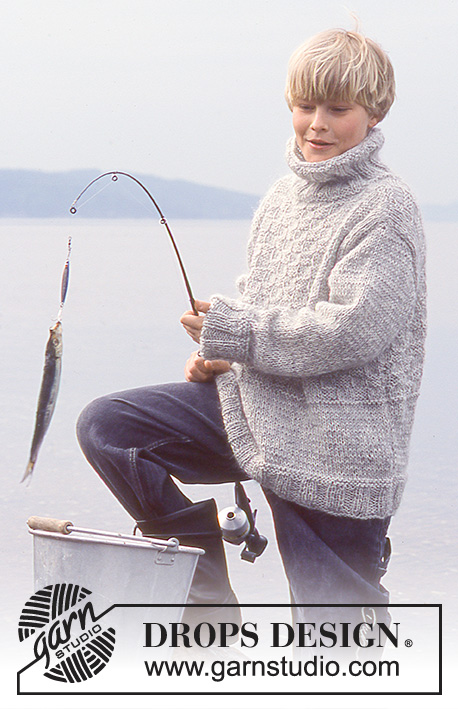
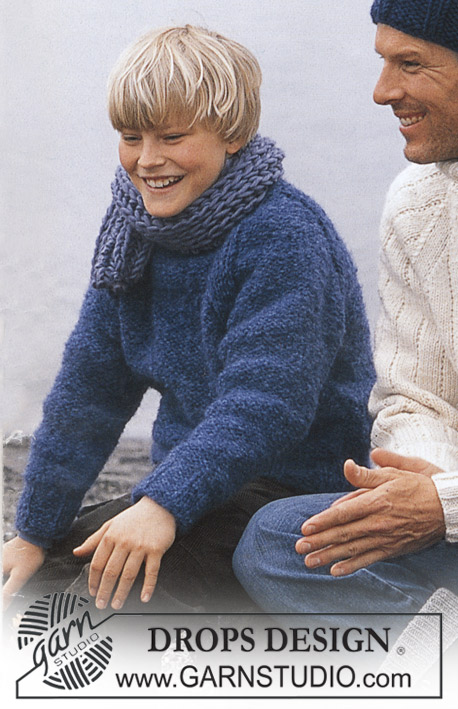
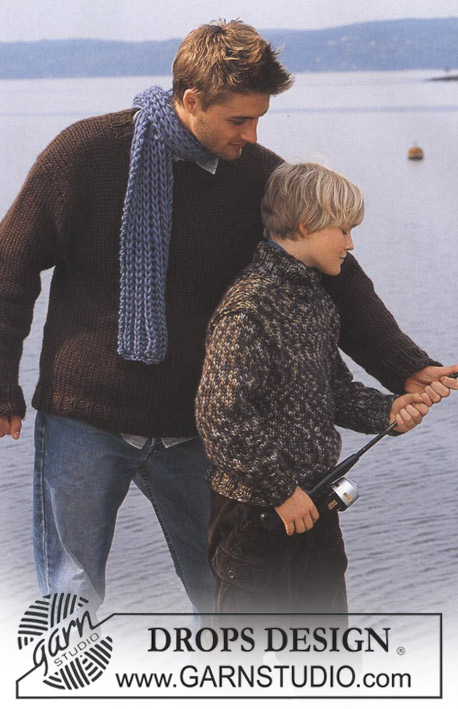
Pulóver de punto para hombre con torsadas y cuello alto en DROPS Alaska, más gorro en DROPS Snow
DROPS 85-23 |
||||||||||||||||||||||||||||
|
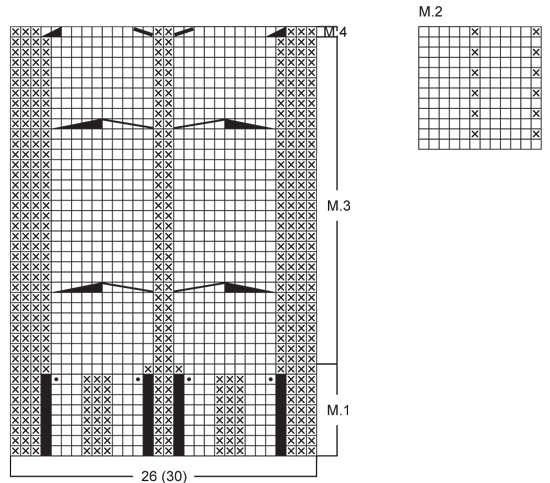
Muestra: 17 pts x 22 vtas en las ag tamaño 5 mm en pt jersey = 10 x 10 cm. Resorte: * 3d, 3r *, repetir de *a*. Patrón: Ver el diagrama abajo. El patrón es visto por el lado derecho. Tips para disminución (para el raglán): Dism como sigue en el lado derecho: Empezar 4 pts antes del marcapuntos (MP): Desl 1 pt del derecho, 1d, pasar pt desl por encima, 4d (el MP queda en el centro de estos 4 pts), 2 pjd. Dism como sigue en el lado revés: Empezar 4 pts antes del MP: 2 pjr, 4r, 2 pjr, retorciendo los pts (si esto es muy difícil, desl 2 pts, regresar a la ag izquierda 1 por 1, retorciendo cada uno, luego 2 pjr).. CUERPO: Mon 155-159-179-183-203 pts en las ag 4 mm; unir y tejer resorte como sigue: 3-5-3-5-3 derechos (colocar un MP en el pt central = lado), * 3r, 3d *, repetir de *a* sobre los 24-24-30-30-36 pts siguientes, M.1 (= 26 pts), * 3d, 3r *, repetir de *a* sobre los 24-24-30-30-36 pts siguientes, 3-5-3-5-3 derechos (colocar un MP en el pt central = lado), * 3r, 3d *, repetir de *a* sobre los 72-72-84-84-96 pts siguientes y terminar con 3r. En la última vta de M.1 dism 2 pts en la espalda y al mismo tiempo aum 4 pts en el delantero, tal como se muestra en el diagrama = 157-161-181-185-205 pts. Cuando M.1 esté terminado (la pieza mide aprox 4 cm) cambiar a ag circular 5 mm y cont como sigue: 3-5-3-5-3 derechos, M.2 sobre los 24-24-30-30-36 pts siguientes, M.3 (= 30 pts), M.2 sobre los 24-24-30-30-36 pts siguientes – leer el diagrama en sentido inverso para que el motivo sea idéntico en ambos lados de M.3, 3-5-3-5-3 derechos y M.2 sobre los 73-73-85-85-97 pts restantes. Cuando la pieza mida 12 cm aum 1 pt de cada lado de los pts con MP, en cada lado, cada 5-4-6-4-4 cm un total de 4-6-4-6-6 veces – tejer los pts aum en M.2 conforme avanza en el tejido = 173-185-197-209-229 pts. Cuando la pieza mida 34-41-42-43-43 cm rem 7 pts de cada lado para la sisa (= los pts con los MP + 3 pts de cada lado) = 82-88-94-100-110 pts en el delantero y 77-83-89-95-105 pts en la espalda. Dejar la pieza a un lado y tejer las mangas. MANGA: Mon 42-42-42-48-48 pts en las ag de doble punta tamaño 4 mm; unir y colocar un MP en la unión. Tejer resorte. Cuando la pieza mida 4 cm, cambiar a las ag de doble punta tamaño 5 mm y tejer de acuerdo a M.2 (tomar nota que el patrón quedará desigual). Cuando la pieza mida 9-12-14-14-14 cm aum 1 pt de cada lado del pt arroz, a nivel del MP, cada 3.5-2.5-2-2.5-2 cm un total de 11-14-17-15-20 veces (integrar los pts aum al patrón conforme avanza en el tejido) = 64-70-76-78-88 pts. Cuando la pieza mida 50-51-53-53-54 cm rem 7 pts a nivel del MP (el pt con el MP + 3 pts de cada lado del MP) = 57-63-69-71-81 pts. Dejar la pieza a un lado y tejer la otra manga. PECHERA: Colocar las mangas en la misma ag circular que la pieza del Cuerpo, en el rem para la sisa = 273-297-321-337-377 pts. Colocar un MP en cada unión entre cuerpo y mangas = 4 MP. Tejer 2-3-0-0-0 antes de las dism. Leer completamente la sección siguiente antes de continuar: Raglán: Dism 1 pt en cada lado de cada MP (= 8 dism) – ver Tips para disminución arriba. Dism en vtas alternas 18-21-23-24-24 veces y en cada vta 0-0-1-1-6 veces. Patrón: Cuando la pieza mida 50-59-61-63-65 cm – ajustar para que finalice después de una torsada – tejer M.4 sobre los 30 pts centrales (disminuyendo los 4 pts aumentados en la última vta de M.1 en la orilla inferior del Cuerpo) – tejer los pts restantes como antes. En la vta sig colocar los 30-30-30-34-34 pts centrales en un gancho o seguro aux para el cuello y tejer de ida y vuelta en las ag. Cont dism 1 pt en cada orilla del cuello, en vtas alternas, 1-2-2-2-2 veces. Después que se ha terminado de dar forma al raglán y cuello, deberá tener 93-91-91-95-95 pts restantes y, la pieza mide aprox 56-66-68-70-72 cm hasta el hombro. BORDE DEL CUELLO: Levantar y tejer aprox 32-38 pts en el delantero del cuello (incl los pts en el gancho o seguro aux) en ag de doble punta y colocar todos los pts en las mismas ag = aprox 125-133 pts. Unir y tejer 1 vta del revés, después 1 vta del derecho, dism equitativamente a 83-89-89-95-95 pts. Tejer resorte (3d, 3r) – pero en el delantero central deberá tener un 2r, siguiendo el patrón en la parte delantera. Cuando el cuello mida 18-20-20-22-22 cm rem todos los pts en pt. resorte. Doblar el borde del cuello hacia afuera. Si se desea un cuello redondo, tejer como sigue: Tejer resorte hasta que el cuello mida aprox 10-11-12-12-13 cm, rem pts siguiendo el patrón. Doblar el borde del cuello hacia adentro y coser al pulóver. TERMINACIÓN: Coser la abertura debajo de la manga. GORRO: Tamaño: Único Materiales: DROPS SNOW de Garnstudio 100 g color No. 15, azul oscuro Agujas de doble punta DROPS tamaño 9 mm [US 13], o el tamaño necesario para obtener la muestra de tejido correcta. Muestra: 10 pts x 14 vtas en pt jersey = 10 x 10 cm. Resorte: * 5r, 2d *, repetir de *a*. GORRO: Mon 56 pts; unir y colocar un MP en la unión. Tejer 1 vta pt jersey, luego tejer resorte – ver instrucciones arriba. Cuando la pieza mida 12 cm dism todos los 5r a 4r = 48 pts. Cuando la pieza mida 15 cm dism todos los 4r a 3r = 40 pts. Dism de la misma manera 2 veces más con 3 cm entre cada vta de dism para tener 1r menos por cada vta de dism = 24 pts – el resorte ahora es * 2d, 1r *. Cuando la pieza mida 22 cm tejer la vta sig así: * 2 pjd, 1r *, repetir de *a* sobre todos los pts = 16 pts. Cortar el hilo y pasar a través de los pts restantes, asegurar prolijamente. El gorro mide aprox 23 cm de alto. Diagrama: Todas las medidas de los diagramas son en cm. Todas las medidas son de lado a lado. |
||||||||||||||||||||||||||||
Explicaciones del diagrama |
||||||||||||||||||||||||||||
|
||||||||||||||||||||||||||||
 |
||||||||||||||||||||||||||||
 |
||||||||||||||||||||||||||||
¿Terminaste este patrón?Entonces, etiqueta tus fotos con #dropspattern o envíalas a la galería #dropsfan. ¿Necesitas ayuda con este patrón?Encontrarás 26 videos tutoriales, un espacio para comentarios/preguntas y más visitando la página del patrón en garnstudio.com © 1982-2026 DROPS Design A/S. Todos los derechos reservados. Este documento, incluyendo todas sus sub-secciones, está protegido por los derechos de autor (copyright). Lee más acerca de lo que puedes hacer con nuestros patrones en la parte de abajo de cada patrón de nuestro sitio. |
||||||||||||||||||||||||||||


Con más de 40 años en el diseño de modelos de punto y de ganchillo, DROPS Design ofrece una de las más vastas colecciones de patrones gratuitos en el internet - traducidos en 17 idiomas. Al día de hoy, contamos con 324 catálogos y 12290 patrones - de los cuales 11675 están traducidos en español.
Nosotros trabajamos con mucho esmero para brindarte lo mejor que las labores de punto y ganchillo tienen para ofrecer,inspiración y consejos, así como hilos de magnífica calidad a precios increíbles! Te gustaría usar nuestros patrones para otro fin además del uso personal? Puedes leer acerca de lo que estás permitida a hacer en el texto de Copyright en la parte de abajo de todos nuestros patrones. Felices labores!
Escribe un comentario sobre DROPS 85-23
¡Nos encantaría saber qué piensas acerca de este patrón!
Si quieres escribir una pregunta referente al patrón, por favor asegúrate de elegir la categoría correcta en el formulario debajo, para acelerar el proceso de respuesta. Los campos obligatorios están marcados con un *.