
Categorías populares
¿Buscas un hilo?


Comentarios / Preguntas (137)
![]() Vicki escribió:
Vicki escribió:
My question is on the neck and armhole shaping on the left front piece. I am making the "s" size. My numbers are not adding up. I start with 58 stitches, I decrease 18 + 4 times on the neck shaping and at the same time decrease 8 times for the arm hole. 58-18-4-8=28. I need to decrease 4 more stiches. What am I missing? Also does the arm hole shaping start at 35 cm?
12.01.2021 - 19:05DROPS Design respondió:
Dear Vicki, you decrease and increase = 58 sts again, then decrease for neck 18 + 4 sts and cast off for armhole 5 + 7 sts = 58- (18+4) - (5+7) = 24 sts. Happy knitting
13.01.2021 - 06:55
![]() Minna escribió:
Minna escribió:
Hihan ohjeessa on virhe, lisäykset tehdään kierroksen välein, ei cm:ien. kLisää nyt 1 s kummassakin reunassa 15-16-16-18-19-20 x 8-7-7-6-5-5 cm:n välein = 76-80-84-90-96-100 s.
20.10.2020 - 09:55
![]() Rhonda🇺🇸 escribió:
Rhonda🇺🇸 escribió:
I am knitting a size xl and not understanding the instructions. I have just cast off 10 stitches on each side for the arm holes. I don’t understand decreasing tip 2. Do you mean to decrease the first stitch on each end for every other row for 13 times? Then not understanding the next set of instructions-to knit 4 rows over the center 56 stitches. What is meant by continuing to knit other stitches as before? The instructions are difficult to understand.
08.09.2020 - 02:22DROPS Design respondió:
Hi Rhondaus, After you have cast off for the armholes the continued decreases are inside the 3 edge stitches on both armholes, slipping and passing over at the beginning of the row (after the edge stitches) and knitting 2 tog. bat the end of the row (before the edge stitches). Both decreases are worked on each row from the right side 13 times. Then you work the neck (later) by working 4 rows of garter stitch over the middle stitches, then casting them off. Hope this helps and happy knitting!
08.09.2020 - 07:07
![]() Judi Buschlen escribió:
Judi Buschlen escribió:
Please clarify the last decreases for the sleeve cap where it says -continue to cast off 2 sts each side until the piece measures 57 cm, then cast off 3 sts 1 time each side. Bind off remaining sts.... Meaning to dec or bind off every 2nd row still?? Knitters online have also found the instructions unclear and have lengthened the sleeve cap. I\\\'m not so brave. But I\\\'d like to how to shape the sleeve cap correctly. :)Thanks , Judi
11.07.2020 - 08:11DROPS Design respondió:
Dear Judi, for the sleeve you will cast off 2 sts at the beg of every row both from RS and from WS (= on each side - make sure you cast off the same number of sts on each side) until sleeve measures 57 cm (the number of remaining sts will depend on your tension in height) then cast off 3 sts at the beg of next 2 rows and cast off the remaining sts. Happy knitting!
13.07.2020 - 09:39
![]() Paula escribió:
Paula escribió:
Please disregard my comment above, I understand those decreasing instructions only apply to the side panels, not the back panel (aside from the decreasing at both edges). Thanks!
03.11.2019 - 20:57
![]() Paula escribió:
Paula escribió:
I don't understand Decreasing Tip-2, specifically for the back piece. I'm not sure what is meant by "dec. inside 3 edge sts at the armhole and inside 12 sts of garter sts for the neck side". I assume for the back you mean inside the 3 edge Sts at the armhole and inside (52 Sts for extra small) of garter Sts. Is this correct?
03.11.2019 - 20:47DROPS Design respondió:
Dear Paula, after you have worked 2 rows in garter stitch over the middle 52 stitches, you cast off on next row the middle 28 sts for neck = 24 sts remain for each shoulder. Continue working each shoulder separately with the remaining 12 sts in garter stitch towards neck as before and decrease 1 st every other row 2 times inside these 12 sts in garter stitch = 22 sts remain. Happy knitting!
05.11.2019 - 08:02
![]() Rosita Gyllenhammar escribió:
Rosita Gyllenhammar escribió:
Efter ökning på bakstycket har jag 104 maskor. St s Vi 35 cm avmaskar jag 5 maskor varje sida och minskar totalt 10 maskor(en i varje sida 5ggr) det bli 20 maskor mindre. I beskrivning står det art det ska vara 80 maskor kvar? 104-20 = 84 ?
09.03.2019 - 23:54DROPS Design respondió:
Hej. Det var lite otydligt skrivet i den svenska översättningen, men du ska minska först 5 maskor i varje sida och sedan 1 maska i varje sida 7 gånger. 104-(5x2)-(7x2)= 80 m.
14.03.2019 - 10:40
![]() Robin Rockwell escribió:
Robin Rockwell escribió:
There are several comments about problems (mistakes?) with the armhole/sleeve directions not being correct. Are those problems corrected in the directions? I'm not an improvisational knitter so I hope the current online pattern is correct. Thanks!
17.02.2019 - 16:36DROPS Design respondió:
Dear Mrs Rockwell, pattern is correct just make sure you get and keep correct tension. should you have any question you are welcome to ask them here. Happy knitting!
18.02.2019 - 10:11
![]() Triste Longcore escribió:
Triste Longcore escribió:
I don’t understand the instruction “dec for the neck shape INSIDE the 12 band stitches” I’m guessing you mean decrease 3 stitches BEFORE the band...?
08.01.2019 - 17:00DROPS Design respondió:
Dear Mrs Longcore, you decrease for neck before the 12 front band stitches worked in garter stitch (on left front piece = from RS): work the RS row until 14 sts remain, K2 tog, K12 (= front band sts. Dec after the 12 front band sts (on right front piece, from RS): work the RS row as follows: 12 sts in garter st, slip 1 as if to K, K1, psso. For armholes, you will dec after the 3 sts (left front piece) and before the 3 sts (right front piece). Happy knitting!
09.01.2019 - 08:02
![]() Margaret McDermott escribió:
Margaret McDermott escribió:
What does K the first row from the WS mean?
06.11.2017 - 19:12DROPS Design respondió:
Dear Mrs McDermott, after the cast on row, knit 1 row, this first row will be knitted and will be wrong side of piece, ie row 2 on piece will be worked from right side. Happy knitting!
07.11.2017 - 08:35
|
|
Swing |
|
|
|
|
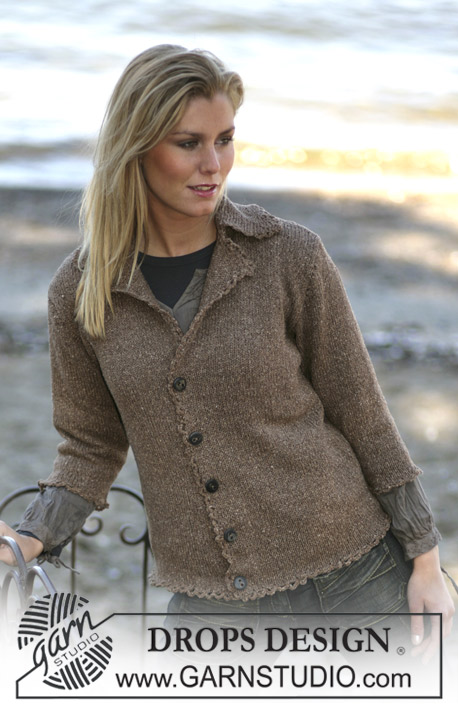
Chaqueta sastre DROPS tejida en “Alpaca"
DROPS 97-18 |
|
|
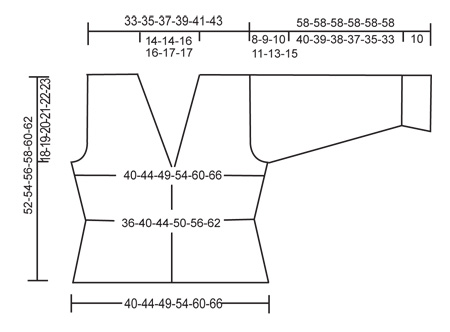
TENSIÓN DE LA MUESTRA: 23 pts x 30 filas con ag tamaño 3.5 mm en pt jersey = 10 x 10 cm PUNTO MUSGO (de ida y vta en ag): Trabajar todas las filas de derecho. TIP-1 PARA LAS DISMINUCIONES (aplicar para el entallado en los lados): Todas las dism se trabajan por el LD! Dism como sigue después del MP (marcapuntos): 2 pjd. Dism como sigue antes del MP: Desl 1 pt como de derecho, 1 d., pasar el pt desl por encima. TIP-2 PARA LAS DISMINUCIONES (aplicar a la sisa y el escote): Todas las dism se trabajan por el LD! Dism dentro de 3 pts del borde para la sisa y dentro de 12 pts en pt musgo para el escote. Dism como sigue antes de 3/12 pts: 2 pjd. Dism como sigue después de 3/12 pts: Desl 1 pt como de derecho, 1 d., pasar el pt desl por encima. TIP PARA LOS AUMENTOS: Aum como sigue: Recoger 1 pt de la fila anterior y trabajar de derecho. ----------------------------------------------------------------------- ESPALDA: Mont 94-104-114-126-140-154 pts (incl 1 pt orillo a cada lado) con ag tamaño 3.5 mm con Alpaca. Trabajar la 1ª fila de derecho por el LR y continuar en pt jersey hasta finalizar la labor. Insertar un MP a 24-26-29-32-35-39 pts de cada lado (= 46-52-56-62-70-76 pts entre los MP). Cuando la labor mida 6-7-8-9-10-11 cm dism en cada MP para el entallado en los lados. Dism después del 1er MP y antes del 2ª MP - ver TIP-1 PARA LAS DISMINUCIONES: Dism cada 6ª fila un total de 5 vcs = 84-94-104-116-130-144 pts. Cuando la labor mida 17-18-19-20-21-22 cm aum otra vez en los MP - aum después del 1er MP y antes del 2º MP - ver TIP PARA LOS AUMENTOS. Aum cada 6ª fila un total de 5 vcs = 94-104-114-126-140-154 pts. Cuando la labor mida 34-35-36-37-38-39 cm cerrar 4-5-6-8-10-12 pts a cada lado para la sisa. Continuar dism 1 pt a cada lado cada 2ª fila - ver TIP-2 PARA LAS DISMINUCIONES: 5-7-8-10-13-15 vcs = 76-80-86-90-94-100 pts. Cuando la labor mida 48-50-52-54-56-58 cm trabajar 4 filas en pt musgo sobre los 52-52-56-56-60-60 pts centrales (continuar trabajando los otros pts como antes) después cerrar los 28-28-32-32-36-36 pts centrales para el escote. Continuar cerrando hacia el escote cada 2ª fila dentro de 12 pts en pt musgo un total de 2 vcs - ver TIP-2 PARA LAS DISMINUCIONES: = 22-24-25-27-27-30 pts quedan para cada hombro. Rematar los pts restantes cuando la labor mida 52-54-56-58-60-62 cm. DELANTERO IZQUIERDO: Mont 53-58-63-69-76-83 pts (incl 1 pt orillo en el lado y 12 pts de la cenefa en el centro del delantero) con ag tamaño 3.5 mm. Trabajar la 1ª fila de derecho por el LR. Continuar en pt jersey pero trabajar los 12 pts de la cenefa siempre en pt musgo. Insertar un MP a 24-26-29-32-35-39 pts del lado. Cuando la labor mida 6-7-8-9-10-11 cm dism 1 pt antes del MP para el entallado - ver TIP-1 PARA LAS DISMINUCIONES: Cada 6ª fila un total de 5 vcs = 48-53-58-64-71-78 pts. Cuando la labor mida 17-18-19-20-21-22 cm aum 1 pt antes del MP - ver TIP PARA LOS AUMENTOS: Cada 6ª fila un total de 5 vcs = 53-58-63-69-76-83 pts. LEER TODA LA SECCIÓN SIGUIENTE ANTES DE CONTINUAR! ESCOTE: Cuando la labor mida 29-30-31-32-33-34 cm dism para el escote dentro de los 12 pts de la cenefa - ver TIP-2 PARA LAS DISMINUCIONES: Dism 1 pt cada 2ª fila un total de 18 vcs y después cada 4ª fila un total de 4-4-6-6-8-8 vcs. SISA: Al mismo tiempo cuando la labor mida 34-35-36-37-38-39 cm cerrar para la sisa como se describe para la espalda. Después de completar todas las dism para el escote y la sisa = quedan 22-24-25-27-27-30 pts para el hombro. Rematar los pts restantes cuando la labor mida 52-54-56-58-60-62 cm. DELANTERO DERECHO: Mont los pts y tejer como el delantero izquierdo pero a la inversa. ATENCIÓN! Dism y aum para el entallado después del MP. Adicionalmente cerrar para 3 ojales en la cenefa. 1 ojal = cerrar el 5º y 6º pt desde el borde y mont 2 pts nuevos en el mismo sitio en la fila de vta. Cerrar para los ojales cuando la labor mida : Talla XS: 21, 24 y 27 cm Talla S: 20, 24 y 28 cm Talla M: 21, 25 y 29 cm Talla L: 22, 26 y 30 cm Talla XL: 21, 26 y 31 cm Talla XXL: 22, 27 y 32 cm MANGA: Mont 56-58-62-64-68-70 pts (incl 1 pt orillo a cada lado) con ag tamaño 3.5 mm. Trabajar 1 fila de derecho por el LR. Continuar en pt jersey. Cuando la labor mida 10 cm dism 10 pts repartidos en la fila = 46-48-52-54-58-60 pts. Continuar aumentando 1 pt a cada lado cada 8-7-7-6-5-5 filas un total de 15-16-16-18-19-20 vcs = 76-80-84-90-96-100 pts. Cuando la labor mida 50-49-48-47-45-43 cm cerrar para la copa de la manga a cada lado cada 2ª fila: 4 pts 1 vez, 3 pts 1 vez, 2 pts 2 vcs, 1 pt 5-6-8-9-12-15 vcs, continuar cerrando 2 pts a cada lado hasta que la labor mida 57 cm, ahora cerrar 3 pts 1 vez a cada lado. Rematar los pts cuando la labor mida aprox 58 cm. TERMINACIÓN: Hacer la costura de los hombros, insertar las mangas y coser las mangas y los lados dentro de 1 pt orillo. Coser los botones. |
|
 |
|
¿Terminaste este patrón?Entonces, etiqueta tus fotos con #dropspattern o envíalas a la galería #dropsfan. ¿Necesitas ayuda con este patrón?Encontrarás 19 videos tutoriales, un espacio para comentarios/preguntas y más visitando la página del patrón en garnstudio.com © 1982-2026 DROPS Design A/S. Todos los derechos reservados. Este documento, incluyendo todas sus sub-secciones, está protegido por los derechos de autor (copyright). Lee más acerca de lo que puedes hacer con nuestros patrones en la parte de abajo de cada patrón de nuestro sitio. |


Con más de 40 años en el diseño de modelos de punto y de ganchillo, DROPS Design ofrece una de las más vastas colecciones de patrones gratuitos en el internet - traducidos en 17 idiomas. Al día de hoy, contamos con 324 catálogos y 12290 patrones - de los cuales 11673 están traducidos en español.
Nosotros trabajamos con mucho esmero para brindarte lo mejor que las labores de punto y ganchillo tienen para ofrecer,inspiración y consejos, así como hilos de magnífica calidad a precios increíbles! Te gustaría usar nuestros patrones para otro fin además del uso personal? Puedes leer acerca de lo que estás permitida a hacer en el texto de Copyright en la parte de abajo de todos nuestros patrones. Felices labores!
Escribe un comentario sobre DROPS 97-18
¡Nos encantaría saber qué piensas acerca de este patrón!
Si quieres escribir una pregunta referente al patrón, por favor asegúrate de elegir la categoría correcta en el formulario debajo, para acelerar el proceso de respuesta. Los campos obligatorios están marcados con un *.