
Categorías populares
¿Buscas un hilo?


Comentarios / Preguntas (42)
![]() Susanne Bøttern escribió:
Susanne Bøttern escribió:
Jeg strikker størrelse L
09.01.2024 - 16:40
![]() Susanne Bøttern escribió:
Susanne Bøttern escribió:
Kunne I lave et diagram eller tegning af modellen ? Synes teksten til opskriften er svær at forstå. Fx ryggen ; tag ud på hvet 2 p xx gange til xx masker. Når arb. Måler 14 cm tages ud igen til samme antal m ????
08.01.2024 - 18:22DROPS Design respondió:
Hej Susanne, hvilken størrelse strikker du, så kan vi hjælpe dig...
09.01.2024 - 15:39
![]() Anne escribió:
Anne escribió:
Hej. Jeg er ved at strikke str L, men forstår ikke instruktioner til udtagning i ryg. Der stå at udtagning på 5 m skal gentages 8 gange i glatstrik = 43m. Dette skulle være inklusive 4 m i hver side i rib. Men 8 gange 5m i udtagning giver 40m + oprindelige 14 m glatstrik + 4m i rib = 58m?
04.01.2024 - 18:26DROPS Design respondió:
Hej Anne, de 5 masker som tages ud jævnt fordelt, tages kun ud én gang. Udtagningen i hver side (indenfor de 4 m rib) gøres på hver 2.pind ialt 8 gange :)
09.01.2024 - 15:25
![]() Winnie escribió:
Winnie escribió:
Hi , I am confused over the section under “ Neck” . Total no of stitches for the M size is 49 ie. 20 for Tummy and 29 for Back. I have placed all stitches ( tummy and back ) on a circular needle but do not understand how decreasing 1 stitch at back results in a total of 44 stitches. Decrease at beg or end of row of back? Also what does make an elevation mean? Please advise, thanks 🙏
13.11.2023 - 14:03
![]() Sabina escribió:
Sabina escribió:
Bei der alten Anleitung welche ich angeschaut hatte war Nadelstärke 9 angegeben. Daraufhin hab ich die Materialien bestellt. Nun müsste ich die Nadelstärken für diese Anleitung auch wieder neu bestellen. Meine Frage war, gibt es im Archiv noch die alte Anleitung vor der Änderung, welche noch am 18.10.2023 online war? Besten Dank
25.10.2023 - 16:25DROPS Design respondió:
Liebe Sabrina, diese Anleitung wurde aktualisiert, dh besser erklärt, die alte ist dann nicht mehr nötig /verfügbar. Viel Spaß beim stricken!
26.10.2023 - 06:35
![]() Sabina escribió:
Sabina escribió:
Hallo Ich hab am 18. Okotber 2023 die Anleitung angeschaut und hab mir daraufhin das Material bestellt. Nun wurde aber die Anleitung abgändert und ich sitz nun hier mit Nadelstärke 9. Wäre es möglich noch irgendwo die alte Anleitung zu bekommen? Besten Dank
25.10.2023 - 09:29DROPS Design respondió:
Liebe Sabina, hier braucht man Nadeln Nr 6 und 7 - beachten Sie daß Ihre Maschenprobe stimmt: 12 M x 16 Reihen glatt mit Nadeln Nr 7 (Größe anpassen, wenn nötig ist). Viel Spaß beim stricken!
25.10.2023 - 15:17
![]() Nathalie escribió:
Nathalie escribió:
Bonjour, et merci d'avance pour votre aide. je suis complètement perdue dans les explications pour le col. Quand vous dites " tourner et tricoter le rang suivant en côtes, tourner de nouveau et tricoter un tour complet". Tourner, ça veut dire passer à l'aiguille suivante ? ou bien tourner l'ouvrage pour repartir dans l'autre sens ? Je crois que c'est ce terme de "tourner" qui me bloque, Merci encore de votre aide
27.01.2023 - 16:12DROPS Design respondió:
Bonjour Nathalie, vous *tricotez d'abord les mailles de l'aiguille n°1 sur l'endroit, puis vous tournez et tricotez ces mailles encore une fois (sur l'envers), tournez et tricotez toutes les mailles du tour (sur l'endroit).*. Tricotez 2 tours sur toutes les mailles et répétez de *-* . Bon tricot!
30.01.2023 - 08:12
![]() Jane Wingquist escribió:
Jane Wingquist escribió:
I’m at the end of the stomach piece (12” and 20 sts) ; how long do I keep knitting at this point? Do I stop at that point or continue till piece measures the same as the back piece?
07.11.2022 - 01:41DROPS Design respondió:
Hi Jane, The back and tummy pieces are now both placed on the double pointed needles and joined together working in the round (the stomach piece is shorter than the back piece), as described under Neck. Happy knitting!
07.11.2022 - 07:41
![]() Vivian Ip escribió:
Vivian Ip escribió:
In this section, "Cast on 8 (includes 1 edge st each side worked in garter st)... 1st row (= WS): K1, work rib *K2, P2*, start and end with K2, end row with K1. 1) Does that mean that I actually cast on 10? 2) How can it end with K2, if I have 8 or 10? The K2, P2 pattern means that I would end with K2, P2, K1.
02.10.2022 - 04:53DROPS Design respondió:
Dear Vivian, the 8 stitches already include the edge stitches. So you only need to cast on 8 stitches. On the 1st row, work: K1, K2, P2, K2, K1. Happy knitting!
03.10.2022 - 00:45
![]() Vivian escribió:
Vivian escribió:
In this section “work all sts in stockinette sts at the same time bind off for leg openings at beg of every row, each side: 5 sts 1 time, 1 st 2 times, then inc 1 st each side on every other row 2 times,” does that mean to start the row by binding off 5 stitches in one stitch and then… knit 2 stitches, and then add 1 stitch at the end of the row? Does that mean to
02.10.2022 - 01:27DROPS Design respondió:
Dear Vivian, cast off 5 sts (not in one stitch, each individually) at the beginning of the row on the right side and at the beginning of the row on the wrong side. Next, cast off 1 stitch at the beginning of the next row from the right side and the next row from the wrong side. Repeat this 1-stitch cast off once more. Finally, on the next row, increase 1 stitch on the right side and don't increase on the wrong side; repeat this once more. Happy knitting!
03.10.2022 - 00:42
|
|
Blue Shadow |
|
 |
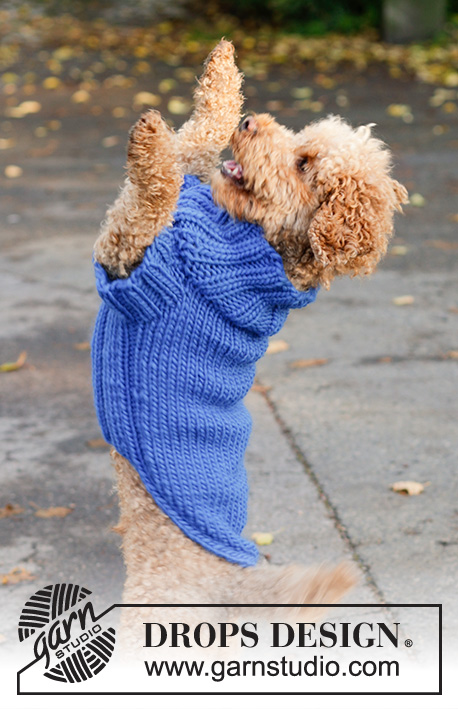 |
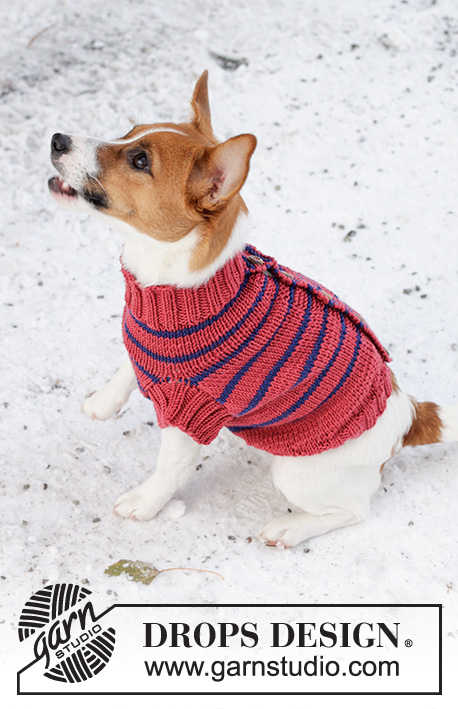
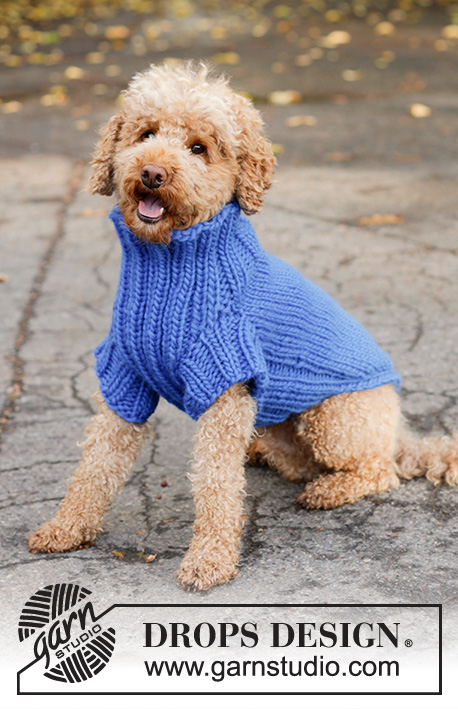
Jersey de punto para perro en DROPS Snow. La pieza está tejida de la cola hasta el cuello con punto jersey y resorte. Tallas XS - L.
DROPS Extra 0-81 |
|
|
EXPLICACIONES PARA REALIZAR EL PATRÓN: ------------------------------------------------ TIP PARA AUMENTAR: Aumentar haciendo 1 lazada, la cual se teje retorcida en la hilera siguiente para evitar que se forme un agujero. Los nuevos puntos se tejen en punto jersey en la espalda y en resorte en el vientre. PUNTO MUSGO (tejido de ida y vuelta): Tejer todas las hileras de derecho. ------------------------------------------------ COMENZAR LA PIEZA AQUÍ: ------------------------------------------------ JERSEY PARA PERRO – RESUMEN DE LA PIEZA: La pieza se teje a partir de la cola hasta el cuello. La espalda y el vientre se tejen separadamente de ida y vuelta, después son unidas y el cuello se teje en redondo. La espalda y el vientre son unidas con costura al final. ESPALDA: Montar 14-18-18-22 puntos con agujas tamaño 7 mm y DROPS Snow. Tejer en resorte de la manera siguiente (primera hilera = lado revés): tejer (2 reveses, 2 derechos) hasta que resten 2 puntos, tejer 2 reveses. Tejer derecho sobre derecho y revés sobre revés durante un total de 3 hileras. Tejer de la manera siguiente por el lado derecho: 2 derechos, 2 reveses, tejer 6-10-10-14 puntos jersey y aumentar 5 puntos distribuidos equitativamente sobre estos puntos – leer TIP PARA AUMENTAR, terminar con 2 reveses, 2 derechos = 19-23-23-27 puntos. Continuar con punto jersey sobre los puntos centrales y 4 puntos en resorte a cada lado. Al mismo tiempo, aumentar 1 punto después/antes de los puntos en resorte a cada lado a cada 2ª hilera un total de 7-7-8-8 veces = 33-37-39-43 puntos. Cuando la pieza mida 12-12-14-14 cm, montar 1 punto a cada lado, estos puntos se tejen en PUNTO MUSGO – leer descripción arriba = 35-39-41-45 puntos. Los puntos de orillo son utilizados al coser la espalda y el vientre entre sí. Cuando la pieza mida 27-31-35-41 cm, tejer punto jersey sobre todos los puntos, rematando puntos cada 2ª hilera para las patas delanteras de la manera siguiente: 5 puntos 1 vez, 1 punto 2-2-3-3 veces. Tejer 2 hileras y montar 2 puntos a cada lado (el fin de las aberturas para las patas delanteras) = 25-29-29-33 puntos. La pieza mide aprox. 33-37-42-48 cm. Colocar los puntos en un gancho auxiliar. VIENTRE: Montar 8-8-16-16 puntos con agujas de doble punta tamaño 6 mm y DROPS Snow. Tejer de la manera siguiente por el lado revés: 1 punto de orillo en punto musgo, (2 reveses, 2 derechos) hasta que resten 3 puntos, tejer 2 reveses y 1 punto de orillo en punto musgo. Continuar este resorte de ida y vuelta durante 15-17-20-26 cm. Insertar 1 marcador a cada lado, muestran dónde comienzan las aberturas para las patas delanteras y son utilizados en el ensamblaje. Continuar el resorte hasta que la pieza mida 20-24-28-35 cm. Ahora aumentar 1 punto después/antes del punto de orillo a cada lado, a cada 2ª hilera, 2 veces = 12-12-20-20 puntos – recordar el TIP PARA AUMENTAR – los nuevos puntos se tejen en resorte. El vientre mide aprox. 23-27-31-38 cm. CUELLO: Colocar los puntos del vientre y de la espalda en agujas de doble punta tamaño 6 mm, dividiéndolos de la manera siguiente: los 12-12-20-20 puntos del vientre en la primera aguja, los 25-29-29-33 puntos de la espalda divididos entre las otras 3 agujas = 37-41-49-53 puntos. Comenzar en el vientre: Tejer 1 punto jersey, tejer en resorte como antes sobre los 10-10-18-18 puntos siguientes, 1 punto jersey (primera aguja), tejer punto jersey y disminuir 1-1-5-5 puntos sobre los puntos de la espalda = 36-40-44-48 puntos. Tejer una pequeña elevación de la manera siguiente: * Tejer los 12-12-20-20 puntos en la primera aguja como antes, virar. Tejer de vuelta como antes, virar. Tejer 1 vuelta de resorte (2 reveses, 2 derechos) sobre todos los puntos *, tejer de *a* un total de 2-2-3-4 veces. Insertar 1 marcador – sirve para medir. Tejer en resorte en redondo sobre todos los puntos durante 5-7-8-10 cm. Rematar flojo. ENSAMBLAJE: Coser la espalda y el vientre juntos a cada lado de la pieza. Comenzar por el punto musgo montado y coser en el interior de este punto a lo largo del lado del vientre hasta los marcadores a cada lado. Los restantes centímetros en la espalda y en el vientre son para las patas delanteras. PATAS DELANTERAS: Levantar 24-28-28-32 puntos (múltiplo de 4) alrededor de la abertura para una de las patas delanteras, con agujas de doble punta tamaño 6 mm. Tejer en resorte en redondo (2 reveses, 2 derechos) durante 5-6-7-8 cm. Rematar flojo. Repetir alrededor de la otra abertura. |
|
¿Terminaste este patrón?Entonces, etiqueta tus fotos con #dropspattern o envíalas a la galería #dropsfan. ¿Necesitas ayuda con este patrón?Encontrarás 19 videos tutoriales, un espacio para comentarios/preguntas y más visitando la página del patrón en garnstudio.com © 1982-2026 DROPS Design A/S. Todos los derechos reservados. Este documento, incluyendo todas sus sub-secciones, está protegido por los derechos de autor (copyright). Lee más acerca de lo que puedes hacer con nuestros patrones en la parte de abajo de cada patrón de nuestro sitio. |
|


Con más de 40 años en el diseño de modelos de punto y de ganchillo, DROPS Design ofrece una de las más vastas colecciones de patrones gratuitos en el internet - traducidos en 17 idiomas. Al día de hoy, contamos con 324 catálogos y 12290 patrones - de los cuales 11675 están traducidos en español.
Nosotros trabajamos con mucho esmero para brindarte lo mejor que las labores de punto y ganchillo tienen para ofrecer,inspiración y consejos, así como hilos de magnífica calidad a precios increíbles! Te gustaría usar nuestros patrones para otro fin además del uso personal? Puedes leer acerca de lo que estás permitida a hacer en el texto de Copyright en la parte de abajo de todos nuestros patrones. Felices labores!
Escribe un comentario sobre DROPS Extra 0-81
¡Nos encantaría saber qué piensas acerca de este patrón!
Si quieres escribir una pregunta referente al patrón, por favor asegúrate de elegir la categoría correcta en el formulario debajo, para acelerar el proceso de respuesta. Los campos obligatorios están marcados con un *.