DROPS Snow
DROPS Snow
100% Wool
from 2.65 $ /50g
Get the yarn to make this pattern from 5.30$.

The yarn cost is calculated from the pattern’s smallest size and the yarn’s cheapest product type. Looking for an even better price? You might find it on the DROPS Deals!

DROPS SS24

Blue Shadow

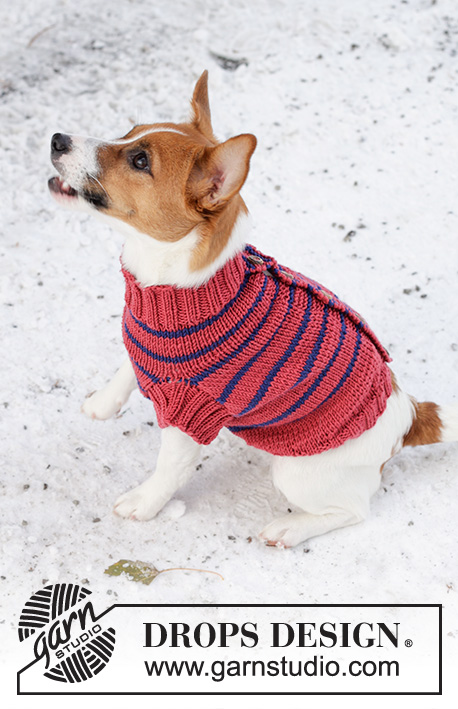
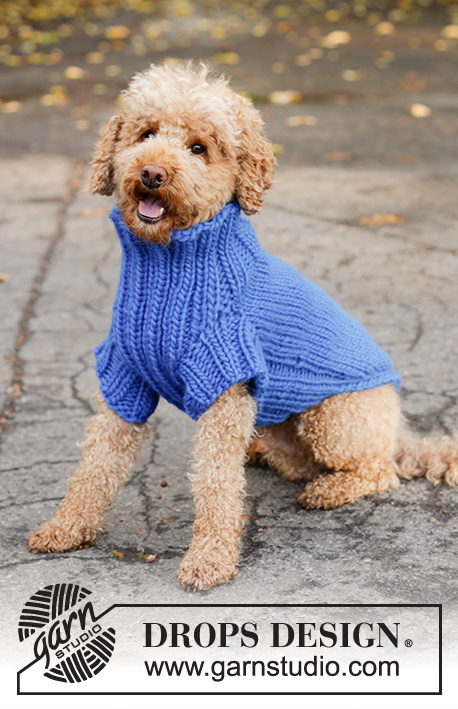
Knitted dog sweater in DROPS Snow. The piece is worked from the tail to the neck with stockinette stitch and rib. Sizes XS - L.

DROPS Extra 0-81
DROPS Pattern: ee-765
Yarn group E or C + C
--------------------------------------------------------
SIZE:
XS - S - M - L
Back-length: 34-38-44-50 cm = 13⅜"-15"-17¼"-19¾"
Chest: 34/38 - 42/46 - 52/56 - 58/62 cm = 13⅜"/15" – 16½"/18" – 20½"/22" – 22¾"/24⅜"
Examples of breeds:
XS = Chihuahua, S = Bichon Frisé, M = Cocker Spaniel, L = Small Boxer

YARN:
DROPS SNOW from Garnstudio (belongs to yarn group E)
150-200-200-200 g color 104, cobalt blue

NEEDLES:
DROPS SINGLE POINTED NEEDLES SIZE 7 MM = US 10,75
DROPS DOUBLE POINTED NEEDLES SIZE 6 MM = US 10

KNITTING GAUGE:
12 stitches in width and 16 rows in height with stockinette stitch = 10 x 10 cm = 4" x 4".
NOTE: Needle size is only a guide. If you get too many stitches on 10 cm = 4", change to a larger needle size. If you get too few stitches on 10 cm = 4", change to a smaller needle size.

-------------------------------------------------------

Alternative Yarn – See how to change yarns here
Yarn Groups A to F – Use the same pattern and change the yarn here
Yarn usage using an alternative yarn – Use our yarn converter here

-------------------------------------------------------

More like this:
Home Pets Dog Sweaters
DROPS Snow
DROPS Snow
100% Wool
from 2.65 $ /50g
Get the yarn to make this pattern from 5.30$.

The yarn cost is calculated from the pattern’s smallest size and the yarn’s cheapest product type. Looking for an even better price? You might find it on the DROPS Deals!

Pattern instructions

NOTE: This pattern is written in American English. All measurements in charts are in cm. For conversion from inches to cm - click here. There are different terms for crocheting in American and British English. If this pattern includes crochet, click for "crochet terms" here. For this pattern in British English, please click here.
-------------------------------------------------------

EXPLANATIONS FOR THE PATTERN:
-------------------------------------------------------

INCREASE TIP:
Increase by making 1 yarn over, which is worked twisted on the next row to avoid a hole. The new stitches are worked in stockinette stitch on the back and rib on the tummy.

GARTER STITCH (worked back and forth):
Knit all rows.

-------------------------------------------------------

START THE PIECE HERE:

-------------------------------------------------------

DOG SWEATER - SHORT OVERVIEW OF THE PIECE:
The piece is worked from the tail to the neck. The back and tummy are worked separately back and forth, then joined and the neck worked in the round. The back and tummy are sewn together to finish.

BACK:
Cast on 14-18-18-22 stitches with needles size 7 MM = US 10,75 and DROPS Snow.
Work rib as follows (first row = wrong side): work (purl 2, knit 2) until there are 2 stitches left, purl 2. Knit over knit and purl over purl for a total of 3 rows.
Work as follows from the right side: Knit 2, purl 2, work 6-10-10-14 stockinette stitches and increase 5 stitches evenly over these stitches - read INCREASE TIP, finish with purl 2, knit 2 = 19-23-23-27 stitches.
Continue with stockinette stitch over the middle stitches and 4 ribbed stitches on each side. At the same time, increase 1 stitch after/before the ribbed stitches on each side every 2nd row a total of 7-7-8-8 times = 33-37-39-43 stitches.
When the piece measures 12-12-14-14 cm = 4¾"-4¾"-5½"-5½", cast on 1 stitch on each side, these stitches are worked in GARTER STITCH – read description above = 35-39-41-45 stitches. The edge stitches are used when sewing the back and tummy together.
When the piece measures 27-31-35-41 cm = 10⅝"-12¼"-13¾"-16⅛", work stockinette stitch over all stitches, binding off stitches every 2nd row for the front legs as follows: 5 stitches 1 time, 1 stitch 2-2-3-3 times. Work 2 rows and cast on 2 stitches on each side (the end of the openings for the front legs) = 25-29-29-33 stitches. The piece measures approx. 33-37-42-48 cm = 13"-14½"-16½"-19". Place the stitches on a stitch holder.

TUMMY:
Cast on 8-8-16-16 stitches with double pointed needles size 6 MM = US 10 and DROPS Snow.
Work as follows from the wrong side: 1 edge stitch in garter stitch, (purl 2, knit 2) until there are 3 stitches left, purl 2 and 1 edge stitch in garter stitch.
Continue this rib back and forth for 15-17-20-26 cm = 6"-6¾"-8"-10¼". Insert 1 marker in each side, which show where the openings for the front legs start and are used when assembling. Continue the rib until the piece measures 20-24-28-35 cm = 8"-9½"-11"-13¾".
Now increase 1 stitch after/before the edge stitch on each side every 2nd row, 2 times = 12-12-20-20 stitches – remember INCREASE TIP – the new stitches are worked in rib. The tummy measures approx. 23-27-31-38 cm = 9"-10⅝"-12¼"-15".

NECK:
Place the stitches from the tummy and the back on double pointed needles size 6 MM = US 10, dividing them as follows: Tummy’s 12-12-20-20 stitches on the first needle, the 25-29-29-33 back-stitches divided between the 3 other needles = 37-41-49-53 stitches. Start on the tummy: Work 1 stockinette stitch, rib as before over the next 10-10-18-18 stitches, 1 stockinette stitch (first needle), work stockinette stitch and decrease 1-1-5-5 stitches over the back-stitches = 36-40-44-48 stitches.
Work a small elevation as follows: * Work the 12-12-20-20 stitches on the first needle as before, turn. Work back as before, turn. Work 1 round of rib (purl 2, knit 2) over all stitches *, work from *-* a total of 2-2-3-4 times. Insert 1 marker to measure from. Work rib in the round over all stitches for 5-7-8-10 cm = 2"-2¾"-3⅛"-4". Loosely bind off.

ASSEMBLY:
Sew the back and tummy together on each side. Start where the 1 garter stitch was cast on and sew inside this stitch along the side of the tummy as far as the markers on each side. The remaining cms on the back and tummy are for the front legs.

FRONT LEGS:
Knit up 24-28-28-32 stitches (divisible by 4) around the opening for the front leg, with double pointed needles size 6 MM = US 10. Work rib in the round (purl 2, knit 2) for 5-6-7-8 cm = 2"-2⅜"-2¾"-3⅛". Loosely bind off.
Repeat around the other opening.

This pattern has been corrected.

Updated online: 13.10.2023
The pattern has been reviewed and rephrased.
Updated online: 23.02.2024
The pattern is updated. Correction on neck in size M and L.
Do you have a question? See a list of frequently asked questions (FAQ)

Knitting tension is what determines the final measurements of your work, and is usually measured per 10 x 10 cm. It is provided like so: number of stitches in width x number of rows in height - eg: 19 stitches x 26 rows = 10 x 10 cm.

The knitting tension is very individual; some people knit/crochet loosely while others work tightly. You adjust the knitting tension with the needle size, which is why the suggested needle size only serve as a guide! You need to adjust this (up or down) to ensure that YOUR knitting tension matches the knitting tension provided in the pattern. If you work with a different knitting tension than provided you will have a different yarn consumption, and your work will have different measurements than what the pattern suggests.

The knitting tension also determines which yarns can replace each other. As long as you achieve the same knitting tension you can replace one yarn with another.

See DROPS lesson: How to measure your tension/gauge

See DROPS video: How to make a gauge tension swatch

The required amount of yarn is provided in grams, eg: 450 g. To calculate how many balls you’ll need you first need to know how many grams are in 1 ball (25g, 50g or 100g). This information is available if you click on the individual yarn quality on our pages. Divide the amount required with the amount of each ball. For example, if each ball is 50g (the most common amount), the calculation will be as follows: 450 / 50 = 9 balls.

The important thing when changing from one yarn to another is that the knitting/crochet tension remains the same. This is so that the measurements of the finished piece will be the same as on the sketch provided. It is easier to achieve the same knitting tension using yarns from the same yarn group. It is also possible to work with multiple strands of a thinner yarn to achieve the knitting tension of a thicker one. Please try our yarn converter. We recommend you to always work a test swatch.

Please NOTE: when changing yarn the garment might have a different look and feel to the garment in the photo, due to individual properties and qualities of each yarn.

See DROPS lesson: Can I use a different yarn than the one mentioned in the pattern?

All our yarns are categorised into yarn groups (from A to F) according to thickness and knitting tension – group A contains the thinnest yarns and group F the thickest. This makes it easier for you to find alternative yarns to our patterns, should you wish to switch yarn. All yarns within the same group have a similar knitting tension and can easily replace each other. However, different yarn qualities have different structures and properties which will give the finished work a unique look and feel.

Click here for an overview of the yarns in each yarn group

At the top of all our patterns you’ll find a link to our yarn converter, which is a helpful tool should you wish to use a different yarn than suggested. By filling in the yarn quality you wish to replace, the amount (in your size) and number of strands, the converter will present good alternative yarns with the same knitting tension. Additionally it will tell you how much you’ll require in the new qualities and whether you’ll need to work with multiple strands. Most skeins are 50g (some are 25g or 100g).

If the pattern is worked with multiple colours, every colour will have to be converted separately. Similarly, if the pattern is worked with several strands of different yarns (for example 1 strand Alpaca and 1 strand Kid-Silk) you will have to find alternatives for each, individually.

Click here to see our yarn converter

Since different yarns have different qualities and textures we have chosen to keep the original yarn in our patterns. However, you can easily find options among our available qualities by using our yarn converter, or simply pick a yarn from the same yarn group.

It is possible that some retailers still have discontinued yarns in stock, or that someone has a few skeins at home that they would like to find patterns for.

The yarn converter will provide both alternative yarn as well as required amount in the new quality.

If you think it's hard to decide what size to make, it can be a good idea to measure a garment you own already and like the size of. Then you can pick the size by comparing those measures with the ones available in the pattern's size chart.

You'll find the size chart at the bottom of the pattern.

See DROPS lesson: How to read size chart

The needle size provided in the pattern serves only as a guide, the important thing is to follow the knitting tension. And since knitting tension is very individual, you will have to adjust the needle size to ensure that YOUR tension is the same as in the pattern – maybe you’ll have to adjust 1, or even 2 needle sizes, up or down to achieve the correct tension. For this, we recommend that you work test swatches.

Should you work with a different knitting tension than the one provided, the measurements of the finished garment might deviate from the measurement sketch.

See DROPS lesson: How to measure your tension/gauge

See DROPS video: How to make a gauge tension swatch

Working a garment top-down provides more flexibility and room for personal adjustment. For example it is easier to try the garment on while working, as well as making adjustments to length of yoke and shoulder caps.

The instructions are carefully explaining every step, in the correct order. Diagrams are adjusted to the knitting direction and are worked as usual.

The diagram depicts all rows/rounds, and every stitch seen from the right side. It is read from bottom to top, from right to left. 1 square = 1 stitch.

When working back and forth, every other row is worked from the right side and every other row is worked from the wrong side. When working from the wrong side, the diagram will have to be worked reversed: from left to right, knit stitches are purled, purl stitches are knit etc.

When working in the round every round is worked from the right side and the diagram are worked from right to left on all rounds.

See DROPS lesson: How to read knitting diagrams

The diagram depicts all rows/rounds, and every stitch seen from the right side. It is worked from bottom to top, from right to left.

When working back and forth every other row is worked from the right side: from right to left and every other row is worked from the wrong side: from left to right.

When working in the round, every row in the diagram are worked from the right side, from right to left.

When working a circular diagram you start in the middle and work your way outwards, counter clockwise, row by row.

The rows usually start with a given number of chain stitches (equivalent to the height of the following stitch), this will either be depicted in the diagram or explained in the pattern.

See DROPS lesson: How to read crochet diagrams

Instructions for working several diagrams after each other on the same row/round, will often be written like so: “work A.1, A.2, A.3 a total of 0-0-2-3-4 times". This means you work A.1 once, then A.2 is worked once, and A.3 is repeated (in width) the number of times provided for your size – in this case like so: S = 0 times, M = 0 times, L=2 times, XL= 3 times and XXL = 4 times.

The diagrams are worked as usual: begin with the first row in A.1, then work the first row in A.2 etc.

See DROPS lesson: How to read knitting diagrams

See DROPS lesson: How to read crochet diagrams

The total width of the garment (from wrist-to-wrist) will be larger in the larger sizes, despite the actual sleeves being shorter. The larger sizes have longer sleeve caps and wider shoulders, so there will be a good fit in all sizes.

The measurement sketch/schematic drawing provides information regarding the full length of the garment. If it’s a jumper or a jacket the length is measured from the highest point on the shoulder (usually closest to the neckline), and straight down to the bottom of the garment. It is NOT measured from the tip of shoulder. Similarly, the length of yoke is measured from the highest point on the shoulder and down to where yoke is split into body and sleeves.

See DROPS lesson: How to read a schematic drawing

Diagrams are often repeated on the round or in height. 1 repeat is the diagram the way it appears in the pattern. If it says to work 5 repeats of A.1 in the round, then you work A.1 a total of 5 times after/next to each other in the round. If it says to work 2 repeats of A.1 vertically/in height you work the entire diagram once, then begin again at the start and work the entire diagram one more time.

Chain stitches are slightly narrower than other stitches and to avoid working the cast-on edge too tight, we simply chain more stitches to begin with. The stitch count will be adjusted on the following row to fit the pattern and measurement sketch.

The rib edge is more elastic and will contract slightly compared to, for example, stocking stitch. By increasing before the rib edge, you avoid a visible difference in width between the rib edge and the rest of the body.

It’s very easy to cast off too tightly, and by making yarn overs while casting off (and simultaneously casting these off) you avoid a too tight cast off edge.

See DROPS video: How to bind off with yarn overs (yo)

To achieve an even increase (or decrease) you can increase on, for example: every 3rd and 4th row alternately, like so: work 2 rows and increase on the 3rd row, work 3 rows and increase on the 4th. Repeat this until the increase is complete.

See DROPS lesson: Increase or decrease 1 st on every 3rd and 4th row alternately

Should you prefer to work in the round instead of back and forth, you may of course adjust the pattern. You’ll need to add steeks mid-front (usually 5 stitches), and follow the instructions. When you would normally turn and work from the wrong side, simply work across the steek and continue in the round. At the end you’ll cut the piece open, pick up stitches to work bands, and cover the cut edges.

See DROPS video: How to knit steeks and cut open

Should you prefer to work back and forth instead of in the round, you may of course adjust the pattern so you work the pieces separately and then assemble them at the end. Divide the stitches for the body in 2, add 1 edge stitch in each side (for sewing) and work the front and back pieces separately.

See DROPS lesson: Can I adapt a pattern for circular needles into straight needles?

Pattern repeats can vary slightly in the different sizes, in order to get the correct proportions. If you’re not working the exact same size as the garment in the photo, yours might deviate slightly. This has been carefully developed and adjusted so that the complete impression of the garment is the same in all sizes.

Make sure to follow instructions and diagrams for your size!

If you have found a pattern you like which is available in women’s size it’s not very difficult to convert it to men’s size. The biggest difference will be the length of sleeves and body. Start working on the women size that you think would fit across the chest. The additional length will be worked right before you cast off for the armhole/sleeve cap. If the pattern is worked top-down you can add the length right after the armhole or before the first decrease on sleeve.

Regarding additional yarn amount, this will depend on how much length you add, but it is better with a skein too many than too few.

All yarns will have excess fibres (from production) that might come off as lint or shedding. Brushed yarns (ie hairier yarns) have more of these loose, excess fibres, causing more shedding.

Shedding also depends on what is worn under or over the garment, and whether this pulls at the yarn fibres. It’s therefore not possible to guarantee that there will be no shedding

Below are some tips on how to get the best result when working with hairier yarns:

1. When the garment is finished (before you wash it) shake it vigorously so the looser hairs come off. NOTE: do NOT use a lint roller, brush or any method that pulls at the yarn.

2. Place the garment in a plastic bag and put it in your freezer - the temperature will cause the fibres to become less attached to each other, and excess fibres will come off easier.

3. Leave in the freezer for a few hours before taking it out and shaking it again.

4. Wash the garment according to the instructions on the yarn label.

Pilling is a natural process that happens to even the most exclusive of fibers. It's a natural sign of wear and tear that is hard to avoid, and that is most visible in high friction areas of your garment like a sweater's arms and cuffs.

You can make your garment look as new by removing the pilling, using a fabric comb or a pill/lint remover.

Still can't find the answer you need? Then scroll down and leave your question so one of our experts can try to help you. This will be done normally within 5 to 10 working days.
In the meantime, you can read the questions and answers that others have left to this pattern or join the DROPS Workshop on Facebook to get help from fellow knitters/crocheters!

You might also like...

Post a comment to pattern DROPS Extra 0-81

We would love to hear what you have to say about this pattern!

If you want to leave a question, please make sure you select the correct category in the form below, to speed up the answering process. Required fields are marked *.

Comments / Questions (33)

country flag Betty Dooper wrote:

Ik zoek Colour 84 pauwblauw.Drops snow mix

17.04.2024 - 16:06

DROPS Design answered:

Dag Betty,

Het bestellen van garens gaat via een van de verkooppunten die onze artikelen verkopen; wij verkopen geen garens via de site. Via deze link vind je een lijst met verkooppunten.

17.04.2024 - 21:47

country flag Susanne Bøttern wrote:

Jeg strikker størrelse L

09.01.2024 - 16:40

country flag Susanne Bøttern wrote:

Kunne I lave et diagram eller tegning af modellen ? Synes teksten til opskriften er svær at forstå. Fx ryggen ; tag ud på hvet 2 p xx gange til xx masker. Når arb. Måler 14 cm tages ud igen til samme antal m ????

08.01.2024 - 18:22

DROPS Design answered:

Hej Susanne, hvilken størrelse strikker du, så kan vi hjælpe dig...

09.01.2024 - 15:39

country flag Anne wrote:

Hej. Jeg er ved at strikke str L, men forstår ikke instruktioner til udtagning i ryg. Der stå at udtagning på 5 m skal gentages 8 gange i glatstrik = 43m. Dette skulle være inklusive 4 m i hver side i rib. Men 8 gange 5m i udtagning giver 40m + oprindelige 14 m glatstrik + 4m i rib = 58m?

04.01.2024 - 18:26

DROPS Design answered:

Hej Anne, de 5 masker som tages ud jævnt fordelt, tages kun ud én gang. Udtagningen i hver side (indenfor de 4 m rib) gøres på hver 2.pind ialt 8 gange :)

09.01.2024 - 15:25

country flag Winnie wrote:

Hi , I am confused over the section under “ Neck” . Total no of stitches for the M size is 49 ie. 20 for Tummy and 29 for Back. I have placed all stitches ( tummy and back ) on a circular needle but do not understand how decreasing 1 stitch at back results in a total of 44 stitches. Decrease at beg or end of row of back? Also what does make an elevation mean? Please advise, thanks 🙏

13.11.2023 - 14:03

country flag Sabina wrote:

Bei der alten Anleitung welche ich angeschaut hatte war Nadelstärke 9 angegeben. Daraufhin hab ich die Materialien bestellt. Nun müsste ich die Nadelstärken für diese Anleitung auch wieder neu bestellen. Meine Frage war, gibt es im Archiv noch die alte Anleitung vor der Änderung, welche noch am 18.10.2023 online war? Besten Dank

25.10.2023 - 16:25

DROPS Design answered:

Liebe Sabrina, diese Anleitung wurde aktualisiert, dh besser erklärt, die alte ist dann nicht mehr nötig /verfügbar. Viel Spaß beim stricken!

26.10.2023 - 06:35

country flag Sabina wrote:

Hallo Ich hab am 18. Okotber 2023 die Anleitung angeschaut und hab mir daraufhin das Material bestellt. Nun wurde aber die Anleitung abgändert und ich sitz nun hier mit Nadelstärke 9. Wäre es möglich noch irgendwo die alte Anleitung zu bekommen? Besten Dank

25.10.2023 - 09:29

DROPS Design answered:

Liebe Sabina, hier braucht man Nadeln Nr 6 und 7 - beachten Sie daß Ihre Maschenprobe stimmt: 12 M x 16 Reihen glatt mit Nadeln Nr 7 (Größe anpassen, wenn nötig ist). Viel Spaß beim stricken!

25.10.2023 - 15:17

country flag Nathalie wrote:

Bonjour, et merci d'avance pour votre aide. je suis complètement perdue dans les explications pour le col. Quand vous dites " tourner et tricoter le rang suivant en côtes, tourner de nouveau et tricoter un tour complet". Tourner, ça veut dire passer à l'aiguille suivante ? ou bien tourner l'ouvrage pour repartir dans l'autre sens ? Je crois que c'est ce terme de "tourner" qui me bloque, Merci encore de votre aide

27.01.2023 - 16:12

DROPS Design answered:

Bonjour Nathalie, vous *tricotez d'abord les mailles de l'aiguille n°1 sur l'endroit, puis vous tournez et tricotez ces mailles encore une fois (sur l'envers), tournez et tricotez toutes les mailles du tour (sur l'endroit).*. Tricotez 2 tours sur toutes les mailles et répétez de *-* . Bon tricot!

30.01.2023 - 08:12

country flag Jane Wingquist wrote:

I’m at the end of the stomach piece (12” and 20 sts) ; how long do I keep knitting at this point? Do I stop at that point or continue till piece measures the same as the back piece?

07.11.2022 - 01:41

DROPS Design answered:

Hi Jane, The back and tummy pieces are now both placed on the double pointed needles and joined together working in the round (the stomach piece is shorter than the back piece), as described under Neck. Happy knitting!

07.11.2022 - 07:41

country flag Vivian Ip wrote:

In this section, "Cast on 8 (includes 1 edge st each side worked in garter st)... 1st row (= WS): K1, work rib *K2, P2*, start and end with K2, end row with K1. 1) Does that mean that I actually cast on 10? 2) How can it end with K2, if I have 8 or 10? The K2, P2 pattern means that I would end with K2, P2, K1.

02.10.2022 - 04:53

DROPS Design answered:

Dear Vivian, the 8 stitches already include the edge stitches. So you only need to cast on 8 stitches. On the 1st row, work: K1, K2, P2, K2, K1. Happy knitting!

03.10.2022 - 00:45