
Categorías populares
¿Buscas un hilo?


Comentarios / Preguntas (121)
![]() Romina B escribió:
Romina B escribió:
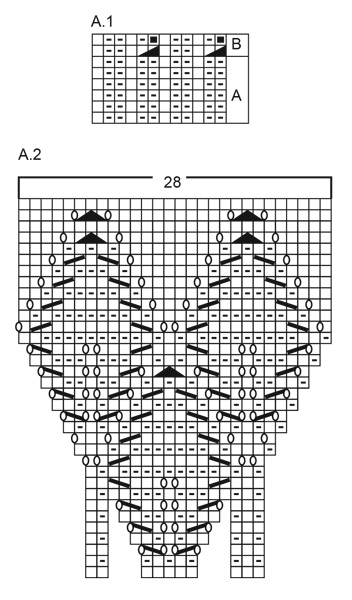
Los diagramas como se leen ? De a bajo hacia arriba? Derecha izquierda? En el diagrama A1 b se debe empezar tejiendo con dos puntos juntos al revés? O se lee del otro lado? Y A2? La primera fila se hacen todos los puntos en derecho , luego la segunda fila, revés, derecho, revés? Estoy algo confundida...
23.07.2024 - 01:27DROPS Design respondió:
Hola Romina, puedes leer más información sobre cómo trabajar nuestros diagramas en la siguiente lección:https://www.garnstudio.com/lesson.php?id=68&cid=23. Este patrón se trabaja en redondo, por lo que todas las filas se ven por el lado derecho, como se trabajan, y se leen de derecha a izquierda y de arriba abajo. A.1b comienza con: 2 puntos juntos de revés, derecho, 2 reveses, derecho; y se repite de este modo. En A.2 comienzas con una vuelta de derecho, la siguiente es de elástico: 1 derecho, 1 revés.
18.08.2024 - 20:16
![]() Catalina M escribió:
Catalina M escribió:
Hola, el patrón A2 cómo se lee? De izquierda a derecha o derecha izquierda? Por lo que veo también, el patrón está volteado en los ejemplos y hay muchos espacios en las primeras filas, que punto corresponde en esos espacios? Podrían dejar indicaciones al lado de la foto?
22.07.2024 - 18:02DROPS Design respondió:
Hola Catalina, puedes leer más información en la siguiente lección:https://www.garnstudio.com/lesson.php?id=68&cid=23. Este patrón se trabaja en redondo, por lo que todas las filas se ven por el lado derecho, como se trabajan y se leen de derecha a izquierda y de arriba abajo. En las primeras filas tienes huecos para alinear el patrón posteriormente, pero los ignoras al trabajar; pasas a la siguiente instrucción del diagrama.
18.08.2024 - 20:12
![]() Romina escribió:
Romina escribió:
Tengo la duda el patrón se lee de derecha a izquierda o de izquierda a derecha ? El A2 por favor 🙏🏻
22.07.2024 - 17:41DROPS Design respondió:
Hola Romina, puedes leer más información en la siguiente lección:https://www.garnstudio.com/lesson.php?id=68&cid=23. Este patrón se trabaja en redondo, por lo que todas las filas se ven por el lado derecho, como se trabajan y se leen de derecha a izquierda y de arriba abajo.
18.08.2024 - 20:13
![]() Susu escribió:
Susu escribió:
How do you knit the A2 chart? Do I knit the 10 stitches together, or do I create stitches in the spaces where there are no squares? Because they are very far apart 🥺
21.07.2024 - 06:12DROPS Design respondió:
Dear Susu, there are spaces in the diagram on the first rows because the increases are not done yet, so start with the 10 sts (skip the spaces) until you have increased all stitches filling the spaces (= 16 sts in each A.2) then continue increasing as shown in diagram until there are 28 sts in each A.2. Happy knitting!
29.07.2024 - 10:33
![]() Catalina M escribió:
Catalina M escribió:
El patrón A2 está al revés ? Comparado con las fotos de ejemplo debo darlo vuelta ? Porque no se parecen, especifiquen bien el dibujo por favor
21.07.2024 - 03:54DROPS Design respondió:
Hola Catalina, el patrón A.2 está correcto; comienzas a trabajar desde abajo hacia arriba; puedes ver más información en la siguiente lección: https://www.garnstudio.com/lesson.php?id=68&cid=23. De esta forma, en la parte superior tienes la hoja de la que obtienes 2 hojas posteriormente, al aumentar en el canesú, tal y como se ve en la foto.
18.08.2024 - 20:09
![]() Lucia escribió:
Lucia escribió:
En el patrón A2 talla L la segunda fila no alcanzo hacer el patrón completo… ya casi al finalizar me quedo con 24 puntos no hago los 28 y de 96 puntos quedé en 80 puntos. El diagrama está bien? Ya que entran 2 figuras de hojas en los 28 pts iniciales, me queda 28 +28+24 no debería ser 28+28+28?
20.07.2024 - 03:26DROPS Design respondió:
Hola Lucia, recuerda que los diagramas se leen de abajo arriba; puedes ver más información en la siguiente lección: https://www.garnstudio.com/lesson.php?id=68&cid=23. En la primera fila de A.2 tienes 10 pts, así que en 80 pts puedes repetir el diagrama 8 veces. Los huecos los ignoras (son para alinear el patrón posteriormente); pasas a la siguiente instrucción del diagrama.
18.08.2024 - 20:07
![]() Aran escribió:
Aran escribió:
En que momento se unen los puntos? No lo especifica las instrucciones… cuando comienzo el cuello debo unirlo para que quede un cuello redondo? O en que momento? Se me hace difícil unirlo con 72 puntos pueden explicarlo?
14.07.2024 - 17:29DROPS Design respondió:
Hola Aran, la labor se trabaja en redondo, con una aguja circular corta y una aguja circular larga para el canesú y el cuerpo. Como puede ser incómodo unir los 72 puntos con una aguja circular larga, se recomienda usar una corta en el cuello, para que sea más fácil unir. En caso contrario, puedes montar con agujas de doble punta o con la técnica anillo mágico para hacer la unión de forma más sencilla. La unión se hace desde el principio, la 1ª vuelta del cuello.
21.07.2024 - 17:30
![]() Susu escribió:
Susu escribió:
Para la talla L, los puntos iniciales en el cuello son de 72 pts? y debo aumentar en 24 pts. Cómo se van distribuyendo los aumentos en este tejido?
13.07.2024 - 19:01DROPS Design respondió:
Hola Susu, sí, para la talla L comienzas con 72 pts. Trabajas 4 cm del elástico y luego, en 1 vuelta de derecho, aumentas 24 puntos (en la misma vuelta todos). Reparte estos puntos según el TIP PARA LOS AUMENTOS (repartidos). Como tienes 72 puntos iniciales, aumenta 1 punto después de cada 3º pt.
21.07.2024 - 17:33
![]() Angelique Fourie escribió:
Angelique Fourie escribió:
In diagram A.2., do i start at the bottom of the diagram? What do i do with the blank spaces? Do i just carry on to the next small square?
03.07.2024 - 13:20DROPS Design respondió:
Dar Mrs Fourie, just skip the white spaces, they are there for technical reasons, as new stitches will be increased afterwards, so first row in A.2 is worked and repeat over 10 sts. Happy knitting!
03.07.2024 - 15:56
![]() Martine Josien escribió:
Martine Josien escribió:
Je ne parviens pas à faire 7 motifs de 10 mailles sur A2 on a bien 70 mailles,mais le motif en fait 14
28.06.2024 - 17:37DROPS Design respondió:
Bonjour MmeJosien, le diagramme A.2 se tricote au 1er rang sur 10 mailles: 3 m end + 5 m end + 2 m end, les espaces ente ces groupes de mailles correspondent aux augmentations qui seront faites par la suite, on garde ainsi les 3 premières et les 3 dernière mailles alignées. Bon tricot!
01.07.2024 - 07:59
|
|||||||||||||||||||||||||
Autumn Wreath#autumnwreathsweater |
|||||||||||||||||||||||||
 |
 |
||||||||||||||||||||||||
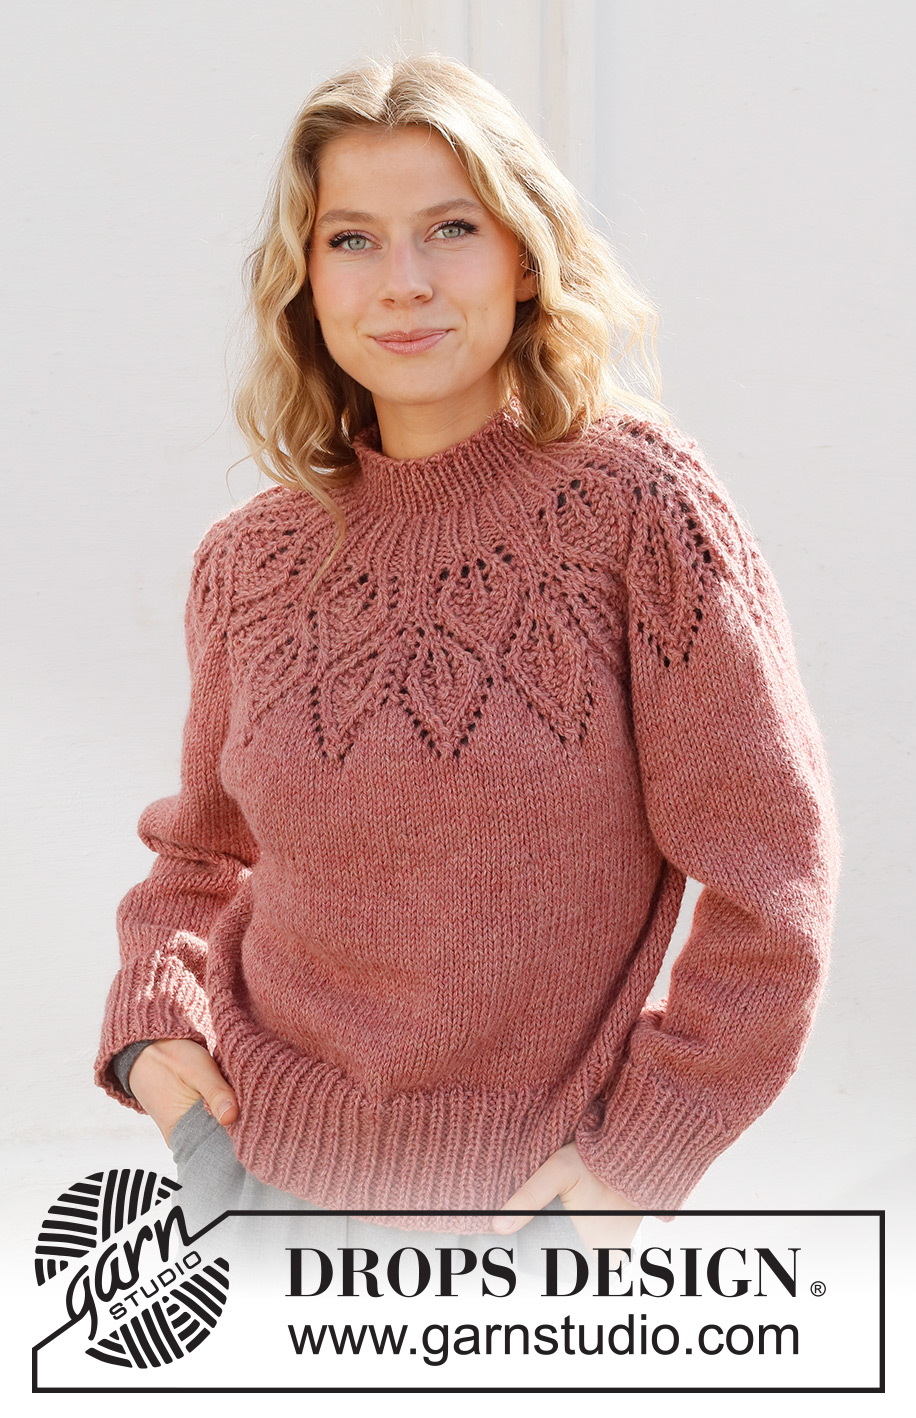
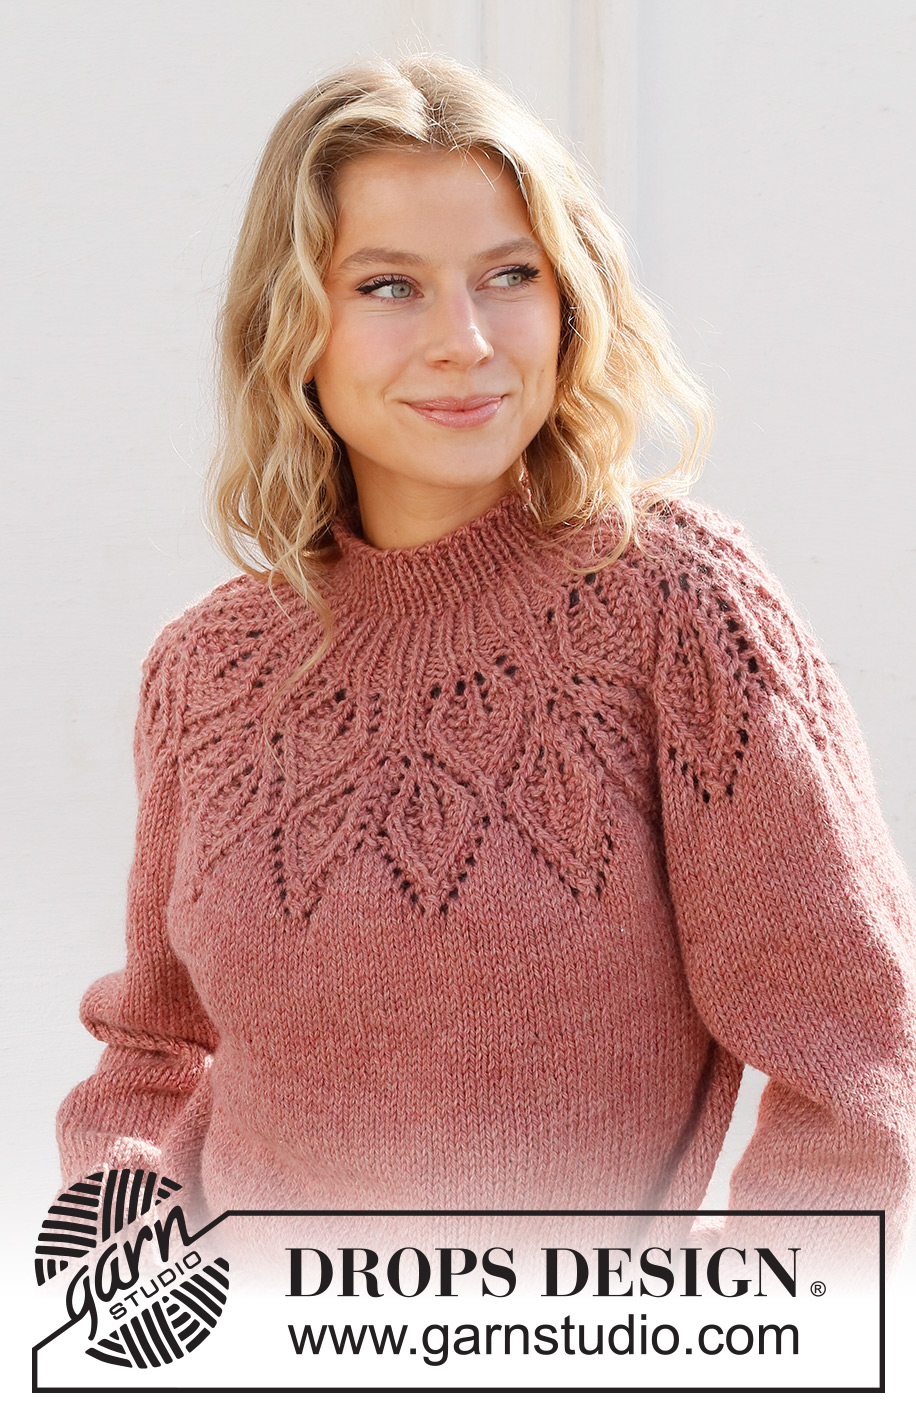
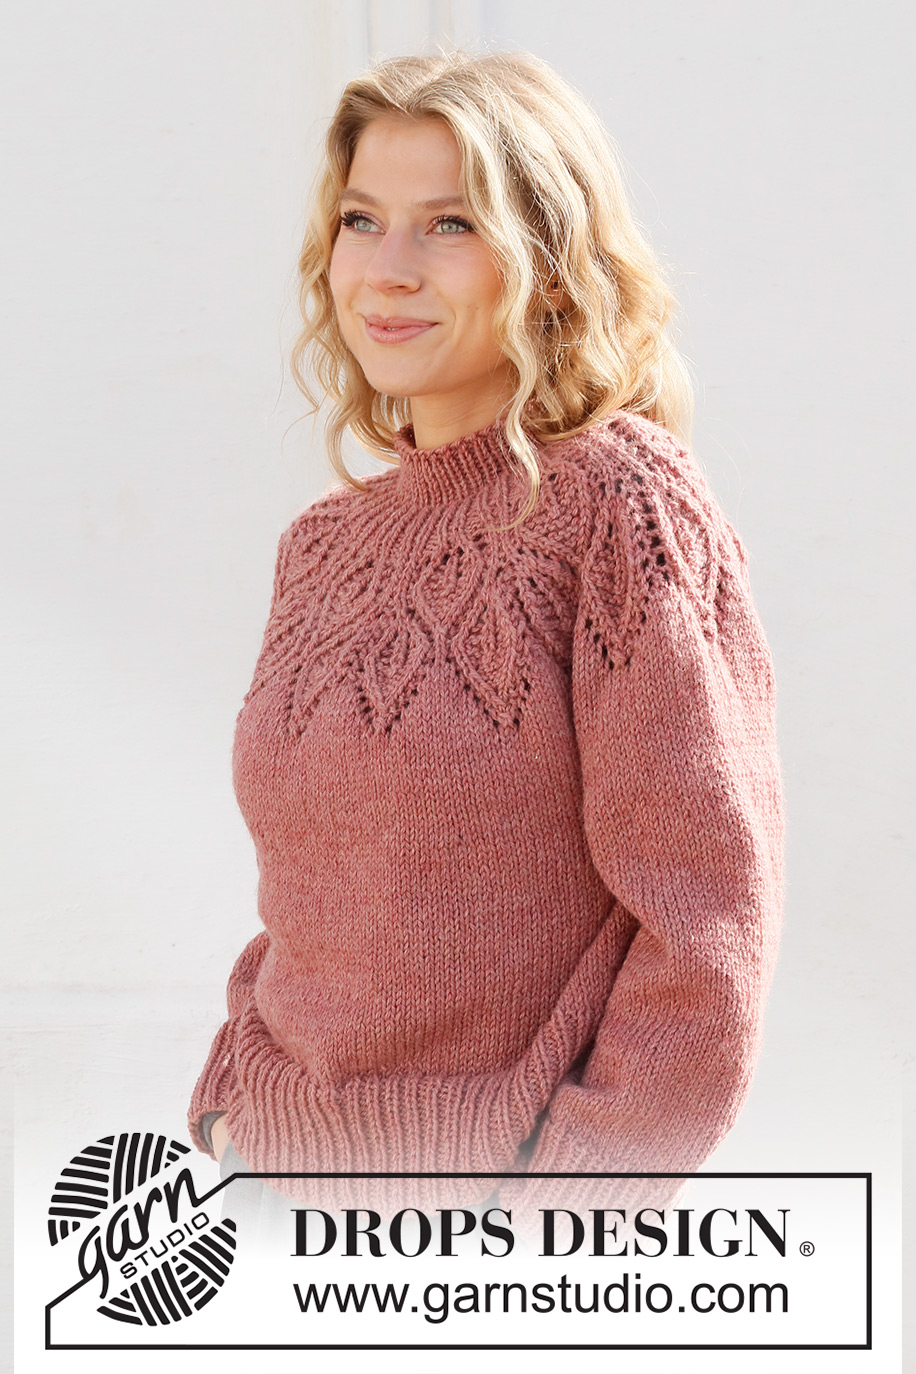
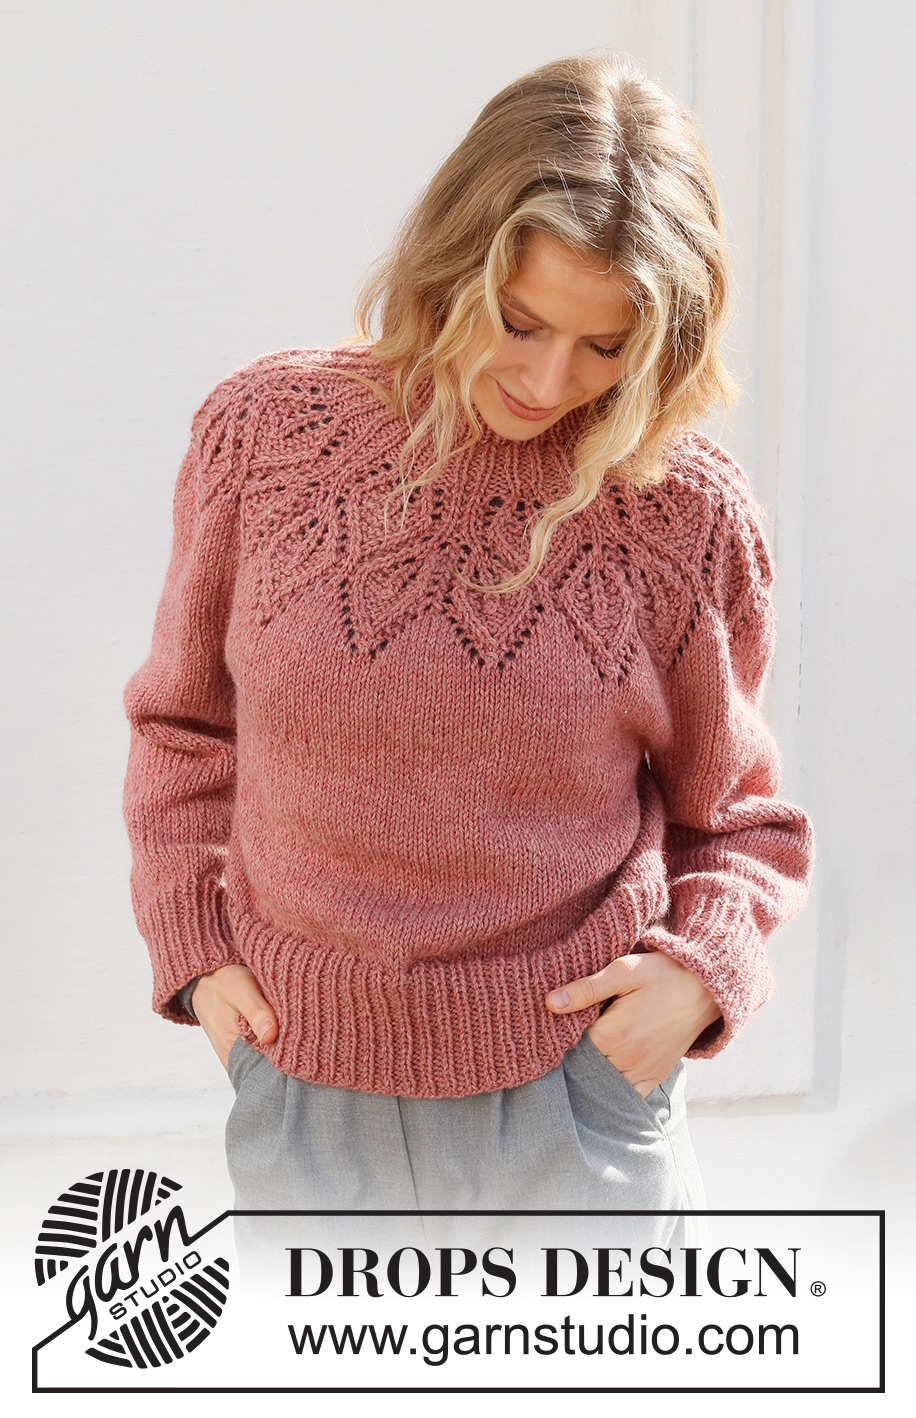
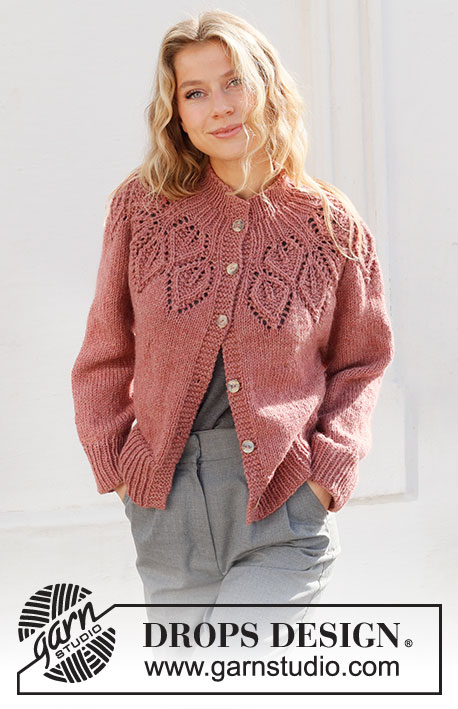
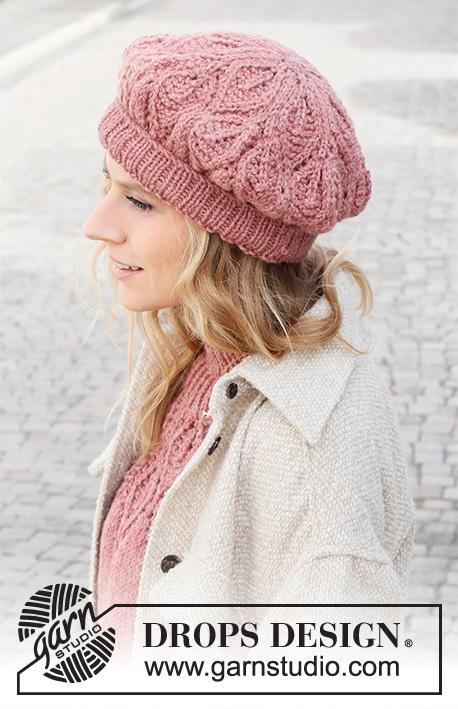
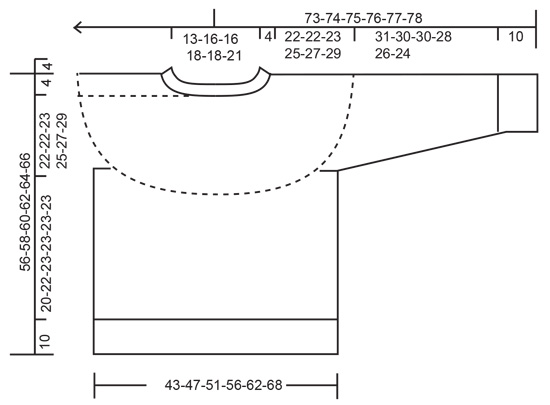
Jersey a punto en DROPS Nepal. La labor está realizada de arriba abajo con el canesú redondo y el patrón de hojas. Tallas: S - XXXL
DROPS 228-1 |
|||||||||||||||||||||||||
|
EXPLICACIONES PARA REALIZAR LA LABOR: ------------------------------------------------------- PATRÓN: Ver los diagramas A.1 y A.2 TIP PARA LOS AUMENTOS (repartidos): Para calcular cómo aumentar puntos repartidos, usar el número total de puntos en la aguja (p.e. 64 puntos) y dividir los puntos entre el número de aumentos a trabajar (p.e.20) = 3.2 En este ejemplo, aumentar haciendo 1 hebra después daprox. cada 3º punto. TIP PARA LAS DISMINUCIONES (aplicar a las mangas): Disminuir 1 punto a cada lado del marcapuntos como sigue: Trabajar hasta que queden 3 puntos antes del marcapuntos y trabajar 2 puntos juntos de derecho, 2 derechos (el marcapuntos se encuentra entre estos puntos), deslizar 1 punto como de derecho, 1 derecho, pasar el punto deslizado sobre el punto trabajado (2 puntos disminuidos) TIP PARA EL REMATE: Para evitar que el borde de remate quede tenso al cerrar, se puede usar una aguja más grande. Si sigue demasiado tenso, hacer 1 hebra después de aprox. cada 6º punto y al mismo tiempo cerrar (las hebras se cierran como puntos normales). ------------------------------------------------------- COMENZAR LA LABOR AQUÍ: ------------------------------------------------------- JERSEY - RESUMEN DE LA LABOR: El cuello y el canesú se trabajan en redondo con una aguja circular, desde el centro de la espalda y de arriba abajo. El canesú se divide para el cuerpo y las mangas y el cuerpo se continua en redondo con una aguja circular. Las mangas se trabajan en redondo con agujas de doble punta/una aguja circular corta, de arriba abajo. CUELLO: Montar 64-68-72-76-80-84 puntos con una aguja circular corta de 4.5 mm y en DROPS Nepal. Trabajar 1 vuelta de derecho, después trabajar el elástico (1 derecho, 1 revés) 4 cm. Trabajar 1 vuelta de derecho y al mismo tiempo aumentar 20-28-24-32-28-36 puntos repartidos – leer TIP PARA LOS AUMENTOS = 84-96-96-108-108-120 puntos. Insertar 1 marcapuntos en la vuelta; el canesú se mide desde este marcapuntos. CANESÚ: Trabajar A.1A sobre todos los puntos (= 7-8-8-9-9-10 repeticiones de 12 puntos) 4 cm, después trabajar A.1B (= 2 vueltas). Ahora hay 70-80-80-90-90-100 puntos. Cambiar a una aguja circular de 5.5 mm. Ahora trabajar A.2 sobre A.1 (= 7-8-8-9-9-10 repeticiones de 10 puntos). RECORDAR MANTENER LA MISMA TENSIÓN DEL TEJIDO. Cuando se haya completado A.2 en vertical hay 196-224-224-252-252-280 puntos y la labor mide aprox. 20 cm desde el marcapuntos. Trabajar 1 vuelta de derecho y al mismo tiempo aumentar 18-11-27-27-47-42 puntos repartidos = 214-235-251-279-299-322 puntos. Continuar con punto jersey hasta que la labor mida 22-22-23-25-27-29 cm. En la siguiente vuelta dividir para el cuerpo y las mangas como sigue: Trabajar los primeros 30-33-35-39-43-48 puntos (= mitad de la espalda), deslizar los siguientes 46-50-54-60-62-64 puntos en 1 gancho auxiliar para la manga, montar 8-8-10-10-12-12 puntos (= en el lado bajo la manga), trabajar los siguientes 62-69-73-81-89-98 puntos (= delantero), deslizar los siguientes 46-50-54-60-62-64 puntos a 1 gancho auxiliar para la manga, montar 8-8-10-10-12-12 puntos (= en el lado bajo la manga), trabajar los últimos 30-33-35-39-43-48 puntos (= mitad de la espalda). El cuerpo y las mangas se finalizan por separado. AHORA MEDIR LA LABOR DESDE AQUÍ! CUERPO: = 138-151-163-179-199-218 puntos. Continuar con punto jersey en redondo hasta que la labor mida 20-22-23-23-23-23 cm. Quedan 10 cm hasta las medidas finales: probarse el jersey y trabajar hasta el largo deseado. Para evitar que el elástico que se trabaja a continuación quede tenso, trabajar 1 vuelta de derecho y al mismo tiempo aumentar 24-26-29-31-35-37 puntos repartidos = 162-177-192-210-234-255 puntos. Cambiar a una aguja circular de 4.5 mm y trabajar el elástico (1 derecho, 2 reveses) 10 cm. Cerrar con derecho sobre derecho y revés sobre revés - leer TIP PARA EL REMATE. El jersey mide aprox. 56-58-60-62-64-66 cm desde el hombro hacia abajo. MANGAS: Deslizar los 46-50-54-60-62-64 puntos desde el gancho auxiliar a un lado de la labor con una aguja circular corta / agujas de doble punta de 5.5 mm y recoger 1 punto en cada uno de los 8-8-10-10-12-12 puntos nuevos montados bajo la manga = 54-58-64-70-74-76 puntos. Insertar un marcapuntos en el centro de los puntos nuevos bajo la manga y comenzar la vuelta en el marcapuntos. Trabajar en punto jersey en redondo 4 cm, después disminuir 1 punto a cada lado del marcapuntos - leer TIP PARA LAS DISMINUCIONES. Disminuir de esta manera cada 3½-3-2-1½-1½-1 cm un total de 8-9-11-13-15-15 veces = 38-40-42-44-44-46 puntos. Continuar en punto jersey hasta que la manga mida 31-30-30-28-26-24 cm. NOTA :Las medidas son más cortas en las tallas más grandes debido a la mayor anchura del escote y mayor largura del canesú. Aumentar 4-5-6-7-7-8 puntos repartidos = 42-45-48-51-51-54 puntos. Cambiar a agujas de doble punta de 4.5 mm y trabajar el elástico (1 derecho, 2 reveses) 10 cm. Cerrar con derecho sobre derecho y revés sobre revés - recordar TIP PARA EL REMATE. La manga mide aprox. 41-40-40-38-36-34 cm desde la división. Trabajar la otra manga de la misma manera. |
|||||||||||||||||||||||||
Explicaciones del diagrama |
|||||||||||||||||||||||||
|
|||||||||||||||||||||||||
 |
|||||||||||||||||||||||||
 |
|||||||||||||||||||||||||
¿Terminaste este patrón?Entonces, etiqueta tus fotos con #dropspattern #autumnwreathsweater o envíalas a la galería #dropsfan. ¿Necesitas ayuda con este patrón?Encontrarás 28 videos tutoriales, un espacio para comentarios/preguntas y más visitando la página del patrón en garnstudio.com © 1982-2026 DROPS Design A/S. Todos los derechos reservados. Este documento, incluyendo todas sus sub-secciones, está protegido por los derechos de autor (copyright). Lee más acerca de lo que puedes hacer con nuestros patrones en la parte de abajo de cada patrón de nuestro sitio. |
|||||||||||||||||||||||||


Con más de 40 años en el diseño de modelos de punto y de ganchillo, DROPS Design ofrece una de las más vastas colecciones de patrones gratuitos en el internet - traducidos en 17 idiomas. Al día de hoy, contamos con 324 catálogos y 12290 patrones - de los cuales 11675 están traducidos en español.
Nosotros trabajamos con mucho esmero para brindarte lo mejor que las labores de punto y ganchillo tienen para ofrecer,inspiración y consejos, así como hilos de magnífica calidad a precios increíbles! Te gustaría usar nuestros patrones para otro fin además del uso personal? Puedes leer acerca de lo que estás permitida a hacer en el texto de Copyright en la parte de abajo de todos nuestros patrones. Felices labores!
Escribe un comentario sobre DROPS 228-1
¡Nos encantaría saber qué piensas acerca de este patrón!
Si quieres escribir una pregunta referente al patrón, por favor asegúrate de elegir la categoría correcta en el formulario debajo, para acelerar el proceso de respuesta. Los campos obligatorios están marcados con un *.