
Categorías populares
¿Buscas un hilo?


Comentarios / Preguntas (41)
![]() ELSA escribió:
ELSA escribió:
Om jag har ett byst mått på 93 vad ska jag välja för storlek?
22.04.2026 - 20:55DROPS Design respondió:
Hej Elsa, storlek L har ett byst mått på 96 cm :)
23.04.2026 - 14:23
![]() Yvonne Obernier escribió:
Yvonne Obernier escribió:
Vielen Dank für die Antwort, die ich nicht lesen kann. Ich habe die Lösung selbst herausgefunden.
25.03.2026 - 10:24
![]() Yvonne Obernier escribió:
Yvonne Obernier escribió:
Wie strickt man die 7Maschen in der Passe Muster A2 wieder ab?
24.03.2026 - 21:00DROPS Design respondió:
Liebe Frau Obernier, in diesem Video zeigen wir, wie man A.2 strickt, es kann Ihnen sicher helfen. Viel Spaß beim Stricken!
25.03.2026 - 07:31
![]() Yvonne escribió:
Yvonne escribió:
1. Is this pattern suitable for someone who is not a beginner but definitely not advanced. I just knitted Moon Valley dress, pattern u-776 and that was fine. Is this dress a lot more difficult than that? 2. I wanted something lacy that would be cool to wear on warm days but as this is for Yarn group B will it be a warm dress?
30.01.2026 - 22:42DROPS Design respondió:
Hi Yvonne, This dress should be possible for an intermediate knitter. Drops belle from yarn group B is one of our thinner yarns, so should not be too warm. Regards, Drops Team.
03.02.2026 - 07:49
![]() Narcissa escribió:
Narcissa escribió:
Hi! I’ve reached A.2 row 18 and proceeded to count my stitches which were supposed to be 250, but they’re 243 😥 any advice on what to do? I don’t know where I went wrong and I cannot tell whether I made mistakes by missing stitches on the previous 2 rounds (I didn’t count my stitches for the previous 2 rounds) and now I’m stuck with this. I’d be thankful if you saved me 😩😩
12.12.2024 - 22:37DROPS Design respondió:
Dear Narcissa, as you are referring to a middle point in A.2 (without indicating your size) and it's difficult to know where the mistakes may be located you should remake the previous 2 rounds. After frogging the 2 rounds, count that the number of stitches match the number you need. The best tip is to place markers in the piece to indicate each repeat so that, if you miss any stitches, it will be easier to see them (because the repeat will be different). Also, check the black square (from 1 stitch obtain 7 stitches), you may have missed one in one repeat of A.2. Happy knitting!
15.12.2024 - 22:34
![]() Sabrina escribió:
Sabrina escribió:
Hejsa Jeg er i tvivl om, hvor meget ease kjolen skal have, så hvis jeg har et brystmål på 89, skal jeg så lave en str. M eller L?
07.07.2024 - 23:24DROPS Design respondió:
Hei Sabrina. Det kommer an på om du ønsker å ha den tight over brystet eller ikke. Har du en kjole fra før som du liker passformen på, ta mål av den og sammenlign med målene i målskissen til "Swing by Spring " kjolen. mvh DROPS Design
09.07.2024 - 12:57
![]() Yulia escribió:
Yulia escribió:
Hi, a question on the body section. What does it mean by increase alternately before and after every marker on every 6th round? Is it right if I do 1 row increase before marker (i.e. 8 sts increase) and 1 row increase after marker? Also is the count of every 6th round include the 2 rounds which I have increase of 8 sts each i.e. work in stockinette 4 rounds before the next increase?
03.07.2023 - 15:55DROPS Design respondió:
Dear Yulia, correct, the first time you will increase before each marker (increasing 8 sts on the round); then the next time you will increase after each marker (increasing 8 sts on the round) and repeat these, alternately before and after each marker. Increase like this: *Work 1 round with increase, 5 rounds without increase*, and repeat these 6 rounds. Happy knitting!
03.07.2023 - 16:03
![]() Yulia escribió:
Yulia escribió:
Hi, do you have a video to work on dividing body and sleeve?
29.05.2023 - 16:35DROPS Design respondió:
Dear Yulia, sure, in this video we show from time code approx. 06:52 how to divide body and how to cast on new stitches for sleeve - and this lesson shows also from picture 9 how you will divide piece - both are for a raglan, but the same technique will be used with a circular yoke. Happy knitting!
30.05.2023 - 11:14
![]() Yulia escribió:
Yulia escribió:
Hi, I am working on Yoke section up to the point dividing body and sleeves. After slipping stitches for sleeve, there are numbers of cast on on needle. Which needle does this refer to? The stitch holder for sleeve or needle on body? Thanks.
28.05.2023 - 16:45DROPS Design respondió:
Dear Yulia, you cast on stitches for the side under the sleeve, so they are in the needle for the body and used as a placeholder for the location of the sleeves while you work the body. Happy knitting!
28.05.2023 - 18:58
![]() Yulia escribió:
Yulia escribió:
Hi, on the neck edge: 1. How to switch to circular needle 4 mm from 3 mm? Moving all the stitches all doing another round of K1P1? I tried to move the stitches but having difficulty cause they are thight. 2. Where is the beginning of round mid back to insert 1 marker?
19.05.2023 - 18:12DROPS Design respondió:
Dear Yulia, when you start working A.1 in the yoke, which is the next row after the rib, you will start changing the needle size. You will be working with the 3mm needle on your left hand, from which you are working and slipping the stitches and a 4mm needle on your right hand, where you will have the new stitches. The beginning of the round is where you start working the round (which will be the mid back of the piece). That is, when you cast on 100 stitches, the beggining of the round would be the space between stitch 100 and stitch 1. Happy knitting!
21.05.2023 - 19:14
|
||||||||||||||||||||||||||||
Swing by Spring#swingbyspringdress |
||||||||||||||||||||||||||||
 |
 |
|||||||||||||||||||||||||||
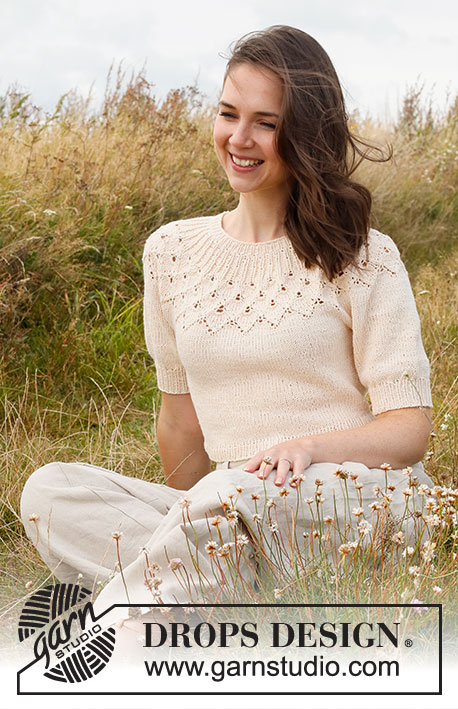
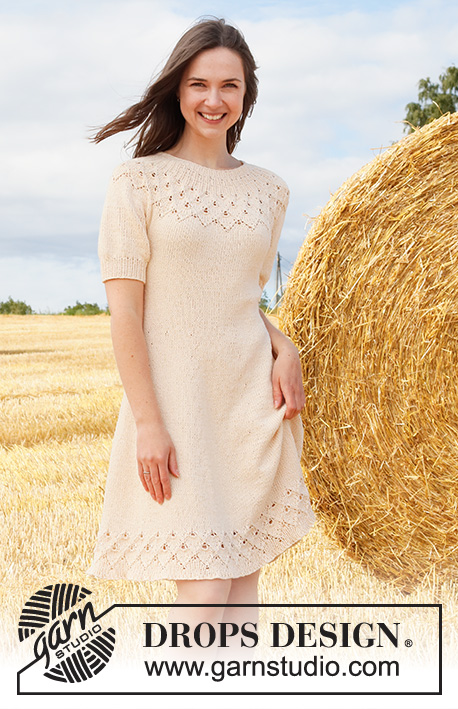
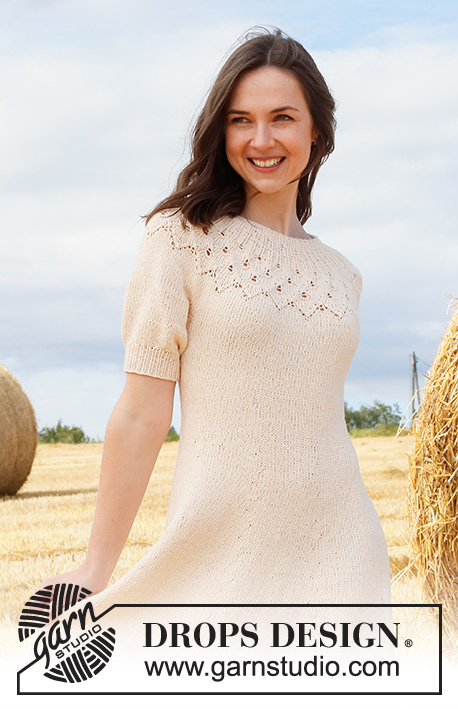
Vestido de punto en DROPS Belle. La pieza está tejida de arriba para abajo con canesú redondo, patrón de calados, patrón de hojas y mangas globo cortas. Tallas: S – XXXL.
DROPS 223-2 |
||||||||||||||||||||||||||||
|
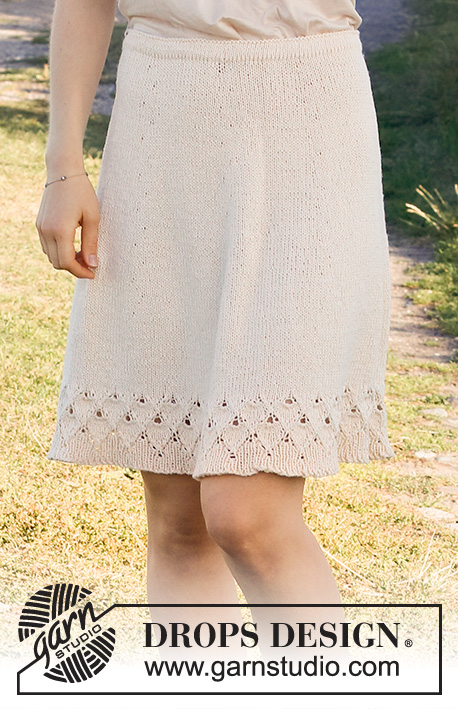
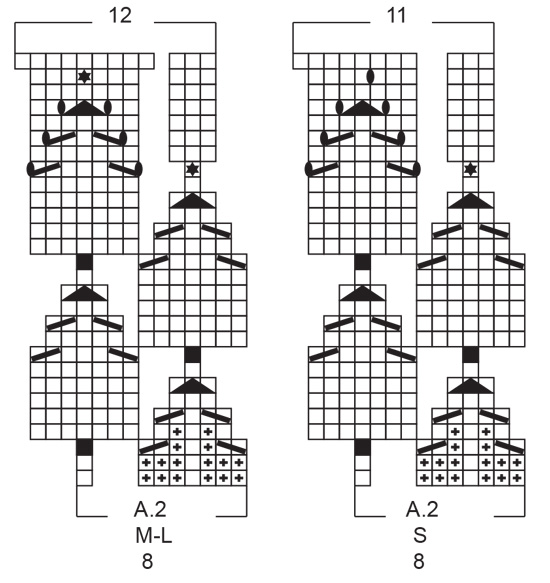
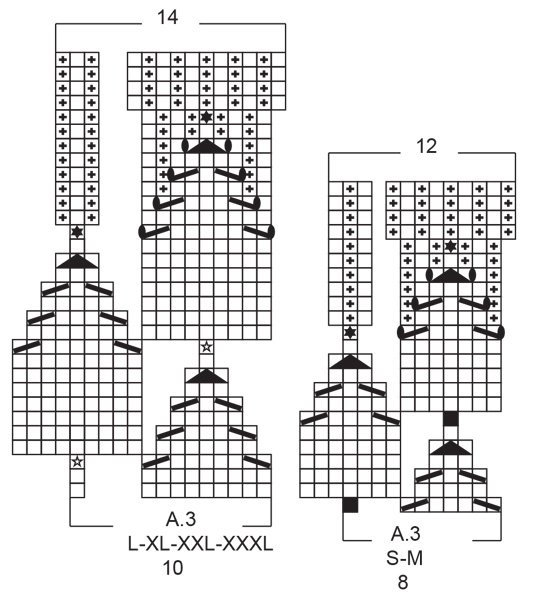
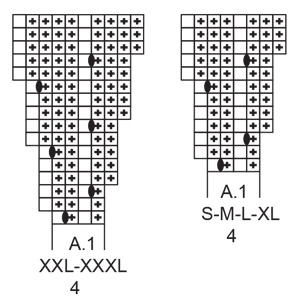
EXPLICACIONES PARA REALIZAR EL PATRÓN: ------------------------------------------------ PATRÓN: Ver diagramas A.1 a A.3. Elegir el diagrama para tu talla. TIP PARA AUMENTAR (aplicar a la falda): Aumentar alternadamente antes y después de cada hilo marcador (es decir, hacer el primer aumento antes de cada hilo marcador, hacer el segundo aumento después de cada hilo marcador, etc.). Aumentar 1 punto antes de cada hilo marcador de la manera siguiente: Tejer hasta que reste 1 punto antes del hilo marcador, 1 lazada (= 1 punto aumentado). Aumentar así en cada hilo marcador (= 8 puntos aumentados en total). Aumentar 1 punto después de cada hilo marcador de la manera siguiente: Tejer hasta el hilo marcador, tejer 1 punto después del hilo marcador, 1 lazada (= 1 punto aumentado). Aumentar así en cada hilo marcador (= 8 puntos aumentados en total). En la vuelta siguiente, tejer las lazadas retorcidas de derecho para evitar que se formen agujeros. Después tejer los nuevos puntos en punto jersey. TIP PARA DISMINUIR (aplicar a los lados del vestido): Disminuir 1 punto a cada lado del hilo marcador de la manera siguiente: Tejer hasta que resten 3 puntos antes del hilo marcador y tejer 2 puntos juntos de derecho, tejer 2 derechos (el hilo marcador está entre estos puntos), deslizar 1 punto como de derecho, tejer 1 derecho, pasar el punto deslizado por encima del punto tejido. TIP PARA REMATAR: Para evitar una orilla de remate apretada, se puede usar una aguja de tamaño más grande. Si aún estuviese apretada, hacer 1 lazada después de aprox. cada 4º punto durante el remate de los puntos (rematar las lazadas como puntos normales). ------------------------------------------------ COMENZAR LA PIEZA AQUÍ: ------------------------------------------------ VESTIDO – RESUMEN DE LA PIEZA: Tejer la orilla del escote y el canesú en redondo a partir del centro de la espalda, de arriba para abajo. Ahora dividir el canesú para el cuerpo y las mangas. El cuerpo se teje en redondo en aguja circular, de arriba para abajo. Tejer las mangas en redondo en agujas de doble punta/aguja circular corta, de arriba para abajo. ORILLA DEL ESCOTE: Montar 100-100-104-108-112-120 puntos en aguja circular tamaño 3 mm con Belle. Tejer 1 vuelta de derecho. Después tejer en resorte = 1 derecho/1 revés. Cuando el resorte mida 2-2-3-3-3-3 cm, cambiar a aguja circular tamaño 4 mm. Insertar 1 marcador al principio de la vuelta en el centro de la espalda, ¡medir el canesú a partir de este marcador! CANESÚ: Tejer A.1 en redondo (= 25-25-26-27-28-30 repeticiones de 4 puntos). Cuando se ha tejido A.1, hay 200-200-208-216-280-300 puntos en la aguja. La pieza ahora mide 4-4-4-4-6-6 cm a partir del marcador. Después tejer A.2 en redondo (= 25-25-26-27-28-30 repeticiones de 8-8-8-8-10-10 puntos). ¡RECORDAR MANTENER LA MISMA TENSIÓN DE TEJIDO DE LA MUESTRA! Cuando se ha tejido A.2, hay 275-300-312-351-392-420 puntos en la aguja. La pieza mide aprox. 14-14-14-17-19-19 cm a partir del marcador (es decir, 16-16-17-20-22-22 cm a partir de la orilla de montaje). Tejer en punto jersey hasta que la pieza mida 18-20-21-23-25-27 cm a partir del marcador. Ahora dividir la pieza para el cuerpo y las mangas. Tejer la vuelta siguiente de la manera siguiente: Tejer 38-42-44-50-58-63 puntos derechos (= ½ pieza de la espalda), deslizar los 62-66-68-76-80-84 puntos siguientes en un gancho auxiliar para la manga, montar 8-8-12-12-12-12 nuevos puntos en la aguja (= en el lado bajo la manga), tejer 75-84-88-99-116-126 puntos derechos (= pieza del frente), deslizar los 62-66-68-76-80-84 puntos siguientes en un gancho auxiliar para la manga, montar 8-8-12-12-12-12 nuevos puntos en la aguja (= en el lado bajo la manga), tejer los últimos 38-42-44-50-58-63 puntos derechos (= ½ pieza de la espalda). CUERPO: = 167-184-200-223-256-276 puntos. Insertar 1 hilo marcador en el centro de los 8-8-12-12-12-12 nuevos puntos bajo cada manga (= en el lado del cuerpo). Ahora hay 83-92-100-111-128-138 puntos en la pieza del frente y 84-92-100-112-128-138 puntos en la pieza de la espalda. Mover los hilos marcadores hacia arriba a medida que se teje; serán usados más tarde cuando se disminuya en los lados. Tejer en punto jersey en redondo. Cuando la pieza mida 3 cm a partir de la división, disminuir 1 punto a cada lado de cada hilo marcador – leer TIP PARA DISMINUIR (= 4 puntos disminuidos). Disminuir así a cada 2 cm 4-4-4-4-5-5 veces en total = 151-168-184-207-236-256 puntos. Tejer punto jersey en redondo hasta que la pieza mida 15-15-16-16-16-16 cm a partir de la división. En la vuelta siguiente, insertar 8 hilos marcadores en la pieza de la manera siguiente: Tejer 9-10-11-12-13-16 puntos derechos, insertar 1 hilo marcador, * tejer 19-21-23-26-30-32 puntos derechos, insertar 1 hilo marcador *, tejer de *a* 7 veces en total y terminar con 9-11-12-13-13-16 puntos derechos. Ahora aumentar puntos para la falda de la manera siguiente: En la vuelta siguiente, aumentar 1 punto antes de cada hilo marcador - ¡leer TIP PARA AUMENTAR! Aumentar alternadamente antes y después de cada hilo marcador a cada 6ª vuelta 15 veces en total = 271-288-304-327-356-376 puntos. Tejer en punto jersey en redondo. Cuando el vestido mida 56-57-56-57-58-59 cm a partir de la división (restan aprox. 8-8-11-11-11-11 cm, o hasta las medidas deseadas), tejer 1 vuelta de derecho aumentando 1-0-6-3-4-4 puntos distribuidos equitativamente = 272-288-310-330-360-380 puntos. Después tejer A.3 en redondo (= 34-36-31-33-36-38 repeticiones de 8-8-10-10-10-10 puntos). Cuando se ha tejido A.3, hay 408-432-434-462-504-532 puntos en la aguja. Rematar de derecho – leer TIP PARA REMATAR. El vestido mide aprox. 86-89-92-95-98-101 cm a partir del hombro para abajo. MANGAS: Deslizar los 62-66-68-76-80-84 puntos del gancho auxiliar en uno de los lados de la pieza en agujas de doble punta/aguja circular corta tamaño 4 mm, y levantar 1 punto en cada uno de los 8-8-12-12-12-12 nuevos puntos montados en el lado bajo la manga = 70-74-80-88-92-96 puntos. Tejer en punto jersey en redondo hasta que la manga mida 12-11-10-8-7-5 cm a partir de la división (restan aprox. 5 cm para completar las medidas, probarse el vestido y tejer hasta la longitud deseada). Tejer 1 vuelta de derecho disminuyendo 16-16-14-14-14-14 puntos distribuidos equitativamente = 54-58-66-74-78-82 puntos. Cambiar a agujas de doble punta tamaño 3 mm. Tejer en resorte en redondo = 1 derecho/1 revés durante 5 cm. Rematar con derecho sobre derecho y revés sobre revés - ¡recordar el TIP PARA REMATAR! La manga mide aprox. 17-16-15-13-12-10 cm a partir de la división. Tejer la otra manga de la misma manera. |
||||||||||||||||||||||||||||
Explicaciones del diagrama |
||||||||||||||||||||||||||||
|
||||||||||||||||||||||||||||
 |
||||||||||||||||||||||||||||
 |
||||||||||||||||||||||||||||
 |
||||||||||||||||||||||||||||
 |
||||||||||||||||||||||||||||
 |
||||||||||||||||||||||||||||
¿Terminaste este patrón?Entonces, etiqueta tus fotos con #dropspattern #swingbyspringdress o envíalas a la galería #dropsfan. ¿Necesitas ayuda con este patrón?Encontrarás 34 videos tutoriales, un espacio para comentarios/preguntas y más visitando la página del patrón en garnstudio.com © 1982-2026 DROPS Design A/S. Todos los derechos reservados. Este documento, incluyendo todas sus sub-secciones, está protegido por los derechos de autor (copyright). Lee más acerca de lo que puedes hacer con nuestros patrones en la parte de abajo de cada patrón de nuestro sitio. |
||||||||||||||||||||||||||||


Con más de 40 años en el diseño de modelos de punto y de ganchillo, DROPS Design ofrece una de las más vastas colecciones de patrones gratuitos en el internet - traducidos en 17 idiomas. Al día de hoy, contamos con 324 catálogos y 12290 patrones - de los cuales 11685 están traducidos en español.
Nosotros trabajamos con mucho esmero para brindarte lo mejor que las labores de punto y ganchillo tienen para ofrecer,inspiración y consejos, así como hilos de magnífica calidad a precios increíbles! Te gustaría usar nuestros patrones para otro fin además del uso personal? Puedes leer acerca de lo que estás permitida a hacer en el texto de Copyright en la parte de abajo de todos nuestros patrones. Felices labores!
Escribe un comentario sobre DROPS 223-2
¡Nos encantaría saber qué piensas acerca de este patrón!
Si quieres escribir una pregunta referente al patrón, por favor asegúrate de elegir la categoría correcta en el formulario debajo, para acelerar el proceso de respuesta. Los campos obligatorios están marcados con un *.