
Popular categories
Looking for a yarn?


Comments / Questions (54)
![]() Trude wrote:
Trude wrote:
Hei, jeg er kommet til diagram A2 og vet ikke helt hvordan jeg skal begynne mtp. midtmaske symbolet. Dette er første gang jeg strikker etter diagram, så er fersk i gamet.
13.06.2021 - 10:53DROPS Design answered:
Hei Trude. Er det på ermene? Du skal ha satt 2 merker i arbeidet (1. merke = midt under ermet og 2. merke midt oppå ermet (forklart i oppskriften hvor etter hvilken str. du strikker). Merket midt oppå ermet skal brukes når det telles ut hvor mønsteret skal starte. Det skal telles ut fra midten på ermet hvor mønsteret skal starte – masken med merke midt oppå ermet skal passe med masken markert med stjerne i A.2 (husk, det felles under ermet samtidig som det strikkes mønster). mvh DROPS design
21.06.2021 - 10:04
![]() Vivi Christensen wrote:
Vivi Christensen wrote:
Jeg er ved at strikken trøjen i str. xxxl og hvis jeg følger opskriften skal jeg ved mønster A2 dele til ærmer - der har jeg kun 258 masker. Hvis jeg skalle have 86 masker til hver ærme er jeg ved udtagning efter mønster A7. Vh. Vivi
11.06.2021 - 22:21DROPS Design answered:
Hej Vivi, Du tager ud ifølge opskriften på 7 omgange i XXXL. 7. og sidste gang du tager ud har du 448 masker. Opskriften siger du skal have 28 pinde i højden på 10 cm. A.1 og A.2 er ialt 80 pinde. 80 pinde/ 28 = ca 29 cm i højden når du er klar med A.2 og alle udtagninger. Tæl hvor mange pinde du har i højden på 10 cm, så tror jeg det er der problemet ligger.
15.06.2021 - 15:13
![]() Kelsey Lemon wrote:
Kelsey Lemon wrote:
Hello again! I just noticed a jog in the yoke where the rows are not totally aligned. Is there anything I can do to fix this? Or if I start again, is there anything I can do to avoid getting this jog? I'd appreciate any help, thanks!
10.04.2021 - 22:04DROPS Design answered:
Dear Kelsey, it depends, if the jog is where your round starts or elsewhere. If it is elsewhere, you have to check and see if you aligned the patterns properly. If it is at the start/end of the round, they are more difficult to hide, but again, make sure you start/end the round at the proper place, and pull the yarn a bit more thightly. Happy Knitting!
11.04.2021 - 03:13
![]() Kelsey Lemon wrote:
Kelsey Lemon wrote:
Hello, I was just wondering about continuing the pattern when picking up the sleeves. I'm knitting M size. And when I try follow the pattern, the stitches I picked up under the arm mess up the colour work. Please help, I don't understand how to continue the colour work on the sleeves.
05.04.2021 - 16:47DROPS Design answered:
Dear Kelsey, you have to use the existing patterns as a base, and calculate the stitches from there under the sleeve. It is possible, that in places the number of stitches will not fit the pattern repeats exatctly, if so, knit the pattern until you can, and be careful to keep the pattern symmetric on both sides. Happy Knitting!
05.04.2021 - 19:38
![]() Charlotte wrote:
Charlotte wrote:
Désolée pour le double envoi... J'avais reçu un message comme quoi mon commentaire n'était pas parti et je vois maintenant qu'il y est...
05.04.2021 - 11:17
![]() Charlotte wrote:
Charlotte wrote:
Bonjour, selon les explications, pour toutes les tailles, A2 est fini ou presque AVANT la séparation des manches. Sur la photo du pull, on voit que tout le dessin A2 ou presque est sur les manches, donc APRÈS la séparation. La photo ne correspond pas aux explications ou quelque chose m'échappe? Merci de m'éclairer à ce sujet. Bonne journée
05.04.2021 - 11:15
![]() Charlotte wrote:
Charlotte wrote:
Bonjour, le modèle explique que, pour toutes les tailles, A2 est terminé (ou il ne reste que quelques rangs) AVANT la séparation des manches. Sur la photo, on voit le dessin A2 presque complet sur les manches, donc APRES la séparation. La photo ne correspond pas aux explications ou y a-t-il quelque chose qui m’echappe? Merci pour votre aide
04.04.2021 - 18:28DROPS Design answered:
Bonjour Charlotte, en fonction de la taille, vous terminerez A.2 plus ou moins de rangs après la division. Bon tricot!
06.04.2021 - 13:47
![]() Berbett wrote:
Berbett wrote:
Merci pour la rapidité de votre réponse. Il me reste encore une petite question pourquoi décaler le marqueur d'une maille après le milieu ? alors que pour la taille S on place le marqueur pile au milieu des 6 m centrales ? Encore pour votre aide.
19.03.2021 - 17:19DROPS Design answered:
Bonjour Mme Berbett, car en taille S le nombre de mailles est impair (= 63 m mises en attente) alors que dans les autres tailles, on a un nombre de mailles impair. Le marqueur du dessus de la manche en S devra être dans une maille, alors que dans les autres tailles, ce marqueur sera entre 2 mailles. Mais on va bien commencer au milieu des 6 nouvelles mailles montées sous la manche. Bon tricot!
22.03.2021 - 07:15
![]() Berbett wrote:
Berbett wrote:
Bonjour, Concernant le début des manches : placer un marqueur dans la 1ére maille après le milieu. Cela veut-il dire que ce marqueur ne suivra pas le tricot mais restera en place ? alors qu'en général je place un marqueur sur l'aiguille entre 2 mailles et ce marqueur suit l'évolution du tricot. Merci d'avance pour votre aide. Pia Berbett.
19.03.2021 - 14:20DROPS Design answered:
Bonjour Mme Berbett, les deux marqueurs doivent suivre l'ouvrage, celui sous la manche va servir de repère pour les diminutions sous les manches (celui-ci est entre 2 mailles) - celui du dessus de la manche sert à centrer le jacquard; celui-ci se trouve dans une maille (voir aussi cette leçon). Bon tricot!
19.03.2021 - 15:25
![]() Vigdis Roland wrote:
Vigdis Roland wrote:
Jeg strikker str M , men ved deling til armer på 24 cm, manglet det 4 masker som skal legges opp ved pil 6. Følger jeg dette, vil delingen til armer komme på 26 eller 27 cm fra merket bak. Hva gjør jeg.?
27.02.2021 - 21:15DROPS Design answered:
Hej Vigdis, det lyder til at du har færre pinde i højden end de 28 som vi har på 10 cm. Kan du øge de 4 masker et par pinde tidligere?
08.04.2021 - 08:49
|
|||||||||||||
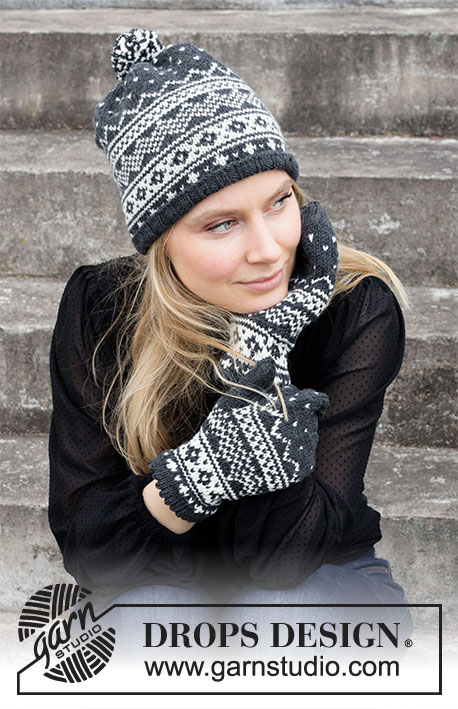
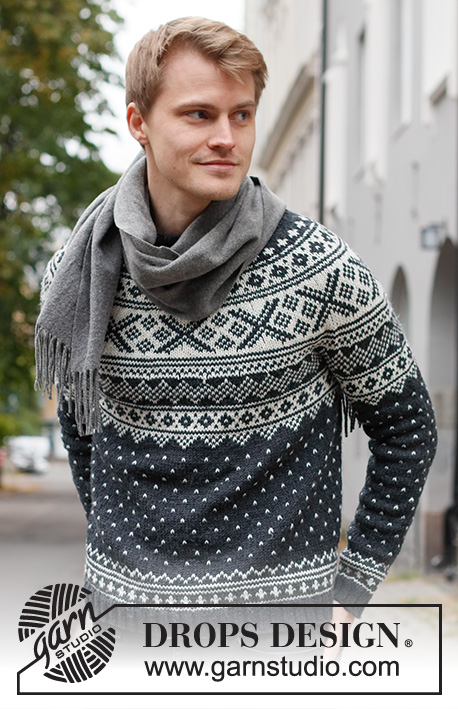
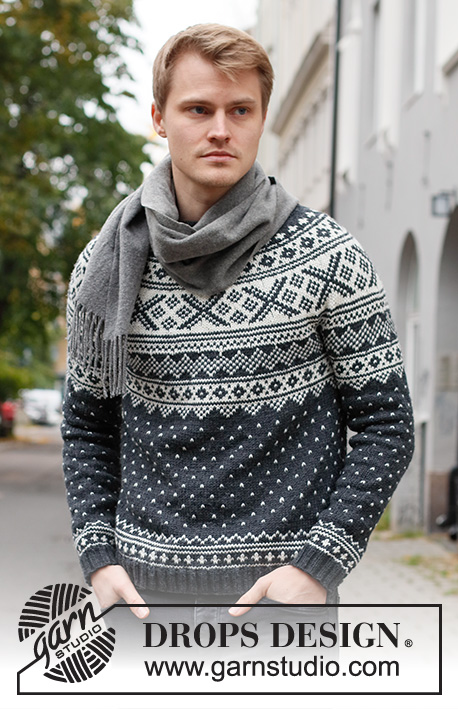
Winter's Night Enchantment#wintersnightenchantmentsweater |
|||||||||||||
 |
 |
||||||||||||
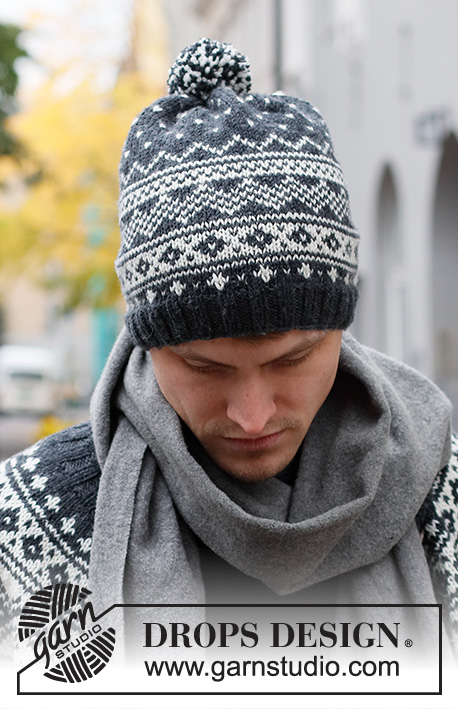
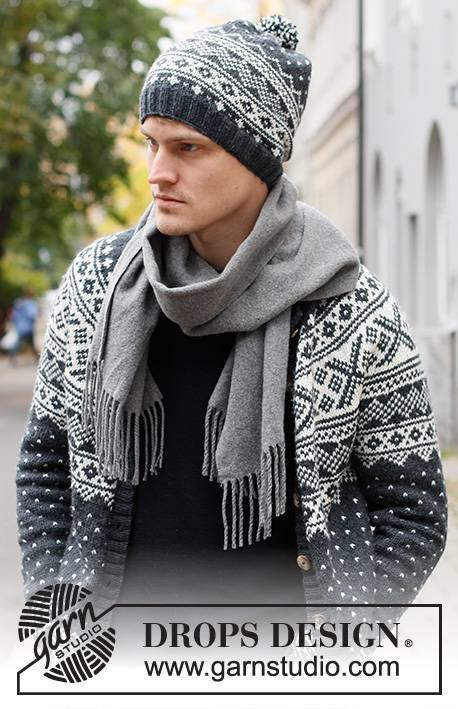
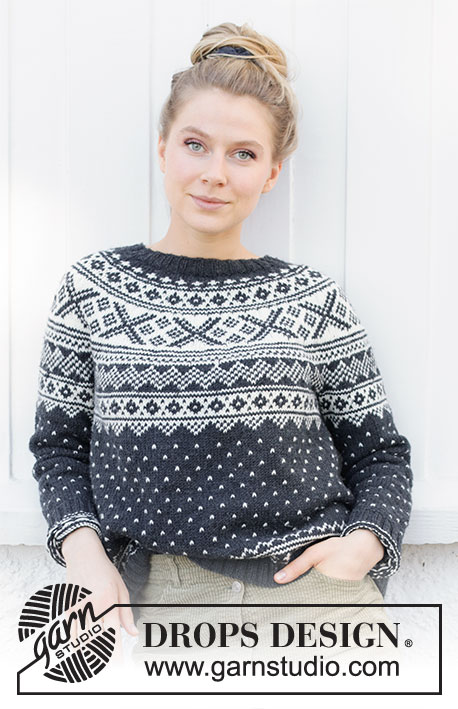
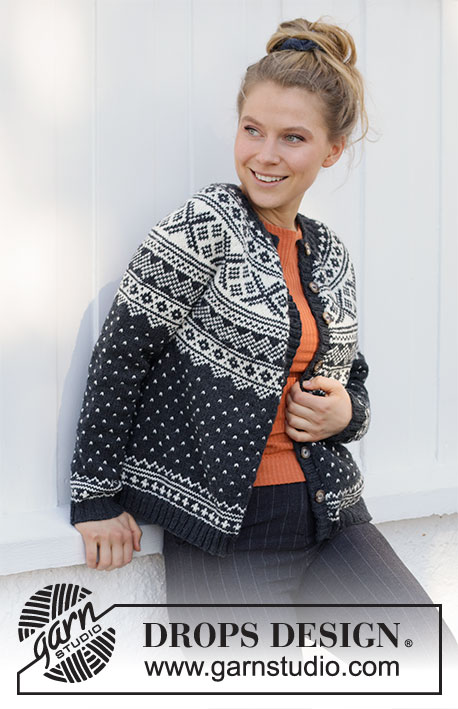
Knitted jumper for men in DROPS Karisma. The piece is worked top down with round yoke and Nordic pattern. Sizes S - XXXL.
DROPS 219-15 |
|||||||||||||
|
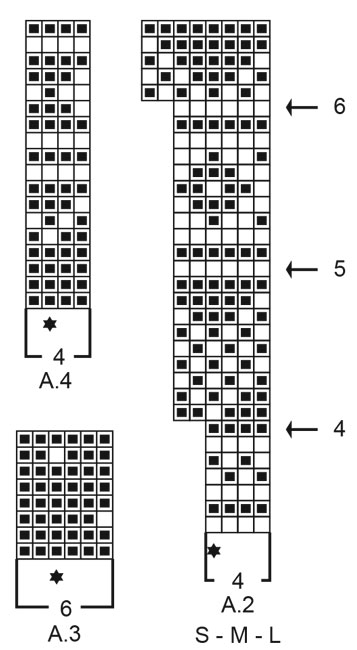
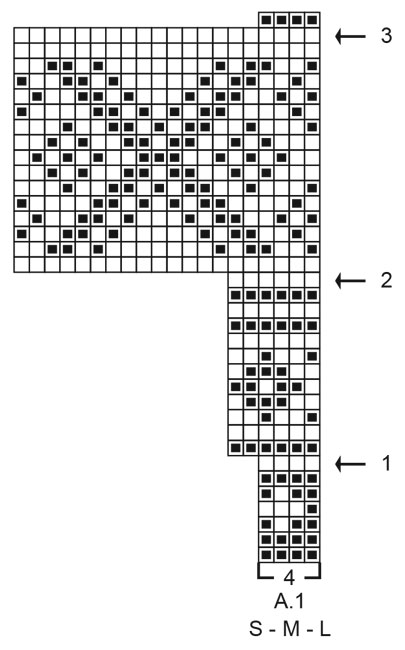
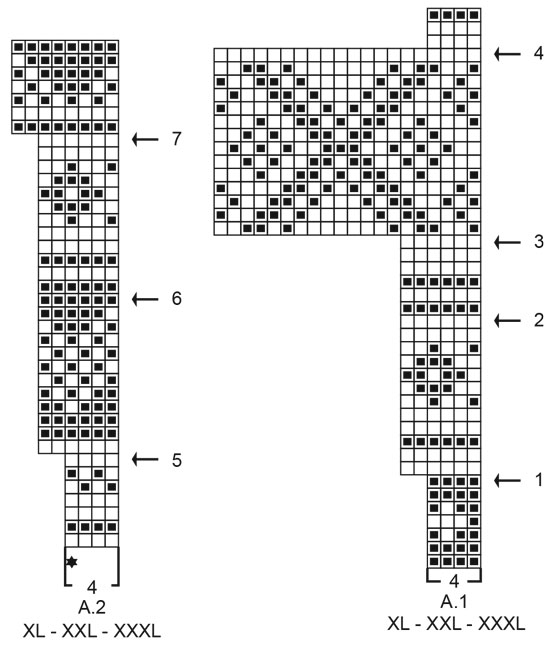
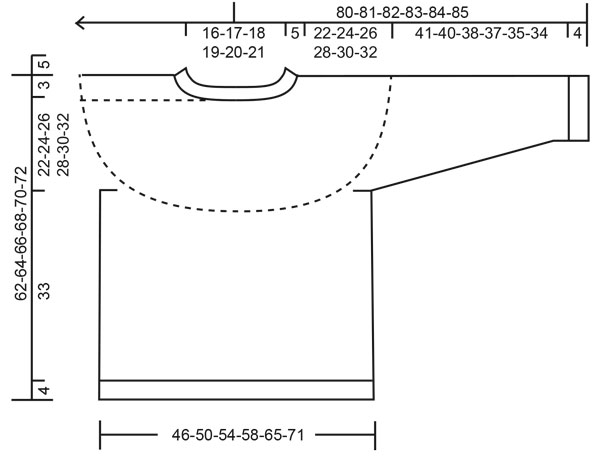
------------------------------------------------------- EXPLANATIONS FOR THE PATTERN: ------------------------------------------------------- INCREASE/DECREASE TIP (evenly spaced): To work out how to increase/decrease evenly, count the total number of stitches on needle (e.g. 92 stitches) and divide by the number of increases/decreases to be made (e.g. 28) = 3.3. In this example, increase by making 1 yarn over after approx. each 3rd stitch. On the next round knit the yarn overs twisted to avoid holes. When decreasing, knit together approx. each 2nd and 3rd stitch. ELEVATION (back of neck): To make the back of the neck slightly higher when working the yoke, you can work an elevation as described here. Skip this section if you do not want an elevation. Insert 1 marker at the start of the round = mid-back. Start from the right side with anthracite and knit 12-13-14-15-15-16 stitches past the marker-stitch, turn, tighten strand and purl 24-26-28-30-30-32 stitches back. Turn, tighten strand and knit 36-39-42-45-45-48 stitches, turn, tighten strand and purl 48-52-56-60-60-64 stitches back. Turn, tighten strand and knit 60-65-70-75-75-80 stitches, turn, tighten strand and purl 72-78-84-90-90-96 stitches back. Turn, tighten the strand and knit back to mid-back. Then work YOKE as described in the text. PATTERN: See diagrams A.1 to A.4. Choose diagram for your size (applies to A.1 and A.2). The whole pattern is worked in stocking stitch. KNITTING TIP: To avoid the knitting tension becoming tighter when working the pattern, it is important that the strands at the back are not tight. Use a size larger needle when working pattern if this is a problem. If the knitting tension is too tight in height, the garment will be short and the armholes too small – you can correct this by regularly working an extra row in the one-coloured sections. If your work is loose, the garment will be too long and the armholes too big – you can correct this by regularly working one less row in the one-coloured sections. DECREASE TIP (for sleeves): Decrease 2 stitches mid-under the sleeve as follows: S: Work until there are 2 stitches left before the marker under the sleeve, knit 2 together with anthracite, marker, knit 2 twisted together with anthracite (= 2 stitches decreased). M, L, XL, XXL and XXXL: Work until there are 2 stitches left before the marker-stitch under the sleeve, knit 2 together with anthracite, knit the marker stitch with anthracite and knit 2 twisted together with anthracite (= 2 stitches decreased). CASTING-OFF TIP: To avoid the cast-off edge being tight you can cast off with a larger size needle. If the edge is still tight, make 1 yarn over after approx. each 4th stitch at the same time as casting off; the yarn overs are cast off as normal stitches. ------------------------------------------------------- START THE PIECE HERE: ------------------------------------------------------- JUMPER – SHORT OVERVIEW OF THE PIECE: The neck and yoke are worked in the round with circular needle, from mid back and top down. The yoke is divided for body and sleeves and the body is continued in the round with circular needle. The sleeves are worked with short circular needle/double pointed needles, top down. NECK: Cast on 92-96-100-104-108-112 stitches with short circular needle size 3 mm and anthracite. Knit 1 round then work rib in the round (knit 2, purl 2) for 5 cm. Change to circular needle size 4 mm and knit 1 round where you increase 28-28-32-32-36-40 stitches evenly spaced – read INCREASE/DECREASE TIP = 120-124-132-136-144-152 stitches. Insert 1 marker mid-front; the yoke is measured from this marker! Now you can work an ELEVATION at the back of the neck – read description above. If you do not want an elevation, go straight to YOKE. YOKE: Work 0-0-2-2-4-6 rounds of stocking stitch with anthracite. Read KNITTING TIP and work A.1 in the round (= 30-31-33-34-36-38 repeats of 4 stitches). Continue this pattern and when A.1 has been completed, work A.2 in the same way REMEMBER THE KNITTING TENSION! AT THE SAME TIME on each round marked with an arrow in A.1 and A.2 increase stitches as described below – remember INCREASE/DECREASE TIP: SIZES S, M and L: Arrow-1: Increase 36-38-42 stitches evenly spaced = 156-162-174 stitches (there is now room for 26-27-29 repeats of 6 stitches). Arrow-2: Increase 64-58-66 stitches evenly spaced = 220-220-240 stitches (there is now room for 11-11-12 repeats of 20 stitches). Arrow-3: Increase 32-40-36 stitches evenly spaced = 252-260-276 stitches (there is now room for 63-65-69 repeats of 4 stitches). Arrow-4: Increase 30-34-36 stitches evenly spaced = 282-294-312 stitches (there is now room for 47-49-52 repeats of 6 stitches). Arrow-5: Increase 24-30-36 stitches evenly spaced = 306-324-348 stitches (there is now room for 51-54-58 repeats of 6 stitches). Arrow-6 (only in sizes M and L, because in S the piece is divided for the body and sleeves before this section starts): Increase 4-4 stitches evenly spaced = 306-328-352 stitches (there is now room for 41-44 repeats of 8 stitches in sizes M and L). SIZES XL, XXL and XXXL: Arrow-1: Increase 44-48-52 stitches evenly spaced = 180-192-204 stitches (there is now room for 30-32-34 repeats of 6 stitches). Arrow-2: Increase 42-48-54 stitches evenly spaced = 222-240-258 stitches (there is now room for 37-40-43 repeats of 6 stitches). Arrow-3: Increase 18-20-22 stitches evenly spaced = 240-260-280 stitches (there is now room for 12-13-14 repeats of 20 stitches). Arrow-4: Increase 60-64-68 stitches evenly spaced = 300-324-348 stitches (there is now room for 75-81-87 repeats of 4 stitches). Arrow-5: Increase 54-54-60 stitches evenly spaced = 354-378-408 stitches (there is now room for 59-63-68 repeats of 6 stitches). Arrow-6: Increase 30-30-30 stitches evenly spaced = 384-408-438 stitches (there is now room for 64-68-73 repeats of 6 stitches). Arrow-7: Increase 8-8-10 stitches evenly spaced = 392-416-448 stitches (there is now room for 49-52-56 repeats of 8 stitches. ALL SIZES: Continue working until the piece measures 22-24-26-28-30-32 cm from the marker on the neck. NOTE: In some sizes there will be a number of rows left in A.2 when you divide for the body and sleeves – the rest of A.2 will be worked on the body and sleeves. Now divide for the body and sleeves as follows: Work 45-49-52-57-63-69 stitches as before (= ½ back piece), place the next 63-66-72-82-82-86 stitches on 1 thread for the sleeve, cast on 6-6-8-8-10-10 new stitches on the needle (= in side under sleeve), work 90-98-104-114-126-138 stitches as before (= front piece), place the next 63-66-72-82-82-86 stitches on 1 thread for the sleeve, cast on 6-6-8-8-10-10 new stitches on the needle (= in side under sleeve) and work the remaining 45-49-52-57-63-69 stitches as before (= ½ back piece). Body and sleeves are finished separately. THE PIECE IS NOW MEASURED FROM HERE! BODY: = 192-208-224-244-272-296 stitches. Finish A.2 – make sure the pattern matches the A.2 on the yoke, but be aware that the pattern does not fit under the sleeves in all sizes when working the last rows in A.2. When A.2 has been completed, work A.3 in the round – AT THE SAME TIME on the first round increase 0-2-4-2-4-4 stitches evenly spaced = 192-210-228-246-276-300 stitches. There is now room for 32-35-38-41-46-50 repeats of A.3 with 6 stitches. Repeat A.3 in height until the piece measures approx. 27 cm from the division in all sizes, finishing after a row with «spots». There is approx. 10 cm left to finished length; try the jumper on and continue A.3 to desired length. Work A.4 in the round – AT THE SAME TIME on the first round decrease 0-2-4-2-4-4 stitches evenly spaced = 192-208-224-244-272-296 stitches (there is now room for 48-52-56-61-68-74 repeats of A.4 with 4 stitches). When A.4 has been completed, the piece measures approx. 33 cm from the division. The body is finished with anthracite. Knit 1 round where you increase 40-44-44-48-56-60 stitches evenly spaced = 232-252-268-292-328-356 stitches. This is done to avoid the rib being tight. Change to circular needle size 3 mm and work rib (knit 2, purl 2) for 4 cm. Cast off with knit over knit and purl over purl – read CASTING-OFF TIP! The jumper measures approx. 62-64-66-68-70-72 cm from the shoulder down. SLEEVE: Place the 63-66-72-82-82-86 stitches from the thread on the one side of the piece on double pointed needles/short circular needle size 4 mm and knit up 1 stitch in each of the 6-6-8-8-10-10 stitches cast on under the sleeve = 69-72-80-90-92-96 stitches. Insert 2 markers in the piece without working the stitches: S: Insert 1 marker mid-under the sleeve in the middle of the middle 6 stitches, count 34 stitches, insert 1 marker in the next stitch = 34 stitches left to end of round. M, L, XL, XXL and XXXL: Start mid-under the sleeve, in the middle of the 6-8-8-10-10 stitches, insert 1 marker in the first stitch after the middle, count 35-39-44-45-47 stitches, insert 1 marker in the next stitch = 35-39-44-45-47 stitches left to end of round. ALL SIZES: Allow the markers to follow your work onwards; the marker under the sleeve is used when decreasing under the sleeve. The marker on top is when positioning the start of the pattern. Continue with PATTERN at the same time as you DECREASE mid-under the sleeve as described below – read the rest of the sleeve section before continuing: PATTERN: Start the round mid-under the sleeve and finish A.2 in the same way as on the body; count from the marker on top of the sleeve to the start of the pattern – the marker-stitch matches the stitch with the star in A.2 (decrease under the sleeve at the same time as you work the pattern). When A.2 has been completed, work A.3 in the round in the same way. Repeat A.3 in height until the sleeve measures approx. 35-34-32-31-29-28 cm from the division, finishing after a round of “spots”. NOTE: Shorter measurements in larger sizes due to wider neck and longer yoke. There is approx. 10 cm left to finished length; try the jumper on and continue A.3 to desired length. Then work A.4 in the round. DECREASING: At the same time, when the sleeve measures 3 cm from the division in all sizes, decrease 2 stitches mid-under the sleeve – read DECREASE TIP. Decrease like this every 4-3½-2½-2-1½-1½ cm a total of 9-10-13-17-18-19 times = 51-52-54-56-56-58 stitches. When A.4 has been completed and the decreases are finished, the sleeve measures approx. 41-40-38-37-35-34 cm from the division. Continue with anthracite. Knit 1 round where you increase 9-8-10-8-8-10 stitches evenly spaced = 60-60-64-64-64-68 stitches. Change to double pointed needles size 3 mm and work rib (knit 2, purl 2) for 4 cm. Cast off with knit over knit and purl over purl – remember CASTING-OFF TIP. The sleeve measures approx. 45-44-42-41-39-38 cm from the division. Work the other sleeve in the same way. |
|||||||||||||
Diagram explanations |
|||||||||||||
|
|||||||||||||
 |
|||||||||||||
 |
|||||||||||||
 |
|||||||||||||
 |
|||||||||||||
Have you finished this pattern?Tag your pictures with #dropspattern #wintersnightenchantmentsweater or submit them to the #dropsfan gallery. Do you need help with this pattern?You'll find 28 tutorial videos, a Comments/Questions area and more by visiting the pattern on garnstudio.com. © 1982-2026 DROPS Design A/S. We reserve all rights. This document, including all its sub-sections, has copyrights. Read more about what you can do with our patterns at the bottom of each pattern on our site. |
|||||||||||||


With over 40 years in knitting and crochet design, DROPS Design offers one of the most extensive collections of free patterns on the internet - translated to 17 languages. As of today we count 324 catalogues and 12239 patterns translated into English (UK/cm).
We work hard to bring you the best knitting and crochet have to offer, inspiration and advice as well as great quality yarns at incredible prices! Would you like to use our patterns for other than personal use? You can read what you are allowed to do in the Copyright text at the bottom of all our patterns. Happy crafting!
Post a comment to pattern DROPS 219-15
We would love to hear what you have to say about this pattern!
If you want to leave a question, please make sure you select the correct category in the form below, to speed up the answering process. Required fields are marked *.