
Popular categories
Looking for a yarn?


Comments / Questions (140)
![]() Rokky wrote:
Rokky wrote:
Please am having problem with the part 1 the 5 stitch in garter .how many rib will I knit before the 7 and A6
27.01.2025 - 14:31DROPS Design answered:
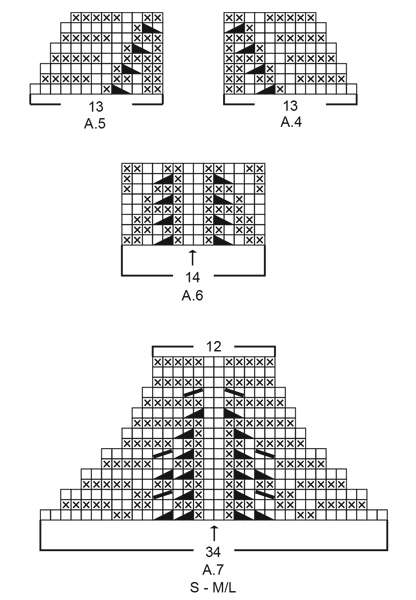
Dear Rokky, right before this step you placed a marker in between the 2 middle stitches on the row. This marker is the middle of the row and helps make the chart symmetrical in the top. Start with 4 edge stitches then work rib until 7 stitches are left before the marker. For example, for the smallest size, you would have: 26 stitches, marker, 26 stitches. So you work 5 edge stitches and work 14 stitches in rib; then work A.6 (= 14 stitches). Then work 14 stitches in rib and work the last 5 edge stitches. For other sizes, you will need to work more stitches in rib in each side and ensure that A.6 is centered on the marker. Happy knitting!
02.02.2025 - 19:34
![]() Aderonke Uwechue wrote:
Aderonke Uwechue wrote:
Hi am having difficulty with the following after edges 5 garter stitch how many will I knit before A6 am confuse
27.01.2025 - 13:11DROPS Design answered:
Dear Aderonke, right before this step you placed a marker in between the 2 middle stitches on the row. This marker is the middle of the row and helps make the chart symmetrical in the top. Start with 4 edge stitches then work rib until 7 stitches are left before the marker. For example, for the smallest size, you would have: 26 stitches, marker, 26 stitches. So you work 5 edge stitches and work 14 stitches in rib; then work A.6 (= 14 stitches). Then work 14 stitches in rib and work the last 5 edge stitches. For other sizes, you will need to work more stitches in rib in each side and ensure that A.6 is centered on the marker. Happy knitting!
02.02.2025 - 19:31
![]() Lili Shemesh Bunczlawer wrote:
Lili Shemesh Bunczlawer wrote:
Hi I work the body .size s . I did 33cm. In round Do i need to continue in round or do back & forth . . When i need to stop the round? I did the first row of the pattern A-2,A-1,A-3 in round . To continue like this ? Or back & forth ? Thans .
14.10.2024 - 20:29DROPS Design answered:
Dear Mrs Shemesh Bunczlawer, when piece measures 33 cm work in the round as before following diagrams as described, then when A.2 and A.3 have been done 1 time in height, you will cast off for the armholes on the next round, cut the yarn at the end of this round and now continue each part separately back and forth on needle.Happy knitting!
15.10.2024 - 09:40
![]() Sophia wrote:
Sophia wrote:
I follow the pattern from outside A4from right to left and then A5 from left to right and at the purl sts pattern goes wrong from outside and write from inside of top. Thank you
30.08.2024 - 10:54DROPS Design answered:
Dear Sophia, I'm not sure what you mean here, the 5 first stitches in A.4 from RS and the last 5 sts in A.5 from RS will be knitted from RS and these stitches = first 5 sts in A.5 from WS and the last 5 sts in A.4 from WS will be kntted from WS = garter stitch. Can this help?
30.08.2024 - 14:51
![]() Sophia wrote:
Sophia wrote:
In A4 and A5 pattern included the 5 stsin garter or we knitting the 5 sts and after the A4?also the pattern begins with 7 knit sts and then the rib pattern doesn’t fit. Thank you
28.08.2024 - 17:59DROPS Design answered:
Dear Sophia, the 5 stitches in garter stitches are included at the beg. of A.4 and at the end of A.5. Happy knitting!
29.08.2024 - 09:52
![]() Mona Dybvad wrote:
Mona Dybvad wrote:
Skal der lukkes til ærmegab og foran inden de 6 mønsterpinde A2 og A3 er strikket
22.08.2024 - 11:30DROPS Design answered:
Hej Mona, du lukker af til ærmegab når arbejdet måler 34-35-36-37 cm, og da er du ikke færdig med A.2 og A.3. Hvis du har yderligere spørgsmål, så skriv hvilken størrelse du strikker :)
22.08.2024 - 12:19
![]() Marianne Winther wrote:
Marianne Winther wrote:
Hvor lang skal croptop modellen inden ærmegab
16.07.2024 - 14:59DROPS Design answered:
Hej Marianne. Du kan se alla mått på skissen längst ner på oppskriften. Mvh DROPS Design
17.07.2024 - 13:17
![]() Dorthe Kaldaras wrote:
Dorthe Kaldaras wrote:
Altså en fråga när man börjar rätt p efter avmaskning av armen så står där man tar inn på framsidan men det är det jo inte om man ser mönster A4 är det från avig man tar inn eller läser jag helt galet
07.06.2024 - 07:18DROPS Design answered:
Hej Dorthe, jo på bakstycket tager du ind i højre side ifølge A.4 og i venstre side ifølge A.5. Indtagningerne sker fra retsiden. Se billedet af ryggen :)
11.06.2024 - 11:34
![]() Lydie wrote:
Lydie wrote:
Bonjour je suis arrivé au niveau du dos ou l on doit faire les diagrammas 4 et 5 si j ai bien compris les diagrammes montrent les rangs endroits mais que doit on faire sur les rang envers vu que les cotes ne sont plus marquees puisqu on a des mailles endroit et envers melangées merci bien bonne journee
02.06.2024 - 18:00DROPS Design answered:
Bonjour Lydie, les diagrammes montrent tous les rangs, vu sur l'endroit , autrement dit aussi bien les rangs sur l'endroit que ceux sur l'envers; sur l'envers, lisez-les de gauche à droite en suivant les indications correspondantes "sur l'envers" des symboles, par ex A.5 va se tricote ainsi: 5m end, 2 m env, 2 m end, 1 m env, 2 m end. Bon tricot!
03.06.2024 - 08:01
![]() Bente Stav Søreng wrote:
Bente Stav Søreng wrote:
Strikker størrelse m/l. Når jeg beg. med diagram A2, A1 og A3 stemmer ikke vrangbord overens med diagrammet, den forskyver seg med en maske og det blir ikke som på modellen.
09.05.2024 - 11:50DROPS Design answered:
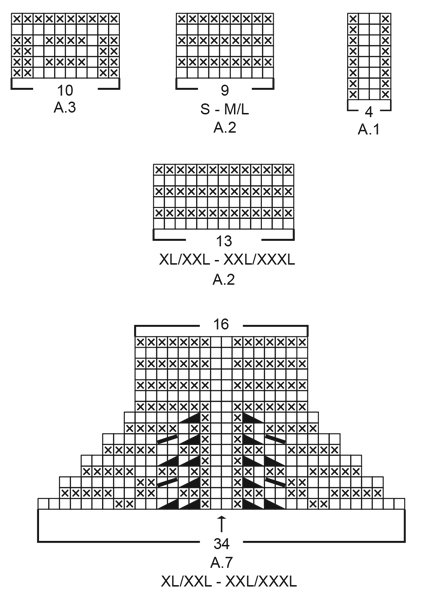
Hei Bente. Du strikker A.2 over de 9 første maskene (9 rettmasker), så fortsetter du med A.1 over de neste 50 maskene (rett masker over rettmasker og vrangmasker over vrangmasker). Når du skal strikke A.3 strikkes det 2 vrangmasker over 2 vrangmasker, og så strikkes det 6 rettmasker (over 2 rett, 2 vrang, 2 rett), 2 vrang over 2 vrang. Fortsett med A.1 over de neste 50 maskene (rett over rett og vrang over vrang). Så er det 18 masker kun rett masker. Fortsett med A.1 over 110 masker (rett over rett og vrang over vrang). Avslutt omgangen med A.2 = 9 masker rett. mvh DROPS Design
13.05.2024 - 11:33
|
||||||||||||||||||||||
Strawberry Summer#strawberrysummertop |
||||||||||||||||||||||
 |
 |
|||||||||||||||||||||
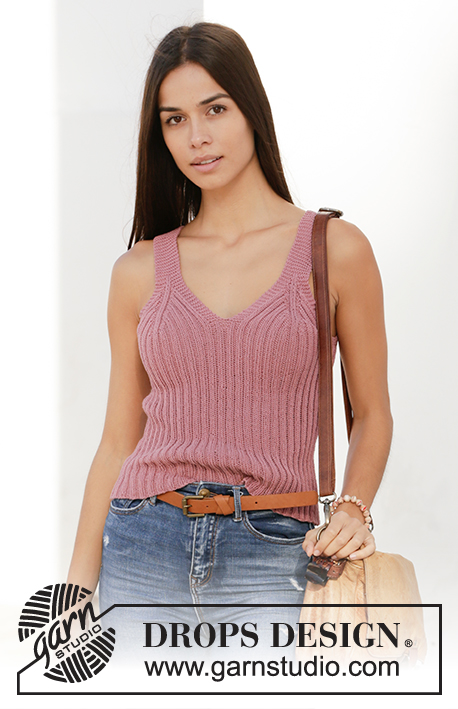
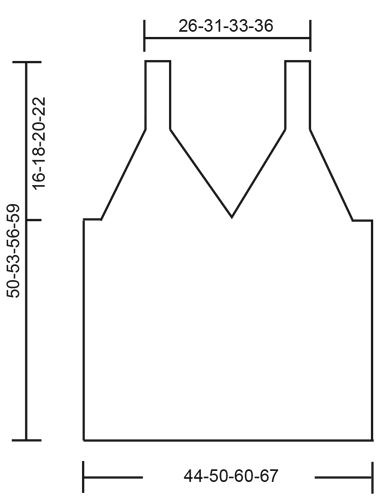
Knitted top in DROPS Safran. Piece is knitted bottom up with rib. Size: S - XXXL
DROPS 211-18 |
||||||||||||||||||||||
|
---------------------------------------------------------- EXPLANATION FOR THE PATTERN: ---------------------------------------------------------- GARTER STITCH (back and forth): Knit all rows. 1 ridge vertically = knit 2 rows. PATTERN: See diagrams A.1 to A.7. Choose diagram for your size (applies to A.2 and A.7). Diagrams show all rows in pattern seen from the right side. ---------------------------------------------------------- START THE PIECE HERE: ---------------------------------------------------------- TOP - SHORT OVERVIEW OF THE PIECE: Work body in the round on circular needle, from the bottom and up to armholes. Then work back piece and the 2 front pieces separately, back and forth on circular needle until finished measurements. Straps on front piece are fastened to back piece. BODY: Cast on 224-256-304-336 stitches on circular needle size 3 mm with Safran. Work A.1 in the round – insert at the same time 1 marker thread at the beginning of round (= left side when garments is worn), and 1 marker thread after 112-128-152-168 stitches (= right side when garment is worn). Both marker threads is between 2 purl stitches. Move the marker thread upwards when working. REMEMBER THE KNITTING TENSION! When piece measures 33-34-35-36 cm, work next round as follows (approx. 1 cm remains until piece is divided mid front, and decrease for armholes): Work A.2 (= 9-9-13-13 stitches), continue A.1 over the next 42-50-58-66 stitches, work A.3 (= 10 stitches mid front), continue A.1 over the next 42-50-58-66 stitches), work A.2 over the next 18-18-26-26 stitches (= 2 repetitions of 9-9-13-13 stitches – marker thread is between these 2 repetitions), continue A.1 over the next 94-110-126-142 stitches (= back piece), and work A.2 over the remaining 9-9-13-13 stitches. Continue pattern like this until A.2 and A.3 have been worked vertically. On next round cast off for armholes, i.e. work next round as follows: Cast off 4-4-8-8 stitches for armhole, work 5 stitches in GARTER STITCH – read explanation above, continue A.1 over the next 42-50-58-66 stitches, work 10 stitches in garter stitch (= mid front), continue A.1 over the next 42-50-58-66 stitches, work 5 stitches in garter stitch, cast off 8-8-16-16 stitches for armhole, work 5 stitches in garter stitch, continue A.1 over the next 94-110-126-142 stitches, work 5 stitches in garter stitch, and cast off the remaining 4-4-8-8 stitches for armhole. Cut the yarn. Finish back piece and front pieces separately. BACK PIECE: = 104-120-136-152 stitches. Begin from wrong side and work 1 row in rib as before with 5 edge stitches in garter stitch in each side. Continue to work in rib with 5 edge stitches in garter stitch in each side while AT THE SAME TIME decreasing for armholes on every row from right side as explained below. I.e. work first row from right side as follows: Work A.4 (= 13 stitches), continue rib as before until 13 stitches remain on row, finish with A.5 (= 13 stitches). Continue pattern like this until A.4 and A.5 have been worked 4-4-5-6 times in total vertically (= 16-16-20-24 stitches decreased in each side) = 72-88-96-104 stitches remain. Work 3 ridges back and forth over all stitches. Cast off - make sure that the cast-off edge is not too tight. Back piece measures approx. 11-11-14-16 cm from where piece was divided for front piece and bac piece. FRONT PIECE: = 104-120-136-152 stitches. Divide the piece mid front and slip half the stitches on 1 stitch holder or extra needle. Then work first part as explained below. PART-1: = 52-60-68-76 stitches. Begin from wrong side and work 1 row in rib as before with 5 edge stitches in garter stitch in each side. Insert 1 marker between the 2 middle stitches on row (= between 2 knit stitch seen from right side). Marker indicates the middle. Continue to work in rib with 5 edge stitches in garter stitch in each side while at the same time decreasing on each side of the middle as explained below. I.e. work first row from right side as follows: 5 edge stitches in garter stitch, work rib as before until 7 stitches remain before marker, work A.6 (= 14 stitches), work rib as before until 5 stitches remain on row, and finish with 5 edge stitches in garter stitch. Continue pattern like this, and repeat A.6 vertically until 34 stitches remain on row – finish after 1 row from wrong side. Now work A.7 over these 34 stitches. When A.7 has been worked, 12-12-16-16 stitches remain on needle for strap, and front piece measures approx. 11-13-16-18 cm from where piece was divided for front and back piece. Work strap as explained below. STRAP: = 12-12-16-16 stitches. Work in garter stitch back and forth until the strap measures approx. 10-12-10-10 cm – try the top on and work to desired length, strap should continue over the shoulder and down to back piece. Cast off. PART-2: Slip the 52-60-68-76 stitches from stitch holder or extra needle back on circular needle size 3 mm, and work part-2 the same way as part-1. Then work strap the same way as on part-1. Cast off. ASSEMBLY: Fasten straps to back piece - begin at the edge in each side and sew stitch to stitch. Cut and fasten the thread. |
||||||||||||||||||||||
Diagram explanations |
||||||||||||||||||||||
|
||||||||||||||||||||||
 |
||||||||||||||||||||||
 |
||||||||||||||||||||||
 |
||||||||||||||||||||||
Have you finished this pattern?Tag your pictures with #dropspattern #strawberrysummertop or submit them to the #dropsfan gallery. Do you need help with this pattern?You'll find 16 tutorial videos, a Comments/Questions area and more by visiting the pattern on garnstudio.com. © 1982-2026 DROPS Design A/S. We reserve all rights. This document, including all its sub-sections, has copyrights. Read more about what you can do with our patterns at the bottom of each pattern on our site. |
||||||||||||||||||||||


With over 40 years in knitting and crochet design, DROPS Design offers one of the most extensive collections of free patterns on the internet - translated to 17 languages. As of today we count 324 catalogues and 12272 patterns translated into English (UK/cm).
We work hard to bring you the best knitting and crochet have to offer, inspiration and advice as well as great quality yarns at incredible prices! Would you like to use our patterns for other than personal use? You can read what you are allowed to do in the Copyright text at the bottom of all our patterns. Happy crafting!
Post a comment to pattern DROPS 211-18
We would love to hear what you have to say about this pattern!
If you want to leave a question, please make sure you select the correct category in the form below, to speed up the answering process. Required fields are marked *.