
Popular categories
Looking for a yarn?


Comments / Questions (40)
![]() Isabelle wrote:
Isabelle wrote:
Bonjour Je ne comprends pas, dns les diminutions côtés : « diminuer 2 mailles vers la gauche au début du dos et 2 mailles sur la droite à la fin du dos ». Qu’entendez-vous par début et fin du dos ? Merci beaucoup Isabelle
17.02.2021 - 07:31DROPS Design answered:
Bonjour Isabelle, vous avez 2 marqueurs pour repérer les côtés du pull = le devant et le dos se trouvent entre ces marqueurs; quand vous tricotez les mailles du début du dos, vous diminuez 2 mailles à gauche, puis vous tricotez les mailles du dos, et diminuez 2 mailles à droit à la fin des mailles du dos (on ne diminue pas les mailles du devant) - la fois suivante, vous diminuerez au début et à la fin du devant et pas sur les mailles du dos. En espérant que ce soit ainsi plus clair pour vous. Bon tricot!
17.02.2021 - 08:29
![]() Petra wrote:
Petra wrote:
Missä kohtaa kerroksen vaihtumiskohta pitäisi hihassa olla? Ja kuinka sitten kavennukset saa poimittujen silmukoiden keskimmäisen ympärille niin, ettei kerroksen vaihtumiskohta häiritse tätä?
07.02.2021 - 11:55DROPS Design answered:
Kerroksen vaihtumiskohta on keskellä hihan alla ja kavennukset tehdään hihan merkityn silmukan kummallakin puolella. Lue myös ohjeen kavennusvinkki.
08.02.2021 - 16:44
![]() Isabelle wrote:
Isabelle wrote:
Bonjour Merci pour vos réponses. Au début de l’empiecement, après 7 tours, on commence les augmentations. Je fais des côtes anglaises avec mailles doubles. Mon rang d’augmentations est un rang « envers »... ça ne pose aucun souci ? Avez-vous une vidéo pour les augmentations raglan côtes anglaises mailles doubles ? J’ai seulement trouvé avec jetés. Merci pour votre réponse. Bonne journée
20.01.2021 - 07:46DROPS Design answered:
Bonjour Isabelle, vous devez augmenter dans la maille endroit + son jeté (= la maille double pour vous) proche de celle (= envers) avec un marqueur. Effectivement, nous n'avons que des vidéos d'augmentation en côtes anglaises avec jetés, essayez sur un échantillon d'augmenter de la même façon (= tricotez la même maille 3 fois 1 x en double,1 jeté, 1 x en double) et au tour suivant, tricotez le jeté torse ou non en fonction du rendu souhaité). Bon tricot!
20.01.2021 - 07:55
![]() Isabelle wrote:
Isabelle wrote:
Bonjour Je voudrais faire ce pull en côtes anglaises avec mailles doubles mais vous faites les côtes anglaises avec des jetés. Comment je peux faire pour modifier les explications ? Merci beaucoup pour votre aide Bonne journée Isabelle
16.01.2021 - 23:46DROPS Design answered:
Bonjour Isabelle, vous pouvez déjà faire un échantillon pour vérifier votre tension en largeur et en hauteur; il est possible que la quantité de fil nécessaire diffère - il vous faudra également adapter les augmentations/diminutions. nous ne sommes malheureusement pas en mesure de pouvoir adapter chacun de nos modèles à chaque demande, n'hésitez pas à demander de l'aide à votre magasin, même par mail ou téléphone. Merci pour votre compréhension. Bon tricot!
18.01.2021 - 09:16
![]() Isabelle wrote:
Isabelle wrote:
Bonjour Je voudrais faire ce pull mais... ça commence mal... Dans le paragraphe « col » il est noté « placer un marqueur en rond »... qu’est ce que ça veut dire ? Merci beaucoup pour votre aide. Isabelle
16.01.2021 - 22:57DROPS Design answered:
Bonjour Isabelle, ce "en rond" a été supprimé... Vous placez simplement un marqueur sur ce tour; ce marqueur va servir pour mesurer l'ouvrage; et vous tricotez, en rond, en suivant les indications de l'empiècement. Merci pour votre retour, bon tricot!
18.01.2021 - 09:07
![]() Johanna wrote:
Johanna wrote:
Raglansilmukoiden lisätskierroksella: mitä tehdään itse eaglansilmukoille? Neulotaan nurin vai tehdään ensin langanlierto ja nostetaan nurin neulomatta? Vai miten? Ja miten lisäyskierroksen jälkeisellä kierroksella viitaten ”raglanlisäykset”-kappaleen viimeiseen lauseeseen: miten nurin ilman langankiertoa - lisäyksessähän on tehty langankierto?
06.12.2020 - 22:42
![]() Hanne wrote:
Hanne wrote:
Kan jeg strikke denne i kun En slags garn kid Silk mohair ? Hvis ja - hvor mange tråde ?
04.10.2020 - 13:54DROPS Design answered:
Hej Hanne. Du kan sticka den i två trådar DROPS Kid-Silk. Se bara till att få den stickfasthet som uppges i oppskriften. Mvh DROPS Design
06.10.2020 - 07:52
![]() Simona Gasser wrote:
Simona Gasser wrote:
Hallo Beim Uebergang zur neuen Reihe, zwischen letzter Rechtsmasche und der ersten Rechtsmasche, ist die Distanz zwischen den zwei Rechtsmaschen grösser als zw. den anderen Rechtsmaschen. Es fällt auf. Wie kann ich es vermeiden? Besten Dank
28.09.2020 - 17:55DROPS Design answered:
Liebe Frau Gasser; versuchen Sie den Faden etwas mehr zu ziehen, damit dieser Übergang nicht sichtbar wird - dieses Video über Vollpatent in Runden kann vielleicht Ihnen helfen. Viel Spaß beim stricken!
29.09.2020 - 07:41
![]() Elisabeth wrote:
Elisabeth wrote:
Hei, strikker denne i XS. Har så vidt begynt, strikket vr borden og felt av til 76 m som beskrevet i oppskriften. Skal så merke av til raglanfelling - 13+9+27+9 så sier oppskriften at jeg skal stå igjen med 14 m. Men det stemmer jo ikke, 13+9+27+9+14=72
27.08.2020 - 00:11DROPS Design answered:
Hei Elisabeth, Du teller 13 og setter merke i neste maske (det blir det 14 masker), tell 9 og setter i neste maske (10) og det samme 2 ganger til. Det blir 14 + 10 + 28 + 10 + 14 = 76. God fornøyelse!
27.08.2020 - 07:47
![]() Cecilie wrote:
Cecilie wrote:
Hej Drops Jeg er gået i gang med jeres flotte lavendler puff, og er nået til at skulle tage ud første gang. Mit problem ligger i omgangen efter, for jeg kan simpelthen ikke få det til at passe med hvordan det ser ud på billedet, med to “ret-masker” uden om “vrang-masken”. Håber i kan hjælpe:)
26.07.2020 - 20:50DROPS Design answered:
Hej Cecilie, har du læst at; første omgang efter en omgang med udtagninger, strikkes vrangmaskerne i udtagningen vrang uden at strikkes sammen med et omslag, fordi omslaget endnu ikke er lavet. Vi har flere videoer med udtagning i patent, men jeg tror denne kan hjælpe dig med at forstå teknikken Tag ud i helpatent
28.07.2020 - 11:43
|
||||||||||
Lavender Puff#lavenderpuffsweater |
||||||||||
 |
 |
|||||||||
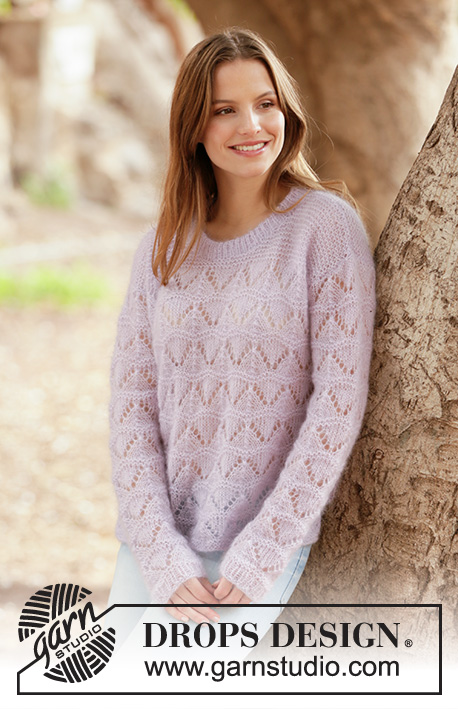
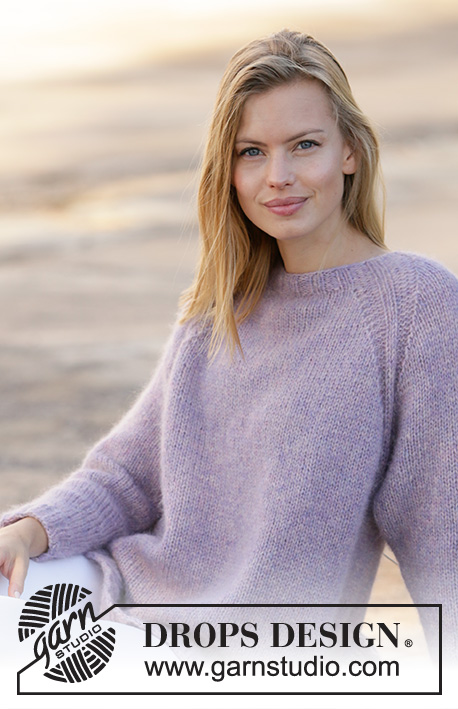
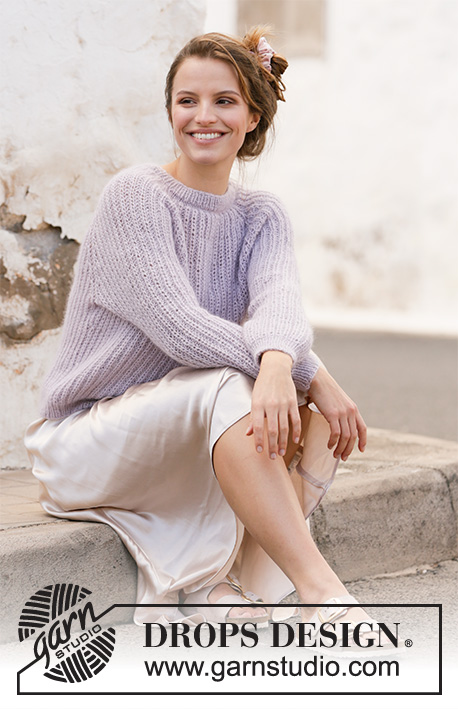
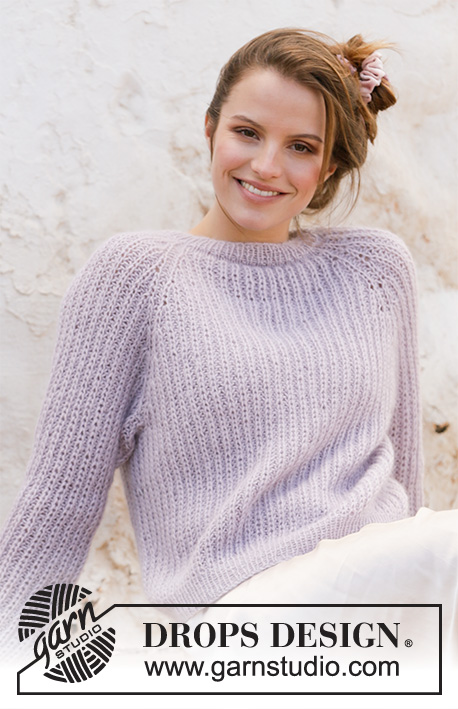
Knitted jumper in DROPS Alpaca and DROPS Kid-Silk. The piece is worked top down with English rib and raglan. Sizes XS - XXL.
DROPS 213-33 |
||||||||||
|
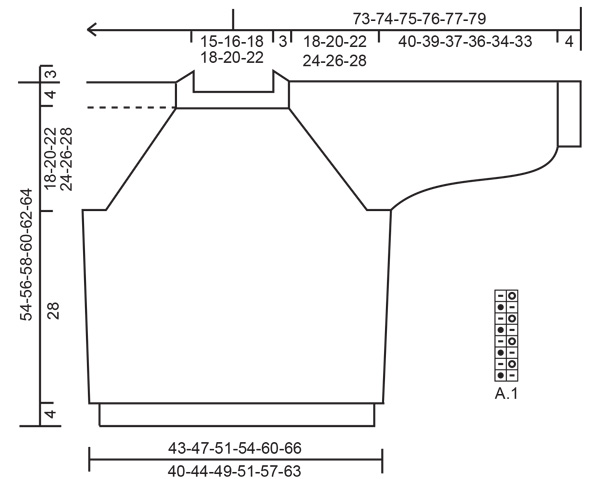
------------------------------------------------------- EXPLANATIONS FOR THE PATTERN: ------------------------------------------------------- PATTERN: See diagram A.1. INCREASE TO RAGLAN: Increase to raglan on each side of the purled stitch with marker (= raglan-stitch), i.e. increase in the knitted stitch and yarn over closest to the raglan-stitch. Increase 2 stitches on each side of all raglan-stitches (= 16 stitches increased on an increase-round). Increase 2 stitches in the knitted stitch by working 3 stitches in the stitch and yarn over as follows: Knit together the stitch and yarn over but do not slip them off the left needle, make 1 yarn over the right needle and knit together the stitch and yarn over 1 more time, then slip the knitted stitch and yarn over off the left needle (= 2 stitches increased). Then work the new stitches in English rib (A.1) but be aware that on the first round after the increase, the purled stitches are purled without yarn overs, as there are no yarn overs for these stitches. DECREASE TIP (for sides of body and mid under the sleeves): Decrease in stitches closest to the purled stitches with markers mid under the sleeve and in the sides of the body. All decreases are worked on a round where the knitted stitches and yarn overs are knitted together! DECREASE 2 STITCHES TOWARDS THE LEFT AS FOLLOWS (i.e. start after the purled stitch with marker): Slip the first knitted stitch and yarn over onto the right needle as if to knit together, knit the next 2 stitches together (i.e. 1 purled + knitted stitch and yarn over), then pass the slipped stitch and yarn-over over the knitted together stitches (= 2 stitches decreased). DECREASE 2 STITCHES TOWARDS THE RIGHT AS FOLLOWS (i.e. start 3 stitches + 2 yarn overs before the purled stitch with marker): Slip the first knitted stitch and yarn over onto the right needle as if to knit together, purl 1, pass the slipped stitch and yarn-over over the purled stitch, slip the stitch back onto the left needle, pass the stitch and yarn-over over the stitch which was slipped back onto the left needle, and finally slip the remaining stitch onto the right needle (= 2 stitches decreased). CASTING-OFF TIP: To avoid the cast-off edge being tight you can cast off with a larger size needle. If the edge is still tight, make 1 yarn over after approx. each 4th stitch at the same time as casting off and the yarn overs are cast off as normal stitches. ------------------------------------------------------- START THE PIECE HERE: ------------------------------------------------------- JUMPER – SHORT OVERVIEW OF THE PIECE: The neck and yoke are worked in the round with circular needle, from mid back and top down. The yoke is divided for body and sleeves and the body is continued in the round with circular needle. The sleeves are worked with short circular needle/double pointed needles, top down. NOTE: All stitch-counts given when working English rib are without the yarn overs, as they are counted together with their respective stitches. NECK: Cast on 78-82-86-88-96-100 stitches with short circular needle size 3.5 mm and 1 strand Alpaca and 1 strand Kid-Silk (= 2 strands). Beginning of round = mid-back. Knit 1 round then work rib in the round (= knit 1 / purl 1) for 3 cm. Knit 1 round where you decrease 2-2-6-4-0-0 stitches evenly spaced = 76-80-80-84-96-100 stitches. Insert 1 marker in the round, then work the yoke as described below. The yoke is measured from the marker. YOKE: Change to circular needle size 5 mm and knit 1 round. The next round is worked as follows: * Knit 1, 1 yarn over, slip 1 stitch as if to purl *, work from *-* to the end of the round. Now insert 4 markers in the piece as described below (without working the stitches). The markers will be used when increasing to raglan. Count 13-15-15-15-17-17 stitches (= ½ back piece), insert 1 marker in the next stitch (= raglan-stitch), count 9-9-9-9-13-13 stitches (= sleeve), insert 1 marker in the next stitch (= raglan-stitch), count 27-29-29-31-33-35 stitches (= front piece), insert 1 marker in the next stitch (= raglan-stitch), count 9-9-9-9-13-13 stitches (= sleeve), insert 1 marker in the next stitch (= raglan-stitch). There are 14-14-14-16-16-18 stitches left for the back piece after the last marker. Now work A.1 in the round. AT THE SAME TIME increase to RAGLAN as described below. REMEMBER THE KNITTING TENSION! RAGLAN: When you have worked 7 rounds of A.1 (and the next round begins with «knit the yarn over and slipped stitch together »), increase to RAGLAN – read description above (= 16 stitches increased on an increase-round). Increase like this every 8th round (i.e. every 4th round with visible English rib stitches in height) a total of 7-8-9-10-11-12 times = 188-208-224-244-272-292 stitches on the needle. Continue with A.1 without further increases until the piece measures 18-20-22-24-26-28 cm from the marker on the neck (the piece measures approx. 22-24-26-28-30-32 cm from the shoulder). Now divide the piece for body and sleeves on the next round as follows: Work 27-31-33-35-39-43 stitches as before (= ½ back piece), place the next 39-43-45-51-57-59 stitches on 1 thread for the sleeve, cast on 5 new stitches on the needle (= in side under the sleeve), work 55-61-67-71-79-87 stitches as before (= front piece), place the next 39-43-45-51-57-59 stitches on 1 thread for the sleeve, cast on 5 new stitches on the needle (= in side under the sleeve) and work the remaining 28-30-34-36-40-44 stitches as before (= ½ back piece). Cut the strand. Body and sleeves are finished separately. THE PIECE IS NOW MEASURED FROM HERE! BODY: = 120-132-144-152-168-184 stitches. Insert 1 marker in the middle of the 5 stitches cast on under each sleeve. Allow the markers to follow your work onwards; they will be used when decreasing in the sides of the body. Start the round at the stitch with the marker and continue with A.1 in the round as before. DECREASE IN SIDES: When the piece measures 8 cm from the division, decrease 2 stitches on the back piece by decreasing 2 stitches in the English rib stitch closest to the purled stitch with the marker on each side – read DECREASE TIP; i.e. decrease 2 stitches towards the left at the beginning of the back piece and 2 stitches to the right at the end of the back piece = 116-128-140-148-164-180 stitches. When the piece measures 18 cm from the division, decrease in the same way on the front piece (i.e. decrease 2 stitches towards the left at the beginning of the front piece and 2 stitches towards the right at the end of the front piece) = 112-124-136-144-160-176 stitches. Continue working until the piece measures 28 cm from the division in all sizes (there is 4 cm left to finished length. You can try the garment on and work to the desired length). Change to circular needle size 3.5 mm and work rib in the round (= knit 1 / purl 1) – on the first round the yarn-overs are knitted together with the knitted stitches. When the rib measures 4 cm, loosely cast off with knit over knit and purl over purl – read CASTING-OFF TIP! The jumper measures approx. 54-56-58-60-62-64 cm from the shoulder down. SLEEVE: Place the 39-43-45-51-57-59 stitches from the thread on the one side of the piece on double pointed needles or short circular needle size 5 mm and knit up 1 stitch in each of the 5 stitches cast on under the sleeve = 44-48-50-56-62-64 stitches. Insert a marker thread in the middle stitch of the 5 stitches cast on under the sleeve. Allow the thread to follow your work onwards; it will be used when decreasing under the sleeve. Work A.1 in the round. AT THE SAME TIME on round 8 (i.e. on the 4th round of visible English rib stitches), decrease 4 stitches mid under the sleeve – read DECREASE TIP (decrease 2 stitches towards the left after the stitch with the marker and decrease 2 stitches towards the right before the stitch with the marker). Decrease like this every 8th-8th-8th-8th-6th-6th round (i.e. every 4th-4th-4th-4th-3rd-3rd round of visible English rib stitches) a total of 2-2-2-3-3-3 times = 36-40-42-44-50-52 stitches. Continue working until the sleeve measures 40-39-37-36-34-33 cm from the division (there is 4 cm left to finished length. You can try the garment on a work to the desired length). NOTE: Shorter measurements in larger sizes due to wider neck and longer yoke. Change to double pointed needles size 3.5 mm. Work rib (= knit 1 / purl 1) – on the first round the yarn overs are knitted together with the knitted stitches. When the rib measures 4 cm, cast off with knit over knit and purl over purl – remember CASTING-OFF TIP! The sleeve measures approx. 44-43-41-40-38-37 cm from the division. Work the other sleeve in the same way. |
||||||||||
Diagram explanations |
||||||||||
|
||||||||||
 |
||||||||||
Have you finished this pattern?Tag your pictures with #dropspattern #lavenderpuffsweater or submit them to the #dropsfan gallery. Do you need help with this pattern?You'll find 16 tutorial videos, a Comments/Questions area and more by visiting the pattern on garnstudio.com. © 1982-2026 DROPS Design A/S. We reserve all rights. This document, including all its sub-sections, has copyrights. Read more about what you can do with our patterns at the bottom of each pattern on our site. |
||||||||||


With over 40 years in knitting and crochet design, DROPS Design offers one of the most extensive collections of free patterns on the internet - translated to 17 languages. As of today we count 324 catalogues and 12290 patterns translated into English (UK/cm).
We work hard to bring you the best knitting and crochet have to offer, inspiration and advice as well as great quality yarns at incredible prices! Would you like to use our patterns for other than personal use? You can read what you are allowed to do in the Copyright text at the bottom of all our patterns. Happy crafting!
Post a comment to pattern DROPS 213-33
We would love to hear what you have to say about this pattern!
If you want to leave a question, please make sure you select the correct category in the form below, to speed up the answering process. Required fields are marked *.