
Popular categories
Looking for a yarn?


Comments / Questions (92)
![]() Apert Agnes wrote:
Apert Agnes wrote:
Que signifie serrer le fil dans la rehausse ? Merci
10.03.2026 - 19:45DROPS Design answered:
Bonjour Mme Apert, il faut simplement serrer le fil lorsque l'on tourne au début d'un rang raccourci pour éviter qu'un trou ne se forme, retrouvez cette technique ici, en vidéo. Bon tricot!
11.03.2026 - 07:35
![]() R C Andersson wrote:
R C Andersson wrote:
Hej, jeg er ved at strikke denne model i str. L . Jeg er kommet ti cm på for-og bagstykket og overvejer at strikke den den som kjole. Er det en mulighed ? hvis ja hvordan gør jeg så? MVH
08.02.2026 - 12:45DROPS Design answered:
Hei RC. Det er en mulighet ja, men design av har dessverre ikke mulighet til å tilpasse en publisert oppskrift til en annen. Men ta en titt på kjoler vi har som er strikket i garngruppe A og se om du selv kan tilpasse oppskriften. Bare husk å ha nok garn :) mvh DROPS Design
09.02.2026 - 15:18
![]() De Souza Dias wrote:
De Souza Dias wrote:
Bonjour , le coloris 6309 s'appelle sur garnstudio uni bleu jeans et vous indiquez pétrole moyen . et le coloris 7139 s'appelle sur garnstudio uni bleu minéral et vous indiquez vert gris foncé .Le coloris 7233 est indiqué sur garnstudio mix olive et vous indiquez olive . les noms des couleurs ont changé ou bien est ce une erreur ? merci pour votre réponse car j’attends pour commander la laine de deux ouvrages
28.01.2026 - 11:58DROPS Design answered:
Bonjour Mme De Souza Dias, il arrive que les noms de couleurs soit ajusté au fil du temps et des collections; les références sont toujours les mêmes; si vous avez besoin d'aide pour choisir d'autres couleurs, votre magasin saura vous aider, même par mail ou téléphone. Bon tricot!
29.01.2026 - 08:41
![]() THELIN wrote:
THELIN wrote:
Quand je lis sur votre modèle Flèche 3 augmenter 26 mailles = 320 mailles. J’étais à la Flèche 2 à 294 mailles. Or 294m , ce n’est pas divisible par 26. Qu’est-ce que j’ai raté
19.01.2026 - 11:59DROPS Design answered:
Bonjour Mme Thelin, le nombre de mailles du diagramme à répéter varie entre 4 et 6; ainsi, après la flèche -2, on a 294 mailles et le motif se répète alors sur 6 mailles, vous pourrez ainsi tricoter 49 fois les 6 m du diagramme. Ensuite, on va augmenter 26 m à la flèche -3, on a alors 320 m et le motif se répète maintenant sur 4 mailles = vous pouvez répéter 80 fois le diagramme. Bon tricot!
20.01.2026 - 08:54
![]() Goldbach wrote:
Goldbach wrote:
Liebes Team, habe den Pullover tatsächlich geschafft. Danke für die tolle Anleitung. Wie kann ich ein Bild von meinem Pullover einstellen? Liebe Grüße Rita Goldbach
06.01.2026 - 11:10DROPS Design answered:
Liebe Frau Goldbach, hier lesen Sie, wie Sie ein Bild von Ihrem Pullover teilen können. Danke im voraus!
07.01.2026 - 07:11
![]() Kate Trygg wrote:
Kate Trygg wrote:
Har stickat oket färdigt och skall nu dela till fram, bakstycke och ärmar. Börjar jag då framifrån i mitten av tröjan?
05.01.2026 - 21:26DROPS Design answered:
Hi Kate, the beginning of round is mid back. Happy knitting!
05.01.2026 - 21:38
![]() THELIN wrote:
THELIN wrote:
Bonjour, je fais 95cm de tour de poitrine. Est-ce que c’est bien la taille M que je dois utiliser comme modèle?
16.12.2025 - 19:11DROPS Design answered:
Bonjour Mme Thelin, vous pouvez choisir entre une taille M et une taille L en fonction de l'aisance souhaitée, découvrez ici comment choisir sa taille. Bon tricot!
17.12.2025 - 17:36
![]() Golliot Jeanne wrote:
Golliot Jeanne wrote:
Pouvez vous me dire à quelle mesure de poitrine correspond la taille L merci beaucoup
03.12.2025 - 20:53DROPS Design answered:
Bonjour Mme Golliot, les mesures indiquées dans le schéma sont celles de l'ouvrage terminé, quand il est à plat. Découvrez ici comment choisir votre taille. Bon tricot!
04.12.2025 - 09:13
![]() Lill Vramo wrote:
Lill Vramo wrote:
Hei, jeg tenker å strikke Heim genser til ei venninne. Lurer på hvordan jeg skal ta riktige mål for å avgjøre størrelse.
06.11.2025 - 15:38DROPS Design answered:
Hei Lill. Da tar du en titt på målskissen nederst på oppskriften. mvh DROPS Design
17.11.2025 - 11:53
![]() Sylie wrote:
Sylie wrote:
Bonjour, Je suis arrivée à la ligne 5 du jacquard A1 et le motif n'est pas aligné sur le motif précédent ? est-ce normal ? Merci pour votre réponse. Cordialement.
04.11.2025 - 11:44DROPS Design answered:
Bonjour Sylie, si vous avez augmenté juste avant, c'est normal, pas d'inquiétude, votre nombre de mailles est divisible par 4 (le nombre de mailles du motif à répéter), répétez simplement le diagramme tout le tour. Bon tricot!
04.11.2025 - 17:16
|
|||||||||||||||||||
Heim#heimsweater |
|||||||||||||||||||
 |
 |
||||||||||||||||||
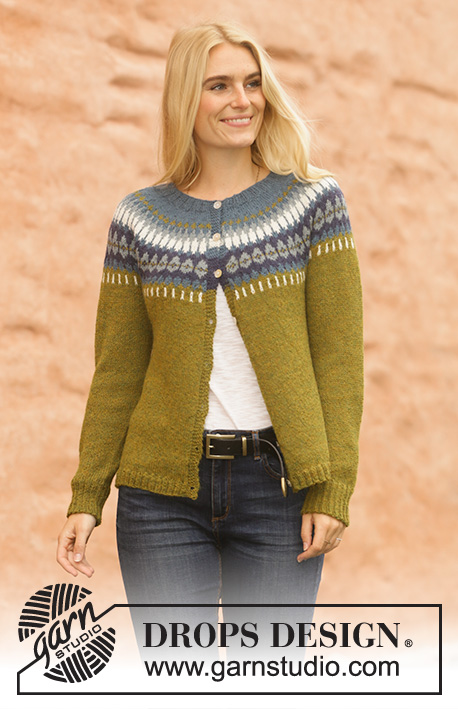
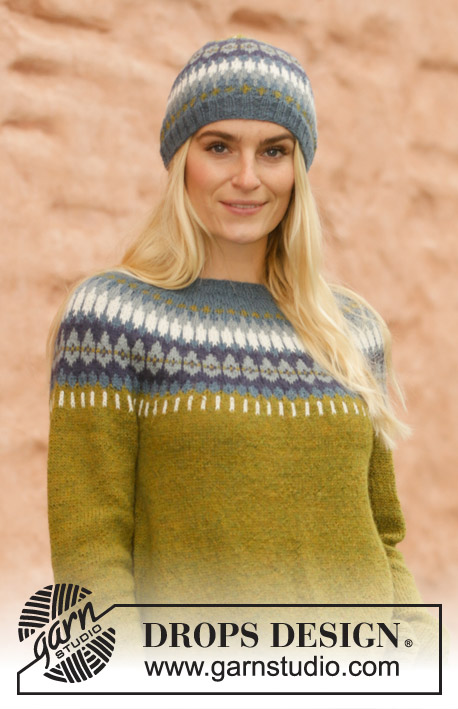
Knitted jumper in DROPS Alpaca. The piece is worked top down with round yoke and Nordic pattern on the yoke. Sizes S - XXXL. Knitted hat with Nordic pattern in DROPS Alpaca.
DROPS 207-1 |
|||||||||||||||||||
|
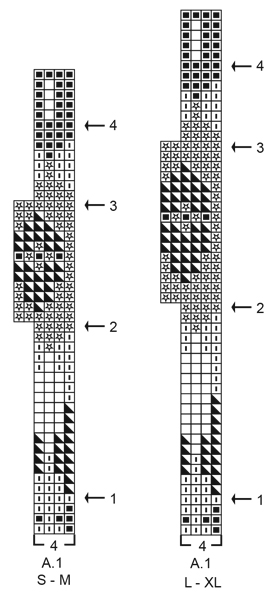
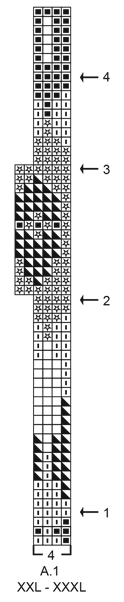
------------------------------------------------------- EXPLANATIONS FOR THE PATTERN: ------------------------------------------------------- INCREASE/DECREASE TIP (evenly spaced): To work out how to increase/decrease evenly, count the total number of stitches on needle (e.g. 104 stitches) and divide by the number of increases/decreases to be made (e.g. 34) = 3.1. In this example, increase by making 1 yarn over after approx. each 3rd stitch. On the next round knit the yarn overs twisted to avoid holes. When decreasing knit together approx. each 2nd and 3rd stitch. ELEVATION (back of neck): To make the jumper slightly higher at the back of the neck when working yoke you can work an elevation as described here. Skip this section if you do not want an elevation. Insert 1 marker at the beginning of the round (mid back). Start from the right side with medium petrol and knit 11-12-12-13-13-14 stitches, turn, tighten strand and purl 22-24-24-26-26-28 stitches back. Turn, tighten strand and knit 33-36-36-39-39-42 stitches, turn, tighten strand and purl 44-48-48-52-52-56 stitches back. Turn, tighten strand and knit 55-60-60-65-65-70 stitches, turn, tighten strand and purl 66-72-72-78-78-84 stitches. Turn, tighten the strand and knit 77-84-84-91-91-98 stitches, turn tighten the strand and purl 88-96-96-104-104-112 stitches. Turn tighten the strand and knit back to mid back. Then work YOKE as described in the text. PATTERN: Jumper: See diagram A.1. Choose diagram for your size. Hat: See diagram A.2. The whole pattern is worked in stocking stitch. KNITTING TIP: To avoid the knitting tension becoming tighter when working pattern it is important that the strands at the back are not tight. Use a size larger needle when working pattern if this is a problem. INCREASE TIP-1 (for sides of body): Work until there are 3 stitches left before the marker thread, make 1 yarn over, knit 6 (marker thread sits between these 6 stitches) make 1 yarn over (= 2 stitches increased at each marker thread; 4 stitches increased on round). On the next round knit the yarn overs twisted to avoid holes. Then work the new stitches in stocking stitch. DECREASE TIP (for mid under sleeve): Work until there are 3 stitches left before the marker thread, knit 2 together, knit 2 (marker thread sits between these 2 stitches), slip 1 stitch as if to knit, knit 1 and pass the slipped stitch over the knitted stitch. CASTING-OFF TIP: To avoid the cast-off edge being tight you can cast off with a larger size needle, or make 1 yarn over after approx. each 8th stitch at the same time as casting off (yarn overs cast off as normal stitches). ------------------------------------------------------- START THE PIECE HERE: ------------------------------------------------------- JUMPER – SHORT OVERVIEW OF THE PIECE: The neck and yoke are worked in the round with circular needle, top down. The yoke is divided for body and sleeves. The body is continued in the round with circular needle. The sleeves are worked in the round with short circular needle/double pointed needles, top down. NECK: Cast on 104-108-112-116-120-124 stitches with short circular needle size 3 mm and medium petrol. Knit 1 round and then work rib in the round (= knit 2 /purl 2) for 3-3-3-4-4-4 cm. When the rib is finished knit 1 round where you increase 34-36-38-40-42-44 stitches evenly spaced – read INCREASE/DECREASE TIP = 138-144-150-156-162-168 stitches. Knit 1 round (yarn overs knitted twisted). Change to circular needle size 3.5 mm. Insert 1 marker in the middle of the round (= mid front) – the yoke will be measured from this marker! Now you can work an ELEVATION in the back of the neck – read description above. If you do not want an elevation, go straight to YOKE. YOKE: Work stocking stitch in the round with medium petrol. When the piece measures 1½-1½-2-2-2-2 cm from the marker mid front, increase 34-36-40-46-48-52 stitches evenly spaced = 172-180-190-202-210-220 stitches. When the piece measures 2½-2½-3-3-3-3 cm from the marker mid front, increase 28-36-38-42-46-48 stitches evenly spaced = 200-216-228-244-256-268 stitches. When the piece measures 3-3-4-4-4-4 cm from the marker mid front, start working A.1 in the round (= 50-54-57-61-64-67 repeats of 4 stitches). Continue this pattern. Read KNITTING TIP and REMEMBER THE KNITTING TENSION! AT THE SAME TIME on each round marked with an arrow in A.1, increase stitches evenly as described below: Arrow-1: Increase 36-36-40-44-44-52 stitches evenly spaced = 236-252-268-288-300-320 stitches (there is now room for 59-63-67-72-75-80 repeats of A.1 with 4 stitches). Arrow-2: Increase 40-42-50-54-60-64 stitches evenly spaced = 276-294-318-342-360-384 stitches (there is now room for 46-49-53-57-60-64 repeats of A.1 with 6 stitches). Arrow-3: Increase 20-26-30-34-44-48 stitches evenly spaced = 296-320-348-376-404-432 stitches (there is now room for 74-80-87-94-101-108 repeats of A.1 with 4 stitches). Arrow-4: Increase 12-20-24-24-28-32 stitches evenly spaced = 308-340-372-400-432-464 stitches (there is now room for 77-85-93-100-108-116 repeats of A.1 with 4 stitches). When A.1 has been completed continue with stocking stitch and olive. AT THE SAME TIME on the first round after A.1, increase 2-6-6-10-6-14 stitches evenly spaced = 310-346-378-410-438-478 stitches. Work until the piece measures 20-22-24-25-27-29 cm from the marker on the neck. Divide the yoke for body and sleeves, working the next round with olive as follows: Work 46-51-54-60-66-73 stitches in stocking stitch (= ½ back piece), place the next 62-70-80-84-86-92 stitches on 1 thread for sleeve, cast on 8-8-10-10-12-12 new stitches on the needle (= in side under sleeve), work 93-103-109-121-133-147 stitches in stocking stitch (= front piece), place the next 62-70-80-84-86-92 stitches on 1 thread for sleeve, cast on 8-8-10-10-12-12 new stitches on the needle (= in side under sleeve) and work the remaining 47-52-55-61-67-74 stitches in stocking stitch (= ½ back piece). Body and sleeves are finished separately. THE PIECE IS NOW MEASURED FROM HERE! BODY: = 202-222-238-262-290-318 stitches. Insert 1 marker thread on each side of the body in the middle of the 8-8-10-10-12-12 stitches cast on under the sleeve. Allow the threads to follow your work onwards; they will be used when increasing in the sides. Start the round at one of the marker threads and work stocking stitch in the round with olive. When the piece measures 5 cm from the division in all sizes increase 1 stitch on each side of both marker threads – read INCREASE TIP (= 4 stitches increased). Increase like this every 5-5-5-4-4-4 cm a total of 5-5-5-6-6-6 times on each side = 222-242-258-286-314-342 stitches. Continue working until the piece measures 30 cm from the division (there is approx. 3 cm to finished length; you can try the jumper on and continue working to desired length). Knit 1 round where you increase 74-82-86-98-106-114 stitches evenly spaced = 296-324-344-384-420-456 stitches (this is done so the rib is not tight). Change to circular needle size 3 mm and work rib (= knit 2 / purl 2) for 3 cm. Cast off with knit over knit and purl over purl – read CASTING OFF TIP! The jumper measures approx. 56-58-60-62-64-66 cm from the shoulder down. SLEEVE: Place the 62-70-80-84-86-92 stitches from the thread on the one side of the piece on short circular needle/double pointed needles size 3.5 mm and knit up 1 stitch in each of the 8-8-10-10-12-12 stitches cast on under the sleeve = 70-78-90-94-98-104 stitches. Insert 1 marker thread in the middle of the 8-8-10-10-12-12 stitches and allow it to follow your work onwards; it will be used when decreasing mid under sleeve. Start the round at the marker thread and work stocking stitch in the round with olive. When the piece measures 3 cm from the division in all sizes decrease 2 stitches mid under sleeve – read DECREASE TIP. Decrease like this every 3½-2½-1½-1½-1½-1 cm a total of 10-13-19-19-19-22 times = 50-52-52-56-60-60 stitches. Continue working until the sleeve measures 37-36-35-33-32-30 cm from the division (there is approx. 7 cm to finished length; you can try the jumper on and continue working to desired length). NOTE: Shorter measurements in larger sizes due to wider neck and longer yoke. Knit 1 round where you increase 18-20-20-20-20-20 stitches evenly spaced = 68-72-72-76-80-80 stitches. Change to double pointed needles size 3 mm and work rib (= knit 2 / purl 2) for 7 cm. Cast off with knit over knit and purl over purl – remember CASTING OFF TIP. The sleeve measures approx. 44-43-42-40-39-37 cm from the division. Work the other sleeve in the same way. ------------------------------------------------------- HAT – SHORT OVERVIEW OF THE PIECE: The piece is worked in the round with short circular needle, bottom up. Change to double pointed needles when necessary. HAT: Cast on 116-120-124 stitches with circular needle size 2.5 mm and medium petrol. Knit 1 round. Then work rib in the round (= knit 2 / purl 2) for 3-4-4 cm. Change to circular needle size 3.5 mm and knit 1 round where you increase 24 stitches evenly spaced in all sizes – read INCREASE/DECREASE TIP = 140-144-148 stitches. Work A.2 in the round (= 35-36-37 repeats of 4 stitches). Continue this pattern. REMEMBER THE KNITTING TENSION! AT THE SAME TIME on each round marked with an arrow in A.2, decrease stitches evenly spaced as described below: Arrow-1: Decrease 8-6-4 stitches evenly spaced = 132-138-144 stitches. Continue the pattern (there is now room for 22-23-24 repeats of 6 stitches). Arrow-2: Decrease 24-26-28 stitches evenly spaced = 108-112-116 stitches. Continue the pattern (there is now room for 27-28-29 repeats of 4 stitches). Arrow-3: Decrease 24-24-24 stitches evenly spaced = 84-88-92 stitches. Continue the pattern (there is now room for 21-22-23 repeats of 4 stitches). When A.2 has been completed continue with olive as follows: Knit 3-3-4 rounds, * knit 1 round where all the stitches are knitted together 2 and 2, knit 5-5-6 rounds *, work from *-* 1 more time. Then knit 1 round where all the stitches are knitted together 2 and 2 = 11-11-12 stitches left. Cut the strand, pull it through the remaining stitches, tighten and fasten well. The hat measures approx. 23-24-25 cm from the top down. |
|||||||||||||||||||
Diagram explanations |
|||||||||||||||||||
|
|||||||||||||||||||
 |
|||||||||||||||||||
 |
|||||||||||||||||||
 |
|||||||||||||||||||
Have you finished this pattern?Tag your pictures with #dropspattern #heimsweater or submit them to the #dropsfan gallery. Do you need help with this pattern?You'll find 27 tutorial videos, a Comments/Questions area and more by visiting the pattern on garnstudio.com. © 1982-2026 DROPS Design A/S. We reserve all rights. This document, including all its sub-sections, has copyrights. Read more about what you can do with our patterns at the bottom of each pattern on our site. |
|||||||||||||||||||


With over 40 years in knitting and crochet design, DROPS Design offers one of the most extensive collections of free patterns on the internet - translated to 17 languages. As of today we count 325 catalogues and 12298 patterns translated into English (UK/cm).
We work hard to bring you the best knitting and crochet have to offer, inspiration and advice as well as great quality yarns at incredible prices! Would you like to use our patterns for other than personal use? You can read what you are allowed to do in the Copyright text at the bottom of all our patterns. Happy crafting!
Post a comment to pattern DROPS 207-1
We would love to hear what you have to say about this pattern!
If you want to leave a question, please make sure you select the correct category in the form below, to speed up the answering process. Required fields are marked *.