
Popular categories
Looking for a yarn?


Comments / Questions (17)
![]() Carmen wrote:
Carmen wrote:
Muchas gracias. Ya lo he entendido. Me había ofuscado con eso de empezar el esquema por el revés de la labor. En realidad, a efectos visuales la primera pasada del revés equivaldría a una pasada 3 del esquema. 🤯🤯 !!!! Gracias Mil
18.11.2019 - 16:13
![]() Carmen wrote:
Carmen wrote:
He empezado la bufanda: “ trabajar 1 fila del revés, después trabajar el patrón A.1”. Si el diagrama es visto del derecho y la labor está del lado del revés, significa que hay que leer el esquema de izda. A dcha. , en lugar de dcha. a izda. ? O hacer 2 filas del revés al inicio para seguir el esquema : filas impares derecho de la labor, filas pares revés de la labor. Espero haberme explicado!!! Saludos
15.11.2019 - 20:04DROPS Design answered:
Hola Carmen. Si, esta bufanda se comienza con una fila de revés para tener un borde más firme, pero esto no afecta al trabajar el diagrama. Se trabaja una fila de revés y después se empieza a trabajar la 1ª fila del diagrama, de derecho. El diagrama se lee como siempre de derecha a izquierda.
17.11.2019 - 19:05
![]() Silke wrote:
Silke wrote:
Warum ist in der Strickschrift von Hin- und Rückreihen die Rede, wenn doch Runden gestrickt werden. Mir ist nicht klar, wie die Schrift zu lesen ist.
16.10.2019 - 19:39DROPS Design answered:
Liebe Silke, wenn Sie die Mütze stricken, werden die Diagramme in der Runde gestrickt, aber wenn Sie den Schal stricken, stricken Sie die Diagramme in Hin- und Rückreihen. So daß 1 Masche rechts in Hin-Reihen wird immer rechts in der Runde gestrickt, und 1 Masche rechts in Rück-Reihen muss dann in der Runde links gestrickt. Viel Spaß beim stricken!
17.10.2019 - 10:20
![]() Silke wrote:
Silke wrote:
Warum ist in der Strickschrift von Hin- und Rückreihen die Rede, wenn doch Runden gestrickt werden. Mir ist nicht klar, wie die Schrift zu lesen ist.
16.10.2019 - 19:37
![]() Jette Hansen wrote:
Jette Hansen wrote:
Strikkefasthedsprøve, er den strikke på pind nr. 8 eller pind nr. 9 Mvh Jette
15.08.2019 - 11:01DROPS Design answered:
Hej Jette, Til halstørklædet har vi brugt pind nr 9 og til huen har vi brugt pind nr 8 (7 til ribkanten). God fornøjelse!
16.08.2019 - 09:56
![]() Mirjam wrote:
Mirjam wrote:
Ren vinterhygge!
22.06.2019 - 19:33
![]() Anne wrote:
Anne wrote:
Confortable et agréable cet ensemble me fait penser à notre chouchou le baigné délicieux spécialité toulonnaise
07.06.2019 - 15:30
|
||||||||||
Hello Autumn#helloautumnset |
||||||||||
 |
 |
|||||||||
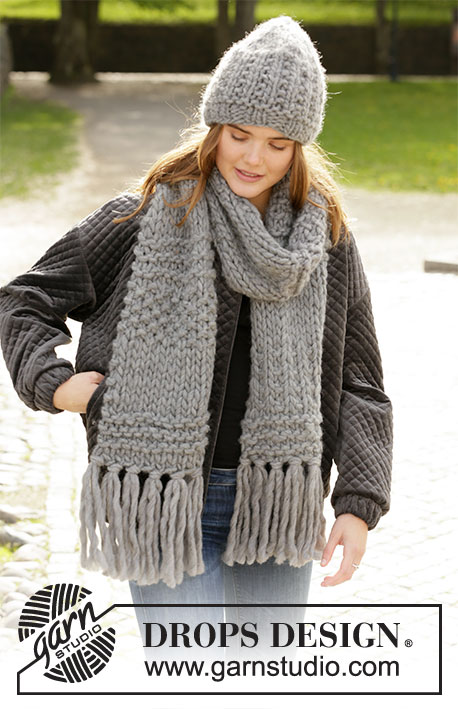
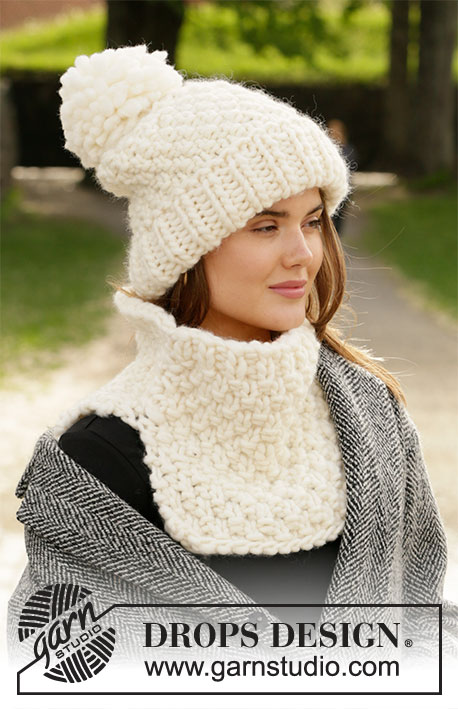
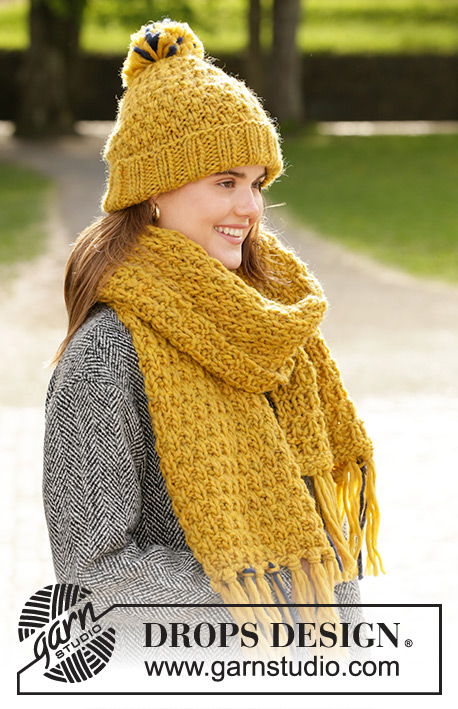
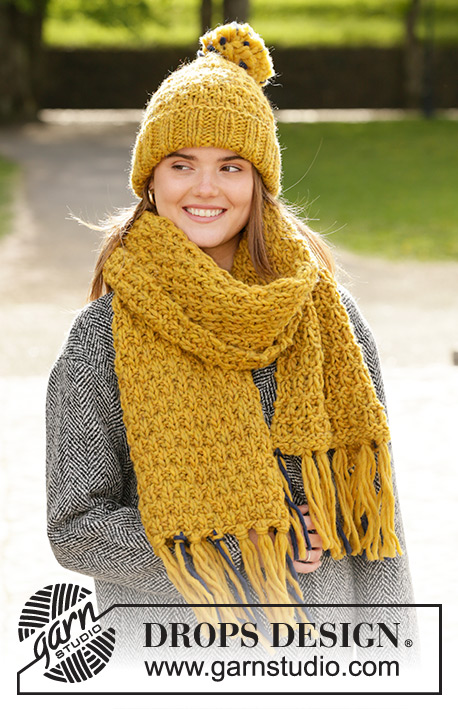
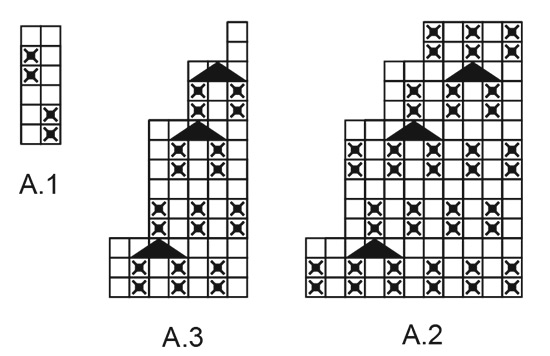
Knitted hat with texture and pom-pom, and scarf with fringes in DROPS Snow.
DROPS 204-2 |
||||||||||
|
------------------------------------------------------- EXPLANATIONS FOR THE PATTERN: ------------------------------------------------------- PATTERN: Hat: See diagrams A.1 to A.3. Scarf: See diagram A.1. The diagram shows all rows in the pattern seen from the right side. DECREASE TIP (evenly spaced): To work out how to decrease evenly, count the total number of stitches on needle (e.g. 64 stitches) and divide by number of decreases to be made (e.g. 10) = 6.4. In this example decrease by knitting alternately each 5th and 6th and each 6th and 7th stitch together. ------------------------------------------------------- START THE PIECE HERE: ------------------------------------------------------- HAT – SHORT OVERVIEW OF THE PIECE: The piece is worked in the round with short circular needle, bottom up. Change to double pointed needles when necessary. HAT: Cast on 64-68 stitches with circular needle size 7 mm and Snow. Purl 1 round then work rib (= knit 2 / purl 2) for 11 cm. Change to circular needle size 8 mm and knit 1 round where you decrease 10-12 stitches evenly spaced – read DECREASE TIP = 54-56 stitches. Work A.1 in the round for 13-14 cm – adjust so you finish after the last round in the diagram. REMEMBER THE KNITTING TENSION. Now begin to decrease: Work 0-2 stitches of A.1 as before, * A.2 (= 11 stitches), A.3 (= 7 stitches) *, work from *-* a total of 3 times in width. When the diagrams have been completed there are 18-20 stitches left on the round. Knit 1 round where all stitches are knitted together 2 and 2 = 9-10 stitches. Cut the strand, pull it through the remaining stitches, tighten and fasten well. The hat measures approx. 32-33 cm (approx. 25-26 cm with 7 cm fold). POM-POM: Make a large, loose pom-pom of approx. 12 cm in diameter with 6 strands curry and 1 strand navy blue. Sew the pom-pom to the top of the hat. ------------------------------------------------------- SCARF – SHORT OVERVIEW OF THE PIECE: The piece is worked back and forth with circular needle. SCARF: Cast on 32 stitches with circular needle size 9 mm and Snow. Purl 1 row then work pattern A.1 back and forth. REMEMBER THE KNITTING TENSION! When the piece measures 164 cm, cast off – make sure the cast-off edge is not tight. FRINGES: Make 11 fringes for each end of the scarf. The scarf in the picture has 7 fringes with curry and 4 fringes with 1 strand of each colour. To allow the fringes to hang neatly, dampen them, shake them and allow them to dry. 1 FRINGE: Cut 2 strands Snow each 36 cm long. Fold them double, thread the loop from the right side through the outermost stitch on the cast-off edge. Then pull the strand-ends through the loop and tighten carefully. Make 10 more fringes in the same way and fasten evenly along the cast-off edge. Repeat along the cast-on edge. |
||||||||||
Diagram explanations |
||||||||||
|
||||||||||
 |
||||||||||
Have you finished this pattern?Tag your pictures with #dropspattern #helloautumnset or submit them to the #dropsfan gallery. Do you need help with this pattern?You'll find 16 tutorial videos, a Comments/Questions area and more by visiting the pattern on garnstudio.com. © 1982-2026 DROPS Design A/S. We reserve all rights. This document, including all its sub-sections, has copyrights. Read more about what you can do with our patterns at the bottom of each pattern on our site. |
||||||||||


With over 40 years in knitting and crochet design, DROPS Design offers one of the most extensive collections of free patterns on the internet - translated to 17 languages. As of today we count 324 catalogues and 12290 patterns translated into English (UK/cm).
We work hard to bring you the best knitting and crochet have to offer, inspiration and advice as well as great quality yarns at incredible prices! Would you like to use our patterns for other than personal use? You can read what you are allowed to do in the Copyright text at the bottom of all our patterns. Happy crafting!
Post a comment to pattern DROPS 204-2
We would love to hear what you have to say about this pattern!
If you want to leave a question, please make sure you select the correct category in the form below, to speed up the answering process. Required fields are marked *.