
Popular categories
Looking for a yarn?


Comments / Questions (24)
![]() Patsy Gadberry wrote:
Patsy Gadberry wrote:
I am making size L/XL, but the pattern calls for 334 chains--I believe that is wrong. It makes up into something that would wrap around a person 2 or 3 times. When I made a blanket that was 80" wide, I used only 258 chains. The numbers of starting chains for all sizes in the pattern are in error! Can you please tell how many start chains there are actually supposed to be for L/XL? Thank you!
19.05.2018 - 07:26DROPS Design answered:
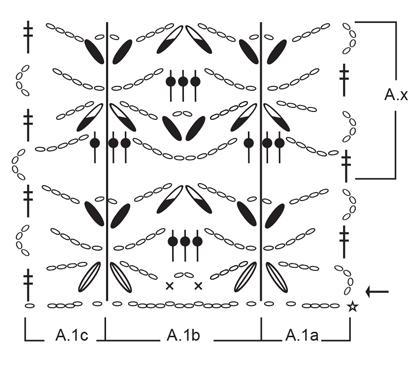
Dear Mrs Gadberry, make sure you get the correct tension, ie 13 double crochet on 10 cm / 4'' in width. Pattern A.1B measures approx. 7 cm / 2¾'' in width and A.x measures approx. 6.5 cm / 2½'' in height - and you'll get the measurements shown in the measurement chart (= in cm, taken flat from side to side). Happy crocheting!
22.05.2018 - 10:28
![]() Althea M Kirby wrote:
Althea M Kirby wrote:
How many skeins does this pattern require?
12.05.2018 - 16:52DROPS Design answered:
Dear Mrs Kirby, you will find total weight of yarn required in each size under the header, ie 550-650-800 g DROPS Paris color 01, apricot - DROPS Paris = 50 g a skein, so that you will need 550/50= 11 balls in first size. Happy crocheting!
14.05.2018 - 11:53
![]() Alexandra wrote:
Alexandra wrote:
Ook ik heb het zelfde als Au3, Keurig netjes aan het schema gehouden, en na 4 toeren meet ik ruim 2 meter. Proeflapje was bij mij ook oke. Ga het uithalen en opzetten met haaknaald 5 en verder haken met 4,5 denk ik. Mijn vraag is dan ook, klopt de maat van de haaknaald wel? Is 5,5 niet erg groot?
06.05.2018 - 18:25DROPS Design answered:
Dag Alexandra, Controleer even goed of de stekenverhouding voor jou klopt en maak evt. een nieuw proeflapje met een kleinere naald totdat het proeflapje klopt. Een herhaling van A.1b meet 7 cm in de breedte. Bij de kleinste maat kom je op een breedte van ongeveer 140 cm. Een kleine afwijking in de stekenverhouding kan in dit geval een groot effect hebben.
08.06.2018 - 13:03
![]() Jessica V wrote:
Jessica V wrote:
Bonjour, Après quelques rang je me retrouve avec une très longue pièce. le début du modèle représente donc l’ arrière et un des côtés avant (vertical) Ou cela représente l’arriere Et les deux côtés donc représente le bas du gilet horizontalement ? Je suis un peu perdue car je ne visualise pas la partie que je fait et j’ ai donc peur de me retrouver avec un gilet bien trop grands pour moi alors que je suis les explications en l-xl à la lettre.
15.04.2018 - 19:21DROPS Design answered:
Bonjour Jessica V., le gilet se crochète de bas en haut, vous crochetez en même temps le devant droit, le dos et le devant gauche (vu sur l'endroit), jusqu'aux emmanchures, puis terminerez chaque partie (chaque devant et le dos) séparément. Bon crochet!
16.04.2018 - 09:42
![]() K Gustavsson wrote:
K Gustavsson wrote:
Håll inte händerna så det skymmer diagrammet
23.01.2018 - 09:26
![]() Au3 wrote:
Au3 wrote:
Ik ben dit vest in maat L/XL aan het maken en vraag mij af of de afmetingen wel kloppen. Mijn proeflapje was prima op maat en ook het patroon vormt geen probleem (heb ik nog gecontroleerd met de video van het patroon), maar nu ik de lossenketting en de eerste toeren heb gehaakt, meet mijn werkstuk ruim 2 meter... Dit lijkt mij niet de bedoeling. 334 lossen lijkt me ook wel wat veel van het goede. Klopt alles in het patroon wel? Zo ja, wat zou ik dan verkeerd gedaan kunnen hebben?
16.07.2017 - 22:03DROPS Design answered:
Hoi Au3, Een herhaling van patroon A.1B meet 7 cm in de breedte en voor jouw maat heb je 23 herhalingen van A.1B (= 14 lossen) plus A.1A en A.1C (samen 12 steken). Dan kom ik op ongeveer 24 herhalingen van 7 cm = 168 cm. Met de overslagen op het voorpand zou dat ongeveer moeten kloppen. Vermoedelijk is er dan toch ergens iets mis gegaan, maar het aantal op te zetten lossen klopt wel. Misschien moet je nog even goed controleren of je iets over het hoofd hebt gezien bij het haken in patroon.
17.07.2017 - 18:17
![]() Niki wrote:
Niki wrote:
I was hoping you might be able to clarify the size of this piece. I am ususally a M/L in most garments so started that option, but it is GIANT. I tried to confirm based on the measurements on the bottom but its very vague. As an example, my start chain was 334 and after doing several rows I measured it (as best I could) and it was over 6 feet long, when I checked the gauge in the begining I was slight under the 4" for 13 DC. Thanks in advance!
22.04.2017 - 00:03DROPS Design answered:
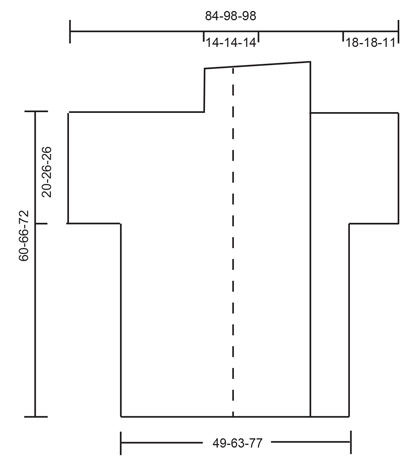
DROPS Design: Dear Niki, for the sizing, you should always refer the diagram at the bottom of the pattern, and do a well sized gauge swatch. For this piece, at the middle size (M/L) should be 63 cm on the back and 62 cm at the from measured WHILE the relaively wide front edge (band and the collar) is laying on one and other.I hope this helps. Happy crocheting!
22.04.2017 - 08:59
![]() Helle Green Nielsen wrote:
Helle Green Nielsen wrote:
Hvorfor kan jeg ikke gemme opskriften som en PDF-fil? Jeg har ikke brug for at skrive dem ud og have alt det papir liggende.
14.03.2017 - 10:01DROPS Design answered:
Hej Helle. Du kan "printe" til pdf - altsaa via din printfunktion. Saa gemmer den som pdf :)
14.03.2017 - 12:49
![]() Denise Nef Frehner wrote:
Denise Nef Frehner wrote:
Margareta Liljequist das habe ich auch festgestellt. Ich arbeite mit einer Häkelnadel 4.25 und 222 LM für Grösse L.
25.02.2017 - 13:58
![]() Margareta Liljequist wrote:
Margareta Liljequist wrote:
Jag tycker att omkretsen på plagget blir alldeles för stor. Den totala bredden av 278 maskor blir 140 cm i storlek S/M? Bakstycket skall enligt måttskiss vara 49 cm. Det blir väldigt mycket över till framstycken.....
15.02.2017 - 17:10DROPS Design answered:
Hej Margareta, Jo men det är så det är tänkt, det skall vara en ganska bred sjalkrage som du ser på bilden. Lycka till!
02.03.2017 - 08:40
|
||||||||||||||||||||||||||||
Peach Sorbet#peachsorbetcardigan |
||||||||||||||||||||||||||||
 |
 |
|||||||||||||||||||||||||||
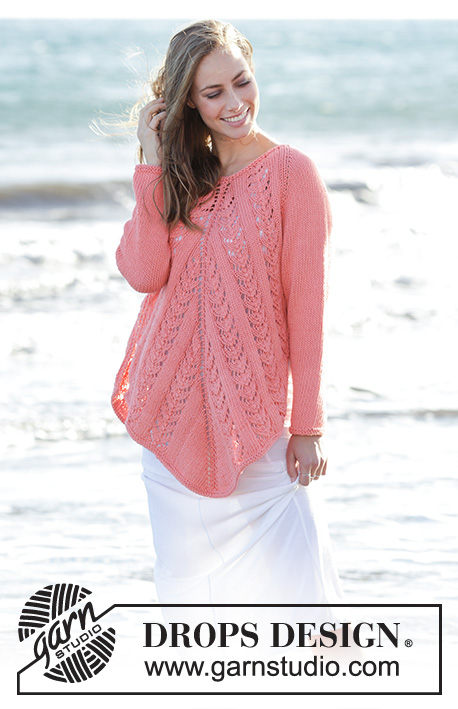
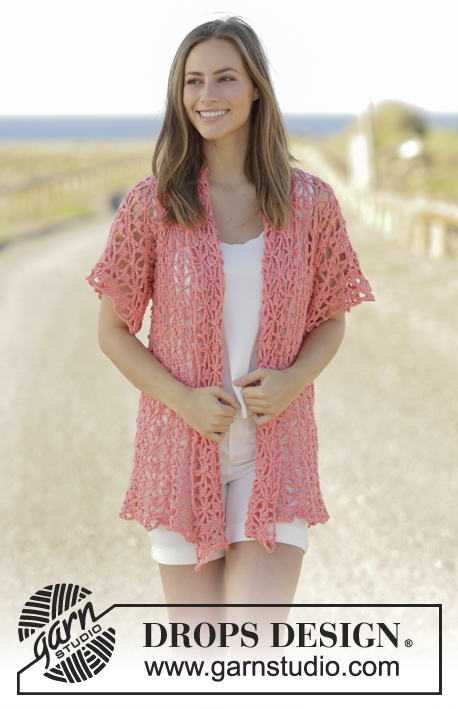
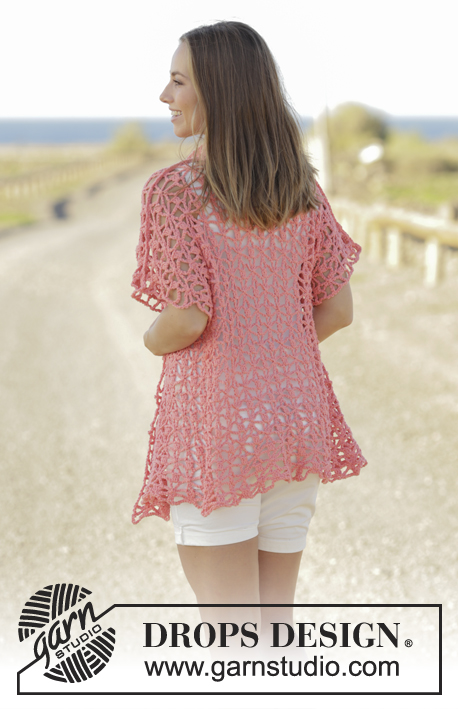
Crochet jacket with seamless sleeves in DROPS Paris. Sizes S - XXXL.
DROPS 175-5 |
||||||||||||||||||||||||||||
|
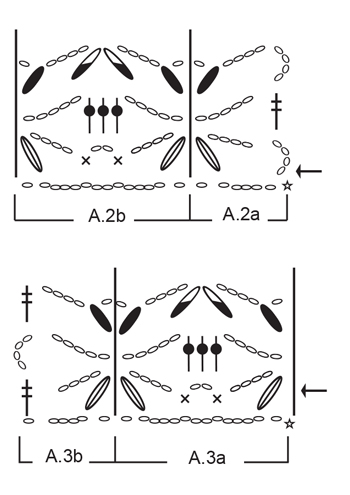
PATTERN: See diagrams A.1 to A.3. ---------------------------------------------------------- JACKET: The piece is worked back and forth. It is worked from the bottom up, the piece is then divided at the armhole and the front and back pieces are worked separately, with the sleeves. THE BODY: Work 278-334-390 chain stitches with hook size 5.5 mm and Paris. Then work as follows starting from the right side: A.1a, A.1b in total 19-23-27 times, finish with A.1c. Continue in this way until A.1 is completed in height, then repeat A.x upwards – REMEMBER THE CROCHET TENSION! Continue in this way until the piece measures approx. 38-38-44 cm, finish after the row 3 in A.x (= row from the wrong side). Then work row 4 in A.x as follows, from the right side: Work A.1a, A.1b in total 6-7-8 times (= right front piece), insert 1 marker in the last chain stitch, work A.1b in total 7-9-11 times (= back piece), insert 1 marker in the last chain stitch, work A.1b in total 6-7-8 times, finish with A.1c (= left front piece). Now divide the piece and each part is worked separately – do not cut the strand. LEFT FRONT PIECE: The next row (= row 1 in A.x) is worked as follows from the wrong side: Work A.1c, A.1b in total 6-7-8 times, finish with 34-34-20 chain stitches for the sleeve. Turn. Next row (= row 2 in A.x and row 1 in A.2) works as follows, from the right side: Work A.2a, A.2b in total 2-2-1 times, A.1b in total 6-7-8 times, finish with A.1c. Continue in this way until A.2 is completed in height. Next row (= row 1 in A.x) is worked as follows, from the wrong side: Work A.1c, A.1b in total 8-9-9 times, finish with A.1a. Continue by repeating A.x in height until the piece measures approx. 60-66-72 cm, adjust so that the last row is row 4 in A.x (= row from the right side). Work the shawl-collar. SHAWL-COLLAR: Next row (= row 1 in A.x) is worked as follows, from the wrong side: Work A.1c, A.1b in total 3-3-3 times, finish with A.1a. Turn. Continue upwards until A.x is completed in height and then work rows 1 and 2 of A.x 1 more time in height. Cut and fasten the strand. RIGHT FRONT PIECE: Next row (= row 1 in A.x) is worked as follows, from the wrong side: Work 34-34-20 chain stitches for the sleeve, continue over the right front piece as follows: A.1b in total 6-7-8 times, finish with A.1a. Turn. Next row (= row 2 in A.x and row 1 in A.3) is worked as follows, from the right side: Work A.1a, A.1b in total 6-7-8 times, A.3a in total 2-2-1 times, finish with A.3b. Continue in this way until A.3 is completed in height. Next row (= row 1 in A.x) is worked as follows, from the wrong side: Work A.1c, A.1b in total 8-9-9 times, finish with A.1a. Repeat A.x in height until the piece measures approx. 60-66-72 cm – adjust to the left front piece. Last row is row 4 in A.x (= row from the right side). Cut the strand and work the shawl-collar in the same way as for the left front piece, but reversed, so you work over the last 12 chain-spaces starting from the wrong side. BACK PIECE: Next row (= row 1 in A.x) is worked as follows, from the wrong side: Work 34-34-20 chain stitches for the sleeve, continue over the back piece and work A.1b in total 7-9-11 times, finish with 34-34-20 chain stitches for the sleeve. Turn. Next row (= row 2 in A.x and row 1 in A.2 and A.3) is worked as follows, from the right side: Work A.2a, A.2b in total 2-2-1 times, A.1b in total 7-9-11 times, A.3a in total 2-2-1 times, finish with A.3b. Continue in this way until A.2 and A.3 are completed in height. Next row (= row 1 in A.x) is worked as follows, from the right side: Work A.1a, A.1b in total 11-13-13 times, finish with A.1c. Repeat A.x in height until the piece measures approx. 60-66-72 cm – adjust to the front pieces. Last row is row 4 in A.x (= row from the right side). Cut and fasten the strand. ASSEMBLY: Lay the front piece on the back piece, right side to right side and crochet the shoulders together as follows: 1 double crochet through both layers, * 3 chain stitches, 1 double crochet around the next chain-space around both layers *, repeat from *-* along the whole shoulder/sleeve and finish with 1 double crochet. Do not work over the middle 5 chain-spaces, the collar will be attached here later. Repeat on the other shoulder. Crochet together under the sleeves as follows: * 1 double crochet around the next chain-space around both layers, 3 chain stitches *, repeat from *-* and finish with 1 double crochet. ASSEMBLING COLLAR: Lay the uppermost edge/last round on the right shawl-collar against the uppermost edge/last round on the left shawl-collar and sew together with small stitches edge to edge. Then sew the side of the collar to the neck. |
||||||||||||||||||||||||||||
Diagram explanations |
||||||||||||||||||||||||||||
|
||||||||||||||||||||||||||||
 |
||||||||||||||||||||||||||||
 |
||||||||||||||||||||||||||||
 |
||||||||||||||||||||||||||||
Have you finished this pattern?Tag your pictures with #dropspattern #peachsorbetcardigan or submit them to the #dropsfan gallery. Do you need help with this pattern?You'll find 8 tutorial videos, a Comments/Questions area and more by visiting the pattern on garnstudio.com. © 1982-2026 DROPS Design A/S. We reserve all rights. This document, including all its sub-sections, has copyrights. Read more about what you can do with our patterns at the bottom of each pattern on our site. |
||||||||||||||||||||||||||||


With over 40 years in knitting and crochet design, DROPS Design offers one of the most extensive collections of free patterns on the internet - translated to 17 languages. As of today we count 324 catalogues and 12290 patterns translated into English (UK/cm).
We work hard to bring you the best knitting and crochet have to offer, inspiration and advice as well as great quality yarns at incredible prices! Would you like to use our patterns for other than personal use? You can read what you are allowed to do in the Copyright text at the bottom of all our patterns. Happy crafting!
Post a comment to pattern DROPS 175-5
We would love to hear what you have to say about this pattern!
If you want to leave a question, please make sure you select the correct category in the form below, to speed up the answering process. Required fields are marked *.