
Popular categories
Looking for a yarn?


Comments / Questions (9)
![]() Akuliina wrote:
Akuliina wrote:
I thank you for your answer, but things still don't add up. My work now has 8 or 9 chain spaces per side, and if I work the "arrow" row here, A2 and A3 only take up three of them, leaving me way too far from the middle of the shawl where A4 should sit. So how do I fill the chain spaces in between? I'm assuming I'm supposed to repeat A3 more than once here, to fill up the space, but is it so?
09.05.2024 - 18:59DROPS Design answered:
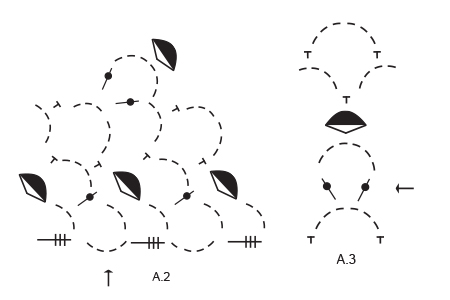
Dear Akuliina, starting with the row with an arrow repeat the diagrams just as before: start with A.2 at the beg of row, the repeat A.3 until you reach the middle stitch in shawl, then work the row with an arrow over this stitch (a total of 5 ch-spaces); then repeat A.3 to the end of the row ending with A.5 when 1 st-group + 1 ch-space remain. Happy crocheting!
10.05.2024 - 08:50
![]() Akuliina wrote:
Akuliina wrote:
I\'m asking the same as everyone else - how to continue after first completing A2-A5. I started following the chart exactly as before, but this way I wasn\'t anywhere near the middle of the shawl when it was time to start A4. Please explain in _detail_ where I should increase and how to keep the charts working. Do I need to repeat A3 more than once each side?
07.05.2024 - 13:27DROPS Design answered:
Dear Akuliina, just repeat the diagrams as before, following the last 4 rows, ie work A.2, repeat A.3, work A.4 in the middle (just as before), work A.3 and finish with A.5, see from WS, work A.5, repeat A.3, work A.4, repeat A.3 and finish with A.2. When the 4 rows are done, repeat from first to 4 again and continue like this until finished measurements. Happy crocheting!
07.05.2024 - 15:47
![]() Emma Hessfelt wrote:
Emma Hessfelt wrote:
Let me try to rephrase my question: After I have completed all diagrams once, what is it that I am supposed to repeat? Am I supposed to repeat the complete diagrams again or is it just the LAST row from each diagram that I should repeat?
09.04.2023 - 06:53DROPS Design answered:
Dear Emma, you should repeat ALL FOUR rows of the chart (excluding the very start), not just the last row. Happy crochetting!
09.04.2023 - 12:47
![]() Emma Hessfelt wrote:
Emma Hessfelt wrote:
Thank you for answering my question, but I still don't understand. Can you explain in detail exactly where in the diagrams A2, A4 and A5 I can find the increase and how the increase works?
09.04.2023 - 06:11DROPS Design answered:
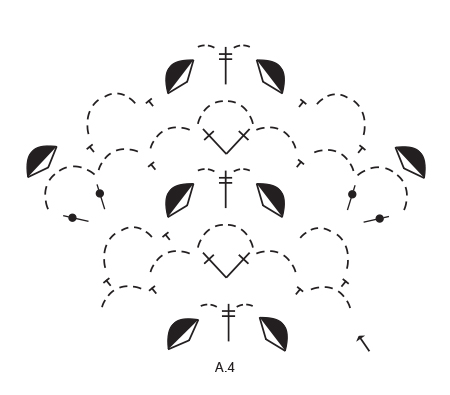
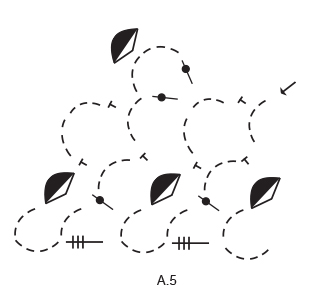
Dear Emma, the increases are done at the start of A.2, at the end of A.5 and near the central stitch in A.4. You have more increases in these charts because you will increase the amount of chain spaces in them. Happy crochetting!
09.04.2023 - 12:53
![]() Emma Hessfelt wrote:
Emma Hessfelt wrote:
Please help! I don't understand how to continue after completing A2-A5. Your instructions says to repeat the last 4 rows in each diagram (which means doing the same thing all over again). But this doesn't add up. Each diagram just has 4 rows! There needs to be an increase for each row if it's going to work. Can you please explain in another way?
08.04.2023 - 19:28DROPS Design answered:
Dear Emma, yes, you need to work exactly as before. Remember that A.2, A.4 and A.5 include increases in their charts, so you will be increasing as you work, just as before. Happy crochetting!
08.04.2023 - 23:01
![]() Paz Juan Gutiérrez wrote:
Paz Juan Gutiérrez wrote:
"Después de completar los diagramas A.2 - A.5 en vertical, repetir la 4 últimas filas de cada diagrama con los aumentos a cada lado del centro del chal como antes." No entiendo cómo seguir. Porque si repito de nuevo los patrones A2 a A5 no sé dónde van los aumentos.
31.05.2019 - 18:00DROPS Design answered:
Hola Paz. Los aumentos siguen en los mismos sitios ( a cada esquina y en el centro). Solo que no repetimos los diagramas enteros, sino que solo las 4 últimas filas de cada diagrama. El resto se trabaja como antes.
13.06.2019 - 23:21
![]() Liana wrote:
Liana wrote:
Buoongiorno, sto lavorando questo modello e mi sono bloccata in questo punto: "Dopo aver lavorato i diagrammi da A.2 a A.5 una volta in verticale, ripetere le ultime 4 righe di ogni diagramma per continuare ad aumentare da ciascun lato e al centro dello scialle come prima". che vuol dire? gli aumenti li devo continuare a fare sin dalla prima riga delle 4 da ripetere o no? non capisco bene come continuare gli aumenti.
09.04.2019 - 11:50DROPS Design answered:
Buongiorno Liana, deve semplicemente continuare a lavorare sulle ultime 4 righe dei diagrammi, gli aumenti sono già inclusi in quelle righe. Buon lavoro!
09.04.2019 - 15:14
![]() Michelle wrote:
Michelle wrote:
Merci à Drops d'avoir l'audace d'introduire parmi ses modèles de très jolies mamies aux cheveux blancs !
18.02.2018 - 10:58
![]() Mary wrote:
Mary wrote:
Hooray for an elegant white haired model!
08.12.2016 - 18:20
|
|||||||||||||||||||||||||||||||
Christmas Charm |
|||||||||||||||||||||||||||||||
 |
 |
||||||||||||||||||||||||||||||
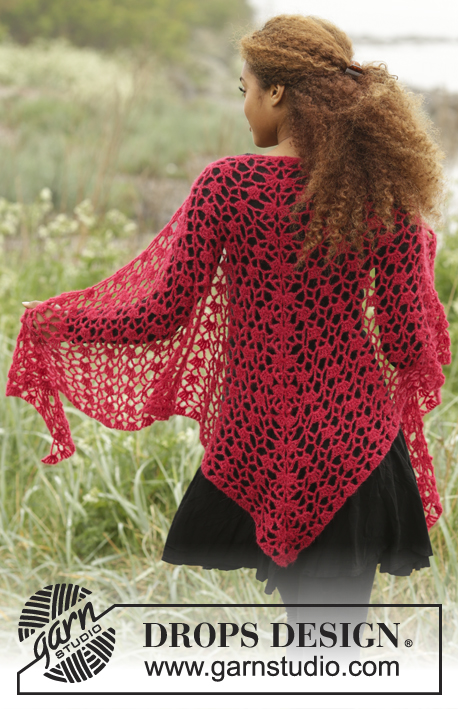
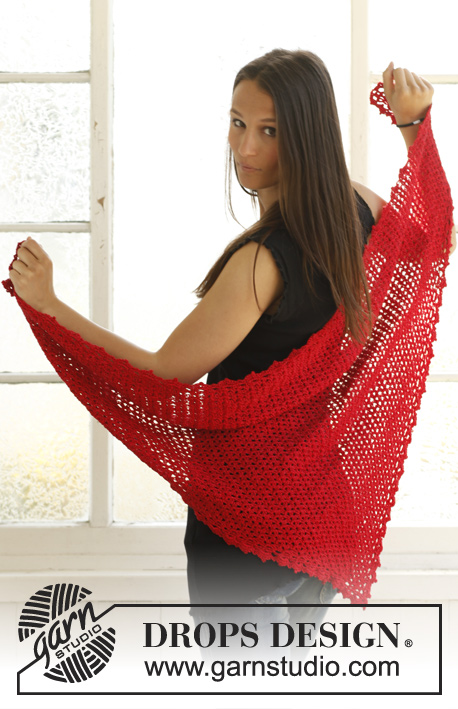
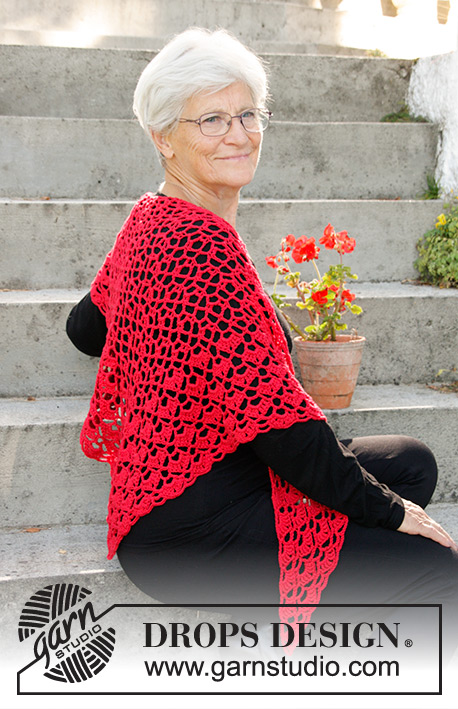
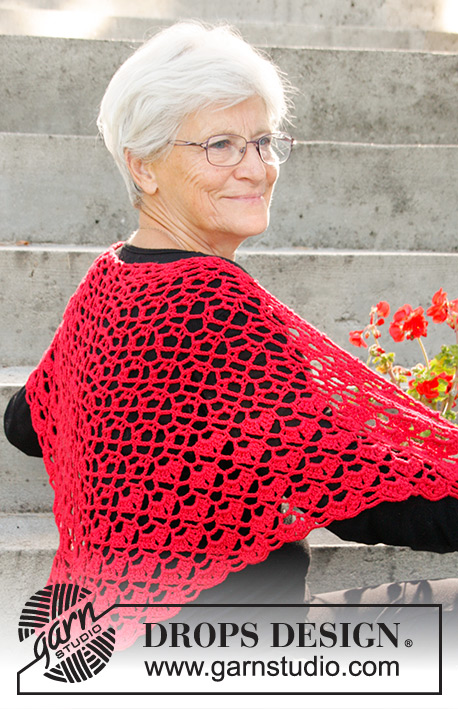
Crochet shawl for Christmas with lace pattern and fans in DROPS Cotton Merino.
DROPS Extra 0-1333 |
|||||||||||||||||||||||||||||||
|
PATTERN: See diagrams A.1 to A.5. ---------------------------------------------------------- SHAWL: Work back and forth from mid back if neck and down. Beg with Cotton Merino on hook size 4.5 mm and work pattern according to diagram A.1. REMEMBER THE CROCHET TENSION! When entire A.1 has been worked, continue with pattern from row with arrow (= 2nd row) as follows: Work A.2 (= inc in the side), A.3, work A.4 (= inc in the middle), A.3, A.5 (= inc in the side). When diagrams A.2 to A.5 have been worked vertically, repeat the last 4 rows in each diagram to continue inc in each side and in the middle of shawl as before. When piece measures approx. 40 cm along inc in the middle of shawl - adjust to finish with 1st or 3rd row - continue as before but now replace symbol for (1 dtr + 6 ch + 1 dtr) with (3 dtr + 2 ch + 3 dtr). Continue like this until shawl measures 65 cm in total along the middle of shawl - adjust so that last row worked is 2nd or 4th row in diagrams A.2 to A.5. Fasten off. Place the shawl in lukewarm water until it is soaking wet. Carefully squeeze the water out of the shawl - do not twist the shawl - then roll the shawl in a towel and squeeze to remove more water - the shawl will now only be moist. Place shawl on a carpet or mattress - carefully stretch it out to measurements - see measurements at the top of pattern. Leave to dry. |
|||||||||||||||||||||||||||||||
Diagram explanations |
|||||||||||||||||||||||||||||||
|
|||||||||||||||||||||||||||||||
 |
|||||||||||||||||||||||||||||||
 |
|||||||||||||||||||||||||||||||
 |
|||||||||||||||||||||||||||||||
 |
|||||||||||||||||||||||||||||||
Have you finished this pattern?Tag your pictures with #dropspattern or submit them to the #dropsfan gallery. Do you need help with this pattern?You'll find 8 tutorial videos, a Comments/Questions area and more by visiting the pattern on garnstudio.com. © 1982-2026 DROPS Design A/S. We reserve all rights. This document, including all its sub-sections, has copyrights. Read more about what you can do with our patterns at the bottom of each pattern on our site. |
|||||||||||||||||||||||||||||||


With over 40 years in knitting and crochet design, DROPS Design offers one of the most extensive collections of free patterns on the internet - translated to 17 languages. As of today we count 324 catalogues and 12290 patterns translated into English (UK/cm).
We work hard to bring you the best knitting and crochet have to offer, inspiration and advice as well as great quality yarns at incredible prices! Would you like to use our patterns for other than personal use? You can read what you are allowed to do in the Copyright text at the bottom of all our patterns. Happy crafting!
Post a comment to pattern DROPS Extra 0-1333
We would love to hear what you have to say about this pattern!
If you want to leave a question, please make sure you select the correct category in the form below, to speed up the answering process. Required fields are marked *.