
Catégories populaires
Vous cherchez un fil?


Commentaires / Questions (9)
![]() Akuliina a écrit:
Akuliina a écrit:
I thank you for your answer, but things still don't add up. My work now has 8 or 9 chain spaces per side, and if I work the "arrow" row here, A2 and A3 only take up three of them, leaving me way too far from the middle of the shawl where A4 should sit. So how do I fill the chain spaces in between? I'm assuming I'm supposed to repeat A3 more than once here, to fill up the space, but is it so?
09.05.2024 - 18:59DROPS Design a répondu:
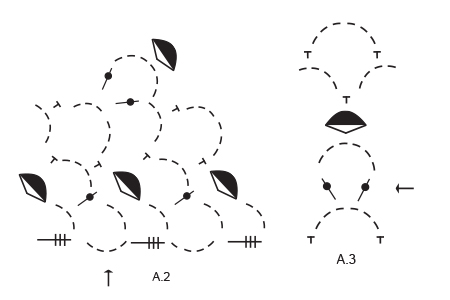
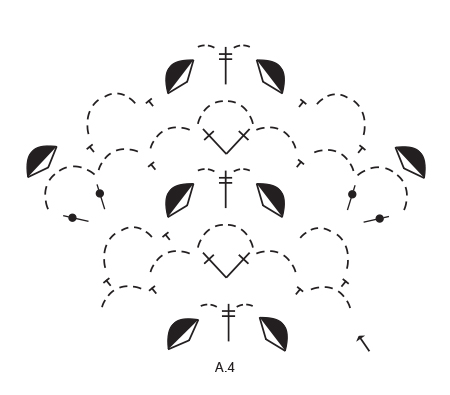
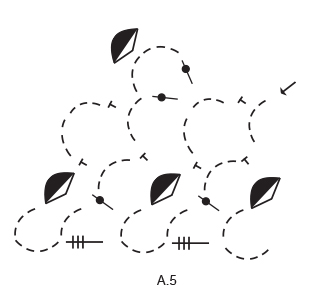
Dear Akuliina, starting with the row with an arrow repeat the diagrams just as before: start with A.2 at the beg of row, the repeat A.3 until you reach the middle stitch in shawl, then work the row with an arrow over this stitch (a total of 5 ch-spaces); then repeat A.3 to the end of the row ending with A.5 when 1 st-group + 1 ch-space remain. Happy crocheting!
10.05.2024 - 08:50
![]() Akuliina a écrit:
Akuliina a écrit:
I\'m asking the same as everyone else - how to continue after first completing A2-A5. I started following the chart exactly as before, but this way I wasn\'t anywhere near the middle of the shawl when it was time to start A4. Please explain in _detail_ where I should increase and how to keep the charts working. Do I need to repeat A3 more than once each side?
07.05.2024 - 13:27DROPS Design a répondu:
Dear Akuliina, just repeat the diagrams as before, following the last 4 rows, ie work A.2, repeat A.3, work A.4 in the middle (just as before), work A.3 and finish with A.5, see from WS, work A.5, repeat A.3, work A.4, repeat A.3 and finish with A.2. When the 4 rows are done, repeat from first to 4 again and continue like this until finished measurements. Happy crocheting!
07.05.2024 - 15:47
![]() Emma Hessfelt a écrit:
Emma Hessfelt a écrit:
Let me try to rephrase my question: After I have completed all diagrams once, what is it that I am supposed to repeat? Am I supposed to repeat the complete diagrams again or is it just the LAST row from each diagram that I should repeat?
09.04.2023 - 06:53DROPS Design a répondu:
Dear Emma, you should repeat ALL FOUR rows of the chart (excluding the very start), not just the last row. Happy crochetting!
09.04.2023 - 12:47
![]() Emma Hessfelt a écrit:
Emma Hessfelt a écrit:
Thank you for answering my question, but I still don't understand. Can you explain in detail exactly where in the diagrams A2, A4 and A5 I can find the increase and how the increase works?
09.04.2023 - 06:11DROPS Design a répondu:
Dear Emma, the increases are done at the start of A.2, at the end of A.5 and near the central stitch in A.4. You have more increases in these charts because you will increase the amount of chain spaces in them. Happy crochetting!
09.04.2023 - 12:53
![]() Emma Hessfelt a écrit:
Emma Hessfelt a écrit:
Please help! I don't understand how to continue after completing A2-A5. Your instructions says to repeat the last 4 rows in each diagram (which means doing the same thing all over again). But this doesn't add up. Each diagram just has 4 rows! There needs to be an increase for each row if it's going to work. Can you please explain in another way?
08.04.2023 - 19:28DROPS Design a répondu:
Dear Emma, yes, you need to work exactly as before. Remember that A.2, A.4 and A.5 include increases in their charts, so you will be increasing as you work, just as before. Happy crochetting!
08.04.2023 - 23:01
![]() Paz Juan Gutiérrez a écrit:
Paz Juan Gutiérrez a écrit:
"Después de completar los diagramas A.2 - A.5 en vertical, repetir la 4 últimas filas de cada diagrama con los aumentos a cada lado del centro del chal como antes." No entiendo cómo seguir. Porque si repito de nuevo los patrones A2 a A5 no sé dónde van los aumentos.
31.05.2019 - 18:00DROPS Design a répondu:
Hola Paz. Los aumentos siguen en los mismos sitios ( a cada esquina y en el centro). Solo que no repetimos los diagramas enteros, sino que solo las 4 últimas filas de cada diagrama. El resto se trabaja como antes.
13.06.2019 - 23:21
![]() Liana a écrit:
Liana a écrit:
Buoongiorno, sto lavorando questo modello e mi sono bloccata in questo punto: "Dopo aver lavorato i diagrammi da A.2 a A.5 una volta in verticale, ripetere le ultime 4 righe di ogni diagramma per continuare ad aumentare da ciascun lato e al centro dello scialle come prima". che vuol dire? gli aumenti li devo continuare a fare sin dalla prima riga delle 4 da ripetere o no? non capisco bene come continuare gli aumenti.
09.04.2019 - 11:50DROPS Design a répondu:
Buongiorno Liana, deve semplicemente continuare a lavorare sulle ultime 4 righe dei diagrammi, gli aumenti sono già inclusi in quelle righe. Buon lavoro!
09.04.2019 - 15:14
![]() Michelle a écrit:
Michelle a écrit:
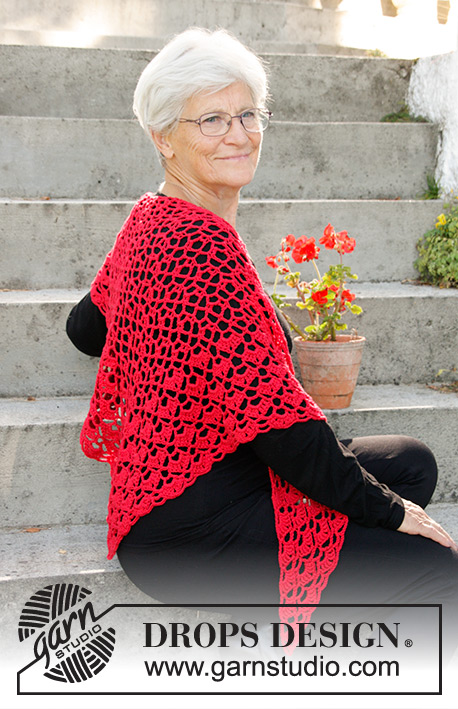
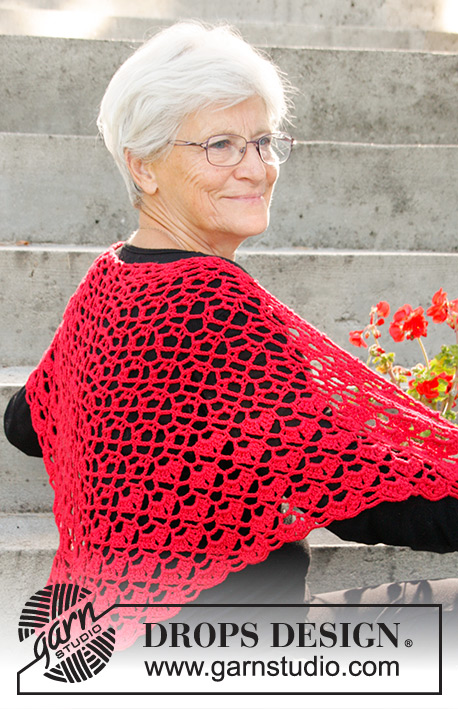
Merci à Drops d'avoir l'audace d'introduire parmi ses modèles de très jolies mamies aux cheveux blancs !
18.02.2018 - 10:58
![]() Mary a écrit:
Mary a écrit:
Hooray for an elegant white haired model!
08.12.2016 - 18:20
|
|||||||||||||||||||||||||||||||
Christmas Charm |
|||||||||||||||||||||||||||||||
 |
 |
||||||||||||||||||||||||||||||
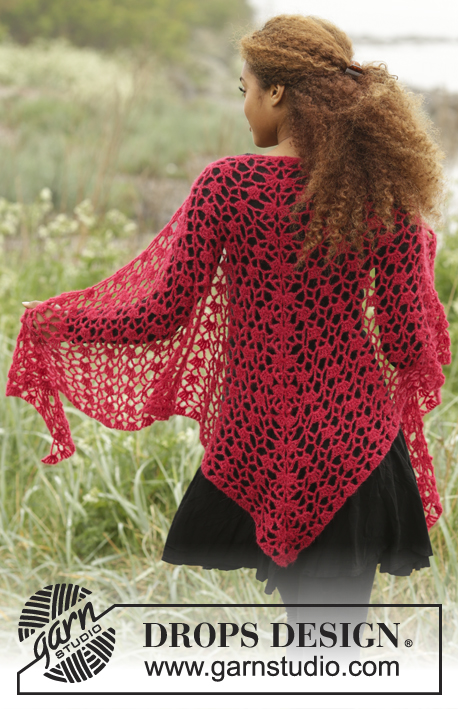
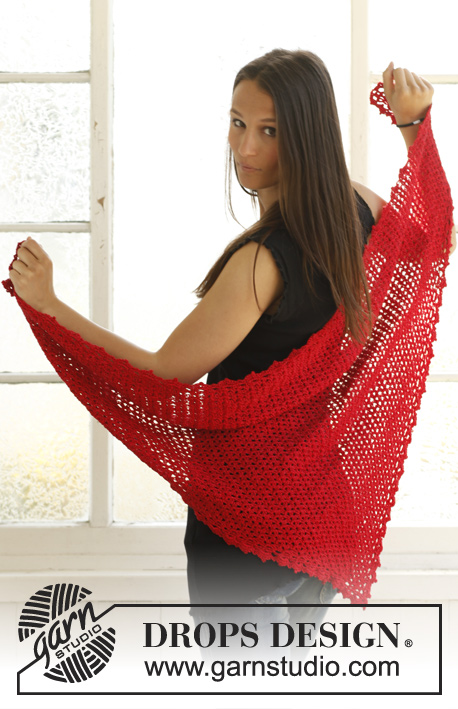
Châle au crochet pour Noël, en point ajouré avec éventails, en DROPS Cotton Merino.
DROPS Extra 0-1333 |
|||||||||||||||||||||||||||||||
|
POINT FANTAISIE: Voir diagrammes A.1 à A.5. ---------------------------------------------------------- CHÂLE: Se crochète en allers et retours, de haut en bas. En Cotton Merino avec le crochet 4,5, crocheter en suivant le diagramme A.1. PENSER À BIEN CONSERVER LA MÊME TENSION QUE POUR L'ÉCHANTILLON! Après A.1, continuer en suivant les diagrammes à partir du rang avec la flèche (= 2ème rang) ainsi: A.2 (= augmentation sur le côté), A.3, A.4 (= augmentation au milieu), A.3, A.5 (= augmentation sur le côté). Quand les diagrammes A.2 à A.5 ont été crochetés 1 fois en hauteur, répéter les 4 derniers rangs de chaque diagramme pour continuer à augmenter de chaque côté et au milieu du châle comme avant. À environ 40 cm de hauteur le long des augmentations au milieu du châle - ajuster pour terminer par un rang 1 ou 3 - continuer comme avant mais maintenant remplacer le symbole (1 DB + 6 ml + 1 DB) par (3 DB + 2 ml + 3 DB). Continuer ainsi jusqu'à ce que le châle mesure 65 cm au total le long du milieu - ajuster pour que le dernier rang soit le rang 2 ou 4 des diagrammes A.2 à A.5. Arrêter. Placer le châle dans l'eau tiède jusqu'à ce qu'il soit trempé. L'essorer délicatement pour extraire l'eau du châle – ne pas le tordre. Le rouler ensuite dans une serviette et presser pour retirer encore plus d'eau- le châle est maintenant seulement humide. Le placer sur un tapis ou un matelas et l'étirer délicatement aux mesures finales – cf au début du modèle. Laisser sécher. |
|||||||||||||||||||||||||||||||
Légende diagramme(s) |
|||||||||||||||||||||||||||||||
|
|||||||||||||||||||||||||||||||

|
|||||||||||||||||||||||||||||||
|
|||||||||||||||||||||||||||||||
|
|||||||||||||||||||||||||||||||
|
|||||||||||||||||||||||||||||||
Vous avez terminé ce modèle?Alors taguez vos photos avec #dropspattern ou bien présentez-les dans la galerie #dropsfan Vous avez besoin d'aide pour ce modèle ?Vous trouverez 8 tutoriels vidéo, une rubrique commentaires/questions et plus encore en vous rendant sur la page du modèle sur garnstudio.com © 1982-2025 DROPS Design A/S. Tous droits réservés. Ce document, y compris ces sous-sections, est protégé par les droits d'auteur (copyright). Apprenez-en davantage sur ce que vous pouvez faire avec nos modèles en bas de chacune des pages de notre site. |
|||||||||||||||||||||||||||||||


Avec plus de 40 ans dans la conception de modèles tricot et crochet, DROPS Design offre l'une des plus vastes collections de modèles gratuits sur internet - traduits dans 17 langues. À ce jour, on compte 314 catalogues et 11822 modèles en français.
Nous nous efforçons de vous apporter le meilleur de ce que le tricot et le crochet peuvent vous offrir, inspiration et conseils mais également des fils de haute qualité à des prix incroyables! Vous souhaiteriez utiliser nos modèles autrement que pour un usage personnel? Vous pouvez lire ce que vous êtes autorisés à faire dans le Copyright en bas de page de chacun de nos modèles. Bon tricot!
Poster un commentaire sur le modèle DROPS Extra 0-1333
Nous aimerions connaître votre avis sur ce modèle !
Si vous souhaitez poser une question, merci de bien vouloir vérifier que vous avez choisi la bonne catégorie dans le formulaire ci-dessous afin d'accélérer la réponse. Les champs obligatoires sont indiqués par une *.