
Popular categories
Looking for a yarn?


Comments / Questions (97)
![]() B. De Bruijn wrote:
B. De Bruijn wrote:
A9 onder A3 alleen snap ik A8 niet. Als ik de tweede naald brei en ik begin bij A9 dan klopt het maar bij A8 kom bij de eerste steek moet ik eerst 1 steek doen en dan twee samen en 1 omslag of meteen twee samen Ik hoor graag snel
03.12.2016 - 16:45DROPS Design answered:
Hoi. Is het misschien de derde nld van A.8? Je breit die als volgt: *2 st r samenbreien, 1 omsl* - en herhaal *-* nog 7 keer (in totaal 8 keer per herhaling). Het aantal st blijft dus in deze nld hetzelfde.
07.12.2016 - 16:26
![]() Alvy wrote:
Alvy wrote:
Je viens de faire le rang (étape tricot en rond avec la modif du A3 sur A2/A7), mais après comment doit on faire pour le rang habituellement fait en maille envers ?
03.10.2016 - 22:53DROPS Design answered:
Bonjour Mme Alvy, quand on tricote en rond, on tricote toujours sur l'endroit, tricotez les mailles comme indiqué dans le diagramme (les m env sur l'env se tricotent maintenant à l'end sur l'endroit et les m end sur l'envers se tricotent maintenant à l'env sur l'endroit). Bon tricot!
04.10.2016 - 10:04
![]() Edith wrote:
Edith wrote:
Hatte mich direkt verliebt. Jetzt ist er fertig und einfach nur genial. Danke für die Anleitung :-)
29.09.2016 - 21:45
![]() Stef wrote:
Stef wrote:
Bonjour, j'ai bien compris maintenant.....merci beaucoup pour toutes les explications et votre patience.... Bonne journée !
22.09.2016 - 13:27
![]() Stef wrote:
Stef wrote:
Bonjour, il y a toujours quelque chose que je ne comprend pas : à quel moment faut il tricoter 2 motifs de plus de A5 entre A4 et A6 ? Merci
21.09.2016 - 23:35DROPS Design answered:
Bonjour Stef, quand vous tricotez 1 fois A.4 à A.6 en hauteur vous augmentez 16 m au total (8 dans A.4 et 8 dans A.6). Quand les diagrammes sont faits 1 fois en hauteur, vous avez 16 m en plus que vous tricotez en A.5 (2 x 8 m de A.5). Au 2ème motif, tricotez les 2 premières m de A.4 , puis répétez A.5 au-dessus des m suivantes (2 motifs en plus en largeur) et terminez par les 3 m de A.6. Bon tricot!
22.09.2016 - 09:37
![]() Stef wrote:
Stef wrote:
Bonjour et merci pour l'explication. Faut il répéter A3 (=18m) A4 (=2m) /A5 2x soit 16 m et A6 (=3m) sur tout le rang ? et répéter ce même procédé sur tous les rangs suivants jusqu'à ce que A4 à A6 ont été tricotés 6-7-8 fois en hauteur ? Merci votre aide
20.09.2016 - 16:08DROPS Design answered:
Bonjour Stef, quand vous continuez en rond, continuez les autres diagrammes comme avant, on remplace juste A.2/A.7 par A.3. Bon tricot!
20.09.2016 - 17:04
![]() Stef wrote:
Stef wrote:
Bonjour, après avoir coupé le fil quand A2/A7 ont été tricotés 2 x, comment reprenez vous les mailles pour continuer en rond ? Merci
17.09.2016 - 10:10DROPS Design answered:
Bonjour Stef, commencez les tours avant les 8 m de A.7 et tricotez maintenant A.3 (= 17 m) au-dessus de A.7 (= 8 m), + 1 m à monter entre A.7 et A.2 et au-dessus de A.2 (= 8 m). Tricotez les autres mailles comme avant. Bon tricot!
19.09.2016 - 09:04
![]() Anne-Helene wrote:
Anne-Helene wrote:
Bonjour, Je n'ai pas compris à quel moment exactement il faut intégrer A.5 entre A.4 et A.6. Lorsque l'on tricote A2 et A7 deux fois (2 x 8 rangs), on tricote entièrement A4 / A5 et A6 il me semble. ( 16 rangs). Est-il question de tricoter plus d'une fois A4 / A5 et A6 ? Merci de votre retour, Bonne journée,
16.08.2016 - 16:08DROPS Design answered:
Bonjour Anne-Hélène, quand A.2/A.7 ont été tricotés 2 fois en hauteur, vous continuez en rond (la fente d'encolure est terminée): coupez le fil, commencez avant les 8 m de A.7 et tricotez maintenant A.3 au-dessus de A.2/A.7. On tricote 6-7-8 fois A.4 à A.6 au total en hauteur. Bon tricot!
17.08.2016 - 09:01
![]() Hanne Petersen wrote:
Hanne Petersen wrote:
Kan det have noget at gøre med at i skriver i A.4(=2m) men for mig er der 3 m I A.6 (=3m) for mig er der 4 m Derfor er der 40 masker på a2, a3, a4,a5,a6 og ikke 38 masker. Kan det være derfor det ikke passer?
03.08.2016 - 13:51DROPS Design answered:
Hej Hanne. Du strikker 3 m i A.6 men i forbindelse med slaa om bliver det 4 m efter förste omg. I A.4 strikker du i förste omg over 2 m, men tager ud til 3 m 1 slaa om. Saa du starter med 38 m, men efter förste omg har du 2 masker mere = 40. Det fremgaar ogsaa af diagrammet.
01.09.2016 - 13:01
![]() Hanne Petersen wrote:
Hanne Petersen wrote:
Jeg strikker str. L/LX
03.08.2016 - 13:40
|
|||||||||||||||||||
Angelica#angelicaponcho |
|||||||||||||||||||
|
|
|||||||||||||||||||
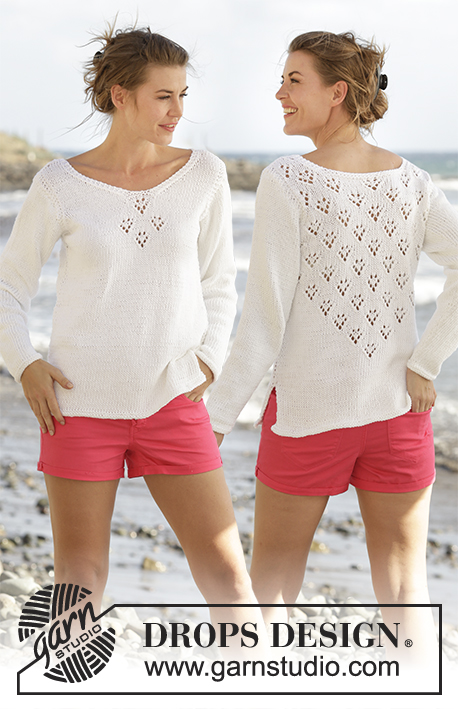
Knitted DROPS poncho with lace pattern and vent at the front in ”Belle”. Worked top down. Size: S - XXXL.
DROPS 170-25 |
|||||||||||||||||||
|
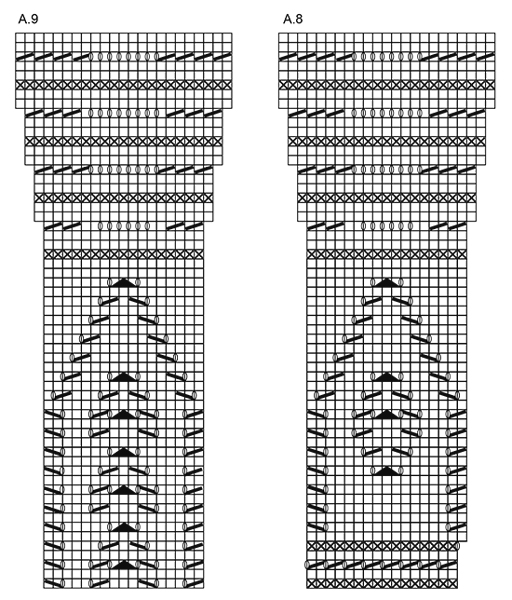
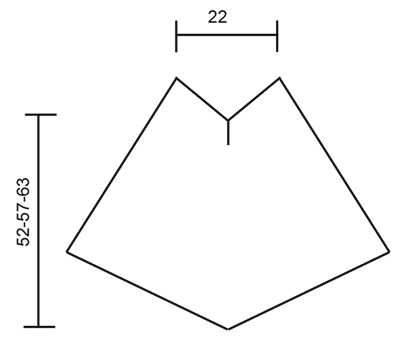
PATTERN: See diagrams A.1 to A.9. The diagrams show all rounds/rows in pattern seen from RS. ---------------------------------------------------------- PONCHO: Worked top down, first back and forth on circular needle, then in the round on circular needle. This is done to get a vent mid front. Cast on 119 sts on a short circular needle size 3.5 mm with Belle. Work A.1 over all sts, on round where K 2 tog and YOs are worked, finish with K 1. When A.1 has been worked 1 time vertically, continue as follows: A.2 (= 8 sts), * A.4 (= 2 sts), A.5 (= 8 sts), A.6 (= 3 sts), A.3 (= 17 sts) *, repeat from *-* 2 more times, A.4, A.5, A.6, A.7 (= 8 sts). Every time A.4 to A.6 have been worked 1 time vertically, work 2 repetitions more of A.5 between A.4 and A.6. Continue this pattern back and forth until 2 repetitions of A.2/A.7 have been worked vertically. Cut the yarn. Now work in the round over all sts but beg round before the 8 sts in A.7. Work A.3 over A.2/A.7, AT THE SAME TIME cast on 1 st between A.2 and A.7 (= middle st in A.3). Continue this pattern upwards, switch to a longer circular needle when needed. REMEMBER THE KNITTING TENSION When A.4 to A.6 have been worked 6-7-8 times vertically (there are now 504-568-632 sts on round), continue as follows: * Work A.9 (= 17 sts) over A.3, work A.8 (= 16 sts) over the next 109-125-141 sts, AT THE SAME TIME on first round in A.8 inc 3 sts evenly over the 109-125-141 sts (= 7-8-9 repetitions of A.8) *, repeat from *-* 3 more times = 516-580-644 sts. When A.8/A.9 have been worked one time vertically, P 1 round over all sts. Cast off. Piece now measures approx. 52-57-63 cm mid front. TWINED STRING: Cut 2 lengths of 3 metres each. Twine the strands tog until they resist, fold the string double so that it twines again. Make a knot at each end. Thread tie up and down around the neck. Thread 5 beads in each end of the tie. Cut 8 lengths of yarn of 20 cm. Thread the ends through the end of the tie and fold them double. Twine one of the strand around the top of tassel. Make a tassel the same way in the other end of tie. |
|||||||||||||||||||
Diagram explanations |
|||||||||||||||||||
|
|||||||||||||||||||
 |
|||||||||||||||||||
 |
|||||||||||||||||||
 |
|||||||||||||||||||
Have you finished this pattern?Tag your pictures with #dropspattern #angelicaponcho or submit them to the #dropsfan gallery. Do you need help with this pattern?You'll find 18 tutorial videos, a Comments/Questions area and more by visiting the pattern on garnstudio.com. © 1982-2026 DROPS Design A/S. We reserve all rights. This document, including all its sub-sections, has copyrights. Read more about what you can do with our patterns at the bottom of each pattern on our site. |
|||||||||||||||||||


With over 40 years in knitting and crochet design, DROPS Design offers one of the most extensive collections of free patterns on the internet - translated to 17 languages. As of today we count 324 catalogues and 12290 patterns translated into English (UK/cm).
We work hard to bring you the best knitting and crochet have to offer, inspiration and advice as well as great quality yarns at incredible prices! Would you like to use our patterns for other than personal use? You can read what you are allowed to do in the Copyright text at the bottom of all our patterns. Happy crafting!
Post a comment to pattern DROPS 170-25
We would love to hear what you have to say about this pattern!
If you want to leave a question, please make sure you select the correct category in the form below, to speed up the answering process. Required fields are marked *.