


Komentáře / Otázky (96)
![]() Sylvie MacNeil napsala:
Sylvie MacNeil napsala:
Is there a way to "split off" the sleeves to transform this poncho into a "peasant top" with long loose sleeves?
24.08.2024 - 20:08Odpověď DROPS Design :
Dear Sylvie, we don't make custom patterns, but you could try modifying it. The shape of this pattern makes it difficult to join it and form sleeves though. Happy knitting!
25.08.2024 - 23:09
![]() Sylvie MacNeil napsala:
Sylvie MacNeil napsala:
I just found this pattern and absolutely LOVE it! Questions because my pattern reading is a bit wonky: When you write "A.2 (= 8 sts), *A.4 (= 2 sts), A.5 (=8 sts) etc.. etc.. do you mean to complete A.2 across all sts for a full vertical set then start A.4 across all stitches for a full vertical set... or do you mean to do row/round 1 of A.2 over 8 stitches then row 1 of A.4 over 2 sts, then row 1 of A.5 etc. then when all repeats are done, start again with row 2 of each pattern?
24.08.2024 - 20:06Odpověď DROPS Design :
Dear Sylvie, you work the first row of the charts over the stitches. On the next row/ round you work the second row of each chart over the stitches. So your second explanations would be correct; work all first rows and then, on the second row, work all second rows. You can read more information here: https://www.garnstudio.com/lesson.php?id=68&cid=19. Happy knitting!
25.08.2024 - 23:00
![]() Jacqueline napsala:
Jacqueline napsala:
Holaaaa!!!! Este patrón es talla única? Porque sólo sale montar 192 pts.
17.08.2023 - 15:35Odpověď DROPS Design :
Hola Jacqueline, puedes ver en el esquema de medidas debajo que hay 3 tallas para este patrón, pero la abertura del cuello es igual en todas. Por eso, comienzas montando el mismo número de puntos en todas las tallas, pero después se trabaja diferentes largos y anchos dependiendo de la talla deseada (en concreto, el número de veces que trabajas A.4, A.5 y A.6 en vertical).
20.08.2023 - 18:03
![]() Andrea napsala:
Andrea napsala:
Danke fuer die Antwort. Leider komme ich, wenn ich A2 u A7 zweimal sowie A6, A5 und A4 einmal in der Höhe gestrickt hab nur auf 182 Maschen. Irgendwas mach ich falsch 😔
20.03.2023 - 16:13Odpověď DROPS Design :
Liebe Andrea, so stimmt es auch mit der neue Maschen zwischen A.2 und A.7 = mitte A.3 haben Sie jetzt 183 Maschen auf der Nadel. Diagramme stricken Sie noch weiter bis A.3-A.6 ingesamt 6-7-8 Mal in der Höhe gestrickt waren (= 504-568-632 Maschen). Viel Spaß beim stricken!
20.03.2023 - 16:26
![]() Andrea napsala:
Andrea napsala:
Ich kapiers nicht 😢 ich komm nicht auf die Maschenzahl am Beginn des Rundstrickens. Auch nach all den Tips in den Kommentaren und einigen Anläufen.... Ich versteh die Anleitung nicht.
18.03.2023 - 22:16Odpověď DROPS Design :
Liebe Andrea, wenn man in Runde strickt, muss man zuerst Faden abschneiden, dann über die 8 Maschen A.7 + die 8 Maschen A.2 stricken Sie jetzt A.3 (8 M A.7 + 1 neue M anschlagen + 8 M A.2), dann stricken Sie die nächsten Diagramme genauso wie zuvor, jetzt lesen Sie alle Diagramme rechts nach links (alle sind Hinreihen). Viel Spaß beim stricken!
20.03.2023 - 09:42
![]() Katharina napsala:
Katharina napsala:
Wieviel Maschen müssen auf der Nadel sein wenn ich A2 und A7 zweimal gestrickt habe und nun zur Runde schließen möchte. Stricke seit fast 40 Jahren. Aber dieses Teil bekomme ich einfach nicht hin. Danke.
11.05.2022 - 11:55Odpověď DROPS Design :
Liebe Katharina, nach 2 Rapporte von A.2 bis A.7 in der Höhe haben Sie 247 Maschen auf der Nadel: A.2=8 M, (A.4=10M, A.5=24 M, A.6=11 M), A.3(=17 m), (A.4=10M, A.5=24 M, A.6=11 M), A.3(=17 m), (A.4=10M, A.5=24 M, A.6=11 M), A.3(=17 m), A.4 (= 10 M), A.5 (=24 M), A.5 (= 11 M), A.7 (= 8 M) = 8+10+24+11+17+10+24+11+17+10+24+11+10+17+24+11+8=247 Maschen. Viel Spaß beim stricken!
11.05.2022 - 13:38
![]() Silke Sakic napsala:
Silke Sakic napsala:
Hallo Gerne würde ich diesen Poncho stricken, aber leider lässt sich die Anleitung nicht ausdrucken. Was kann ich tun damit ich die Anleitung bekomme?
07.10.2021 - 13:05Odpověď DROPS Design :
Liebe Frau Sakic, Wahrscheinlich gab es ein Problem mit den Bildern, als Sie mit dem Drucken begannen. Aktualisieren Sie die Seite und prüfen Sie, ob alle Diagramme sichtbar sind, dann versuchen Sie die Anleitung nochmal auszudrucken. Viel Spaß beim Stricken!
07.10.2021 - 15:47
![]() Françoise napsala:
Françoise napsala:
Comment dois-je tricoter les mailles envers en rong dans votre modèle 170-25 ? Si je suis le diagramme c'est à l'envers, est-ce exact?
19.04.2021 - 13:21Odpověď DROPS Design :
Bonjour Françoise, tout dépend des diagrammes et du moment où vous les tricotez, lorsque vous tricotez en rangs, les cases blanches sont du jersey endroit = à l'envers sur l'envers mais quand vous les tricoterez en rangs = à l'endroit sur l'endroit. Bon tricot!
19.04.2021 - 15:12
![]() Françoise napsala:
Françoise napsala:
Bonjour Merci pour votre message, mais ma question était comment tricoter les rangs envers quand on tricote en rond ? Merci de votre réponse. Cordialement
19.04.2021 - 12:44Odpověď DROPS Design :
Bonjour Françoise, quand vous tricotez en rond, vous êtes toujours sur l'endroit, ainsi vous allez tricoter les mailles jersey à l'endroit - cette vidéo montre comment tricoter du jersey en rond; autrement dit, les rangs pairs des diagrammes A.3, A.4, A.5 et A.6 vont se tricoter à l'endroit (= en rond uniquement). Si vous voulez tricoter du point mousse en rond, vous devez alterner 1 tour endroit, 1 tour envers (cf vidéo). Bon tricot!
19.04.2021 - 13:11
![]() Françoise napsala:
Françoise napsala:
Bonjour Comment dois-je tricoter les rangs envers de A3 A4 A5 et A6 ? Le diagramme indique 1m env sur l'envers, ce serait donc du point mousse. Sommes nous d'accord ? Merci de votre réponse. Cordialement
18.04.2021 - 17:41Odpověď DROPS Design :
Bonjour Françoise, en tricotant 1 m envers sur l'envers vous obtiendrez du jersey; les rangs envers de A.3, A.4, A.5 et A.6 se tricotent en jersey = tout à l'envers. Les 3 premières mailles de A.3 et les 3 dernières mailles de A.7 se tricotent au point mousse (= à l'endroit sur l'endroit et à l'endroit sur l'envers). Bon tricot!
19.04.2021 - 08:35
|
|||||||||||||||||||
Angelica#angelicaponcho |
|||||||||||||||||||
|
|
|||||||||||||||||||
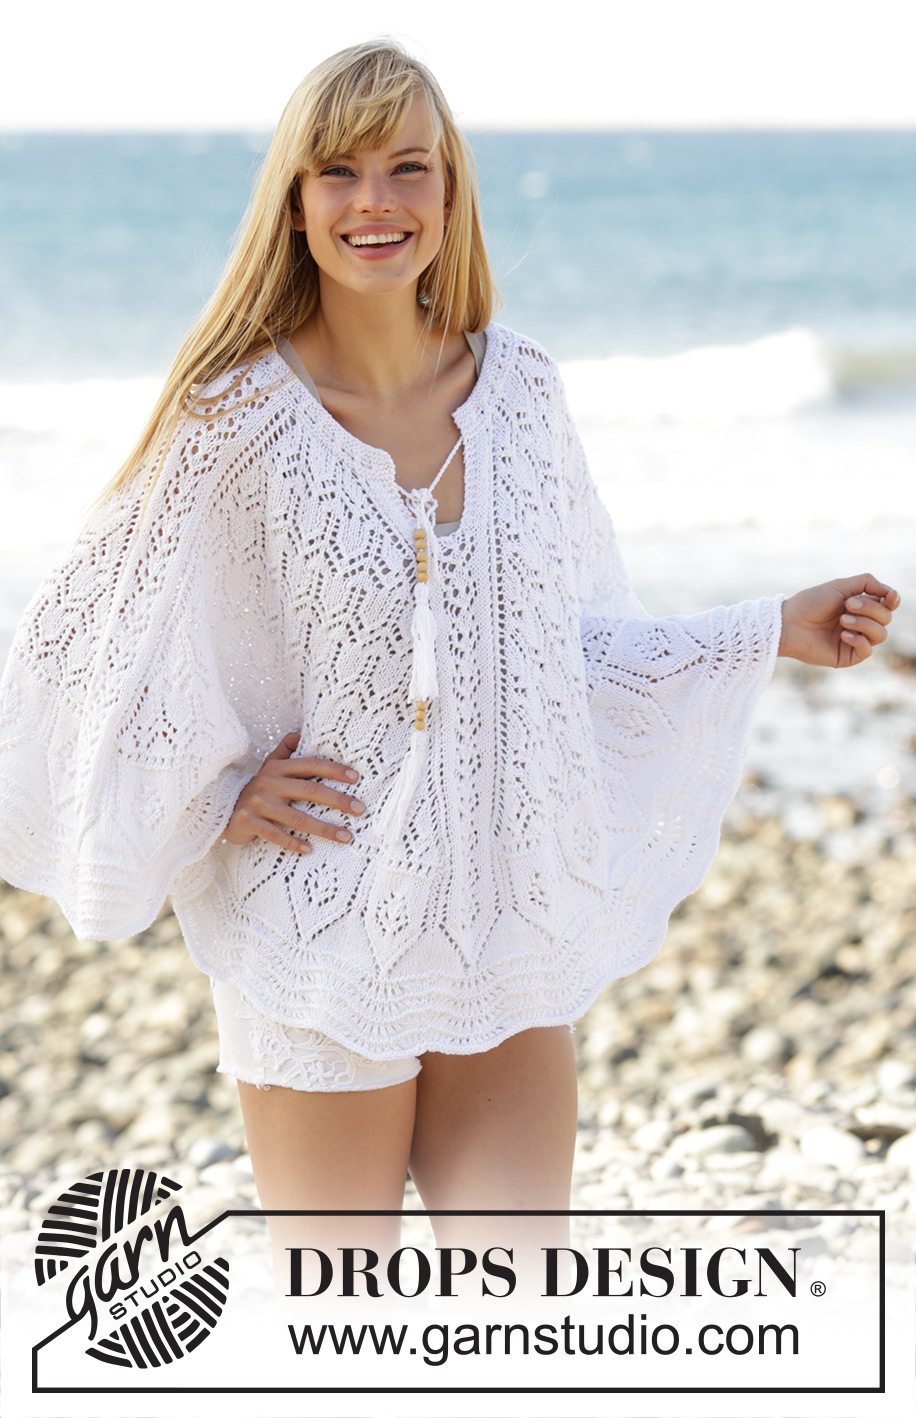
DROPS pončo s krajkovým vzorem pletené shora dolů z příze "Belle". Velikost: S-XXXL.
DROPS 170-25 |
|||||||||||||||||||
|
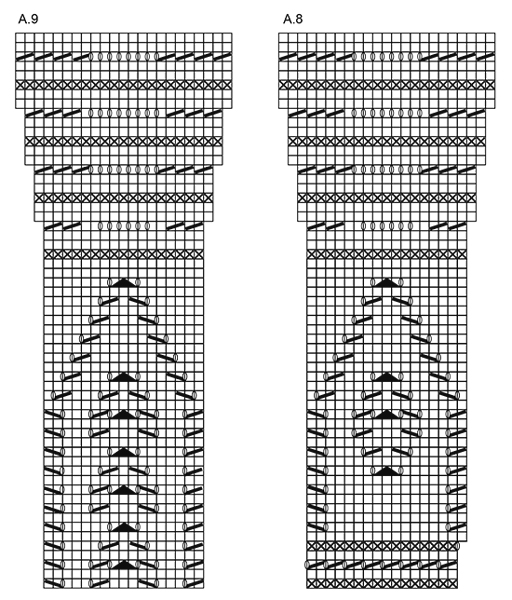
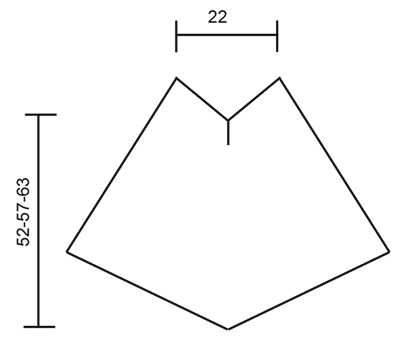
VZOR: Viz schémata A.1 až A.9; zobrazeny jsou všechny kruhové řady/řady vzoru nahlížené z lícové strany. ---------------------------------------------------------- PONČO: Pleteme shora dolů, nejprve v řadách (= výstřih na předním dílu), pak v kruhových řadách na kruhové jehlici. Na kratší kruhovou jehlici č.3,5 nahodíme přízí Belle 119 ok a pleteme vzor A.1; kruhové řady, ve kterých splétáme 2 oka hladce a nahazujeme, končíme 1 okem hladce. Po dokončení celé 1 sekvence vzoru A.1 (na výšku) pokračujeme takto: vzor A.2 (= 8 ok), *vzor A.4 (= 2 oka), vzor A.5 (= 8 ok), vzor A.6 (= 3 oka), vzor A.3 (= 17 ok)*, *-* opakujeme ještě 2x, pak pleteme vzor A.4, vzor A.5, vzor A.6 a vzor A.7 (= 8 ok). Pokaždé, když upleteme 1 celou sekvenci vzor A.4 až A.6 (na výšku), upleteme mezi vzory A.4 a A.6 o 2 sekvence vzoru A.5 více. Takto pokračujeme, až máme dopletené 2 celé sekvence vzoru A.2/A.7 (na výšku). Přízi odstřihneme. Nyní pleteme v kruhových řadách nad všemi oky, ale kruhová řada začíná před 8 oky vzoru A.7. Nad vzorem A.2/A.7 teď pleteme vzor A.3 a SOUČASNĚ nahodíme 1 oko mezi vzorem A.2 a A.7 (= středové oko ve vzoru A.3). V tomto rozvržení vzorů pokračujeme, podle potřeby převedeme pleteninu na delší kruhovou jehlici. Když upleteme sekvenci vzoru A.4 až A.6 celkem 6-7-8x (na výšku, v kruhové řadě máme nyní 504-568-632 ok), pokračujeme takto: *nad vzorem A.3 pleteme vzor A.9 (= 17 ok), nad následujícími 109-125-141 oky pleteme vzor A.8 (= 16 ok, 7-8-9 sekvencí vzoru) a SOUČASNĚ přidáme v 1. kruhové řadě nad 109-125-141 oky vzoru A.8 rovnoměrně 3 oka*, *-* opakujeme ještě 3x = 516-580-644 ok. Po dokončení celé 1 sekvence vzoru A.8/A.9 (na výšku) máme v kruhové řadě 712-804-896 ok. Upleteme 1 kruhovou řadu obrace nad všemi oky a poté oka uzavřeme. Pončo nyní měří asi 52-57-63 cm – měřeno uprostřed předního dílu. KROUCENÁ ŠŇŮRA: Ustřihneme si 2 vlákna příze, každé o délce 3 metry. Vlákna stáčíme pevně dohromady - jakmile se začnou samovolně kroutit, přeložíme je napolovic a necháme zkroutit znovu. Na každém konci uvážeme uzel. Šňůru pak provlečeme okrajem průkrčníku. Na každý konec šňůry navlečeme 5 korálků. Ustřihneme si 8 vláken příze, každé o délce 20 cm. Tato vlákna protáhneme koncem kroucené šňůry a přeložíme je napolovic. Jedno vlákno obtočíme kolem nich a vytvoříme střapec. Další střapec pak vyrobíme i na druhém konci šňůry. |
|||||||||||||||||||
Vysvětlivky ke schématu |
|||||||||||||||||||
|
|||||||||||||||||||

|
|||||||||||||||||||
|
|||||||||||||||||||
|
|||||||||||||||||||
Dokončili jste tento model?Pak označte své fotky tagem #dropspattern #angelicaponcho nebo je pošlete do galerie #dropsfan. Potřebujete s tímto návodem poradit?Otevřete-li si návod na stránce garnstudio.com, najdete tam 18 výukových video-ukázek, Komentáře/Dotazy a další užitečné informace. © 1982-2025 DROPS Design A/S. Vyhrazujeme si veškerá práva. Tento dokument, včetně všech jeho dílčích částí, podléhá autorským právům. Podrobnější komentář k možnostem užití našich návodů najdete dole pod každým návodem na našich stránkách. |
|||||||||||||||||||


V oblasti pletené a háčkované módy působí DROPS Design více než 40 let. Díky tomu vám můžeme nabídnout jednu z nejrozsáhlejších kolekcí modelů s bezplatnými návody dostupnými na internetu - navíc v 17 jazycích. K dnešnímu dni máme na 314 katalogů a 11822 návodů celkem - z nich je už 7048 dostupných v [češtině].
Přidejte komentář k návodu DROPS 170-25
Rádi bychom věděli, co si o tomto modelu myslíte!
Pokud se chcete na něco zeptat, dbejte prosím na to, abyste ve formuláři níže vybrali správnou kategorii - díky tomu se dříve dozvíte, co potřebujete vědět. Povinná pole jsou označena *.