
Popular categories
Looking for a yarn?


Comments / Questions (18)
![]() Sanne wrote:
Sanne wrote:
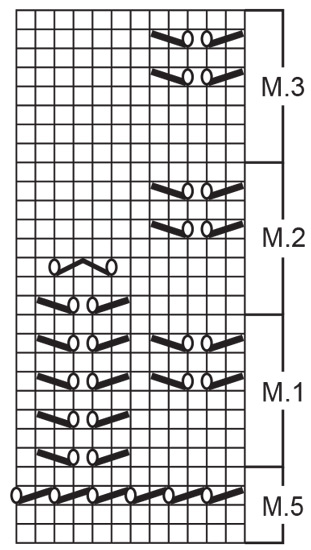
Diagram 1 har 6 ret i starten af pinden, men efter pind 6 er der ikke 6 ret masker, men mønster, på billede ligner det ikke at det er korrekt, jeg strikker mønster nedefra og op
01.01.2026 - 12:19DROPS Design answered:
Hei Sanne. Jo, diagram M.1 ligner det man ser på bildet. M.1 består av 12 masker i bredden og når M.1 strikkes i høyden får man 1 "rad" med hullmønster på hver 2. rad (venstre side av diagrammet) og 1 "rad"med hullmønster på 5. og 7. rad (høyre side av diagrammet). Husk at M.1 består av 8 rader og disse radene skal gjentas til arbeidet måler ca 29-30-31 cm. så skal M.2 strikkes, deretter M.3 til ferdig mål. mvh DROPS Design
12.01.2026 - 13:40
![]() Monica Larsson wrote:
Monica Larsson wrote:
Hej, diagram M1 stämmer inte med hur bilden ser ut, fattas det något i diagrammet?
27.03.2024 - 17:48DROPS Design answered:
Hej Monica, hvad er det som ikke passer? Strikker du diagrammet nedefra og op?
05.04.2024 - 09:17
![]() Marie-Armelle AQUILINA wrote:
Marie-Armelle AQUILINA wrote:
Je commence cet ouvrage, je tricote 2 rangs de point mousse, lors du changement de fil et début de M1 je suis sur le rang envers ? Donc je ne comprends pas
28.03.2023 - 16:37DROPS Design answered:
Bonjour Mme Aquilina, le 1er rang de M.1 doit être tricoté sur l'endroit, autrement dit, après le montage, tricotez 2 rangs endroit puis continuez avec l'autre couleur: ce 1er rang avec la nouvelle couleur est le 1er rang sur l'endroit. Bon tricot!
29.03.2023 - 09:29
![]() Barbara wrote:
Barbara wrote:
Ile razy należy wykonać rzędy skrócone? Czy tylko w pierwszym rzędzie schematu M3?
22.09.2020 - 19:48DROPS Design answered:
Witaj Barbaro! Przerabiasz rzędy skrócone tylko w 1-szym rzędzie schematu M3. Pozdrawiamy!
24.09.2020 - 08:14
![]() Angela Beer wrote:
Angela Beer wrote:
Thank you for responding to my question. When re-reading the pattern I see I was over complicating it. I always peruse the patterns before I contemplate knitting them. However I must say that Drops yarn is fantastic both in colour range and quality. I have knitted and crocheted many of the flowers, hats, scarves and winter decorations. Thank you for providing continued interest and design to so many people. It is very inspiring.
07.10.2019 - 12:58
![]() Angela Beer wrote:
Angela Beer wrote:
Pretty design but instructions do not seem very clear. Pattern does not seem to correspond with the M1 to M 5 in as much as which ones are for the sleeves and which ones are for the body. There is a remark to follow corrected chart of the pattern but which is the corrected one? Please I don't mean to criticise but unless carrying out a rough sample of the pattern on some scrap yarn first I feel some clearer explanation would have been nice. I am a dedicated fan of Drops yarns.
05.10.2019 - 10:58DROPS Design answered:
Dear Mrs Beer, you work now in rows (= short rows), ie on first row, work the first 4 stitches at the beg of the row and slip these 4 sts on a thread, continue working all stitches to the end of the row, turn, work the first 4 sts and slip them on a thread, work to the end of the row (= there are now 4 sts on each side on a thread). Continue like this but slipping the first 2 stitches worked at the beginning of each row on each side (= both from RS and from WS) until 1 stitch remain on needle (= the middle stitch). Hope it helps, happy knitting!
07.10.2019 - 10:48
![]() Ágnes Bárányné Vizi wrote:
Ágnes Bárányné Vizi wrote:
Vagyis 3-3-2 alkalommal.
02.09.2017 - 12:02
![]() Ágnes Bárányné Vizi wrote:
Ágnes Bárányné Vizi wrote:
Az ujja leírás végén kimaradt egy rész: az utolsó 3 szem leláncolás előtt még van 2 szem leláncolása 2-3-3 alkalommal.
02.09.2017 - 11:57
![]() Inez Huizinga wrote:
Inez Huizinga wrote:
Hoe kan ik dit patroon in een grotere maat breien?
21.05.2017 - 12:23DROPS Design answered:
Hallo Inez, Als je voldoende ervaring hebt met patronen, dan zou je hem bijvoorbeeld groter kunnen maken met de volgende tips: - meer patroonherhalingen in de breedte/hoogte maken op het lijf en en mouwen(of meer tricotsteken tussen de herhalingen) - maak evt. meerderingen of minderingen na de mouwboord voor het juiste aantal steken voor mouwpatroon - Het armsgat en mouwkop evt. aanpassen - Eventueel kun je voor de maten kijken naar een bestaand patroon. - Let er op dat verandering van maatvoering ook effect heeft op halslijn, schouderbreedte etc. - Eerst goed meten en rekenen voor je begint.
22.05.2017 - 16:32
![]() MK wrote:
MK wrote:
Re: pattern 1. It is to be done over 233 stitches. It is a 12 repeat pattern and 12 does not go into 233 evenly. Am I reading this wrong, or is the pattern wrong? Please advise. thank you so much!
20.05.2017 - 07:02DROPS Design answered:
Dear MK, you will work M.1 as follows: repeat the 12 sts in M1 a total of 19 times, then work the first 5 sts in M1 = 19 x 12 sts + 5 = 233 sts. Happy knitting!
22.05.2017 - 09:36
|
||||||||||||||||
Dainty Date |
||||||||||||||||
|
|
||||||||||||||||
DROPS Lace Cardigan in Safran.
DROPS 68-8 |
||||||||||||||||
|
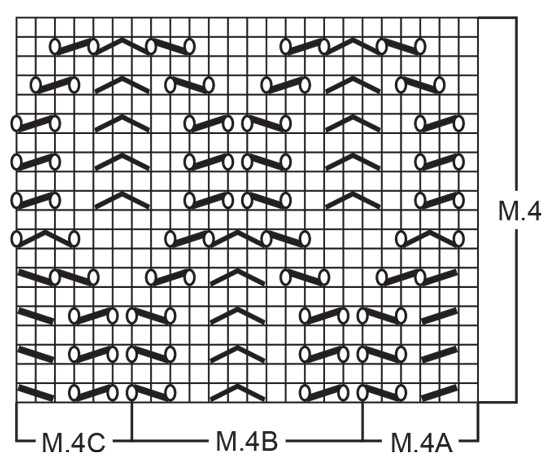
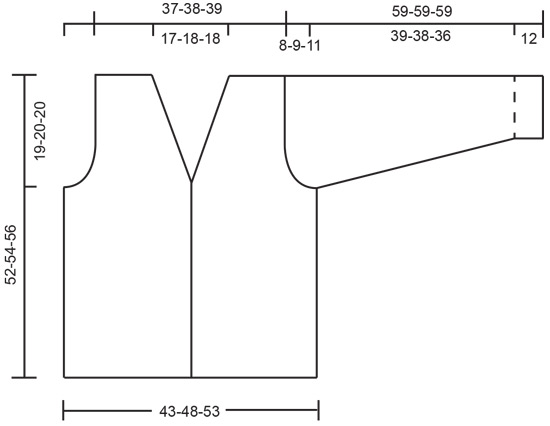
Gauge: 24 sts x 32 rows = 10 x 10 cm in stockinette st. Garter st, when knitting flat: Knit all sts, all rows. Knitting tips (for neck): All decs are made on right side rows inside of 4 edge sts in garter st. Dec 1 st as follows: Before 4 edge sts: K 2 tog. After 4 edge sts: sl 1, K 1, psso. Pattern: See chart. The pattern is seen from the right side. Body: Cast on 219-243-267 sts on circular needles with 2 strands denim blue. Change to 1 strand and knit 2 rows garter st. Change to light blue violet and establish the next row as follows: K 4 (button band knit in garter st throughout), K 1 (stockinette st), 209-233-257 sts of Pattern 1, K 1 (stockinette st), K 4 (button band knit in garter st). Knit in pattern as established until the piece measures approx. 29-30-31 cm – adjust so you end with the last row of Pattern 1 – then knit Pattern 2 once, then Pattern 3 to finished dimensions, keeping the 5 sts at each side (button bands) the same as initially established (4 sts in garter st + 1 stockinette st). Read the entire next section before knitting: At the same time as you begin Pattern 3 knit 2 rows garter st over only the outer 4 sts of the button band (the remaining sts are not knit on these 2 rows). Then dec 1 st for the neck inside the 4 garter st edge sts 18-18-18 times every other row and then 6-7-7 times every 4th row - see knitting tips. After the 2nd neck dec (the piece measures approx. 33-34-36 cm) knit the next row as follows: 50-56-62 sts for the front, bind off 7 sts for armhole, 101-113-125 sts for the back, bind off 7 sts for armhole, 50-56-62 sts for the front. Knit each piece separately. Left Front: = 50-56-62 sts. Continue shaping neck as instructed above and at the same time bind off for armhole every other row: 2 sts 2-3-5 times and 1 st 2-5-6 times. After all neck and armhole shaping is complete 24-24-25 sts remain on shoulder. Bind off the remaining sts when the piece measures approx. 52-54-56 cm - adjust so you bind off after at least 2 rows stockinette st over all sts (no lace). Right Front: Knit the same as the left front, reversing all shaping. Back: = 101-113-125 sts. Bind off for armhole at each side as on front = 89-91-93 sts. When the piece measures approx. 49-51-53 cm - adjust so there are at least 2 rows stockinette st over all sts - knit 4 rows garter st over the center 45-47-47 sts. On the next row bind off the center 37-39-39 sts for the neck, and knit 4 sts at each neck edge in garter st to finished measurements. Dec 1 st for the neck every other row 2 times inside 4 edge sts in garter st - see knitting tips = 24-24-25 sts remain on each shoulder. Bind off the remaining sts when the piece measures the same as the fronts. Sleeve: Cast on 62-62-62 sts with 2 strands lilac. Change to 1 strand denim blue and establish the pattern on the next row as follows (right side row): K 1 (edge st knit in garter st throughout), 6 sts of Pattern 4A, 48 sts of Pattern 4B, 6 sts of Pattern 4C, K 1 (edge st knit in garter st throughout). Knit Pattern 4 twice (40 rows). Change to lilac and Pattern 5 once (keep edge sts in garter st). Change to light blue violet and Pattern 1. At the same time when the piece measures 15 cm inc 1 st at each side a total of 10-13-13 times every 12-9-8 rows = 82-88-88 sts. Knit the increased sts knit into the pattern as you go along. When sleeves measures 49-47-45 cm (adjust so you end on the last row of Pattern 1) knit Pattern 2 once, then Pattern 3 to finished dimensions. When sleeve measures 51-50-48 cm bind off for sleeve cap at each side every other row: 3 sts 2-2-2 times, 2 sts 3-4-2 times, 1 st 3-3-9 times, then bind off 2 sts 3-3-2 times, then bind off 3 sts at each side until the piece measures 59-59-59 cm. Bind off the remaining sts. Assembly: Sew shoulder seams. Sew the sleeve seam using edge sts as seam allowance. Sew in the sleeves. Cut ribbon in 3 parts, 2 each 60 cm long and 1 80 cm long. Thread one of the 60 cm ribbons through the holes in Pattern 5 of each sleeve and fasten on the wrong side. Use the 80 cm long ribbon uses to tie together the cardigan at center front. Thread one end through the inside of the right button band at the beginning of the neck shaping, and the other end through the left side. Tie together at center front. |
||||||||||||||||
Diagram explanations |
||||||||||||||||
|
||||||||||||||||
 |
||||||||||||||||
 |
||||||||||||||||
 |
||||||||||||||||
Have you finished this pattern?Tag your pictures with #dropspattern or submit them to the #dropsfan gallery. Do you need help with this pattern?You'll find 23 tutorial videos, a Comments/Questions area and more by visiting the pattern on garnstudio.com. © 1982-2026 DROPS Design A/S. We reserve all rights. This document, including all its sub-sections, has copyrights. Read more about what you can do with our patterns at the bottom of each pattern on our site. |
||||||||||||||||


With over 40 years in knitting and crochet design, DROPS Design offers one of the most extensive collections of free patterns on the internet - translated to 17 languages. As of today we count 324 catalogues and 12290 patterns translated into English (UK/cm).
We work hard to bring you the best knitting and crochet have to offer, inspiration and advice as well as great quality yarns at incredible prices! Would you like to use our patterns for other than personal use? You can read what you are allowed to do in the Copyright text at the bottom of all our patterns. Happy crafting!
Post a comment to pattern DROPS 68-8
We would love to hear what you have to say about this pattern!
If you want to leave a question, please make sure you select the correct category in the form below, to speed up the answering process. Required fields are marked *.