
Popular categories
Looking for a yarn?


Comments / Questions (76)
![]() Franca wrote:
Franca wrote:
Buongiorno, sto lavorando a questo modello... ho letto e riletti la parte riguardante la lavorazione delle strisce, ma non riesco a capire come lavorarle senza dover tagliare i fili, essendo il modello basato su una riga in bianco e una in blu... qualcuno riesce ad aiutarmi??? Grazie mille!
28.01.2016 - 13:37DROPS Design answered:
Buongiorno Franca. Per le strisce, lavorando sui ferri circolari, procede come segue: lavora la prima striscia con il bianco, sul diritto del lavoro. Non gira il lavoro, ma lavora di nuovo un ferro sul diritto del lavoro con il colore blu. Adesso gira il lavoro; lavora un ferro con il bianco sul rovescio del lavoro; non gira e lavora un altro ferro sul rovescio del lavoro con il colore blu, e così via. Nel paragrafo Strisce, trova indicato come lavorare le m dei bordi. Buon lavoro!
28.01.2016 - 15:12
![]() Mieke Romijn wrote:
Mieke Romijn wrote:
Hele mooie zomertrui die ik heel graag wil maken. Maar ik kan niet breien op een rondbreinaald. Kan het ook op gewone naalen? Zie uit naar uw reactie
20.01.2016 - 11:14DROPS Design answered:
Hoi Mieke. Ja, deze wordt heen en weer gebreid op de rondbreinaald, dus je kan ook op rechte naalden breien. Als je een keer een patroon wilt aanpassen die in de rondte is gebreid, dan kan je hier kijken voor een uitleg
20.01.2016 - 12:37
![]() Birgitte Larsen wrote:
Birgitte Larsen wrote:
Hej med jer. Jeg vil gerne strikke denne model, men jeg forstår ikke hvordan i har strikket striberne. Jeg har ledt alle videoer igennem men kan ikke finde noget jeg kan bruge. Kommer der en video? Eller en forklaring så selv jeg kan forstå det?
18.01.2016 - 17:22DROPS Design answered:
Hej. Du stickar en p ret med färg 1, sedan skjuter du alla maskorna tillbaka på pinnen och stickar en p ret med färg 2. Sedan stickar du från vr med färg 1, skjuter tillbaka maskorna och stickar vr med färg 2. Hoppas du förstår hur du ska göra.
08.02.2016 - 12:05Anna wrote:
What a lovely top but on the page no sewing pattern...
18.01.2016 - 13:57DROPS Design answered:
Dear Anna, measurement chart has been now added. Thank you! Happy knitting!
18.01.2016 - 15:30
![]() Sabine Sell wrote:
Sabine Sell wrote:
Ein sehr tolles Top aber... gibt es auch noch eine Maßskizze?
18.01.2016 - 13:57DROPS Design answered:
Ja, Sie finden die Maßskizze ganz unten am Ende der Anleitung.
23.01.2016 - 17:50
![]() Annukka wrote:
Annukka wrote:
Supersöpö ja ToDo-listalle :)
11.01.2016 - 17:32
![]() Simone Verweij wrote:
Simone Verweij wrote:
De kleurtjes heb ik al, nu het patroon nog!
11.01.2016 - 13:29
![]() Frida wrote:
Frida wrote:
Ni måste ta med detta mönster! Så fint!
05.01.2016 - 16:36
![]() Sila wrote:
Sila wrote:
Original, favorecedor y fácil
30.12.2015 - 07:55
![]() Angela wrote:
Angela wrote:
Super schön. Würde ich gerne nacharbeiten.
24.12.2015 - 20:11
|
|
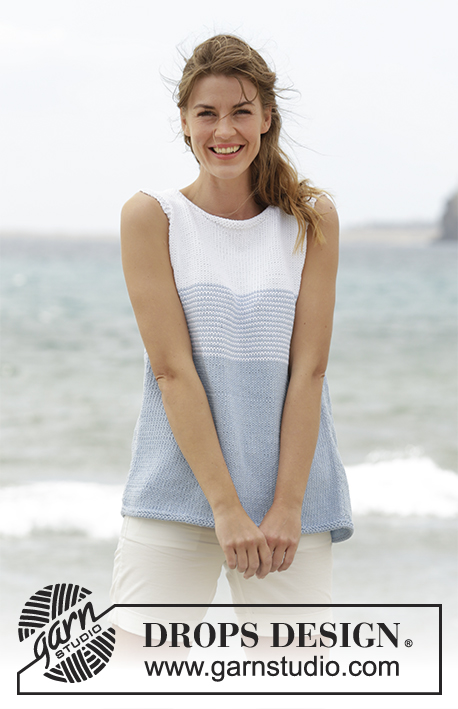
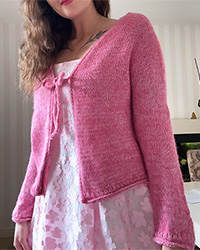
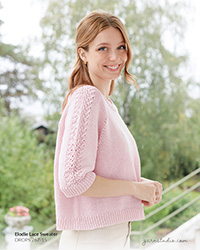
Sea Line#sealinetop |
|
 |
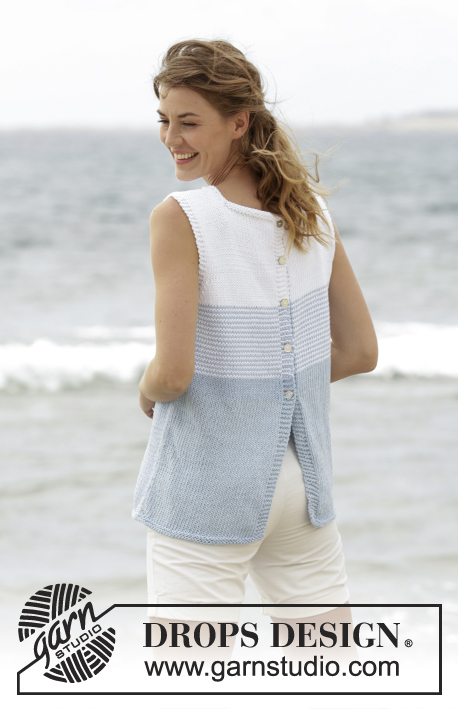 |
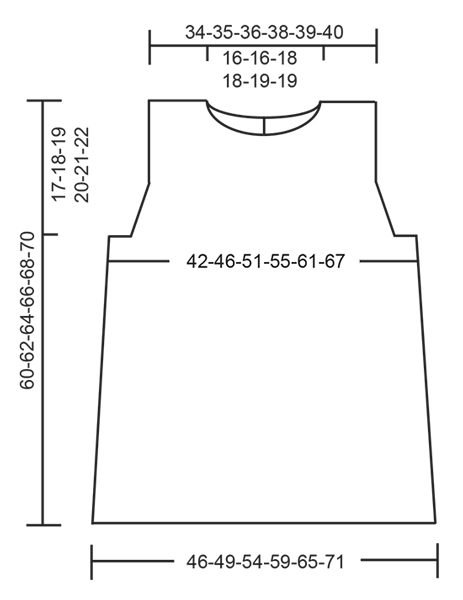
Knitted DROPS top with stripes and button band at the back in ”Paris”. Size: S - XXXL.
DROPS 168-4 |
|
|
GARTER ST (back and forth): K all rows. 1 ridge = 2 rows K. STRIPES: * 1 row white, 1 row light blue *, repeat from *-*. NOTE: To avoid cutting the yarn work alternately 2 rows from RS and 2 rows from WS but note that the band sts in garter sts on these rows are worked as follows: * K from RS, P from RS, P from WS, K from WS *, repeat from *-*. DECREASE TIP-1 (applies to body): All dec are done from RS! Beg 3 sts before marker and K 2 tog, K 2 (marker is between these 2 sts), slip 1 st as if to K, K 1, psso (= 2 sts dec). DECREASE TIP-2 (applies to armholes): Dec inside 3 edge sts in garter st. All dec are done from RS! Dec as follows after 3 edge sts: Slip 1 st as if to K, K 1, psso. Dec as follows before 3 edge st: K 2 tog. BUTTONHOLES: Dec for buttonholes on left back piece (seen from RS). 1 buttonhole = K tog second and third st from edge and make 1 YO. Dec for buttonholes when piece measures: SIZE S: 29, 35, 42, 48 and 55 cm SIZE M: 29, 36, 43, 51 and 57 cm SIZE L: 29, 36, 44, 52 and 59 cm SIZE XL: 29, 35, 42, 48, 55 and 61 cm. SIZE XXL: 29, 35, 42, 49, 56 and 63 cm. SIZE XXXL: 29, 37, 44, 51, 58 and 65 cm. ---------------------------------------------------------- TOP: Worked back and forth on circular needle from mid back. Cast on 166-178-194-210-230-250 sts (incl 5 band sts in each side towards mid back) on circular needle size 4 mm with light blue. Work 2 ridges in GARTER ST - see explanation above. Switch to circular needle size 5 mm and insert a marker 44-47-51-55-60-65 sts in from each side (= 78-84-92-100-110-120 sts between markers on front piece). Then work in stocking st with 5 band sts in garter st in each side towards mid back. REMEMBER THE KNITTING TENSION When piece measures 12 cm, dec 1 st on each side of both markers - READ DECREASE TIP-1 (= 4 sts dec). Repeat dec every 10-10-10-12-12-12 cm 3 times in total = 154-166-182-198-218-238 sts. Remember BUTTONHOLES on left band - see explanation above. AT THE SAME TIME when piece measures 30-31-32-33-34-35 cm, work STRIPES over all sts - see explanation above! READ ALL OF THE FOLLOWING SECTION BEFORE CONTINUING: When piece measures 42-43-44-45-46-47 cm, continue with white until finished measurements - AT THE SAME TIME when piece measures 42-43-44-45-46-47 cm work 2 ridges over the middle 12-14-16-20-24-28 sts in each side (work the other sts as before). On next row from RS after the ridges, cast off the middle 6-8-10-14-18-22 sts in each side for armholes and finish front and back pieces separately. FRONT PIECE: = 66-70-76-80-86-92 sts. Continue back and forth in stocking st with 3 edge sts in garter st in each side. On first row from RS, dec 1 st more for armhole in each side - READ DECREASE TIP-2. Repeat dec every other row (i.e. every row from RS) 4-5-7-8-10-12 times in total = 58-60-62-64-66-68 sts. When piece measures 54-56-57-59-60-62 cm, slip the middle 16-16-18-18-20-20 sts on a stitch holder for neck and finish each shoulder separately. Continue in stocking st with 3 edge sts in garter st towards the armhole and cast off for neck at beg of every row from the neck as follows: Cast off 2 sts 2 times and 1 st 2 times = 15-16-16-17-17-18 sts remain on shoulder. Continue until piece measures 60-62-64-66-68-70 cm and cast off. Repeat on the other shoulder. LEFT BACK PIECE: = 38-40-43-45-48-51 sts. Continue pattern back and forth with 5 band sts in garter st towards mid back and 3 edge sts in garter st towards armhole. AT THE SAME TIME dec for armhole as on front piece = 34-35-36-37-38-39 sts remain on needle. When piece measures 55-57-59-60-62-64 cm, slip the first 15-15-16-16-17-17 sts seen from RS on a stitch holder for neck (1 row should be worked after last buttonhole) - NOTE: To avoid cutting the yarn being used, work the sts before slipping them on the stitch holder. Then cast off at beg of every row from neck as follows: Cast off 2 sts 1 time and 1 st 2 times = 15-16-16-17-17-18 sts remain on shoulder. Continue until piece measures 60-62-64-66-68-70 cm and cast off. RIGHT BACK PIECE: Work as left but reversed. ASSEMBLY: Sew the shoulder seams. NECK EDGE: Pick up from RS approx. 90 to 110 sts around the neck on circular needle size 4 mm with white (including all sts slipped on threads). K 1 row from WS, K 1 row from RS and K 1 row from WS before casting off with K from RS. Sew on buttons. |
|
 |
|
Have you finished this pattern?Tag your pictures with #dropspattern #sealinetop or submit them to the #dropsfan gallery. Do you need help with this pattern?You'll find 22 tutorial videos, a Comments/Questions area and more by visiting the pattern on garnstudio.com. © 1982-2026 DROPS Design A/S. We reserve all rights. This document, including all its sub-sections, has copyrights. Read more about what you can do with our patterns at the bottom of each pattern on our site. |
|

With over 40 years in knitting and crochet design, DROPS Design offers one of the most extensive collections of free patterns on the internet - translated to 17 languages. As of today we count 324 catalogues and 12220 patterns translated into English (UK/cm).
We work hard to bring you the best knitting and crochet have to offer, inspiration and advice as well as great quality yarns at incredible prices! Would you like to use our patterns for other than personal use? You can read what you are allowed to do in the Copyright text at the bottom of all our patterns. Happy crafting!
Post a comment to pattern DROPS 168-4
We would love to hear what you have to say about this pattern!
If you want to leave a question, please make sure you select the correct category in the form below, to speed up the answering process. Required fields are marked *.