
Popular categories
Looking for a yarn?


Comments / Questions (76)
![]() Marie-Laure wrote:
Marie-Laure wrote:
Bonjour, Je ne comprends pas les explications au début du blanc. Comment fait-on les 3 morceaux (devant et les 2 demi dos). Ou doit-on faire le rabattage des mailles. Merci
03.11.2018 - 22:01DROPS Design answered:
Bonjour Marie-Laure, vous tricotez de bas en haut, en commençant par le demi-dos d'un côté pour terminer par le demi-dos de l'autre côté jusqu'aux emmanchures. Après avoir rabattu les mailles des emmanchures, vous terminez chaque partie séparément: d'abord le devant puis chaque demi-dos. Bon tricot!
05.11.2018 - 09:17
![]() Manuela wrote:
Manuela wrote:
Scusate se disturbo ancora, ho un po' di confusione per quanto riguarda le righe sui bordi a punto legaccio... Ma non si lavorano tutti i ferri a dritto? Non capisco bene come fare. Grazie e buona giornata.
26.07.2018 - 12:02DROPS Design answered:
Buongiorno Manuela. Quando lavora le strisce, lavora p.es due ferri consecutivi sul diritto del lavoro (così non deve tagliare il filo). Per avere il legaccio lavorando 2 ferri consecutivi sul diritto, deve lavorare le maglie a diritto sul primo ferro , a rovescio sul secondo ferro. Se lavorasse le maglie a diritto su entrambi i ferri, risulterebbe maglia rasata. In modo analogo quando lavora due ferri consecutivi sul rovescio del lavoro. Buon lavoro!
26.07.2018 - 12:50
![]() Manuela wrote:
Manuela wrote:
Grazie infinite ci provo😀 se non ci riesco mi sa che vi dovrò disturbare ancora... Grazie ancora e buona giornata. Manuela
07.07.2018 - 09:41
![]() Manuela wrote:
Manuela wrote:
Buongiorno, non riesco a capire come fare le righe portandomi dietro il filo senza tagliarlo e senza che si veda sui bordi dell'apertura dietro. Grazie infinite e complimenti per il vostro bellissimo sito web pieno di meravigliosi modelli gratuiti. Manuela
07.07.2018 - 00:39DROPS Design answered:
Buongiorno Manuela. Per le strisce, lavorando sui ferri circolari, procede come segue: lavora la prima striscia con il bianco, sul diritto del lavoro. Non gira il lavoro, ma riporta le maglie all'inizio del ferro per lavorare di nuovo sul diritto del lavoro con il colore blu. Adesso gira il lavoro; lavora un ferro con il bianco sul rovescio del lavoro; non gira, sposta le maglie e lavora un altro ferro sul rovescio del lavoro con il colore blu, e così via. Nel paragrafo Strisce, trova indicato come lavorare le m dei bordi. Buon lavoro!
07.07.2018 - 07:51
![]() Lucia wrote:
Lucia wrote:
Buongiorno, sto per ultimare il lavoro. Ho ripreso 90 maglie con i ferri circolari da 4. Ora non riesco a capire se devo lavorare avanti e indietro (perciò lasciare che la maglia di fatto si chiuda solo con i bottoni) oppure se devo lavorare in tondo unendo così il dietro destro con il dietro sinistro. Grazie!
17.06.2018 - 16:48DROPS Design answered:
Buonasera Lucia. Deve lavorare avanti e indietro. Buon lavoro!
17.06.2018 - 20:47
![]() Lucia wrote:
Lucia wrote:
Buongiorno, sono arrivata al punto in cui devo lavorare 2 coste a legaccio sulle maglie centrali ai lati. Quanti ferri devo fare in totale prima di intrecciare per gli scalfi? Non riesco a capire se devo fare 2 o 4 ferri. Grazie mille!
22.05.2018 - 09:08DROPS Design answered:
Buongiorno Lucia. Deve lavorare 4 ferri e poi intrecciare le maglie per gli scalfi. Buon lavoro!
22.05.2018 - 09:16
![]() Kim Shaw wrote:
Kim Shaw wrote:
I am at the striping instructions on the Sea Line pattern. I know how to do the striping but do not understand the instructions for the striping at the ribbing. Can you please clarify for me.
18.06.2017 - 17:28DROPS Design answered:
Dear Kim, the striping at the button band is the same as on the body, you only have to do those stitches i garter sitch. I hope this helped, Happy Knitting!
18.06.2017 - 18:01
![]() Valeri De Meester wrote:
Valeri De Meester wrote:
Goeieavond, ik ben bezig met het maken van de top en ben aan de laatste stap. Ik had een vraagje daarbij: neem je zomaar 90 tot 110 steken op in totaal of zijn dat specifieke steken? Dankjewel! Groetjes
05.06.2017 - 18:10DROPS Design answered:
Hoi Valerie, Je neemt gewoon steken op verdeeld langs de halsrand, zodat het er gelijkmatig uit ziet. Misschien helpt deze video daarbij.
09.06.2017 - 07:38Barbara wrote:
How high do I make the button holes 2 or 4 rows?
29.04.2017 - 03:17DROPS Design answered:
Dear Barbara, the buttonholes are made of a k2tog and a yarnover. In the next row, you continue to knit as before. I hope this helps. Happy knitting!
29.04.2017 - 08:40Barbara Maxwell wrote:
Sorry this may be a odd question but I'm just starting to knit from purchased patterns and am not sure how to read how much yarn I need of each colour for this pattern.
12.04.2017 - 04:07DROPS Design answered:
Dear Mrs Maxwell, you will find amount of yarn for each size under tab "Materials", so that in first size (= in size S) you will need here 250 g colour no 101 (250/50 g a ball Paris = 5 balls) + 200 g colour no 16 (= 200/50 g = 4 balls). Would you like to work it with one colour only, you would need 400 g Paris/50 g a ball =8 balls in the colour of your choice. Happy knitting!
12.04.2017 - 12:36
|
|
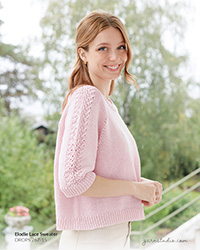
Sea Line#sealinetop |
|
 |
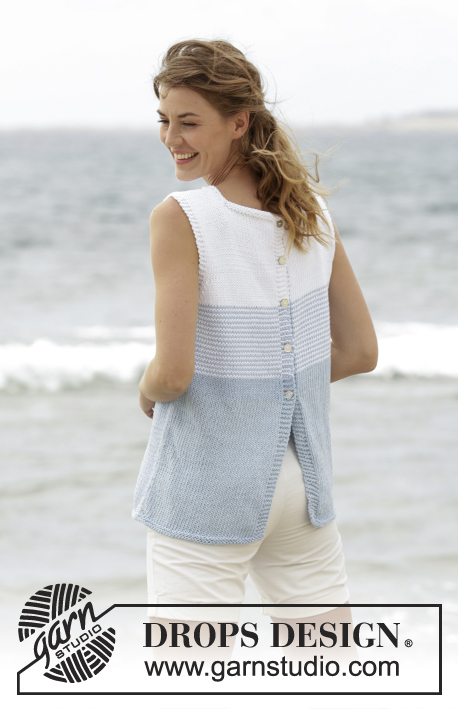 |
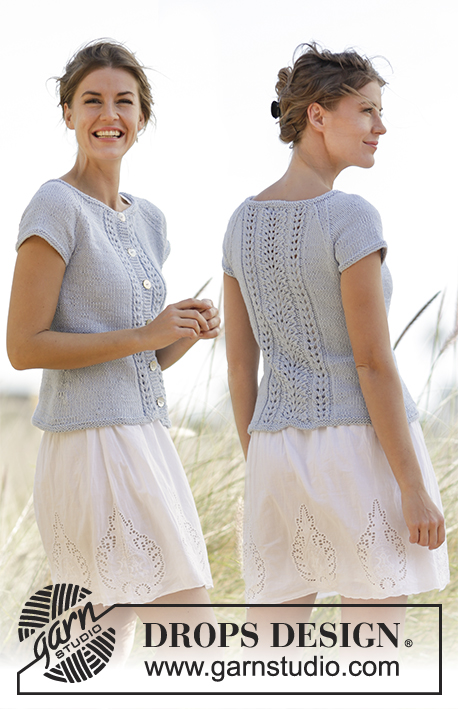
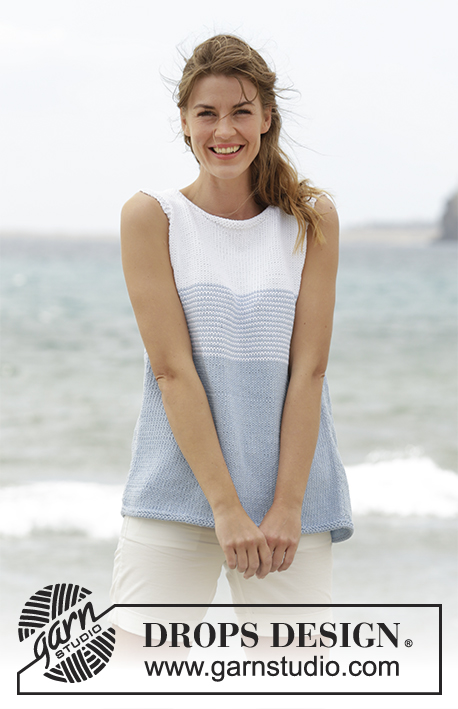
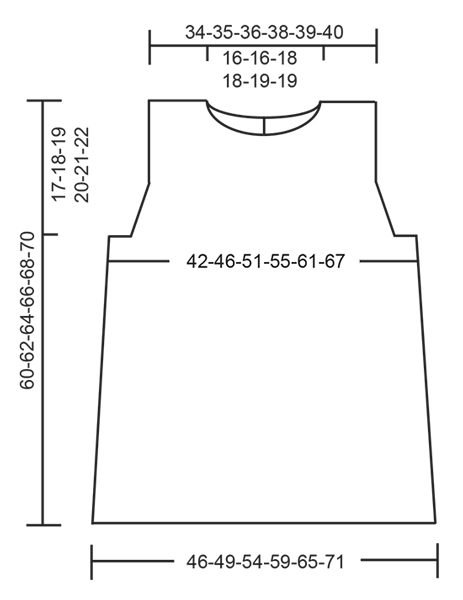
Knitted DROPS top with stripes and button band at the back in ”Paris”. Size: S - XXXL.
DROPS 168-4 |
|
|
GARTER ST (back and forth): K all rows. 1 ridge = 2 rows K. STRIPES: * 1 row white, 1 row light blue *, repeat from *-*. NOTE: To avoid cutting the yarn work alternately 2 rows from RS and 2 rows from WS but note that the band sts in garter sts on these rows are worked as follows: * K from RS, P from RS, P from WS, K from WS *, repeat from *-*. DECREASE TIP-1 (applies to body): All dec are done from RS! Beg 3 sts before marker and K 2 tog, K 2 (marker is between these 2 sts), slip 1 st as if to K, K 1, psso (= 2 sts dec). DECREASE TIP-2 (applies to armholes): Dec inside 3 edge sts in garter st. All dec are done from RS! Dec as follows after 3 edge sts: Slip 1 st as if to K, K 1, psso. Dec as follows before 3 edge st: K 2 tog. BUTTONHOLES: Dec for buttonholes on left back piece (seen from RS). 1 buttonhole = K tog second and third st from edge and make 1 YO. Dec for buttonholes when piece measures: SIZE S: 29, 35, 42, 48 and 55 cm SIZE M: 29, 36, 43, 51 and 57 cm SIZE L: 29, 36, 44, 52 and 59 cm SIZE XL: 29, 35, 42, 48, 55 and 61 cm. SIZE XXL: 29, 35, 42, 49, 56 and 63 cm. SIZE XXXL: 29, 37, 44, 51, 58 and 65 cm. ---------------------------------------------------------- TOP: Worked back and forth on circular needle from mid back. Cast on 166-178-194-210-230-250 sts (incl 5 band sts in each side towards mid back) on circular needle size 4 mm with light blue. Work 2 ridges in GARTER ST - see explanation above. Switch to circular needle size 5 mm and insert a marker 44-47-51-55-60-65 sts in from each side (= 78-84-92-100-110-120 sts between markers on front piece). Then work in stocking st with 5 band sts in garter st in each side towards mid back. REMEMBER THE KNITTING TENSION When piece measures 12 cm, dec 1 st on each side of both markers - READ DECREASE TIP-1 (= 4 sts dec). Repeat dec every 10-10-10-12-12-12 cm 3 times in total = 154-166-182-198-218-238 sts. Remember BUTTONHOLES on left band - see explanation above. AT THE SAME TIME when piece measures 30-31-32-33-34-35 cm, work STRIPES over all sts - see explanation above! READ ALL OF THE FOLLOWING SECTION BEFORE CONTINUING: When piece measures 42-43-44-45-46-47 cm, continue with white until finished measurements - AT THE SAME TIME when piece measures 42-43-44-45-46-47 cm work 2 ridges over the middle 12-14-16-20-24-28 sts in each side (work the other sts as before). On next row from RS after the ridges, cast off the middle 6-8-10-14-18-22 sts in each side for armholes and finish front and back pieces separately. FRONT PIECE: = 66-70-76-80-86-92 sts. Continue back and forth in stocking st with 3 edge sts in garter st in each side. On first row from RS, dec 1 st more for armhole in each side - READ DECREASE TIP-2. Repeat dec every other row (i.e. every row from RS) 4-5-7-8-10-12 times in total = 58-60-62-64-66-68 sts. When piece measures 54-56-57-59-60-62 cm, slip the middle 16-16-18-18-20-20 sts on a stitch holder for neck and finish each shoulder separately. Continue in stocking st with 3 edge sts in garter st towards the armhole and cast off for neck at beg of every row from the neck as follows: Cast off 2 sts 2 times and 1 st 2 times = 15-16-16-17-17-18 sts remain on shoulder. Continue until piece measures 60-62-64-66-68-70 cm and cast off. Repeat on the other shoulder. LEFT BACK PIECE: = 38-40-43-45-48-51 sts. Continue pattern back and forth with 5 band sts in garter st towards mid back and 3 edge sts in garter st towards armhole. AT THE SAME TIME dec for armhole as on front piece = 34-35-36-37-38-39 sts remain on needle. When piece measures 55-57-59-60-62-64 cm, slip the first 15-15-16-16-17-17 sts seen from RS on a stitch holder for neck (1 row should be worked after last buttonhole) - NOTE: To avoid cutting the yarn being used, work the sts before slipping them on the stitch holder. Then cast off at beg of every row from neck as follows: Cast off 2 sts 1 time and 1 st 2 times = 15-16-16-17-17-18 sts remain on shoulder. Continue until piece measures 60-62-64-66-68-70 cm and cast off. RIGHT BACK PIECE: Work as left but reversed. ASSEMBLY: Sew the shoulder seams. NECK EDGE: Pick up from RS approx. 90 to 110 sts around the neck on circular needle size 4 mm with white (including all sts slipped on threads). K 1 row from WS, K 1 row from RS and K 1 row from WS before casting off with K from RS. Sew on buttons. |
|
 |
|
Have you finished this pattern?Tag your pictures with #dropspattern #sealinetop or submit them to the #dropsfan gallery. Do you need help with this pattern?You'll find 22 tutorial videos, a Comments/Questions area and more by visiting the pattern on garnstudio.com. © 1982-2026 DROPS Design A/S. We reserve all rights. This document, including all its sub-sections, has copyrights. Read more about what you can do with our patterns at the bottom of each pattern on our site. |
|

With over 40 years in knitting and crochet design, DROPS Design offers one of the most extensive collections of free patterns on the internet - translated to 17 languages. As of today we count 324 catalogues and 12220 patterns translated into English (UK/cm).
We work hard to bring you the best knitting and crochet have to offer, inspiration and advice as well as great quality yarns at incredible prices! Would you like to use our patterns for other than personal use? You can read what you are allowed to do in the Copyright text at the bottom of all our patterns. Happy crafting!
Post a comment to pattern DROPS 168-4
We would love to hear what you have to say about this pattern!
If you want to leave a question, please make sure you select the correct category in the form below, to speed up the answering process. Required fields are marked *.