
Popular categories
Looking for a yarn?


Comments / Questions (55)
![]() Gun-Britt Fredriksson wrote:
Gun-Britt Fredriksson wrote:
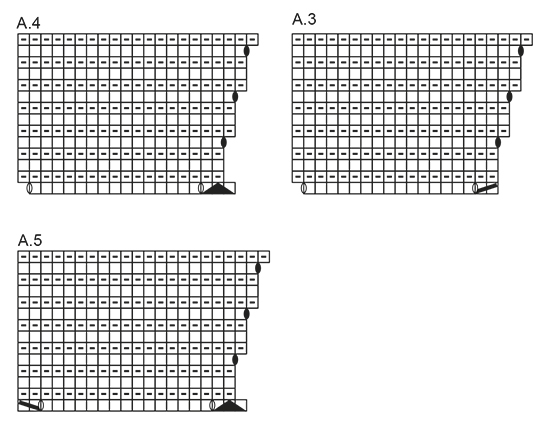
A3 är det en ökning i början av varvet, A5 i slutet på varvet är det ingen ökning. Varför? Har jag missat något?
12.09.2017 - 14:32DROPS Design answered:
Hej Gun-Britt, är du på varv 1? När du stickar A.3, A.4 och A.5 har du lika många ökningar som minskningar, dvs samma antal maskor efter första varvet.
13.09.2017 - 15:57
![]() Gun-Britt Fredriksson wrote:
Gun-Britt Fredriksson wrote:
Varv 34 i diagrammet, jag tycker att det är ett fel där. Jag vill att det ska vara 6 aviga, 7 räta. Det blir symmetriskt.
07.09.2017 - 19:27
![]() J.koelemeijer- De Jong wrote:
J.koelemeijer- De Jong wrote:
Heb al een paar keer een patroon gebruikt van Drops en dit vest gebreid voor maat xl met Drops Lima mix daar 800 gr voor besteld ,maar ik merk dat jullie de aangegeven hoeveelheid wel erg groot nemen ,want ik houd 4 bollen en een beetje over. Ik zou eigenlijk maar 2 bollen over moeten houden .Geven jullie altijd ruim het aantal dan hoef ik in het vervolg geen extra bollen te bestellen .? Hartelijke groet
22.07.2017 - 11:46DROPS Design answered:
Hallo J. Koelemeijer, Het garen wordt zo aangegeven dat je voldoende zou moeten hebben om het werkstuk te maken, dus naar boven toe afgerond. Overgebleven bollen kun je trouwens meestal weer inleveren bij de winkel waar je ze hebt aangeschaft.
26.07.2017 - 10:27Ingrid wrote:
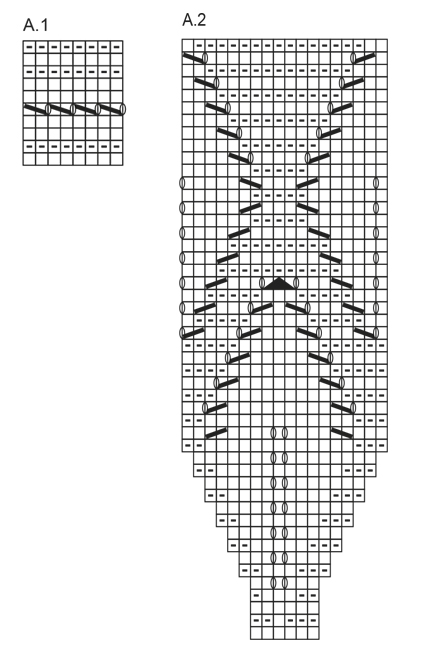
Beautiful cardi :) First row on A.1 is RS or WS? Knit or purl? Thank you.
05.07.2017 - 22:36DROPS Design answered:
Dear Ingrid, the first row of pattern A.1 is knitted from the right side with knit stitches. I hope this helps. Happy Knitting!
06.07.2017 - 00:33
![]() Olga wrote:
Olga wrote:
Hallo! Ich bin mit dem Blattmuster und Aufnahmen fertig, hat alles super geklappt. Da bin ich auf die Idee gekommen, Rest (Rumpf) auch in Krausrippen zu Stricken. Bin aber etwas unsicher, habe Angst, das die Jacke zu schwer wird.
28.06.2017 - 12:59
![]() CHEVALLIER Ursula wrote:
CHEVALLIER Ursula wrote:
Hallo, bin gerade in der 39. Reihe von Muster A2, bemerke , dass sich das Blattmuster nach oben wölbt und sehr plastisch aussieht. Auf dem Foto sieht es aber glatt aus. Mache ich vielleicht einen Fehler ? Ich werde versuchen, nach Fertigstellung glattzubügeln.
12.06.2017 - 00:39DROPS Design answered:
Liebe Frau Chevalier, das Blattmuster macht etwas relief aber es sollte nicht nach oben wölben. Es sieht kompliziert zu beanworten, ohne Ihr Projekt zu sehen. Am besten zeigen Sie Ihr Laden (im Laden oder mit Foto per Mail), sicher können sie Ihnen besser weiterhelfen. Viel Spaß beim stricken!
12.06.2017 - 15:49
![]() Katja Huru wrote:
Katja Huru wrote:
Onko kaavio A.2 varmasti oikein? Tuleeko 30 krs ylöspäin liikaa nurjalla oikeita silmukoita?
24.04.2017 - 11:17DROPS Design answered:
En löydä piirroksessa virhettä. Voit aina tuoda neuleesi lähimpään DROPS-jälleenmyyjäliikkeeseen, he auttavat sinua mielellään paikan päällä.
04.05.2017 - 16:46
![]() Kastner, Edeltraut wrote:
Kastner, Edeltraut wrote:
Hallo, danke für die Antwort. Jetzt bin ich ca 20 vor dem Abschluss und habe überlegt ob man das Blattmuster am Schluss noch Mal wiederholen könnte oder ist das zuviel? Was müsste ich bei dem Muster beachten oder haben Sie einen anderen Tipp? Vielen Dank
08.03.2017 - 09:30DROPS Design answered:
Liebe Frau Kastner, wenn Sie möchten, können Sie das Blattmuster unten noch stricken, beachten Sie nur, daß die Maschenprobe nicht zunimmt. Viel Spaß beim stricken!
08.03.2017 - 13:47
![]() Kastner, Edeltraut wrote:
Kastner, Edeltraut wrote:
Hallo, vielen Dank für die Antwort. Nun muss ich noch einmal Fragen, werden die Diagramme 3-5 hintereinander oder nebeneinander gestrickt. Vielen Dank
03.03.2017 - 17:17DROPS Design answered:
Liebe Frau Kasther, Die Diagramme A.3-A.5 werden nebeneinander so bearbeitet, A.3 (= 17 M) 1 x in der Breite dann, A.4 11-18 x (siehe Größe), und A.5 (= 20 M) 1 x in der Breite mit 5 M Kraus re. auf beiden Seiten. Viel Spaß beim stricken!
06.03.2017 - 08:32
![]() Kastner, Edeltraut wrote:
Kastner, Edeltraut wrote:
Hallo, ich bin etwas unsicher mit den Symbolen. Wenn da steht Hinreihe rechts und Rückreise links und bei dem Symbol darunter Hinreihe links und Rückreise rechts, sind das dann 4 Reihen oder 2? Danke
01.03.2017 - 18:05DROPS Design answered:
Liebe Frau Kastner, das erste Symbol ist für glatt rechts (= Hinreihe rechts, Rückreihe links), und das 2. Symbol ist für glatt links (= Hinreihe links, Rückreihe rechts). So daß A.1 so gestrickt wird: 1. Reihe: rechts, 2. Reihe: rechts, 3. Reihe: rechts, 4. Reihe: links usw. Viel Spaß beim stricken!
02.03.2017 - 08:31
|
||||||||||||||||||||||
Summer Leaves Cardigan#summerleavescardigan |
||||||||||||||||||||||
 |
 |
|||||||||||||||||||||
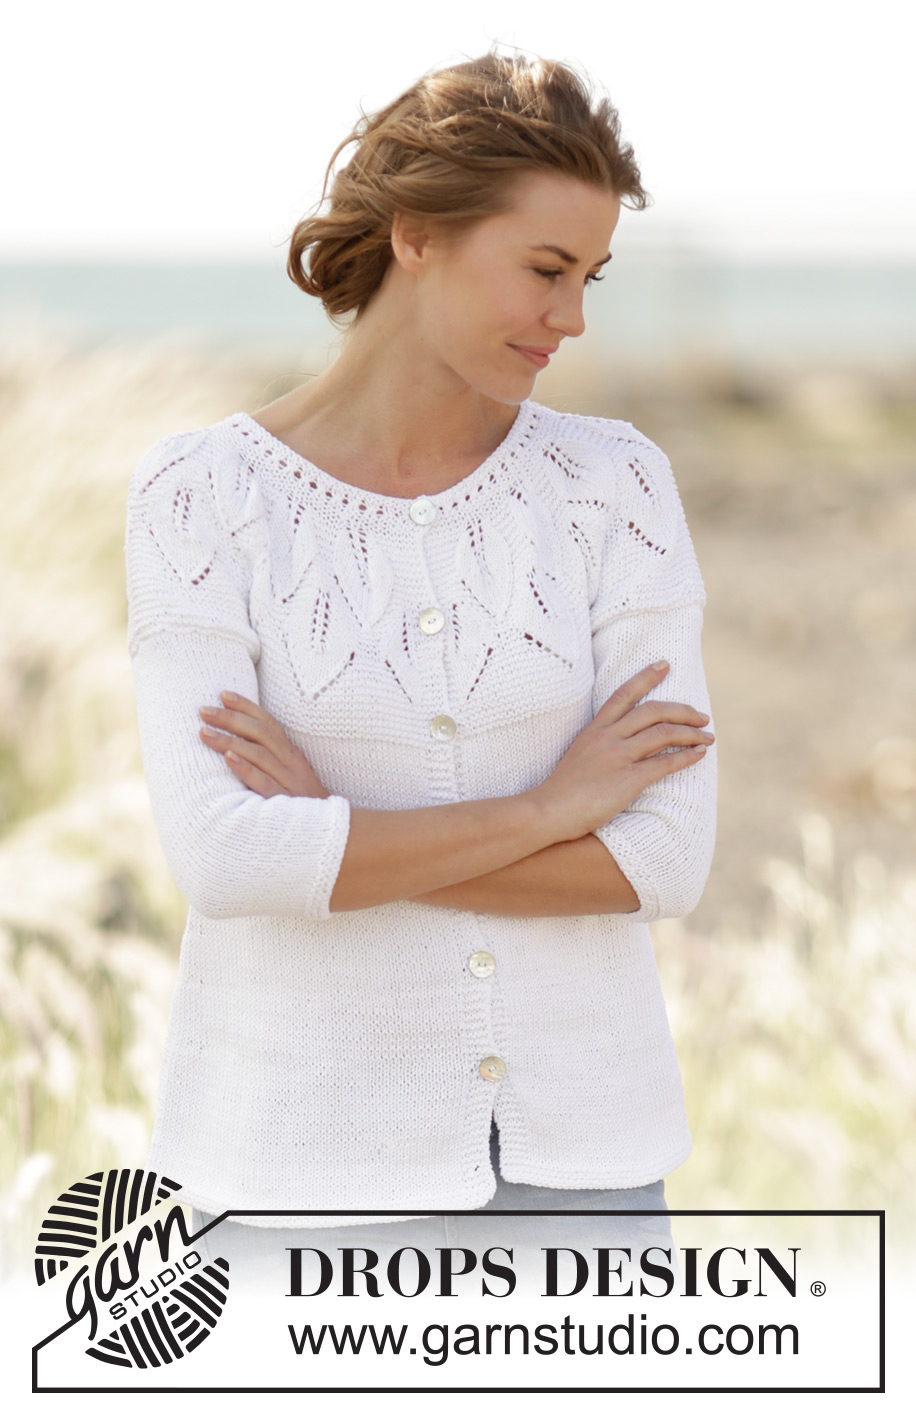
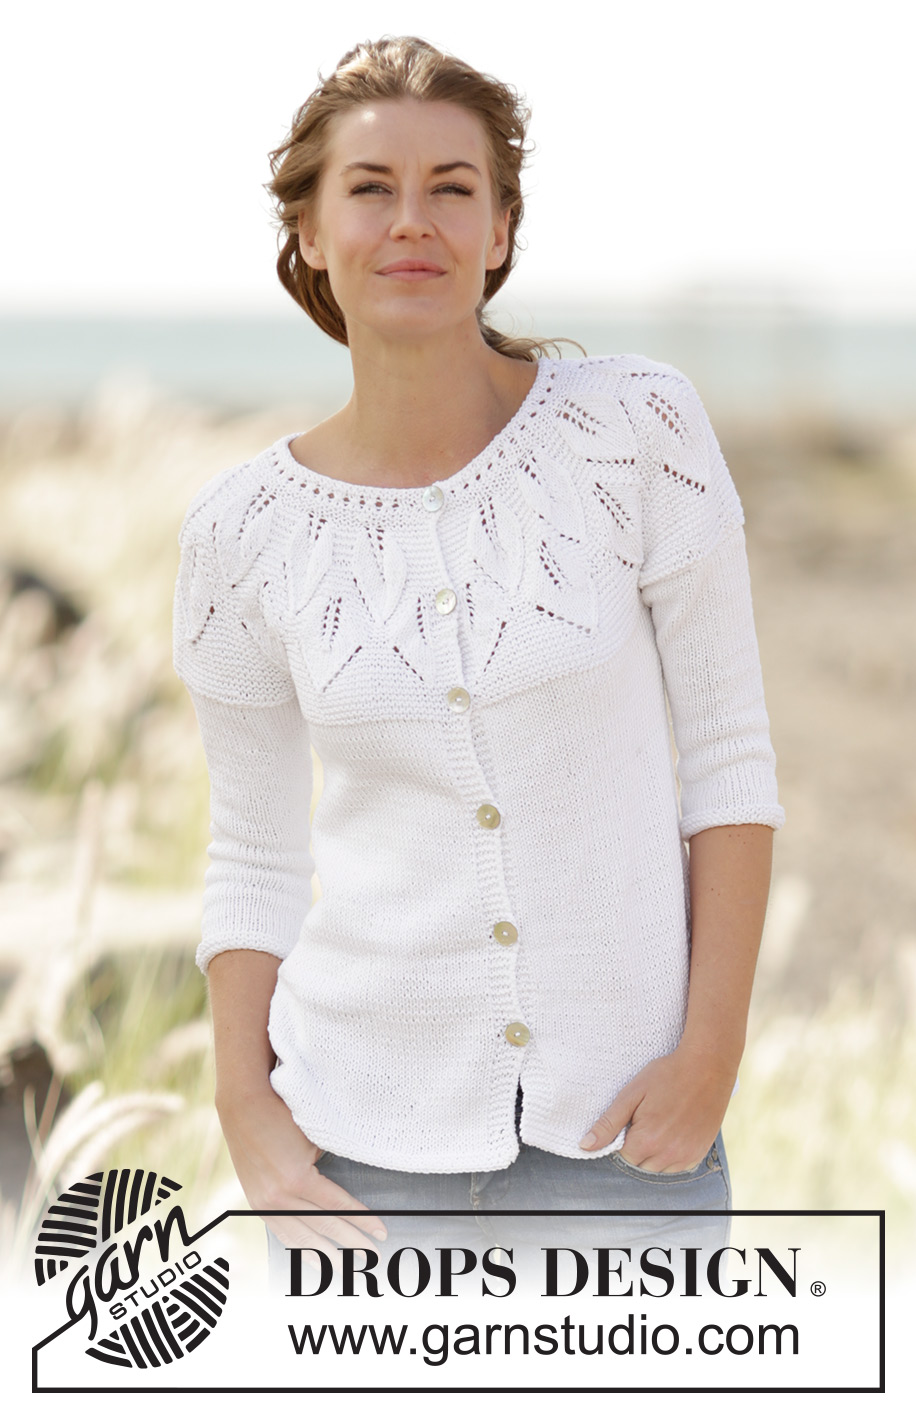
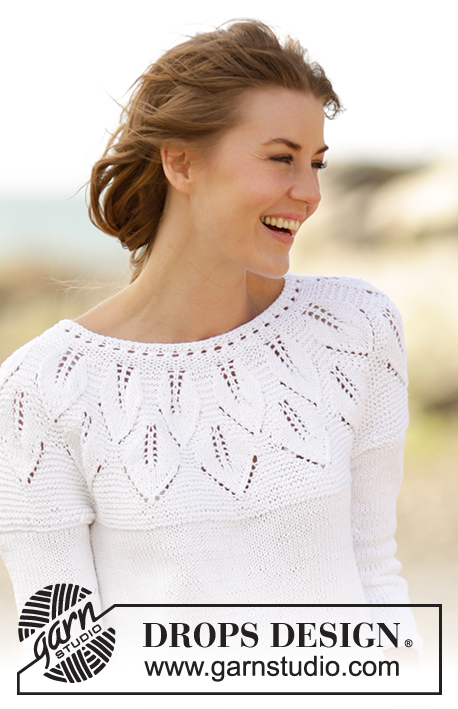
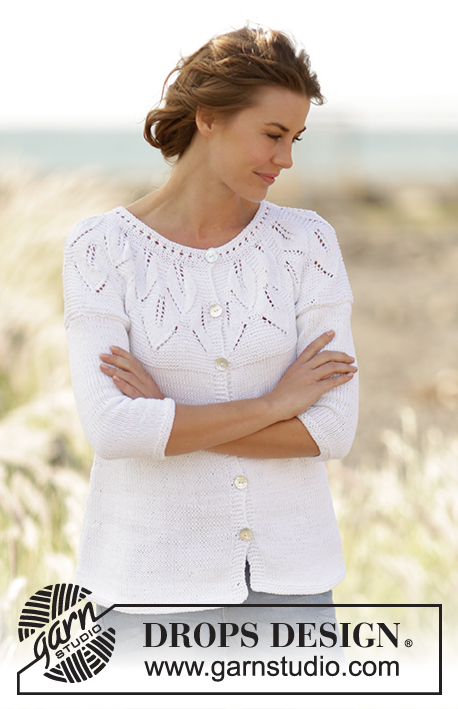
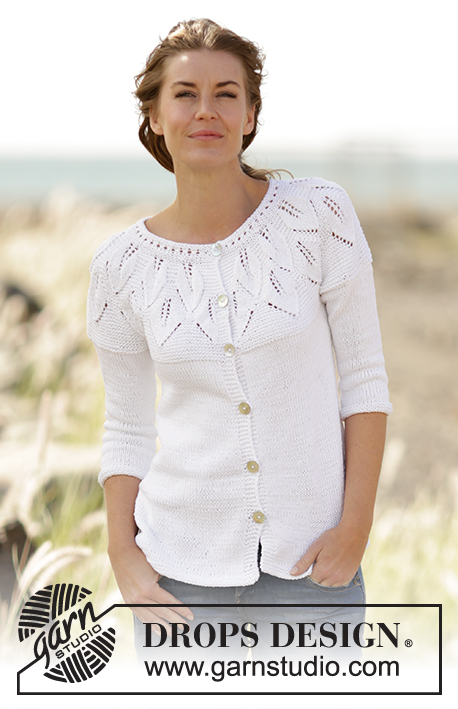
Knitted DROPS jacket with leaf pattern, ridges and round yoke, worked top down in ”Muskat”. Size S-XXXL.
DROPS 169-2 |
||||||||||||||||||||||
|
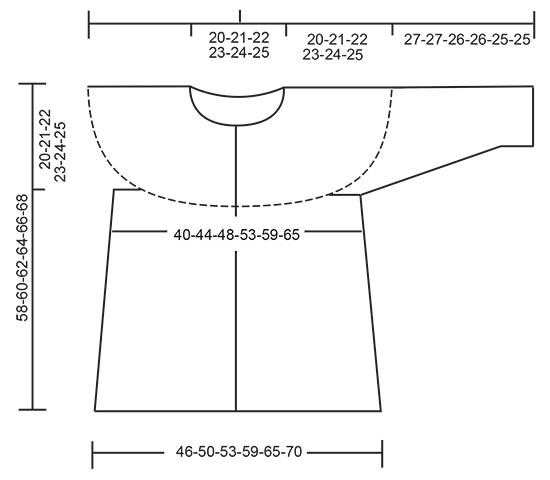
GARTER ST (back and forth): K all rows. 1 ridge = 2 rows K. GARTER ST (worked in the round): 1 ridge = 2 rounds. * K 1 round and P 1 round *, repeat from *-*. PATTERN: See diagrams A.1 to A.5. The diagrams show all rows in pattern seen from RS. BUTTONHOLES: Dec for buttonholes on right band (i.e. band at the end of row seen from RS). 1 buttonhole = K tog third and fourth st from edge and make 1 YO. Dec for buttonholes when piece measures (from cast-on edge and along the band): SIZE S-M-L: 2, 10, 18, 26, 34, 42 and 50 cm SIZE XL-XXL-XXXL: 2, 10, 18, 26, 34, 42, 50 and 58 cm ---------------------------------------------------------- JACKET: Worked back and forth on circular needle, top down. YOKE: Cast on 89-95-101-113-125-131 sts on circular needle size 3.5 mm with Muskat. Dec for BUTTONHOLES on right band - see explanation above. Work 5 sts in GARTER ST - see explanation above (= band), A.1 until 5 sts remain, 5 sts in garter st (= band). When A.1 has been worked 1 time vertically, continue as follows: 5 sts in garter st, A.2 (= 6 sts), repeat A.2 13-14-15-17-19-20 times in total, finish with first st in A.2 (so that pattern is the same in each side), finish with 5 sts in garter st. REMEMBER THE KNITTING TENSION When A.2 has been worked 1 time vertically, there are 245-263-281-317-353-371 sts on needle. Then work as follows: 5 sts in garter st, A.3 (= 17 sts), repeat A.4 11-12-13-15-17-18 times, A.5 (= 20 sts) and 5 sts in garter st. When A.3-A.5 have been worked 1 time vertically, there are 284-305-326-368-410-431 sts on needle. Continue in garter st until piece measures 20-21-22-23-24-25 cm, on last row from WS adjust no of sts to 288-312-336-370-402-434. Continue to work as follows (from RS): Work the first 44-48-52-58-64-70 sts (= left front piece), slip the next 61-65-69-74-78-82 sts on a stitch holder (= sleeve), cast on 6 new sts under sleeve, work the next 78-86-94-106-118-130 sts (= back piece), slip the next 61-65-69-74-78-82 sts on a stitch holder (= sleeve), cast on 6 new sts under sleeve, work the remaining 44-48-52-58-64-70 sts (= right front piece). BODY: There are now 178-194-210-234-258-282 sts for body. Insert a marker in each side of body where new sts were cast on under sleeve (= 3 new sts on each side of marker). NOW MEASURE THE PIECE FROM HERE. Switch to circular needle size 4 mm. Continue in stocking st and garter st on bands. When piece measures 4 cm, inc 1 st on each side of each marker (= 4 sts inc). Repeat inc every 5-5-5-6-6-6 cm 5 more times = 202-218-234-258-282-306 sts. Continue in stocking st and garter st until piece measures 34-35-36-37-38-39 cm, switch to circular needle size 3,5 mm and work 3 ridges. Cast off. The whole piece measures approx. 58-60-62-64-66-68 cm. SLEEVE: Slip sts from stitch holder back on double pointed needles size 3.5 mm (= 61-65-69-74-78-82 sts). Pick up 1 st in each of the 6 sts cast on under sleeve, insert a marker in the middle of these sts = 67-71-75-80-84-88 sts. Work 2 ridges in GARTER ST – see explanation above, switch to double pointed needles size 4 mm, then work in stocking st. When piece measures 3 cm, dec 1 st on each side of marker, repeat dec every 2-2-1½-1½-1-1 cm 9-10-11-13-14-15 more times = 47-49-51-52-54-56 sts. Continue in stocking st until sleeve measures 27-27-26-26-25-25 cm (shorter measurements in the larger sizes because of longer yoke), switch to double pointed needle size 3.5 mm and work 3 ridges. Cast off. Work the other sleeve the same way. ASSEMBLY: Sew the buttons on to left front piece. |
||||||||||||||||||||||
Diagram explanations |
||||||||||||||||||||||
|
||||||||||||||||||||||
 |
||||||||||||||||||||||
 |
||||||||||||||||||||||
 |
||||||||||||||||||||||
Have you finished this pattern?Tag your pictures with #dropspattern #summerleavescardigan or submit them to the #dropsfan gallery. Do you need help with this pattern?You'll find 24 tutorial videos, a Comments/Questions area and more by visiting the pattern on garnstudio.com. © 1982-2026 DROPS Design A/S. We reserve all rights. This document, including all its sub-sections, has copyrights. Read more about what you can do with our patterns at the bottom of each pattern on our site. |
||||||||||||||||||||||


With over 40 years in knitting and crochet design, DROPS Design offers one of the most extensive collections of free patterns on the internet - translated to 17 languages. As of today we count 324 catalogues and 12290 patterns translated into English (UK/cm).
We work hard to bring you the best knitting and crochet have to offer, inspiration and advice as well as great quality yarns at incredible prices! Would you like to use our patterns for other than personal use? You can read what you are allowed to do in the Copyright text at the bottom of all our patterns. Happy crafting!
Post a comment to pattern DROPS 169-2
We would love to hear what you have to say about this pattern!
If you want to leave a question, please make sure you select the correct category in the form below, to speed up the answering process. Required fields are marked *.