
Popular categories
Looking for a yarn?


Comments / Questions (23)
![]() Marián Martín wrote:
Marián Martín wrote:
Buenos días, quería preguntar, si aparte del problema del peso de la labor, esta chaqueta se puede tejer con agujas rectas. Creo que me costaría mucho acostumbrarme a las agujas circulares. Gracias. Un saludo Marián
19.04.2015 - 10:41DROPS Design answered:
Hola Marian, la ag circular se usa para tener sitio para todos los pts que son muchos. Se puede trabajar en ag rectas si entran todos los pts.
20.04.2015 - 09:45
![]() Inmaculada wrote:
Inmaculada wrote:
No se cuando tengo que dividir el canesu en los delanteros la espalda y las mangas. Los puntos que tendría que tener en las distintas partes se la chaqueta.y los puntos totales del canesu antes de hacer la división.gracias un saludo yma
05.03.2015 - 20:18DROPS Design answered:
Hola Inmaculada, la labor se empieza a dividir como pone en la 4 fila del apartado CANESÚ cuando tenemos 76-76-80-80-84-84 pts. Las partes las dividimos con los marcapuntos MP. Ej: 5 pts de la cenefa en pt musgo, 10-10-11-11-12-12 d., insertar el 1er MP, 2 d. (= delantero izquierdo). Los últimos 2 pts de derecho son para la forma del raglán, del 2º MP al 3º sería la primera manga...etc
09.03.2015 - 10:46
![]() E. Van Swieten wrote:
E. Van Swieten wrote:
Eenvoudig model. Erg leuk. Voor een simpel breiwerkje tussendoor.
11.12.2014 - 12:43
![]() Ellen wrote:
Ellen wrote:
Hei! Her er det regnefeil. Andes kommer i nøster på 100 gram, prisen her er regnet ut fra nøster på 50 gram :)
05.08.2014 - 19:23DROPS Design answered:
Hej Ellen. Det har du ret i. Vi har rettet. Tak for meldingen.
07.08.2014 - 13:55
![]() Shelia wrote:
Shelia wrote:
Love the classically simple style. My kind of pattern!!!!
27.06.2014 - 21:26
![]() Marcella wrote:
Marcella wrote:
MI PIACE LA SEMPLICITA'
15.06.2014 - 21:39
![]() Susan wrote:
Susan wrote:
Heel stijlvol door zijn eenvoud.
14.06.2014 - 18:06
![]() Monica wrote:
Monica wrote:
Parfait pour sa simplicite
10.06.2014 - 22:23
![]() Alessandra wrote:
Alessandra wrote:
Sportivo e bello il colore.
04.06.2014 - 16:31
![]() Donatella wrote:
Donatella wrote:
Pratico
04.06.2014 - 11:05
|
|
Ruby My Dear#rubymydearcardigan |
|
|
|
|
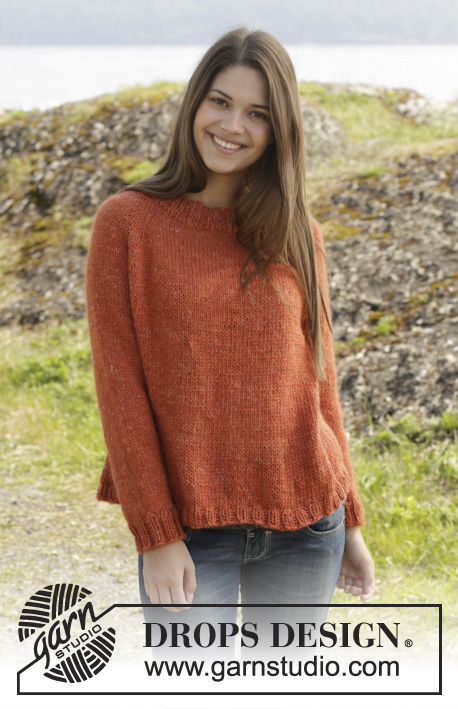
Knitted DROPS jacket in garter st with round yoke, worked top down in "Andes". Size: S - XXXL.
DROPS 158-27 |
|
|
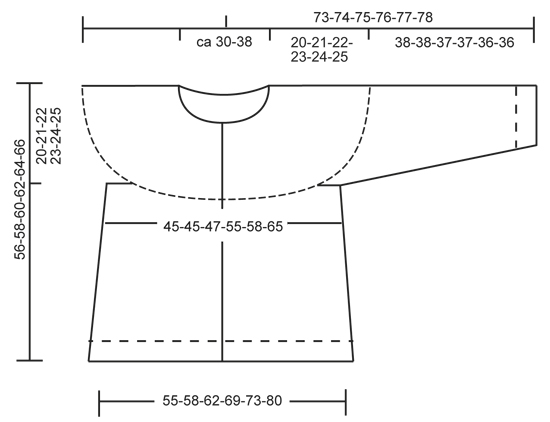
GARTER ST (back and forth on needle): K all rows. 1 ridge = 2 rows K. INCREASE TIP: Inc 1 st by making a YO. On next row K YO twisted (i.e. work in back loop of st instead of front) to avoid holes. DECREASE TIP: Dec 1 st before marker as follows: Work until 2 sts remain before marker, slip 1 st as if to K, K 1, psso. Dec 1 st after marker as follows: K 2 tog. BUTTONHOLES: Dec for buttonholes on right band. 1 buttonhole = cast off 3rd st from mid front and cast on 1 new st on next row over this st.Dec for buttonholes when piece measures: SIZE S: 2, 10, 18, 26 and 34 cm SIZE M: 2, 10, 18, 26 and 34 cm SIZE L: 2, 10, 18, 26 and 34 cm SIZE XL: 2, 11, 20, 29 and 38 cm SIZE XXL: 2, 11, 20, 29 and 38 cm SIZE XXXL: 2, 11, 20, 29 and 38 cm ---------------------------------------------------------- JACKET: Worked top down, back and forth on circular needle. YOKE: Cast on 79-79-82-82-85-85 sts (incl 5 band sts in each side of piece) on circular needle size 7 mm with Andes. Work 5 band sts in GARTER ST - see explanation above - rib = K 1/P 2 until 5 sts remain, finish with 5 band sts in garter st. Continue like this until piece measures 2 cm. Remember BUTTONHOLES - see explanation above. Switch to circular needle size 8 mm. Then work piece in garter st. On 1st row dec 3-3-2-2-1-1 st evenly = 76-76-80-80-84-84 sts. REMEMBER THE KNITTING TENSION! On next row from RS insert 8 markers in the piece as follows: 5 band sts in garter st, K 10-10-11-11-12-12, insert 1st marker, K 2 (= left front piece), insert 2nd marker, K 9 (= sleeve), insert 3rd marker, K 2, insert 4th marker, K 20-20-22-22-24-24, insert 5th marker, K 2 (= back piece), insert 6th marker, K 9 (= sleeve), insert 7th marker, K 2, insert 8th marker, K 10-10-11-11-12-12, finish with 5 band sts in garter st (= right front piece). Then inc 1 st – READ INCREASE TIP, before 1st-3rd-5th and 7th marker and after 2nd-4th-6th and 8th marker (= 8 sts inc). Repeat inc every 4th row 9-9-9-10-11-12 more times. AT THE SAME TIME when piece measures 4-3-2-2-2-1½ cm, inc as follows: Inc 0-0-0-1-1-2 sts evenly on each front piece (NOTE: Do not inc over band sts), 3-4-4-4-4-4 sts on each sleeve and 0-0-0-2-2-4 sts evenly on back piece. Repeat inc evenly every 8 cm 2 more times. When piece measures 19 cm, inc 1-0-2-2-2-2 sts evenly on each sleeve. When all inc are done there are 176-180-188-208-220-240 sts on needle. Then work in garter st until piece measures 20-21-22-23-24-25 cm. Work next row as follows: Work 5 band sts in garter st, K 22-22-23-27-29-33 sts, slip the next 39-41-43-45-47-49 sts on a stitch holder for sleeve, cast on 6 new sts, insert 1 marker in the middle of the new sts, work the next 44-44-46-54-58-66 sts, slip the next 39-41-43-45-47-49 sts on a stitch holder for sleeve, cast on 6 new sts under sleeve, insert 1 marker in the middle of the new sts, K 22-22-23-27-29-33, finish with 5 band sts in garter st = 110-110-114-130-138-154 sts. NOW MEASURE PIECE FROM HERE! BODY: When piece measures 3 cm, inc 1 st on each side of markers (= 4 sts inc). Repeat inc every 6-4-4-4-4-4 cm 4-6-7-7-7-7 more times = 130-138-146-162-170-186 sts. When piece measures 34-35-36-37-38-39 cm, inc 6-4-5-4-5-4 st evenly = 136-142-151-166-175-190 sts. Switch to circular needle size 7 mm and work rib K 1/P 2 with 5 band sts in garter st in each side of piece. Cast off when piece measures 36-37-38-39-40-41 cm. SLEEVE: The sleeve is worked back and forth on circular needle. Slip the 39-41-43-45-47-49 sts from stitch holder back on circular needle size 8 mm. Cast on 3 sts in each side of piece at the end of the next 2 rows = 45-47-49-51-53-55 sts. Work in garter st. When piece measures 3 cm, dec 1 st in each side of piece. Repeat dec every 3-3-3-2½-2½-2½ cm 8-8-8-9-9-10 more times = 27-29-31-31-33-33 sts. Work in garter st until piece measures 35-35-34-34-33-33 cm. Then inc 3-4-5-5-6-6 sts evenly = 30-33-36-36-39-39 sts. Switch to circular needle size 7 mm. Work rib = K 1/P 2. Cast off when piece measures 38-38-37-37-36-36 cm (shorter measurements in the larger sizes because of wider shoulders). Work the other sleeve the same way. ASSEMBLY: Sew sleeve seams in outer loops of edge sts. Sew tog under sleeves. Sew the buttons on to the left band. |
|
 |
|
Have you finished this pattern?Tag your pictures with #dropspattern #rubymydearcardigan or submit them to the #dropsfan gallery. Do you need help with this pattern?You'll find 24 tutorial videos, a Comments/Questions area and more by visiting the pattern on garnstudio.com. © 1982-2026 DROPS Design A/S. We reserve all rights. This document, including all its sub-sections, has copyrights. Read more about what you can do with our patterns at the bottom of each pattern on our site. |


With over 40 years in knitting and crochet design, DROPS Design offers one of the most extensive collections of free patterns on the internet - translated to 17 languages. As of today we count 324 catalogues and 12290 patterns translated into English (UK/cm).
We work hard to bring you the best knitting and crochet have to offer, inspiration and advice as well as great quality yarns at incredible prices! Would you like to use our patterns for other than personal use? You can read what you are allowed to do in the Copyright text at the bottom of all our patterns. Happy crafting!
Post a comment to pattern DROPS 158-27
We would love to hear what you have to say about this pattern!
If you want to leave a question, please make sure you select the correct category in the form below, to speed up the answering process. Required fields are marked *.