Comments / Questions (139)
![]() Marie France Milette wrote:
Marie France Milette wrote:
Bonjour merci pour ce patron voici ma question. Pour l'empiècement, lorsque je fais les 23 m en fausse côte est ce que les jeter sont calculé comme une mailles ? merci
21.12.2015 - 02:27DROPS Design answered:
Bonjour Mme Milette, les jetés ne comptent pas comme des mailles (ils "appartiennent" à la m glissée). Bon tricot!
21.12.2015 - 11:26
![]() Elke wrote:
Elke wrote:
Habe den Pullover nochmal gestrickt mit Nadelstärke 8 statt 9. Das kommt an der Raglanpasse gut hin, wahrscheinlich hätte ich auch Stärke 7 nehmen können. Die Breite des Strickstücks entspricht allerdings eher Größe L als M, trotz der nochmal überprüften korrekten Maschenprobe. Da ich normalerweise eng stricke, verstehe ich das nicht wirklich. Durch die Weite wirkt der Pulli nicht ganz so elegant wie auf dem Bild, sieht aber trotzdem schön aus und die Wolle ist superweich. LG, Elke
16.12.2015 - 18:07
![]() Elke wrote:
Elke wrote:
Habe den Pullover fast fertig, er ist aber zu weit und sieht viel gröber aus als auf dem Bild,! Obwohl die Maschenprobe glatt rechts genau gestimmt , hat. Maschenprobe rundgestricktes falsches Patent gejt ja nicht, habe jich deshalb auf glatt rechts verlassen. Habt ihr einen Tipp, mit welchet Nadelstärke ich en feineres Strickbild und 10 cm weniger in der Breite hinbekomme? LG, Elke
01.12.2015 - 18:45DROPS Design answered:
Das lässt sich pauschal nicht sagen, Sie müssten es selbst herausfinden, indem Sie ein Probestück im falschen Patent mit einer dünneren Nadel stricken und dann mit Ihrem Pullover vergleichen (auf 10 cm umgerechnet). Damit können Sie ermitteln, um wie viel der Pullover enger wird, wenn Sie ihn mit einer dünneren Nadel stricken. Achten Sie aber darauf, dass die Höhenmaße bleiben, Sie sollten bei der Raglanpasse immer mal wieder vergleichen und ggf. eine Ziwschenreihe einfügen, sollte die Passe kürzer werden.
05.12.2015 - 17:51
![]() Gerrie Hekman wrote:
Gerrie Hekman wrote:
Wellicht is het handig om bij een patroon te vermelden dat als je een garenalternatief neemt dat de looplengte van groot belang is. (Als wiskundige had ik dit natuurlijk moeten weten). Ik ben bezig met 157-20 en had geen zin in pluizige wol (brushed alpaca silk) en ben gegaan voor een aangeraden alternatief Big Fabel 912, ik had al extra genomen, maar ik heb nog niet genoeg en nu is deze wol uit het assortiment.
11.11.2015 - 15:40
![]() Gerrie wrote:
Gerrie wrote:
Is het nodig om voor de hals, de steken op te nemen en dan nog eens 2 ribbels te breien, of kan dat ook meteen aan het begin.
25.10.2015 - 08:15DROPS Design answered:
Hoi Gerrie. Ik denk dat je ook kan beginnen met de 2 ribbels
27.10.2015 - 14:43
![]() Lene Hasle wrote:
Lene Hasle wrote:
For mig at se blir der ikke falsk patent, hvis man følger strikkeanvisningen
21.10.2015 - 14:47
![]() Ellen wrote:
Ellen wrote:
När jag lagt upp 55 maskor och ska börja sticka runt på rundstickan (80 cm) så är ju kabeln alldeles för lång för att jag ska kunna sticka runt. Ska jag använda strumpstickorna tills jag ökat tillräckligt många maskor? Tacksam för snabbt svar! Tack!
27.07.2015 - 21:42DROPS Design answered:
Hej Ellen, Ja börja med strumpst eller så får du börja med en mindre rundsticka. Lycka till!
28.07.2015 - 12:31Cathy Atlija wrote:
Sorry, last question (I hope) - can I replace the false english rib with english rib? The stitches are about the same but the rows are different, would that totally throw off the raglan seams? Because this yarn is so fluffy and you're increasing on every other row, I'm finding it really hard to see the pattern in the few rows I've knitted and it just doesn't look right. Wish I could translate all the other comments and see if others had this problem!
07.04.2015 - 05:09DROPS Design answered:
Dear Mrs Atlija, you can work another pattern but remember to check your gauge. You may have to knit some cm before pattern can be visible (make a swatch first to get used to work the pattern and see after some cm how it will look). Remember you can also get help from your DROPS store. Happy knitting!
07.04.2015 - 10:36Cathy Atlija wrote:
I'm so sorry for all the questions! I'm past the casting on now, woohoo! Now I think I'm doing the False English Rib wrong! When you read the instructions and then watch the video, they don't seem to jive. In both rounds of False English Rib, where it says '1 stitch in garter stitch' - I've been doing it as a knit stitch on both rounds, is that wrong? I wish the instructions were a little bit clearer. Thank you.
22.03.2015 - 03:03DROPS Design answered:
Dear Mrs Atlija, when you work garter st in the round, you will work alternately K 1 round, P1 round - the st worked in garter st in the False English rib will be worked K on 1st round and P on 2nd round (= Round 1: K1, YO, slip 1 as if to P - Round 2: P1, K tog YO ans slipped st). Happy knitting!
23.03.2015 - 09:37Cathy Atlija wrote:
There are 9 stitches added in the 2nd row anyways, would this really affect the pattern that much if I added them into the cast on instead of the 2nd row? I didn't get my yarn from a store, I ordered online from Nordicmart.
20.03.2015 - 17:26DROPS Design answered:
Dear Mrs Atlija, you are right, you can cast on 9 sts more and then don't increase these 9 sts on 2nd round - check then by the neck if you like to keep these 9 sts extra or dec them. You can contact Nordicmart also per mail or telephone if requested, they'll answer. Happy knitting!
21.03.2015 - 10:12
Lazy Afternoon#lazyafternoonsweater |
|
|
|
|
Knitted DROPS jumper with raglan and false English rib, worked top down in 2 strands ”Brushed Alpaca Silk”. Size S-XXXL
DROPS 157-20 |
|
|
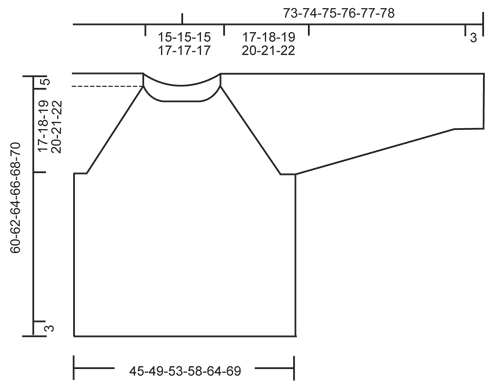
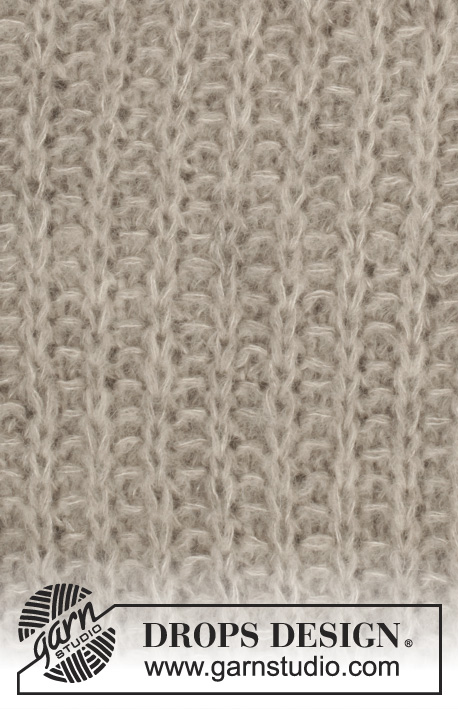
GARTER ST (in the round on circular needle): 1 ridge = 2 rounds. * K 1 round and P 1 round *, repeat from *-*. FALSE ENGLISH RIB (in the round on circular needle): ROUND 1: * K1 st, 1 YO, slip 1 st as if to P *, repeat from *-* until 1 st remains, finish with K1 st. ROUND 2: * P1 st, K tog YO and slipped st from previous round *, repeat from *-* until 1 st remains, finish with P1 st. Repeat rounds 1 to 2. RAGLAN: Inc on each side of every marker as follows: Work until 1 st remains before marker, 1 YO, work 2 sts in stocking st and 1 YO. Repeat at the remaining markers on round. On next round K YOs twisted (i.e. work in back loop of st instead of front) to avoid holes. DECREASE TIP (applies to sleeve): Dec as follows BEFORE st with marker in: Slip 1 st as if to K, K 1, psso. Dec as follows AFTER st with marker in: K 2 tog. ---------------------------------------------------------- JUMPER: Worked top down in the round on circular needle/double pointed needles. At the end, pick up sts around the neck and work an edge in garter st. YOKE: Cast on 55-55-55-59-59-59 sts with 2 strands Brushed Alpaca Silk on circular needle size 9 mm. Work 1 ridge in GARTER ST - see explanation above AT THE SAME TIME on last round in ridge inc 9 sts evenly in all sizes = 64-64-64-68-68-68 sts. On next round work as follows from right raglan at the back: 1 st in stocking st, insert 1st marker here, 9 sts in stocking st, insert 2nd marker here, 1 st in stocking st, 21-21-21-23-23-23 sts in FALSE ENGLISH RIB – see explanation above (= front piece), 1 st in stocking st, insert 3rd marker here, 9 sts in stocking st, insert 4th marker here, 1 st in stocking st, 21-21-21-23-23-23 sts in false English rib (= back piece). Continue like this AT THE SAME TIME on next round beg inc for RAGLAN – see explanation above! Repeat this inc every other round 5-7-10-13-18-22 more times, and every 4th round 5-5-4-3-1-0 times = 152-168-184-204-228-252 sts. NOTE: Work the new inc sts on front and back piece in false English rib and work the new inc sts on sleeves in stocking st. REMEMBER THE KNITTING TENSION! Piece measures 22-23-24-25-26-27 cm from shoulder. Work 1 round more with pattern as before but now stop 1 st before 1st marker (i.e. 1 st before round is done). Slip the next 33-37-41-45-51-57 sts on a stitch holder (= sleeve), cast on 7 new sts under sleeve, work the next 43-47-51-57-63-69 sts (= front piece), slip the next 33-37-41-45-51-57 sts on a stitch holder (= sleeve), cast on 7 new sts under sleeve, work the next 43-47-51-57-63-69 sts (= back piece). BODY: There are now 100-108-116-128-140-152 sts. Continue false English rib as before. P the middle of the 7 new sts under each sleeve, work the remaining new sts in false English rib. Continue like this until piece measures 35-36-37-38-39-40 cm from the new sts under sleeve. Now work 3 ridges before loosely casting off. SLEEVE: Slip the 33-37-41-45-51-57 sts back on double pointed needles. Work 1 row in stocking st over all sts. Then cast on 7 sts at the end of row = 40-44-48-52-58-64 sts. Insert a marker in the middle of the new sts under the sleeve. NOW MEASURE THE PIECE FROM HERE. Then work the sleeve in stocking st in the round. When piece measures 4 cm, beg dec for sleeve – READ DECREASE TIP. Repeat the same dec every 5½-5-4-3½-2½-2½ cm 6-7-9-10-13-15 more times = 26-28-28-30-30-32 sts. When piece measures 41-41-41-40-40-40 cm, work 3 ridges and loosely cast off. ASSEMBLY: Sew the holes under the sleeves. NECK EDGE: Pick up 1 st in every st in ridge in the neck with 2 strands Brushed Alpaca Silk = 55-55-55-59-59-59 sts. Work 2 ridges and loosely cast off. |
|
 |
|
Have you finished this pattern?Tag your pictures with #dropspattern #lazyafternoonsweater or submit them to the #dropsfan gallery. Do you need help with this pattern?You'll find 23 tutorial videos, a Comments/Questions area and more by visiting the pattern on garnstudio.com. © 1982-2025 DROPS Design A/S. We reserve all rights. This document, including all its sub-sections, has copyrights. Read more about what you can do with our patterns at the bottom of each pattern on our site. |


Post a comment to pattern DROPS 157-20
We would love to hear what you have to say about this pattern!
If you want to leave a question, please make sure you select the correct category in the form below, to speed up the answering process. Required fields are marked *.