
Popular categories
Looking for a yarn?


Comments / Questions (141)
![]() Sylvia wrote:
Sylvia wrote:
Hallo, ich habe eine Frage zu den Stricknadel-Angaben. Was bedeutet die Nr. 9 bei "DROPS NADELSPIEL und RUNDNADEL (40 und 80 cm) Nr. 9 – oder die benötigte Nadelstärke"? Eigentlich wird doch die Nadelstärke 5 bei der Wolle benötigt. Viele Grüße
14.10.2014 - 09:22DROPS Design answered:
Liebe Sylvia, Sie stricken den Pulli ja mit 2 Fäden, also mit doppel gelegtem Faden, dementsprechend müssen Sie eine dickere Nadel verwenden als die für das Garn angegebene. Verwenden Sie die Nadelstärke, die Sie zum Erreichen der Maschenprobe benötigen, es ist ganz wichtig, dass die Maschenprobe stimmt, in diesem Fall wird sie natürlich ebenso wie der Pulli mit doppeltem Faden gestrickt.
14.10.2014 - 21:22Noudji wrote:
Bonjour, J'ai fait les augmentations du raglan- soit 2 fois 5*8 mailles- donc 80 mailles au total. Pour la taille S on obtient donc 64 mailles de départ + 80 = 144 et non pas 152 ?
09.10.2014 - 17:16DROPS Design answered:
Bonjour Mme Noudji, en taille S, on commence les augmentations au tour suivant après avoir placé les marqueurs et on les répète encore 5 fois tous les 2 tours soit 6 fois au total tous les 2 tours, puis 5 fois tous les 4 tours. On a ainsi 64 + (6 x 8) + (5 x 8) = 152 m. Bon tricot!
10.10.2014 - 09:38
![]() Noudji wrote:
Noudji wrote:
Tout d'abord merci pour vos réponses :-) Encore deux questions: lorsque, au troisième tour il est dit "Au tour suivant, tricoter ainsi à partir du côté droit du raglan dos". Le côté droit du raglan dos ne se trouve-t-il pas au début du tour? Si non, comment le trouver et comment faut-il tricoter jusque là?
01.10.2014 - 22:26DROPS Design answered:
Bonjour Mme Noudji, tout à fait, le début du tour sera au niveau du côté droit du raglan dos. Bon tricot!
02.10.2014 - 09:43
![]() Noudji wrote:
Noudji wrote:
Pour le raglan, si l'on tricote jusqu'à 1 m avant le marqueur, il reste une maille avant le marqueur. On fait un jeté mais comment peut-on tricoter ensuite 2 mailles en jersey puisqu'il ne reste qu'une maille avant le marqueur? Est-ce qu'il s'agit des deux mailles qui sont juste avant et après le marqueur? Merci
30.09.2014 - 18:37DROPS Design answered:
Bonjour Mme Noudji, les marqueurs sont placés ainsi : 1 m jersey, marqueur 1 ou 3, 9 m jersey, marqueur 2 ou 4, 1 m jersey. Vous augmentez ainsi : 1 jeté, 1 m jersey, marqueur, 1 m jersey, 1 jeté à chacun des 4 marqueurs (le marqueur se trouve à chaque fois entre les 2 m jersey). Bon tricot!
01.10.2014 - 10:25
![]() SABATIER Catherine wrote:
SABATIER Catherine wrote:
Au niveau de l'empiècement quand après le 4e marqueur, quand vs dites "continuer ainsi " je ne comprends pas car il me reste 14 mailles avant de finir le tour . Pourriez vous détailler les mailles a tricoter ? En vous remerciant
21.09.2014 - 20:23DROPS Design answered:
Bonjour Mme Sabatier, vous tricotez les 64 m ainsi : 1 m jersey, (marqueur), 9 m jersey, (marqueur), 1 m jersey, 21 m côtes anglaises, 1 m jersey, (marqueur), 9 m jersey, (marqueur), 1 m jersey, 21 m côtes anglaises = 64 m et 4 marqueurs. Vous continuez ensuite en jersey et côtes anglaises comme sur ce tour. Bon tricot!
22.09.2014 - 09:41
![]() SABATIER Catherine wrote:
SABATIER Catherine wrote:
Avec quelle taille d'aiguille circulaire 9 faut-il monter les 55 mailles de l'empiècement 40 ou 80 cm ? Si il faut celles de 40 cm ,a quel moment utiliser celle de 80 cm? Merci pour votre réponse.
21.09.2014 - 13:25DROPS Design answered:
Bonjour Mme Sabatier, vous pouvez commencer avec l'aiguille circulaire de 40 cm, puis changer pour la 80 cm quand les mailles commenceront à être un peu trop serrées pour la 40 cm (après un certain nombre d'augmentations, quand l'ouvrage aura au moins 80 cm de circonférence). Bon tricot!
22.09.2014 - 09:29
![]() Kerstin wrote:
Kerstin wrote:
Ist das Nadelspiel eigentlich ein Muss oder geht es auch nur mit der Rundnadel? Ich mag diesen Pullover, habe aber noch nie mit einem Nadelspiel gestrickt.
30.08.2014 - 09:53DROPS Design answered:
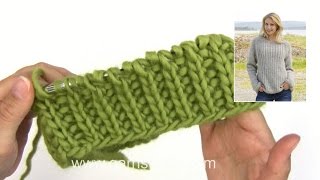
Die Rundnadel wird am Ende zu weit für den Ärmel. Der Ärmel ist ja am Ende deutlich enger als eine 40cm-Rundnadel. Aber das Problem mit den Nadeln ist eigentlich keins - Sie stricken ganz normal rund, nur dass die Maschen auf den Nadeln verteilt sind. Auf diese Weise kann beliebig eng gestrickt werden. Bei unseren Strickvideos (unter Tipps & Hilfe) finden Sie auch ein Video zum Stricken mit dem Nadelspiel.
30.08.2014 - 15:15
![]() Jos Spijker V Buren wrote:
Jos Spijker V Buren wrote:
Beste Medewerkers, Wil graag dit model breien kan dat ook van het garen Cotton Viscose uni colour. enkele draad hoe moet ik dan het patroon bereken snap dat niet zo goed kan u me helpen . Vriendelijke Groet Jos Spijker.
29.08.2014 - 16:39DROPS Design answered:
Dit raden wij u af. Om dezelfde dikte te bereiken zou u dan met 4 draden cotton viscose moeten breien en dan krijgt u een erg zware trui. Deze zal niet lijken op het model op de foto. Dit ontwerp is het best geschikt voor licht en luchtig garen.
01.09.2014 - 17:47
![]() Kirsten Hammervig wrote:
Kirsten Hammervig wrote:
Nu har jeg startet 6 gAnge på denne trøje og må trevle op igen. I beskriver falsk patent på en anden måde end den der er vist på Jeres video!! Den måde der står i opskriften bliver slet ikke til det mønster der er vist ??
22.08.2014 - 15:32
![]() Eah wrote:
Eah wrote:
Hei, jeg håper på svar denne gangen. Er det feil i mønsteret (falsk patent)?? Det stemmer ikke, uansett hvordan jeg strikker, jeg har også sett videoen. I videoen strikkes det både rett og vridd rett, er ganske forvirra. Har strikka masse masse, men akkurat patent har jeg aldri prøvd meg på. Hadde satt pris på en skikkelig god og riktig forklaring/oppskrift :)
14.08.2014 - 20:12DROPS Design answered:
Hej, Vi har valgt at i videoen strikke hver 2. m som er "rillemasken/retstriksmasken" som drejet ret på den 1.p og som drejet vrang på den 2.p. Uanset om du strikker rillem "normalt" eller som drejet, så får du FALSK PATENT - rundt på rundp. God fornøjelse!
21.08.2014 - 14:45
|
|
Lazy Afternoon#lazyafternoonsweater |
|
|
|
|
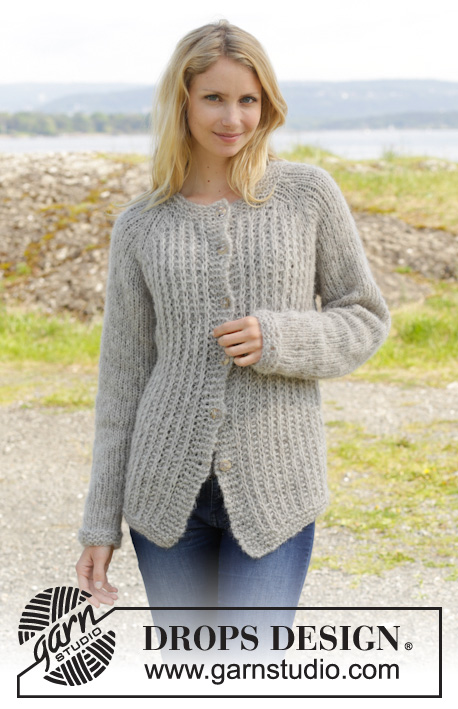
Knitted DROPS jumper with raglan and false English rib, worked top down in 2 strands ”Brushed Alpaca Silk”. Size S-XXXL
DROPS 157-20 |
|
|
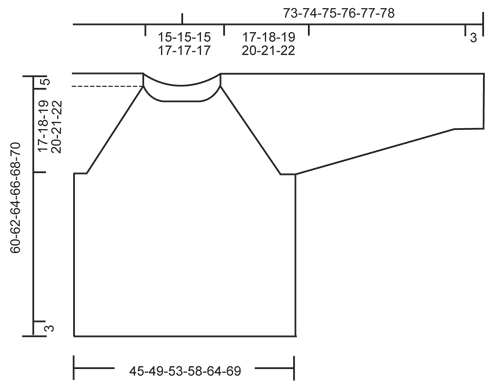
GARTER ST (in the round on circular needle): 1 ridge = 2 rounds. * K 1 round and P 1 round *, repeat from *-*. FALSE ENGLISH RIB (in the round on circular needle): ROUND 1: * K1 st, 1 YO, slip 1 st as if to P *, repeat from *-* until 1 st remains, finish with K1 st. ROUND 2: * P1 st, K tog YO and slipped st from previous round *, repeat from *-* until 1 st remains, finish with P1 st. Repeat rounds 1 to 2. RAGLAN: Inc on each side of every marker as follows: Work until 1 st remains before marker, 1 YO, work 2 sts in stocking st and 1 YO. Repeat at the remaining markers on round. On next round K YOs twisted (i.e. work in back loop of st instead of front) to avoid holes. DECREASE TIP (applies to sleeve): Dec as follows BEFORE st with marker in: Slip 1 st as if to K, K 1, psso. Dec as follows AFTER st with marker in: K 2 tog. ---------------------------------------------------------- JUMPER: Worked top down in the round on circular needle/double pointed needles. At the end, pick up sts around the neck and work an edge in garter st. YOKE: Cast on 55-55-55-59-59-59 sts with 2 strands Brushed Alpaca Silk on circular needle size 9 mm. Work 1 ridge in GARTER ST - see explanation above AT THE SAME TIME on last round in ridge inc 9 sts evenly in all sizes = 64-64-64-68-68-68 sts. On next round work as follows from right raglan at the back: 1 st in stocking st, insert 1st marker here, 9 sts in stocking st, insert 2nd marker here, 1 st in stocking st, 21-21-21-23-23-23 sts in FALSE ENGLISH RIB – see explanation above (= front piece), 1 st in stocking st, insert 3rd marker here, 9 sts in stocking st, insert 4th marker here, 1 st in stocking st, 21-21-21-23-23-23 sts in false English rib (= back piece). Continue like this AT THE SAME TIME on next round beg inc for RAGLAN – see explanation above! Repeat this inc every other round 5-7-10-13-18-22 more times, and every 4th round 5-5-4-3-1-0 times = 152-168-184-204-228-252 sts. NOTE: Work the new inc sts on front and back piece in false English rib and work the new inc sts on sleeves in stocking st. REMEMBER THE KNITTING TENSION! Piece measures 22-23-24-25-26-27 cm from shoulder. Work 1 round more with pattern as before but now stop 1 st before 1st marker (i.e. 1 st before round is done). Slip the next 33-37-41-45-51-57 sts on a stitch holder (= sleeve), cast on 7 new sts under sleeve, work the next 43-47-51-57-63-69 sts (= front piece), slip the next 33-37-41-45-51-57 sts on a stitch holder (= sleeve), cast on 7 new sts under sleeve, work the next 43-47-51-57-63-69 sts (= back piece). BODY: There are now 100-108-116-128-140-152 sts. Continue false English rib as before. P the middle of the 7 new sts under each sleeve, work the remaining new sts in false English rib. Continue like this until piece measures 35-36-37-38-39-40 cm from the new sts under sleeve. Now work 3 ridges before loosely casting off. SLEEVE: Slip the 33-37-41-45-51-57 sts back on double pointed needles. Work 1 row in stocking st over all sts. Then cast on 7 sts at the end of row = 40-44-48-52-58-64 sts. Insert a marker in the middle of the new sts under the sleeve. NOW MEASURE THE PIECE FROM HERE. Then work the sleeve in stocking st in the round. When piece measures 4 cm, beg dec for sleeve – READ DECREASE TIP. Repeat the same dec every 5½-5-4-3½-2½-2½ cm 6-7-9-10-13-15 more times = 26-28-28-30-30-32 sts. When piece measures 41-41-41-40-40-40 cm, work 3 ridges and loosely cast off. ASSEMBLY: Sew the holes under the sleeves. NECK EDGE: Pick up 1 st in every st in ridge in the neck with 2 strands Brushed Alpaca Silk = 55-55-55-59-59-59 sts. Work 2 ridges and loosely cast off. |
|
 |
|
Have you finished this pattern?Tag your pictures with #dropspattern #lazyafternoonsweater or submit them to the #dropsfan gallery. Do you need help with this pattern?You'll find 23 tutorial videos, a Comments/Questions area and more by visiting the pattern on garnstudio.com. © 1982-2026 DROPS Design A/S. We reserve all rights. This document, including all its sub-sections, has copyrights. Read more about what you can do with our patterns at the bottom of each pattern on our site. |


With over 40 years in knitting and crochet design, DROPS Design offers one of the most extensive collections of free patterns on the internet - translated to 17 languages. As of today we count 324 catalogues and 12290 patterns translated into English (UK/cm).
We work hard to bring you the best knitting and crochet have to offer, inspiration and advice as well as great quality yarns at incredible prices! Would you like to use our patterns for other than personal use? You can read what you are allowed to do in the Copyright text at the bottom of all our patterns. Happy crafting!
Post a comment to pattern DROPS 157-20
We would love to hear what you have to say about this pattern!
If you want to leave a question, please make sure you select the correct category in the form below, to speed up the answering process. Required fields are marked *.