
Popular categories
Looking for a yarn?


Comments / Questions (11)
![]() Marcela Kuchovská wrote:
Marcela Kuchovská wrote:
Dobrý den, objevila jsem spoustu svetrů, které nejsou bohužel přeloženy do češtiny. Je to škoda, katalogy 78, 73... Nemáte v plánu přeložit? Děkuji m
11.07.2020 - 11:38DROPS Design answered:
Dobrý den, Marcelo! Díky za podnět, návody z těchto katalogů ráda zařadím. Prosím ale o trpělivost, návody přidávám postupně a přednost mají vždy ty z aktuální kolekce. Věřím , že i mezi nimi najdete nějaký zajímavý kousek ;-) Příjemné pletení či háčkování! Hana
11.07.2020 - 23:05
![]() Ellen Halling wrote:
Ellen Halling wrote:
Hvordan laver jeg de 4 stolpemasker på det første forstykke?
26.09.2017 - 21:34DROPS Design answered:
Hei Ellen. De 4 stolpemaskene strikkes som retstrikk. Retstrik (frem og tilb): 1.p: Ret, 2.p: Ret (står også i oppskriften over forklaringen til Stolpe. God Fornøyelse!
27.09.2017 - 09:18
![]() Joan Enemark wrote:
Joan Enemark wrote:
Hej. Jeg er i gang med ærmerne og har lukket til ærmegab 3 m 1 gang, 2m 1 gang og 1m 2 gange. Så står der videre, " der lukkes to masker til arbejdet måler 58 cm"? Mit spørgsmål er, hvor ofte skal der lukkes to masker. Venlig hilsen Joan
09.11.2016 - 13:19DROPS Design answered:
Hej Joan. Det gör du indtil arbejdet maaler 58 cm - der er ikke angivet et fast antal i opskriften.
09.11.2016 - 14:05Helen Mitchell wrote:
Help again please - When sleeve measures 51-50-49-47-46 cm bind off for sleeve cap at each side every other row: 3 sts 1 time, 2 sts 1 time and 1 st 1-2-3-5-6 times, then bind off 2 sts at each side until the piece measures 58-58-59-58-59 cm. Bind off the remaining sts. I'm not sure if you really mean bind off 2 stitches at each end - presumably from every other, not every row? therefore when you get to the required length, how many stitches should be left to bind off?
01.11.2016 - 19:25DROPS Design answered:
Dear Mrs Mitchell, you first bind off on each side every other row: 3 sts 1 time, 2 st 1 time and 1 st 1-2-3-5-6 times, then bind off 2 sts on each side every other row (= at the beg of each row on each side) until sleeve measures 58-59 cm, the number of remaining sts will depend on your tension in height. Make sure you have cast off 2 sts the same number of times on both sides (from RS and from WS). Happy knitting!
02.11.2016 - 09:01
![]() Helen Mitchell wrote:
Helen Mitchell wrote:
I do not understand this instruction to finish off the back - please could it be explained further. Thanks. "When the piece measures 53-55-57-59-62 cm P 1 row (on a right side row) over the 16-16-16-18-18 center sts. On the next row bind off the center 8-8-8-10-10 sts = 14-15-15-15-15 sts remain on each shoulder. Continue with stockinette st, but keep the 4 edge sts at each neck edge in garter st. Bind off when the piece measures 56-58-60-62-65 cm."
28.10.2016 - 18:04DROPS Design answered:
Dear Mrs Mitchell, when the piece measures 53-62 cm (see size), P the 16-18 sts from RS and K the remaining sts as before. On next row from WS cast off the 8-10 middle sts for neck = 14-15 sts remain for each shoulder. Happy knitting!
31.10.2016 - 08:38
![]() Natassja wrote:
Natassja wrote:
Vad ska man ha för stickor till den här tröjan?
29.11.2014 - 19:11DROPS Design answered:
Hej Natassja. Du skal have: DROPS St nr 8 och 9 (staar överst i opskriften under Material). God fornöjelse.
01.12.2014 - 14:49
![]() DROPS Design wrote:
DROPS Design wrote:
Forklaring til ermet starte i midten av nest siste avsnitt.
24.10.2011 - 12:25
![]() DROPS Design wrote:
DROPS Design wrote:
Forklaring til ermet starte i midten av nest siste avsnitt.
24.10.2011 - 12:24
![]() Helen Winqvist wrote:
Helen Winqvist wrote:
Var finns beskrivningen på hur man stickar ärmarna? Jag har stickat bakstycket och framstyckena men det finns ingen beskrivning på ärmarna, jättetråkigt att ha en ofärdig kofta!
22.10.2011 - 09:33
![]() DROPS Design NL wrote:
DROPS Design NL wrote:
De maten voor DROPS dames/heren zijn ca als volgt: S = 36/38, M = 38/40, L = 40/42, XL = 42/44 XXL = 44/46, XXXL = 46+. Volgens Europese standaard. Kijk ook onderaan dit patroon. Hier staan maattekening met de afmetingen staan in cm. U kunt hier vergelijken met uw eigen afmetingen. Succes. Gr. Tine
13.09.2010 - 11:45
|
|
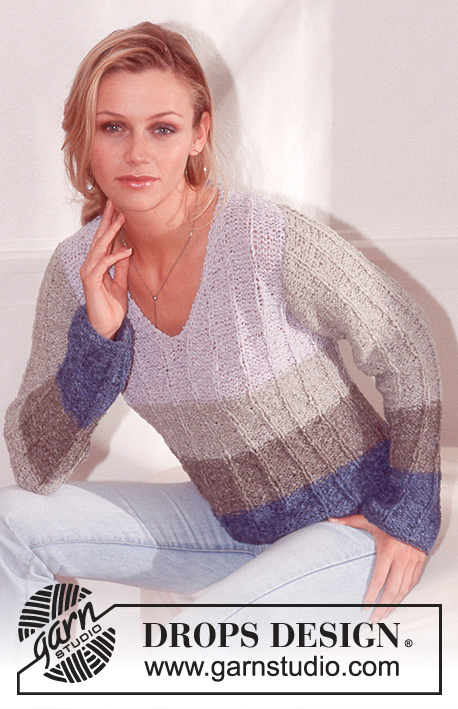
DROPS 73-23 |
|
|
|
|
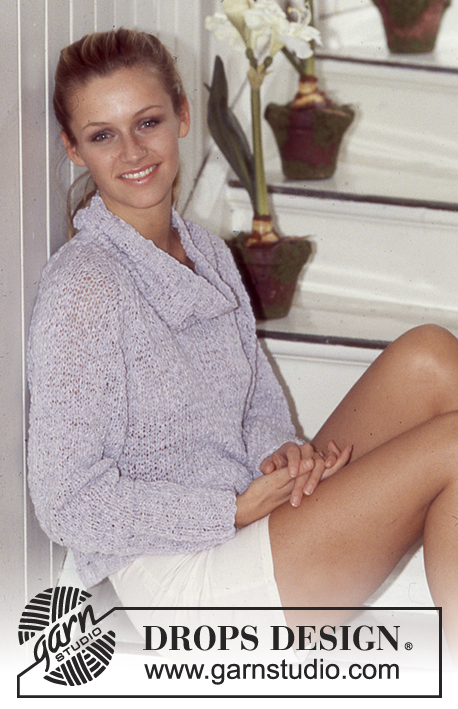
DROPS Cardigan in Snow with V-neck.
DROPS 73-23 |
|
|
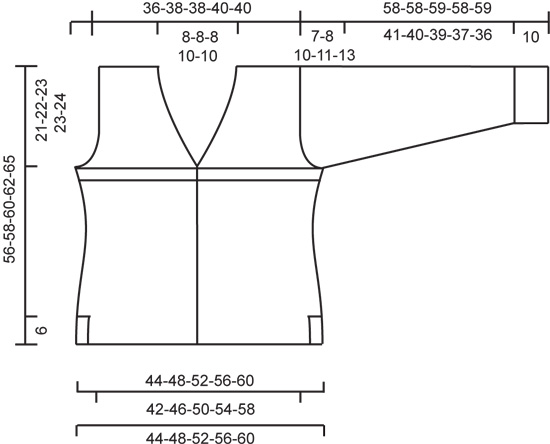
Gauge: 10 sts x 14 rows = 10 x 10 cm on larger needles in stockinette st. Garter st, when knitting flat: Knit all sts, all rows. Knitting tips (for V-neck): Dec 1 st inside of 4 edge sts knit in garter st: After 4 sts: Slip 1 as if to knit, K 1, psso. Before 4 sts: K 2 tog. Buttonbands: The buttonbands are knit in garter st throughout, and continues through neck shaping. Back: Cast on 44-48-52-56-60 sts on smaller needles and knit 4 rows garter st. Change to larger needles and stockinette st, keeping 3 sts at each side in garter st for the side slit edge. When the piece measures 6 cm knit stockinette st over all sts (end of side slit). When the piece measures 16-16-16-17-18 cm dec 1 st at each side = 42-46-50-54-58 sts. Then inc 1 st at each side again when the piece measures 25-25-25-26-27 cm = 44-48-52-56-60 sts. When the piece measures 32-33-34-36-38 cm knit as follows (start with a right side row): P 2 rows, K 2 rows, then continue with stockinette st again. When the piece measures 35-36-37-39-41 cm bind off for armhole at each side every other row: 2 sts 1-1-2-2-3 times and 1 st 2-3-3-4-4 times = 36-38-38-40-40 sts. When the piece measures 53-55-57-59-62 cm P 1 row (on a right side row) over the 16-16-16-18-18 center sts. On the next row bind off the center 8-8-8-10-10 sts = 14-15-15-15-15 sts remain on each shoulder. Continue with stockinette st, but keep the 4 edge sts at each neck edge in garter st. Bind off when the piece measures 56-58-60-62-65 cm. Left front: Cast on 26-28-30-32-34 sts on smaller needles and knit 4 rows garter st. Change to larger needles and stockinette st, but keep 4 edge sts at the center front (buttonband) and 3 sts at the side (side slit edge) in garter st. When the piece measures 6 cm end side slit, and knit stockinette st over the 3 side edge sts. When the piece measures 16-16-16-17-18 cm dec 1 st at the side = 25-27-29-31-33 sts. Then inc 1 st at the side when the piece measures 25-25-25-26-27 cm = 26-28-30-32-34 sts. Read the entire next section before knitting: When the piece measures 32-33-34-36-38 cm knit as follows (start with a right side row): P 2 rows, K 2 rows. Note: these 4 rows should also be knit on buttonband sts - adjust so that the 1st P row corresponds to the garter st rows on buttonband. Continue with stockinette st. When the piece measures 35-36-37-39-41 cm bind off for armhole at the side as on back, at the same time dec 1 st for V-neck - see knitting tips - every other row: 4 times, then every 4 rows: 4-4-4-5-5 times = 14-15-15-15-15 sts remain on shoulder. Bind off when the piece measures 56-58-60-62-65 cm. Right front: Cast on and knit the same as the left, reversing all shaping. Make buttonholes along buttonband. 1 buttonhole = bind off the 3rd st from center front (on right side rows) and cast on 1 new st over the bound off st on the next row. Make buttonholes when the piece measures: Size S: 5, 12, 19, 26 and 33 cm. Size M: 6, 13, 20, 27 and 34 cm. Size L: 6, 14, 21, 28 and 35 cm. Size XL: 6, 14, 22, 30 and 37 cm. Size XXL: 6, 13, 19, 26, 33 and 39 cm. Sleeve: Cast on 24-24-24-26-26 sts on smaller needles and knit 4 rows garter st. Change to larger needles and stockinette st. When the piece measures 10 cm knit as follows (begin with right side row): P 2 rows, K 2 rows, and then knit stockinette st. At the same time when the piece measures 10 cm inc 1 st at each side every 5-5-4.5-4.5-4 cm a total of 8-8-9-8-9 times = 40-40-42-42-44 sts. When sleeve measures 51-50-49-47-46 cm bind off for sleeve cap at each side every other row: 3 sts 1 time, 2 sts 1 time and 1 st 1-2-3-5-6 times, then bind off 2 sts at each side until the piece measures 58-58-59-58-59 cm. Bind off the remaining sts. Assembly: Sew shoulder seams. Sew in sleeves. Sew sleeve and side seams down to side slit opening. Sew on buttons. |
|
 |
|
Have you finished this pattern?Tag your pictures with #dropspattern or submit them to the #dropsfan gallery. Do you need help with this pattern?You'll find 16 tutorial videos, a Comments/Questions area and more by visiting the pattern on garnstudio.com. © 1982-2026 DROPS Design A/S. We reserve all rights. This document, including all its sub-sections, has copyrights. Read more about what you can do with our patterns at the bottom of each pattern on our site. |


With over 40 years in knitting and crochet design, DROPS Design offers one of the most extensive collections of free patterns on the internet - translated to 17 languages. As of today we count 324 catalogues and 12290 patterns translated into English (UK/cm).
We work hard to bring you the best knitting and crochet have to offer, inspiration and advice as well as great quality yarns at incredible prices! Would you like to use our patterns for other than personal use? You can read what you are allowed to do in the Copyright text at the bottom of all our patterns. Happy crafting!
Post a comment to pattern DROPS 73-23
We would love to hear what you have to say about this pattern!
If you want to leave a question, please make sure you select the correct category in the form below, to speed up the answering process. Required fields are marked *.