
Popular categories
Looking for a yarn?


Comments / Questions (50)
SIrina wrote:
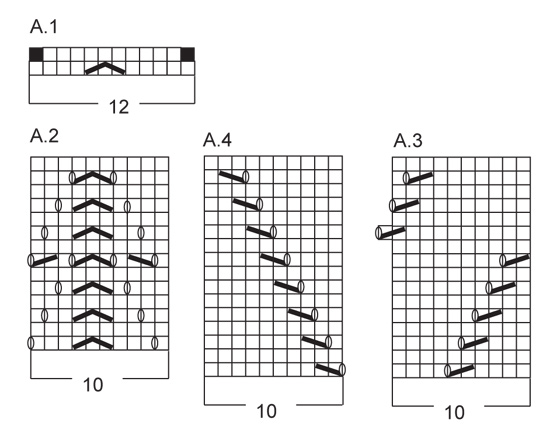
Continuing: ... because the next row of the diagram A1 has in the middle of it : slip 1 as if to k, k 2 together, psso, so I believe this row needs to be knitted not purled, so the first row needs to be purled?
12.05.2016 - 13:24DROPS Design answered:
Dear Slrina, see answer below. Happy knitting!
12.05.2016 - 17:51SIrina wrote:
Hello! What do I do with the st that is not there from the diagram A1? Do I slip it? Do I knit it? And another question: When I start diagram A1 do I k in the first row(is it the front of the work) or do I purl the row? I am wondering because the next row of the diagram has in the middle of the diagram
12.05.2016 - 13:20DROPS Design answered:
Dear Slrina, start reading diagrams from the bottom corner on the right side towards the left from RS and from the left towards the right from WS - read more here. This mean, you are working each repeat of M.1 over 12 sts, dec 2 sts in each repeat, on 2nd row, you will have only 10 sts left in each repeat (= row 2 in M1 is worked from WS = P all sts). Happy knitting!
12.05.2016 - 17:51
![]() Julia wrote:
Julia wrote:
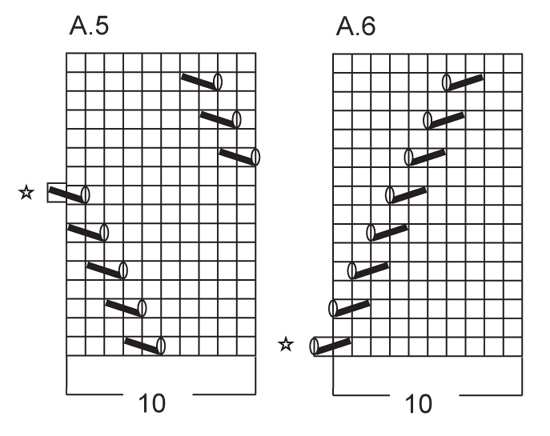
Hi, I am all done up till 25 cm, I couldn't continue on the pattern A4/A6, can you explain how should I start and look at the chart ? Thanks
25.04.2016 - 03:14DROPS Design answered:
Dear Julia, in A.3 holes are going diagonally to the right, work then A.4 with holes going diagonally to the left (see diagrams) - and in A.5 holes were going diagonally to the left, work now A.6 with holes going diagonally to the right. Happy knitting!
25.04.2016 - 10:29
![]() Isabelle wrote:
Isabelle wrote:
Ein Nachtrag: Ich glaube, die Lösung wäre gewesen, zwischen den Ab- und Zunahmen in der Taille die neuen Lochreihen schon früher zu beginnen, wenn dazwischen auch nur 9 Maschen liegen.
23.04.2016 - 11:20
![]() Isabelle wrote:
Isabelle wrote:
Hallo! Danke für eure Antwort! Das Problem ist, dass zwischen den Ab- und Zunahmen 2 neue Mustersätze begonnen haben, die dann bereits 10 Maschen umfassten. Zunahmen konnten daher später nur noch in 9 der 11 Mustersätzen erfolgen.
23.04.2016 - 11:03
![]() Isabelle wrote:
Isabelle wrote:
Ich komme nach den Zunahmen in der Taille - obwohl in jedem Mustersatz wieder 10 Maschen sind - in Größe L nur noch auf 231 statt 233 Maschen. Das kann ich mir nicht erklären. Die Maschen müsste ich also in den Teil-Mustersätzen am Rand neu aufnehmen. Aber das stimmt mit der Anleitung ja nicht überein.
19.04.2016 - 13:11DROPS Design answered:
Liebe Isabelle, Sie nehmen ja nach der Taille wieder zu, sodass jeder Rapport wieder 10 Maschen umfasst und Sie wieder die gleiche Maschenzahl haben wie vorher (also 233 in Grösse L).
20.04.2016 - 07:49Pauline wrote:
Its OK now, forget my last comment, I still hadn't understood, but have got it now - all going correctly, thank you.
06.11.2015 - 08:50Pauline wrote:
Thank you for your reply, just to make sure ive understood correctly - the dec is therefore only on each side, in the first and last eyelet of every other row until 11 stitches have been decreased.(I'm doing third size).I think I understand now :)
05.11.2015 - 11:29DROPS Design answered:
Dear Pauline, you dec in A.3 and in A.5 in every other repetition, and repeat these decreases (in remaining repetitions with 10 sts) when piece measures 15 cm (= a total of 22 dec sts = 211 sts remain). Each repetition is then 9 sts. Happy knitting!
05.11.2015 - 14:11Pauline wrote:
Hi, I'm struggling with the dec on the body and have undone it so many times as I can't get anything to work :( but now I wonder if there is an error and where it says "On next row from RS dec in A.3 as follows: Instead of K 2 tog as shown in diagram, K 3 tog (= 1 st dec) on every other vertical eyelet row (i.e. every other repetition of A.3)" maybe it should actually say horizontal not vertical? Help please! Regards Pauline
04.11.2015 - 23:18DROPS Design answered:
Dear Pauline, the dec should be made in every other repetition of A.3, ie in every other vertical eyelet pattern (1 eyelet pattern vertically = 1 repeat of A.3 in width). Happy knitting!
05.11.2015 - 09:06
![]() Andrea wrote:
Andrea wrote:
Hallo.Komme mit der Aussage ,Gleichzeitig wird in jeder 16.Reihe ein neuer Lochstreifen begonnen nicht klar.Wo soll der beginnen?
20.04.2015 - 21:32DROPS Design answered:
Sie haben zwischen den einzelnen Lochstreifen (Umschlag + zusammengestr. Maschen) ja stets 8 M glatt re. Nach 16 R ist ein Lochstreifen im Rapport von einer Seite zur anderen "gewandert" (in A.4 z.B. von rechts unten nach links oben), sodass Sie nun wieder mit einem neuen Rapport beginnen müssen. Arbeiten Sie das Muster einfach so, dass zwischen den Löchern (d.h. Umschlag + zusammengestrickte Maschen) immer ein Abstand von 8 M glatt re ist, wie im Diagramm, damit erklärt sich eigentlich von selbst, wo Sie einen neuen Rapport beginnen. Ansonsten fragen Sie gerne noch einmal nach. Gutes Gelingen!
23.04.2015 - 14:17
|
||||||||||||||||||||||
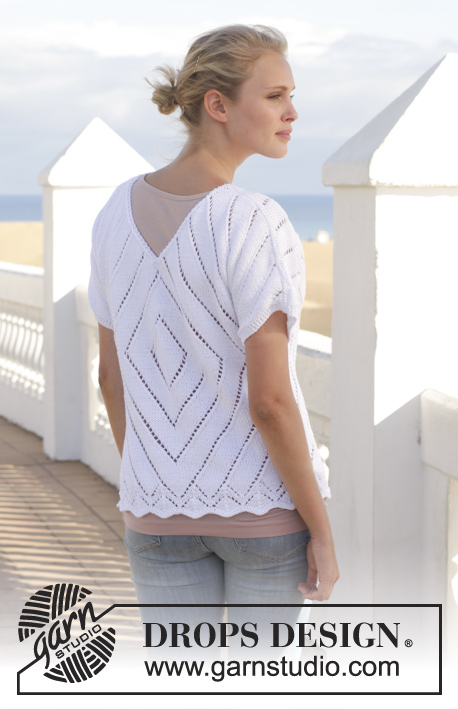
Mykonos#mykonoscardigan |
||||||||||||||||||||||
 |
 |
|||||||||||||||||||||
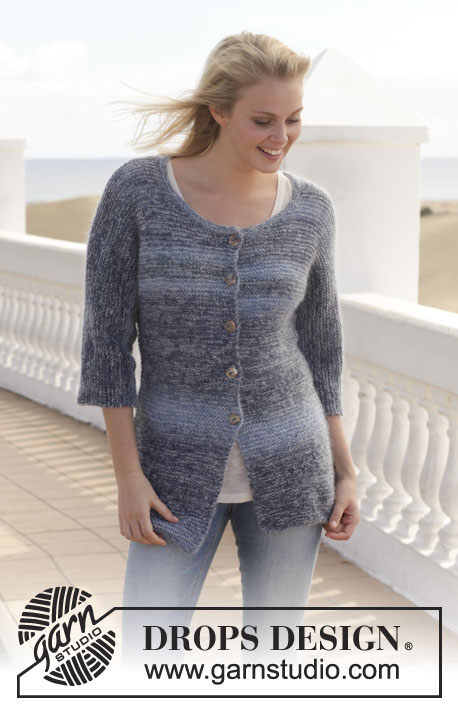
Knitted DROPS jacket with lace pattern in ”Muskat”. Size: S - XXXL.
DROPS 152-22 |
||||||||||||||||||||||
|
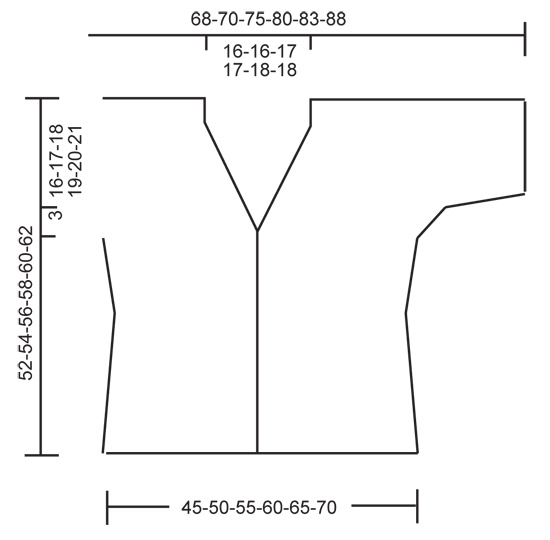
KNITTING TIP: When neck dec beg, continue eyelet rows that have been started, but do not beg new eyelet rows. NOTE! Adjust to not dec for neck on the first 4 rows of diagram A.4/A.6. GARTER ST (back and forth on needle): K all rows. 1 ridge = 2 rows K. PATTERN: See diagrams A.1-A.6. The diagrams show all rows in pattern seen from RS. NOTE: Diagrams do not fit vertically when repeated, but continue eyelet rows as before, AT THE SAME TIME beg a new eyelet row every 16th row. When A.4 and A.6 meet mid back, work 1 hole more in A.6, but do not work in A.4 (i.e. there is 1 hole in the middle between A.4 and A.6). DECREASE TIP (applies to neck dec): Dec inside 2 sts in garter st. All dec are done from RS! Dec as follows before 2 sts: Start 2 sts before and K 2 tog. Dec as follows after 2 sts: Slip 1 st as if to K, K 1, psso. BUTTONHOLES: Dec for buttonholes on right band. 1 buttonhole = K tog second and third st from edge and make 1 YO. Dec for buttonholes when piece measures (measured in the side where piece is shortest): SIZE S: 7, 13, 19, 25, 31 and 37 cm. SIZE M: 9, 15, 21, 27, 33 and 39 cm. SIZE L: 4, 10, 16, 22, 28, 34 and 40 cm SIZE XL: 6, 12, 18, 24, 30, 36 and 42 cm SIZE XXL: 7, 13, 19, 25, 31, 37 and 43 cm SIZE XXL: 9, 15, 21, 27, 33, 39 and 45 cm ---------------------------------------------------------- BODY: Worked back and forth on circular needle from mid front. Cast on 229-253-277-301-325-349 sts (incl 6 band sts in each side towards mid front) on circular needle size 4 mm with Muskat. Work 1 ridge in GARTER ST - see explanation above. Work 6 band sts in each side in garter st until finished measurements. Continue as follows: K 6 (= band), A.1 (= 12 sts) 18-20-22-24-26-28 times total in width, then 1 st in stocking st (work like this so that both sides are the same) and K 6 (= band). REMEMBER THE KNITTING TENSION! When A.1 has been worked 1 time vertically, there are 193-213-233-253-273-293 sts on needle. Then work A.2 (= 10 sts) over A.1 1 time vertically, finish row with 1st st in A.2 before the last 6 K sts (so that pattern is the same in each side towards bands at the front). Remember BUTTONHOLES on right band - see explanation above. Then work 6 sts in garter st (= band), A.3 (= 10 sts) over A.2 9-10-11-12-13-14 times in total in width (= mid back), then work A.5 (= 10 sts) over A.2 9-10-11-12-13-14 times in total in width, then 1 st in stocking st, finish with 6 sts in garter st (= band). Pattern A.3/A.5 is displaced towards the 6 band sts in each side worked in garter st until finished measurements. NOTE: Work 9th row in A.5 as follows: Work pattern and in garter st as before until 8 sts remain, 1 YO, slip 1 st, K 1, psso – see diagram, finish with 6 sts in garter st (= band). Continue pattern until piece measures 13 cm. On next row from RS dec in A.3 as follows: Instead of K 2 tog as shown in diagram, K 3 tog (= 1 st dec) on every other vertical eyelet row (i.e. every other repetition of A.3), on same row dec on every other vertical eyelet row in A.5 as follows: Instead of "slip 1 st, work 1 st, psso", work as follows: Slip 1 st, K 2 tog, psso (= 9-10-11-12-13-14 sts dec in total). Repeat dec 1 more time in the remaining vertical eyelet rows when piece measures 15 cm (= 18-20-22-24-26-28 sts dec in total) = 175-193-211-229-247-265 sts remain on needle. NOTE: Dec only 1 st in every repetition (i.e. 1 repetition = 9 sts). Continue with pattern on every other row until piece measures 23 cm. On next row from RS inc in A.3 and A.5 as follows: Instead of K 2 tog as shown in diagram, work first row from RS as follows: K until YO, 1 YO (YO = inc st), K after YO, continue to work as before. Repeat inc on every other vertical eyelet row (= 9-10-11-12-13-14 sts inc). Repeat inc on the remaining vertical eyelet row when piece measures 25 cm = 193-213-233-253-273-293 sts on needle. NOTE: Inc only 1 st in every repetition (i.e. 1 repetition = 10 sts). AT THE SAME TIME when piece measures 25 cm (adjust to work 1 whole repetition of A.3/A.5), work A.4 over A.3 and A.6 over A.5. Pattern is displaced and worked until finished measurements. NOTE: Work 1st row in A.6 as follows: Work pattern and in garter st as before until 8 sts remain, K 2 tog, 1 YO – see diagram, finish with 6 sts in garter st (= band). When piece measures 33-34-35-36-37-38 cm, divide the piece, finish front and back piece separately as follows: Slip the first 51-56-61-66-71-76 sts (= right front piece) and the last 52-57-62-67-72-77 sts (= left front piece) on a stitch holder (NOTE: There is 1 st more on left front piece so that pattern is the same in both sides), cut the yarn, then work only over the middle 90-100-110-120-130-140 sts (= back piece). BACK PIECE: Continue pattern as before AT THE SAME TIME cast on new sts for sleeves in each side of piece at the end of every row as follows: cast on 4 sts 2 times in total in each side, then 9-8-8-8-7-7 sts 2 times in total in each side = 142-148-158-168-174-184 sts on needle. Work inc sts in pattern and when all sts have been inc, work 4 sts in garter st in each side of piece for sleeve edges. Continue lace pattern as before. When piece measures 38-40-41-43-44-46 cm - see KNITTING TIP above, work 2 ridges in garter st over the middle 4 sts (= 69-72-77-82-85-90 sts on each side), work the other sts as before. Then continue working in garter st over the 4 sts and pattern as before, AT THE SAME TIME divide the piece for v-neck and finish each shoulder separately (= 71-74-79-84-87-92 sts on each shoulder). Continue to work in garter st over the 2 outermost sts towards the neck, AT THE SAME TIME on next row from RS dec 1 st for neck inside the 2 sts in garter st - read DECREASE TIP, repeat dec on every row from RS 16-16-17-17-18-18 more times (= 17-17-18-18-19-19 times in total) = 54-57-61-66-68-73 sts remain on the shoulder. Work until piece measures 51-53-55-57-59-61 cm. Work 1 ridge in garter st over all sts. Cast off. Piece measures approx. 52-54-56-58-60-62 cm. RIGHT FRONT PIECE: = 51-56-61-66-71-76 sts. Now cast on new sts for sleeve at the end of every row from RS as follows: cast on 4 sts 2 times in total, then 9-8-8-8-7-7 sts 2 times in total = 77-80-85-90-93-98 sts on row (NOTE: There is 1 st more on left front piece, i.e. after inc there are 78-81-86-91-94-99 sts on needle). Work inc sts in pattern and when all sts have been inc, work the last 4 sts in garter st for sleeve edge. Continue lace pattern as before. REMEMBER BUTTONHOLES! When piece measures 38-40-41-43-44-46 cm – see KNITTING TIP above - cast off the 4 band sts at beg of next row from RS = 73-76-81-86-89-94 sts remain on needle. Continue to work in garter st over the 2 outermost band sts towards the neck and pattern as before, AT THE SAME TIME on next row from RS dec 1 st for neck inside the 2 band sts - read DECREASE TIP, repeat dec on every row from RS 19-19-20-20-21-21 times = 54-57-61-66-68-73 sts remain on the shoulder. Work until piece measures 51-53-55-57-59-61 cm. Work 1 ridge in garter st over all sts. Cast off. Piece measures approx. 52-54-56-58-60-62 cm. LEFT FRONT PIECE: Work as right front piece but reversed. When casting off for neck, cast off the outermost 4 band sts at beg of next row from WS, work 2 sts in garter st, P the next 2 sts in stocking st tog (i.e. same no of sts on right and left front piece). Then work as right front piece. ASSEMBLY: Sew shoulder seams and underarm seams. Sew the buttons on to left front piece. |
||||||||||||||||||||||
Diagram explanations |
||||||||||||||||||||||
|
||||||||||||||||||||||
 |
||||||||||||||||||||||
 |
||||||||||||||||||||||
 |
||||||||||||||||||||||
Have you finished this pattern?Tag your pictures with #dropspattern #mykonoscardigan or submit them to the #dropsfan gallery. Do you need help with this pattern?You'll find 20 tutorial videos, a Comments/Questions area and more by visiting the pattern on garnstudio.com. © 1982-2026 DROPS Design A/S. We reserve all rights. This document, including all its sub-sections, has copyrights. Read more about what you can do with our patterns at the bottom of each pattern on our site. |
||||||||||||||||||||||


With over 40 years in knitting and crochet design, DROPS Design offers one of the most extensive collections of free patterns on the internet - translated to 17 languages. As of today we count 325 catalogues and 12298 patterns translated into English (UK/cm).
We work hard to bring you the best knitting and crochet have to offer, inspiration and advice as well as great quality yarns at incredible prices! Would you like to use our patterns for other than personal use? You can read what you are allowed to do in the Copyright text at the bottom of all our patterns. Happy crafting!
Post a comment to pattern DROPS 152-22
We would love to hear what you have to say about this pattern!
If you want to leave a question, please make sure you select the correct category in the form below, to speed up the answering process. Required fields are marked *.