
Popular categories
Looking for a yarn?


Comments / Questions (147)
![]() Seniel wrote:
Seniel wrote:
Nevermind I was over complicating it! THANKS!
05.06.2014 - 01:51
![]() Seniel wrote:
Seniel wrote:
Thank you, I understand that I start with row 2 when doing LEFT FRONT/BACK but how do I go about doing the stitch when it gets to " = K 2 tog = slip 1 st as if to K, K 1, psso = 1 YO between 2 sts from wrong side do I PURL instead of KNIT or just do the same as I did on the RIGHT FRONT PIECE
05.06.2014 - 01:49DROPS Design answered:
Dear Mrs Seniel, you will start from WS with row 2 in diagram, ie, read diagram starting from row 2 from the left towards the right (in A.1: K3, P17 ,K3). Happy knitting!
05.06.2014 - 09:35
![]() Seniel wrote:
Seniel wrote:
When working the LEFT FRONT/BACK PIECE when you get to A.1 do I work from left to right? or do I still go right to left but PURL two together etc.
03.06.2014 - 02:55DROPS Design answered:
Dear Seniel, work diagrams as for right front/back piece, ie 1st row from RS from the right towards the left etc. Work short rows starting from WS with row 2 in A.1 and A.3. Happy knitting!
03.06.2014 - 10:17Ceci Kandia wrote:
Buenas, He tejido con sus patrones antes y son perfectos! Es posible hacer una mejor explicacion de este patron? Siento que está muy incompleto. Gracias por el hermoso trabajo!
02.06.2014 - 22:55DROPS Design answered:
Hola Ceci. Pasaremos tu sugerencia al departamento de diseño.
03.06.2014 - 09:21
![]() Arina wrote:
Arina wrote:
Hallo Tini,ik heb geen gaatje,alleen de 6 de t/m de 10 te steek zijn heel los ,het golft heel erg,ik brei nu op naald 5,5 .Brei ik de eerste 5 steken dan te strak.Ik begrijp het ook niet,als ik de rand naar beneden trek dan is de rand beter.Of hoort het zo.Gr. Arina
28.05.2014 - 21:22DROPS Design answered:
Hoi Arina. Het spijt me, maar ik kan helaas niet echt beoordelen wat er fout is gegaan. Misschien kan je beter je werk meenemen naar je winkel of breigroup. Misschien kunnen zij zien wat er fout is gegaan.
04.06.2014 - 17:30
![]() Hannah wrote:
Hannah wrote:
I am having a problem with understand the chest sizeing... on an xl it says 114cm but that sounds very big?
13.05.2014 - 13:43DROPS Design answered:
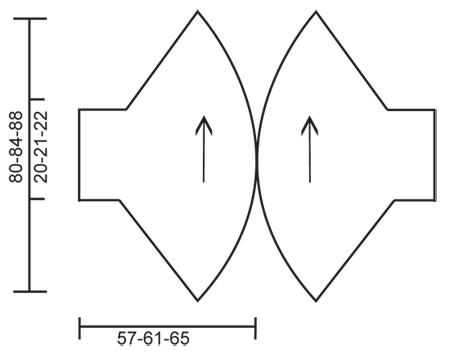
Dear Hannah, in size L/XL, each side piece measures 61 cm width from mid back to sleeve edge, ie a bit less for only back part. As you can see on the picture, the form of the jacket is quite loose. For any individual help you are welcome to contact your Drops store. Happy knitting!
13.05.2014 - 16:01
![]() Hannah wrote:
Hannah wrote:
I am not quite understaning the chest sizeing? for an xl it says 114cm? sounds a little bit big
13.05.2014 - 13:42
![]() Annika Heinemann wrote:
Annika Heinemann wrote:
Hallo, ich habe ein Problem bei der dritten Hinreihe: 1M re, A.2A, A.2B über die nächsten 8M, a.2C, 2 M re hier wenden. Das ergibt 12 M, nach der Angabe der verkürzten Reihen bräuchte ich allerdings 16 M. Im Video werden auch 16 M gestrickt, ich verstehe nur nicht, woher die fehlenden 4 M kommen. Vielen Dank für die Hilfe. LG Annika
08.05.2014 - 09:42DROPS Design answered:
Liebe Annika, es ergibt 16 M: 1 + 3 (=A.2A) + 8 (= 2x A.2B) + 2 (= A.2C) + 2 = 16. Ich möchte auch noch auf die Antworten zu den deutschen Kommentaren vom 11.04. und 20.02. verweisen, dort wurde genauer erklärt, wie man im Muster wendet. Vielleicht hilft Ihnen das zusätzlich weiter.
08.05.2014 - 11:25
![]() Birgit Klöckner wrote:
Birgit Klöckner wrote:
Hallo zusammen, erst vor einigen Monaten bin ich durch eine Arbeitskollegin auf Drops design aufmerksam geworden. Ihr habt super Wolle,tolle Modelle. Die Anleitungen sind z. Teil etwas schwierig, aber Hilfe findet man durch die Videos. Hatte mit dieser Jacke zunächst Probleme, die nun ausgeräumt wurden. Super, bitte weiter so!
01.05.2014 - 13:17
![]() Karin wrote:
Karin wrote:
Ich habe noch eine frage, die verkürzten reihen wieder holen.heisst das wenn ich einmal kompl die reihe durch gestrickt habe, das ich von vorne wie am anfang drüber stricke?
24.04.2014 - 12:59DROPS Design answered:
Antwort siehe unten! :-)
26.04.2014 - 11:40
|
||||||||||||||||
Summer Snug#summersnugjacket |
||||||||||||||||
 |
 |
|||||||||||||||
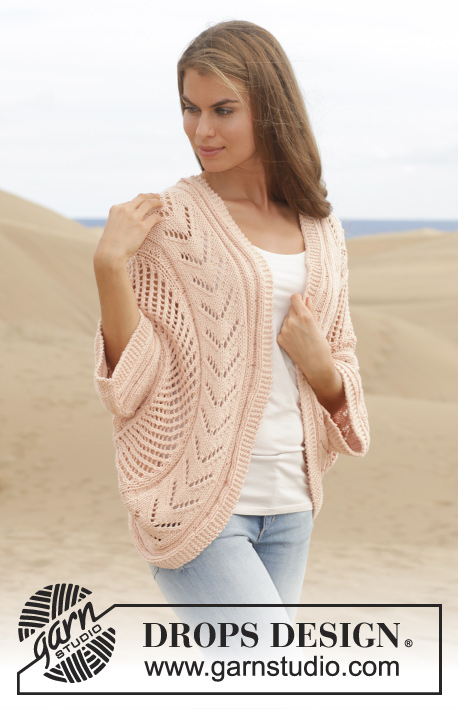
Knitted DROPS jacket worked in a circle with lace pattern in ”Paris”. Size: S - XXXL.
DROPS 154-8 |
||||||||||||||||
|
GARTER ST (back and forth on needle): K all rows. 1 ridge = 2 rows K. PATTERN: See diagrams A.1 to A.3. The diagrams show all rows in pattern seen from RS. SHORT ROWS: * Work 1 row over the first 10 sts on row, turn and work back. Work 1 row over the first 35 sts on row, turn and work back. Work 1 row over the first 51-57-63 sts on row, turn and work back. Work 1 row over all sts, turn and work back *. Repeat from *-*, i.e. 8 rows at the widest and 2 rows at the most narrow in 1 repetition. ---------------------------------------------------------- RIGHT FRONT/BACK PIECE: Worked back and forth on circular needle. Cast on 86-92-98 sts on circular needle size 6 mm with Paris. Work 1 ridge in GARTER ST - see explanation above. Then work pattern AT THE SAME TIME work SHORT ROWS – see explanation above (1st row = from RS): 5 sts in garter st, K 2, P 3, (turn here), K 2, A.1 (= 23 sts) (turn here), K 1, A.2A, A.2 B over the next 8-14-20 sts, A.2 C, K 2, (turn here), A.1(= 23 sts), K 2, P 3, K 2, 5 sts in garter st. Continue pattern until piece measures 40-42-44 cm at the most narrow and 160-168-176 cm at the widest. Work 1 ridge over all sts and cast off. LEFT FRONT/BACK PIECE: Worked back and forth on circular needle. Cast on 86-92-98 sts on circular needle size 6 mm with Paris. Work 1 ridge in GARTER ST - see explanation above. K 1 row from RS. Then work pattern AT THE SAME TIME work SHORT ROWS – see explanation above (1st row = from WS - NOTE: Beg on 2nd row in A.1 and A.3): 5 sts in garter st, P 2, K 3, (turn here), P 2, A.1 (= 23 sts), (turn here), P 1, A.3A, A.3 B over the next 8-14-20 sts, A.3 C, P 2, (turn here), A.1 (= 23 sts), P 2, K 3, P 2, 5 sts in garter st. Continue pattern until piece measures 40-42-44 cm at the most narrow and 160-168-176 cm at the widest. Work 1 ridge over all sts and cast off. ASSEMBLY: Sew tog the cast-on and cast-off edge. Place the two part towards each other so that the 5 sts in garter st in the widest side meet, and sew tog approx. 58-62 cm mid back, edge to edge – make sure that seam on the parts is mid under sleeve. |
||||||||||||||||
Diagram explanations |
||||||||||||||||
|
||||||||||||||||
 |
||||||||||||||||
 |
||||||||||||||||
Have you finished this pattern?Tag your pictures with #dropspattern #summersnugjacket or submit them to the #dropsfan gallery. Do you need help with this pattern?You'll find 20 tutorial videos, a Comments/Questions area and more by visiting the pattern on garnstudio.com. © 1982-2026 DROPS Design A/S. We reserve all rights. This document, including all its sub-sections, has copyrights. Read more about what you can do with our patterns at the bottom of each pattern on our site. |
||||||||||||||||


With over 40 years in knitting and crochet design, DROPS Design offers one of the most extensive collections of free patterns on the internet - translated to 17 languages. As of today we count 324 catalogues and 12290 patterns translated into English (UK/cm).
We work hard to bring you the best knitting and crochet have to offer, inspiration and advice as well as great quality yarns at incredible prices! Would you like to use our patterns for other than personal use? You can read what you are allowed to do in the Copyright text at the bottom of all our patterns. Happy crafting!
Post a comment to pattern DROPS 154-8
We would love to hear what you have to say about this pattern!
If you want to leave a question, please make sure you select the correct category in the form below, to speed up the answering process. Required fields are marked *.