
Popular categories
Looking for a yarn?


Comments / Questions (147)
![]() Will Zegers wrote:
Will Zegers wrote:
Heb zojuist een opmerking geplaatst maar dit is een vraag
28.02.2014 - 17:04
![]() Will Zegers wrote:
Will Zegers wrote:
Met het telpatroon in de 2e en 3e nld kom ik 4 St. Tekort. 1e nld 35 St., 2e nld 51 St. = 35st. 1e nld +8 St. + a2c + 2 r totaal 47 St. terwijl er 51 moeten worden gebreid. Zo ook de hele naald 35+35+12=82 St. Waar klopt dit patroon niet. Graag uw reactie
28.02.2014 - 17:00
![]() Antje wrote:
Antje wrote:
Hallo liebes Drops Team, Anfrage hat sich erledigt. Ich hab's geschafft :)) Die Jacke wird echt SUUUPER! Ihr habt echt tolle Modelle. Hoffe ihr bleibt weiter so kreativ!!!! Gruß Antje
27.02.2014 - 21:42
![]() Antje wrote:
Antje wrote:
Hiiilfe!!! Liebes Drops Team, braue dringend eure Hilfe. Ich habe das re. T. beendet. Sieht toll aus. Jetzt bei dem anderen Teil stehe ich wohl total auf dem Schlauch. 2. Reihe von A1 und A3 beginnen? Dann fehlt mir doch die Musterreihe 1. Und wenn ich in 2. Reihe beginne stricke ich dann re. oder li. Maschen? Stricke ich dann den Mustersatz von A1 von li.nach re.ß D.h. zuerst 1 Masche abh. und über die nächste ziehen, Umschl.... Umschl. 2 M.re.zusammen? Ich bin total verwirrt!! :( Gruß Antje
27.02.2014 - 19:24
![]() Heke wrote:
Heke wrote:
Hallo ,ich bin verzweifelt,ich verstehe nicht wie man gleichzeitig die verkürzten Reihen strickt und Muster strickt. Wäre nett wenn mir da jemand helfen kann Lieben gruss Heike
23.02.2014 - 13:06DROPS Design answered:
Liebe Heike, bitte lesen Sie doch den etwas weiter unten in dieser Kommentarliste stehenden Tipp (vom 20.02.), ich hoffe, dass Ihnen dann klar wird, wie Muster und verkürzte R gleichzeitig zu stricken sind. Gutes Gelingen!
23.02.2014 - 15:07
![]() Birgit Carter wrote:
Birgit Carter wrote:
Hallo liebes DROPS Design Team, ich möchte mich herzlichst bei euch bedanken. habt mir sehr gut auf die Sprünge geholfen und der Kroschen ist gefallen. Auch möchte ich mich für die immer schönen Anleitungen freuen. MACHT WEITER SO !!!!! Liebe Grüsse Birgit
21.02.2014 - 10:35
![]() Birgit wrote:
Birgit wrote:
Leider komm ich nicht klar mit der Anleitung!!!! Nun im Muster str, dabei GLEICHZEITIG die VERKÜRZTE REIHEN arb.5 M kraus rechts, 2 M re, 3 M li, (hier wenden)2 M re, A.1 (= 23 M) (hier wenden) wo und wie füge ich die verkürzten Reihen ein bzw. das Muster???? Bitte um Hilfe... steh bestimmt nur auf der Leitung. LG Birgit
20.02.2014 - 13:47DROPS Design answered:
Liebe Birgit, die beschriebene R zeigt die Musterfolge, allerdings wird die R nicht durchgängig gestrickt, da Sie immer an den Stellen "hier wenden" wenden & zurückstricken (= verkürzte R). In der 1. R stricken Sie also 5 kraus re, 2 re, 3 li (= insges. 10 M), dann wenden Sie und stricken zurück. In der nächsten R stricken Sie 5 kraus re, 2 re, 3 li, 2 re, A.1 (= insg. 35 M), dann wenden Sie und stricken zurück usw. Gutes Gelingen!
20.02.2014 - 15:24Madeleine wrote:
Je comp rends 2 rgs.au plus petit,mais je ne vois que 6 rangs au plus larges?
16.02.2014 - 15:43DROPS Design answered:
Bonjour Madeleine, on tricote 2 rangs sur les 10 premières m, 2 rangs sur les 35 premières m, 2 rangs sur les 51-57-63 premières m, 2 rangs sur toutes les mailles = soit un total de 8 rangs sur les premières m (au plus large) et 2 rangs sur les dernières m (au plus petit). Bon tricot!
17.02.2014 - 09:48
![]() Liselotte wrote:
Liselotte wrote:
Hej! Jag tycks inte få ihop maskantalet på denna kofta... Stickar S/M. Har lagt upp 86 maskor och när jag kommer till tredje vändningsvarvet så stämmer inte antalet maskor. Det står " 1 rm, A.2A, A.2B över de nästa 8 m." Men A.2A + A.2B är bara 7 maskor? Och nu i slutet av detta varv har jag 9 maskor över. Enligt mina beräkningar så blir mönstret bara totalt 83 maskor när man räknar ihop det hela. Nånting verkar vara väldigt galet här. Hoppas på snabbt svar!
06.02.2014 - 17:04DROPS Design answered:
Hej Liselott, det är A.2B som du upprepar över 8 m. Så eftersom A.2B är 4 m, så blir det att du upprepar A.2B 2 ggr.
06.02.2014 - 19:40
![]() Anita Bank wrote:
Anita Bank wrote:
Ang.: 154-8 Jeg er gået i gang med denne model i str. L/XL, kan det passe for mig at efter mønstret, får jeg 3 masker i overskud? Der skal slås 92 masker op, men tæller man maskerne i højre for/rygstk. skal der kun 89 masker til?????
05.02.2014 - 11:14DROPS Design answered:
Hej Anita. Du maa overse noget. Jeg har talt efter og kommer frem til 92 masker naar du strikker mönstret for L/XL: 5 m retstrik, 2 m ret, 3 m vr, 2 m ret, A.1 (= 23 m), 1 m ret, A.2A (= 3 m), A.2 B over de næste 140 m, A.2 C (= 2 m), 2 m ret, A.1(= 23 m), 2 m ret, 3 m vr, 2 m ret, 5 m retstrik = 92 m.
05.02.2014 - 16:29
|
||||||||||||||||
Summer Snug#summersnugjacket |
||||||||||||||||
 |
 |
|||||||||||||||
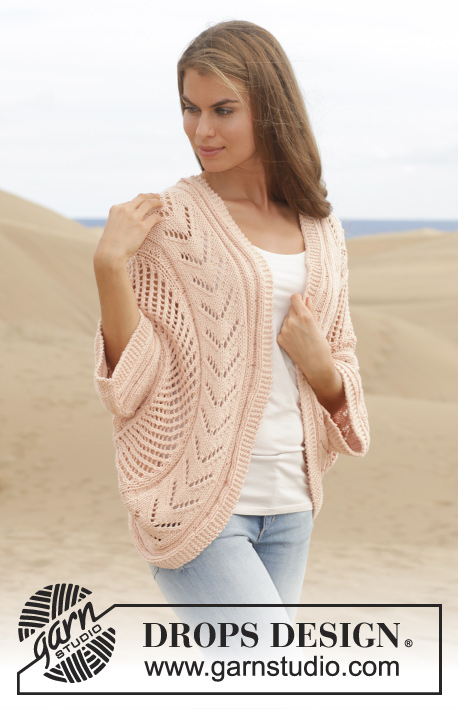
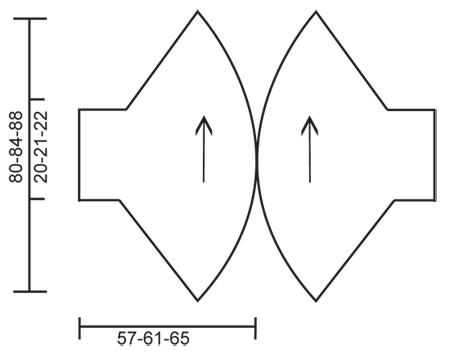
Knitted DROPS jacket worked in a circle with lace pattern in ”Paris”. Size: S - XXXL.
DROPS 154-8 |
||||||||||||||||
|
GARTER ST (back and forth on needle): K all rows. 1 ridge = 2 rows K. PATTERN: See diagrams A.1 to A.3. The diagrams show all rows in pattern seen from RS. SHORT ROWS: * Work 1 row over the first 10 sts on row, turn and work back. Work 1 row over the first 35 sts on row, turn and work back. Work 1 row over the first 51-57-63 sts on row, turn and work back. Work 1 row over all sts, turn and work back *. Repeat from *-*, i.e. 8 rows at the widest and 2 rows at the most narrow in 1 repetition. ---------------------------------------------------------- RIGHT FRONT/BACK PIECE: Worked back and forth on circular needle. Cast on 86-92-98 sts on circular needle size 6 mm with Paris. Work 1 ridge in GARTER ST - see explanation above. Then work pattern AT THE SAME TIME work SHORT ROWS – see explanation above (1st row = from RS): 5 sts in garter st, K 2, P 3, (turn here), K 2, A.1 (= 23 sts) (turn here), K 1, A.2A, A.2 B over the next 8-14-20 sts, A.2 C, K 2, (turn here), A.1(= 23 sts), K 2, P 3, K 2, 5 sts in garter st. Continue pattern until piece measures 40-42-44 cm at the most narrow and 160-168-176 cm at the widest. Work 1 ridge over all sts and cast off. LEFT FRONT/BACK PIECE: Worked back and forth on circular needle. Cast on 86-92-98 sts on circular needle size 6 mm with Paris. Work 1 ridge in GARTER ST - see explanation above. K 1 row from RS. Then work pattern AT THE SAME TIME work SHORT ROWS – see explanation above (1st row = from WS - NOTE: Beg on 2nd row in A.1 and A.3): 5 sts in garter st, P 2, K 3, (turn here), P 2, A.1 (= 23 sts), (turn here), P 1, A.3A, A.3 B over the next 8-14-20 sts, A.3 C, P 2, (turn here), A.1 (= 23 sts), P 2, K 3, P 2, 5 sts in garter st. Continue pattern until piece measures 40-42-44 cm at the most narrow and 160-168-176 cm at the widest. Work 1 ridge over all sts and cast off. ASSEMBLY: Sew tog the cast-on and cast-off edge. Place the two part towards each other so that the 5 sts in garter st in the widest side meet, and sew tog approx. 58-62 cm mid back, edge to edge – make sure that seam on the parts is mid under sleeve. |
||||||||||||||||
Diagram explanations |
||||||||||||||||
|
||||||||||||||||
 |
||||||||||||||||
 |
||||||||||||||||
Have you finished this pattern?Tag your pictures with #dropspattern #summersnugjacket or submit them to the #dropsfan gallery. Do you need help with this pattern?You'll find 20 tutorial videos, a Comments/Questions area and more by visiting the pattern on garnstudio.com. © 1982-2026 DROPS Design A/S. We reserve all rights. This document, including all its sub-sections, has copyrights. Read more about what you can do with our patterns at the bottom of each pattern on our site. |
||||||||||||||||


With over 40 years in knitting and crochet design, DROPS Design offers one of the most extensive collections of free patterns on the internet - translated to 17 languages. As of today we count 324 catalogues and 12290 patterns translated into English (UK/cm).
We work hard to bring you the best knitting and crochet have to offer, inspiration and advice as well as great quality yarns at incredible prices! Would you like to use our patterns for other than personal use? You can read what you are allowed to do in the Copyright text at the bottom of all our patterns. Happy crafting!
Post a comment to pattern DROPS 154-8
We would love to hear what you have to say about this pattern!
If you want to leave a question, please make sure you select the correct category in the form below, to speed up the answering process. Required fields are marked *.