
Popular categories
Looking for a yarn?


Comments / Questions (28)
![]() Ulla wrote:
Ulla wrote:
Skulle ha lest kommentarer før jeg prøvde for 3 gang 🙈. Dropp første omgang da den gir alt for mange masker. Hekle omgang 3 og deretter 2,3,2,3...
05.07.2025 - 21:46
![]() Renate Moen wrote:
Renate Moen wrote:
Etter 1. rad; hvor mange «stjerner» har man da?
25.03.2025 - 13:53DROPS Design answered:
Hej Renate, du bruger 2 fm til 1 stjerne :)
27.03.2025 - 13:37
![]() Hanne Nielsen wrote:
Hanne Nielsen wrote:
1. række er forkert. Hver stjerne skal i stedet for hækles over en maske mere på rækken før end i opskriften
11.06.2019 - 21:05
![]() Hanne wrote:
Hanne wrote:
Opskriften er helt klart forkert. Utroligt I ikke retter det efter flere henvendelser
03.06.2019 - 21:42DROPS Design answered:
Hei Hanne. Hvor er det du mener oppskriftern er feil, hvis det er noe som ikke stemmer vil vi gjerne rette dette. Om du sikter til kommentaren fra 13 august 2018, så stemmer rad 1 med stjernemønster slik den er. Det er rad 2 og 3 som gjentas oppover, og her hekles ikke i fremre og bakre maskebue, så antallet stjerner forblir det samme. God fornøyelse
06.06.2019 - 11:12
![]() Annika Jönsson wrote:
Annika Jönsson wrote:
Mönstret är felaktigt på varav 1 efter att botten virkats färdig. Om man gör omslag i bakre och främre maskbågen på samma maska så får man en kraftig ökning av antalet maskor. Texten kanske är korrekt för den allra första stjärnan, men den del som upprepas hela varvet ut är fel. Korrekt är att man virkar som på varv 3 ,"1 omslag i var och en av de två nästa maskorna".
13.08.2018 - 11:33
![]() Marita Lendt wrote:
Marita Lendt wrote:
Es soll natürlich heißen: 1. Reihe weglassen...
29.04.2018 - 17:39
![]() Marita Lendt wrote:
Marita Lendt wrote:
Nach dem Korbboden: 1. 1. 1. Reihe weglassen und mit 3. Reihe beginnen. Danach 2. Reihe und 3. Reihe im Wechsel häkeln.
29.04.2018 - 17:36DROPS Design answered:
Liebe Frau Lendt, mit 1. Reihe anfangen, es ist wie Reihe 3 gehäkelt aber aus dem hinteren Maschenglied der vorrigen Runden gehäkelt, dann Reihe 2 und 3 wiedherholen. Viel Spaß beim häkeln!
30.04.2018 - 11:28
![]() Susanne Jørgensen wrote:
Susanne Jørgensen wrote:
Jeg har samme problem som flere andre: min kurv bliver flad. Jeg er startet forfra flere gange og har set videoerne en del gange. Jeg har fulgt opskrift og video til punkt og prikke!
27.08.2017 - 22:48DROPS Design answered:
Hei Susanne. Det er veldig viktig at heklefastheten stemmer. Om du ikke har gjort det tidlgere, er det lurt å hekle en prøvelapp og måle heklefastheten. Hekler man litt for løst, kan kurven bli flat.
29.08.2017 - 13:20
![]() Liesbeth wrote:
Liesbeth wrote:
Bij mij is de rand zo wijd, dat hij totaal niet rechtop komt te staan. Wat kan ik daaraan doen? Zou het helpen als ik de eerste toer niet van dezelfde steek (vaste) de voorste lus gebruik, maar gewoon een volgende vaste?
11.09.2016 - 03:31
![]() Camilla wrote:
Camilla wrote:
Hej, hvis man følger jeres opskrift bliver kanten helt bølget og ikke som i videoen i henviser til. Er der en fejl i jeres opskrift?
22.08.2016 - 17:16DROPS Design answered:
Hej Camilla. Overholder du haeklefastheden? Hvis du haekler for löst kan den bölge.
06.09.2016 - 16:16
|
|
Summer Baskets#summerbaskets |
|
|
|
|
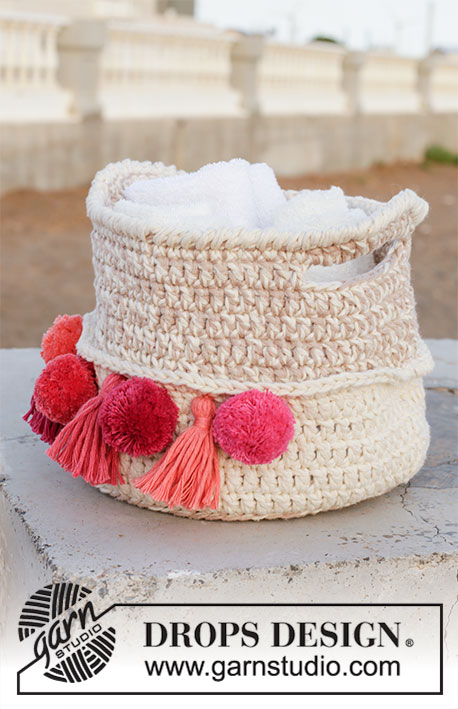
Crochet DROPS basket with star pattern in ”Paris”.
DROPS 152-34 |
|
|
CROCHET TIP: Beg every round with dc with 1 ch and finish with 1 sl st in 1st dc from beg of round. ---------------------------------------------------------- SMALL BASKET: Worked from bottom up. Crochet 4 ch on hook size 4 mm with light yellow and form a ring with 1 sl st in first ch. ROUND 1: Work 6 dc in ch-ring – see CROCHET TIP! ROUND 2: Work 2 dc in every dc = 12 dc. ROUND 3: Work 1 and 2 dc alternately in every dc the entire round = 18 dc. ROUND 4: Work 1 dc in every dc but work 2 dc in every 3rd dc = 24 dc. ROUND 5: Work 1 dc in every dc but work 2 dc in every 4th dc = 30 dc. Then work 1 dc more between inc until basket measures approx. 20 cm in diameter. NOW MEASURE PIECE FROM HERE! Now work star pattern back and forth, beg from RS as follows: ROW 1: Work 3 ch, pick up 1 st in 2nd and 3rd ch from hook, pick up 1 st in back loop of next dc, pick up 1 st in front loop of same dc, pick up 1 st in the next dc on row = 6 sts on hook, make a YO and pull through all 6 sts, work 1 ch, * pick up 1 st in the hole, pick up 1 st in the side on the last of the 6 sts, pick up 1 st in same st as the last of the 6 sts was picked up in, pick up 1 st in back loop of next dc, pick up 1 st in front loop of same st = 6 sts on hook, make a YO and pull through all 6 sts, 1 ch *, repeat from *-* until 1 dc remains on row, work 1 htr in last dc. Turn. ROW 2: 2 ch (replace 1 htr), work 2 htr in every "star hole", finish row with 1 htr in last st. Turn. ROW 3: Work 3 ch, pick up 1 st in 2nd and 3rd ch from hook, pick up 1 st in the first 3 htr on row = 6 sts on hook, make a YO and pull through all 6 sts, work 1 ch, * pick up 1 st in the hole, pick up 1 st in the side on the last of the 6 sts, pick up 1 st in same st as the last of the 6 sts was picked up in, pick up 1 st in each of the next 2 sts = 6 sts on hook, make a YO and pull through all 6 sts, 1 ch *, repeat from *-* until 1 dc remains on row, work 1 htr in last htr. Turn. Repeat row 2 and 3 until piece measures approx. 11 cm vertically (adjust after row 2). Finish and cut the yarn, leave approx. 25 cm for assembly. ASSEMBLY: Sew tog in the side and fasten off. Fold the edge double inwards. ---------------------------------------------------------- LARGE BASKET: Work the same way as SMALL BASKET with vanilla, but inc until bottom measures approx. 23 cm in diameter. Repeat star pattern until piece measures 17 cm vertically. |
|
Have you finished this pattern?Tag your pictures with #dropspattern #summerbaskets or submit them to the #dropsfan gallery. Do you need help with this pattern?You'll find 9 tutorial videos, a Comments/Questions area and more by visiting the pattern on garnstudio.com. © 1982-2026 DROPS Design A/S. We reserve all rights. This document, including all its sub-sections, has copyrights. Read more about what you can do with our patterns at the bottom of each pattern on our site. |


With over 40 years in knitting and crochet design, DROPS Design offers one of the most extensive collections of free patterns on the internet - translated to 17 languages. As of today we count 324 catalogues and 12290 patterns translated into English (UK/cm).
We work hard to bring you the best knitting and crochet have to offer, inspiration and advice as well as great quality yarns at incredible prices! Would you like to use our patterns for other than personal use? You can read what you are allowed to do in the Copyright text at the bottom of all our patterns. Happy crafting!
Post a comment to pattern DROPS 152-34
We would love to hear what you have to say about this pattern!
If you want to leave a question, please make sure you select the correct category in the form below, to speed up the answering process. Required fields are marked *.