
Popular categories
Looking for a yarn?


Comments / Questions (26)
![]() Gunvor wrote:
Gunvor wrote:
Jag förstår inte hur jag ska sy ihop sid och ärmsömmar. Axelsömmar var lätt men sedan?
11.04.2024 - 10:02DROPS Design answered:
Hei Gunvor. Du kan sy sidesømmene sammen med en usynlig sidesøm. Ta en titt på hjelpevideoen(e) som er linket til oppskriften under VIDEOR. mvh DROPS Design
15.04.2024 - 10:36
![]() Lorraine Forcier wrote:
Lorraine Forcier wrote:
Merci mais ça ne répond pas à ma question. Je veux savoir les m. aug. pour manches (3m, 4m, (9fs) donc 130 m. (L) au total se tricotent-elles en pt fantaisie ou en pt mousse. En pt fantaisie, si oui, ça s'avère tout un calcul pour arriver à une continuité avec les mailles du dos.
28.05.2020 - 14:57DROPS Design answered:
Bonjour Mme Forcier les augmentations doivent se tricoter en point fantaisie, avec toujours 2 m point mousse de chaque côté pour les bordures. La continuité du motif sera simple, vous devez tricoter un motif supplémentaire à chaque fois: le point ajouré sur 2 mailles et les 6 m jersey entre chaque "rayure" ajourée. Les 2 premières et les 2 dernières mailles se tricotent au point mousse. Bon tricot!
28.05.2020 - 16:20
![]() Lorraine Forcier wrote:
Lorraine Forcier wrote:
Les mailles qu'on rajoutent pour constituer les manches se tricotent-elles toutes au point mousse avant l'obtention des 258 mailles?
28.05.2020 - 04:49DROPS Design answered:
Bonjour Mme Forcier, seules les 2 premières mailles de chaque côté vont se tricoter au point mousse, les autres mailles augmentées vont se tricoter au point ajouré. Bon tricot!
28.05.2020 - 08:40
![]() Lyne wrote:
Lyne wrote:
Bonjour, je suis rendue à 42 cm pour monter de chaque côté les mailles pour les manches , dit moi ont continue toujours en points fantaisie je ne comprend pas comment le faire Pourriez-vous m’aider. Merci j’attend votre explication
27.04.2020 - 20:42DROPS Design answered:
Bonjour Lyne, les nouvelles mailles des manches vont se tricoter avec les 2 premières mailles comme avant, puis vous continuez simplement le point fantaisie en début de rang et en fin de rang sur l'endroit de sorte que le motif se répète comme avant, soit 6 mailles jersey, 2 m ajouré (= 8 m de A.1), donc en début de rang, tricotez un nouveau motif en commençant par les dernières m de A.1 (= un point ajouré) puis en jersey et en fin de rang, tricotez les m en jersey puis en point ajouré (vu sur l'endroit), ainsi, vous aurez toujours la continuité du motif. Bon tricot!
28.04.2020 - 10:12
![]() Annie GAUCHET wrote:
Annie GAUCHET wrote:
Bonjour Madame, J'aimerais savoir si ce modèleest tricoté en fil double ... ce n'est pas précisé. Je m'en doute mais je voudrais avoir confirmation avant de me lancer ! Merci d'avance pour votre réponse ! Bien cordialement, Anne-Hortense
01.05.2019 - 12:00DROPS Design answered:
Bonjour Mme Annie. Vous tricotez avec 1 seul fil. Bon tricot!
01.05.2019 - 12:50
![]() Paola wrote:
Paola wrote:
Buonasera!! Non capisco questo passaggio: "Lavorare le nuove m seguendo il motivo, quindi lavorare le prime 2 nuove m (quindi compresa la m vivagno) da ciascun lato seguendo il motivo traforato. Proseguire con il motivo come prima. Quando tutte le m sono state avviate, proseguire come segue sul diritto del lavoro:" mi sembra si ripeta tre volte di avviare 2m, ma una volta si dice di lavorarle seguendo il motivo, una di farle a legaccio...
29.06.2017 - 18:16DROPS Design answered:
Buonasera Paola, abbiamo leggermente modificato il testo, in ogni caso il n° di maglie da avviare è corretto, e durante gli avvi deve lavorare le nuove maglie con il motivo, e le prime 2 maglie a ogni lato con il motivo traforato. Buon lavoro!
29.06.2017 - 18:48
![]() Paola Mazzinghi wrote:
Paola Mazzinghi wrote:
Buongiorno! Pur avendo realizzato il campione, mi ritrovo che 120 maglie danno come risultato una misura molto maggiore rispetto ai 69cm del modello. Devo usare ferri più piccoli? Non risulterà un lavoro troppo "duro"? Grazie mille
11.01.2017 - 18:41DROPS Design answered:
Buonasera Paola, secondo il campione indicato 120 m corrispondono più o meno a 70 cm, per cui le misure sono corrette. Se le sue non corrispondono, vuol dire che ha una tensione div55ersa durante il lavoro, provi a rifare il campione. Buon lavoro!
11.01.2017 - 22:16
![]() Inma wrote:
Inma wrote:
Hola!! Tengo una duda que no sé cómo solventar. Tengo ya tejidas las tres piezas, pero no consigo averiguar cómo coserlas. En las instrucciones dice "Coser las mangas y los lados en una", y no sé cómo interpretarlo, en una qué??. La foto tampoco me permite saber cómo va la manga. Si la parte más ancha de la espalda la pliego, el brazo no me cabe, no da la anchura suficiente. O es que queda tipo "manga murciélago"?? Ayuda!!
04.07.2016 - 09:03DROPS Design answered:
Hola Inma. Cuando se dice coser las mangas y los lados en una, quiere decir que tenemos una costura continua que empieza en la manga y continua bajando por el lado.
04.07.2016 - 21:51
![]() Kaisu Uimaniemi wrote:
Kaisu Uimaniemi wrote:
Ohje on sekavan tuntuinen. Esim. :"Lisätyillä silmukoilla neulotaan mallineuletta, eli kummankin reunan ensimmäisillä 2 s:lla (eli sis. reunas) neulotaan pitsineuletta, sitten jatketaan neulomista kuten aiemmin. Eli kun kaikki tarvittavat s:t on luotu, neulo seuraavasti (1. krs = oikea puoli): Neulo 2 s ainaoikeaa, *6 s sileää neuletta, 2 s pitsineuletta*..." Ensin sanotaan mallineuletta sitten se onkin pitsineule ja mikä on pitsi neule? Sitä ei sanota missään????
15.09.2015 - 11:13Arva wrote:
Don't understand how this pattern comes together. Looking at the diagram and reading the instructions, there is no space left for the neck, and one side of the sleeves is straight which would make it shorter than the tapered side. If you told the sweater at the dotted line, the fronts will come out at the sleeve seam level.please help. I've already bought the yarn and started knitting.thank you
22.04.2015 - 05:11DROPS Design answered:
Dear Arva, this jacket has a special construction, you fold piece along the dotted line (= shoulder) to sew sleeves & sides. Front pieces are worked sideways and sew between markers (see under Assembly). Happy knitting!
22.04.2015 - 12:01
|
||||||||||||||||
Indulgence#indulgencecardigan |
||||||||||||||||
 |
 |
|||||||||||||||
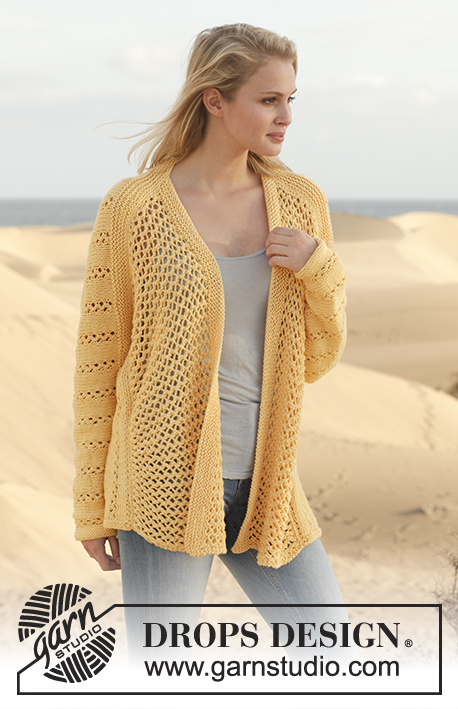
Knitted DROPS jacket with lace pattern in ”Paris”. Size: S - XXXL.
DROPS 152-36 |
||||||||||||||||
|
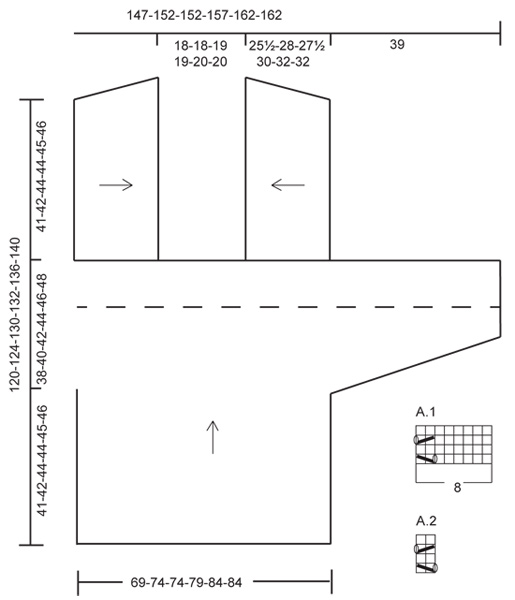
GARTER ST (back and forth on needle): K all rows. 1 ridge = 2 rows K. PATTERN: See diagrams A.1-A.2. The diagrams show all rows in pattern seen from RS. ---------------------------------------------------------- JACKET: Worked from bottom of back piece up to and with the sleeves. Work each front piece separately. BACK PIECE: Worked back and forth on circular needle to make room for all the sts. Cast on 120-128-128-136-144-144 sts (incl 1 edge st in each side) on circular needle size 5 mm with Paris. Work 2 ridges in GARTER ST - see explanation above. On next row work 1 st in garter st (= edge st), P all sts until 1 st remains, 1 st in garter st (= edge st). Then work as follows from RS: Work 1 edge st in garter st, diagram A.1 (= 8 sts) 14-15-15-16-17-17 times in width, finish with 6 sts in stocking st (worked like this so that pattern is the same in both sides) and 1 edge st in garter st. Continue the pattern like this until piece measures 41-42-44-44-45-46 cm. Now work edge sts in pattern. Then cast on sts for sleeves in each side of piece as follows: * Cast on 3 sts at the end of the next 2 rows, cast on 4 sts at the end of the next 2 rows *, repeat from *-* 9 times in total, then cast on 2 sts at the end of the next 2 rows = 250-258-258-266-274-274 sts on needle. Work the new sts in pattern, i.e. work the first 2 new sts (i.e. incl edge st) in each side in lace pattern, then work pattern as before. I.e. when all sts have been cast on work as follows from RS: Work 2 sts in garter st, * 6 sts in stocking st, 2 sts lace pattern *, repeat from *-* until 8 sts remain (= 30-31-31-32-33-33 repetitions of A.1 in width), finish with 6 sts in stocking st and 2 sts in garter st. Work the last 2 inc sts in each side of piece in garter st. Continue with pattern until piece measures 76-79-83-85-88-91 cm. Adjust so that last row is from WS. Work 5 ridges over all sts AT THE SAME TIME on last row from RS insert 4 markers in the piece as follows: Work 66 sts, insert 1st marker, work 44-48-47-51-54-54 sts, insert 2nd marker, work 30-30-32-32-34-34 sts, insert 3rd marker, work 44-48-47-51-54-54 sts, insert 4th marker, work the rest of row. Right front piece is sewn to back piece between 1st and 2nd marker and left front piece is sewn to back piece between 3rd and 4th marker. Loosely cast off. LEFT FRONT PIECE: Worked from the side to mid front, back and forth on circular needle to make room for all the sts. Loosely cast on 70-72-74-74-76-78 sts on circular needle size 5 mm with Paris. Work as follows (1st row = WS): Work 2 sts in garter st, P 67-69-71-71-73-75, 1 edge st in garter st. Then on next row from RS work 1 edge st in garter st, 1 st in stocking st, pattern A.2 over the next 66-68-70-70-72-74 sts, finish with 2 sts in garter st. Continue like this until piece measures 22½-25-24½-27-29-29 cm. Adjust so that last row is from WS. Work 5 ridges (= band) AT THE SAME TIME on 1st row inc sts as follows: * Work 2 sts, 1 YO *, repeat from *-* until 2 sts remain, 2 sts in garter st (= 34-35-36-36-37-38 sts inc) = 104-107-110-110-113-116 sts on needle. Work YOs twisted on next row. Loosely cast off. RIGHT FRONT PIECE: Work as left but reversed, i.e.work as follows from RS: 2 sts in garter st, A.2 over the next 67-69-71-71-73-75 sts, 1 st in stocking st, finish with 1 edge st in garter st. ASSEMBLY: Place back piece over 1 edge st in garter st on right front piece and sew tog from 1st to 2nd marker. Sew left front piece between 3rd and 4th marker. Sew sleeve and side seams in one. |
||||||||||||||||
Diagram explanations |
||||||||||||||||
|
||||||||||||||||
 |
||||||||||||||||
Have you finished this pattern?Tag your pictures with #dropspattern #indulgencecardigan or submit them to the #dropsfan gallery. Do you need help with this pattern?You'll find 19 tutorial videos, a Comments/Questions area and more by visiting the pattern on garnstudio.com. © 1982-2026 DROPS Design A/S. We reserve all rights. This document, including all its sub-sections, has copyrights. Read more about what you can do with our patterns at the bottom of each pattern on our site. |
||||||||||||||||


With over 40 years in knitting and crochet design, DROPS Design offers one of the most extensive collections of free patterns on the internet - translated to 17 languages. As of today we count 324 catalogues and 12290 patterns translated into English (UK/cm).
We work hard to bring you the best knitting and crochet have to offer, inspiration and advice as well as great quality yarns at incredible prices! Would you like to use our patterns for other than personal use? You can read what you are allowed to do in the Copyright text at the bottom of all our patterns. Happy crafting!
Post a comment to pattern DROPS 152-36
We would love to hear what you have to say about this pattern!
If you want to leave a question, please make sure you select the correct category in the form below, to speed up the answering process. Required fields are marked *.