
Popular categories
Looking for a yarn?


Comments / Questions (8)
![]() Rosi wrote:
Rosi wrote:
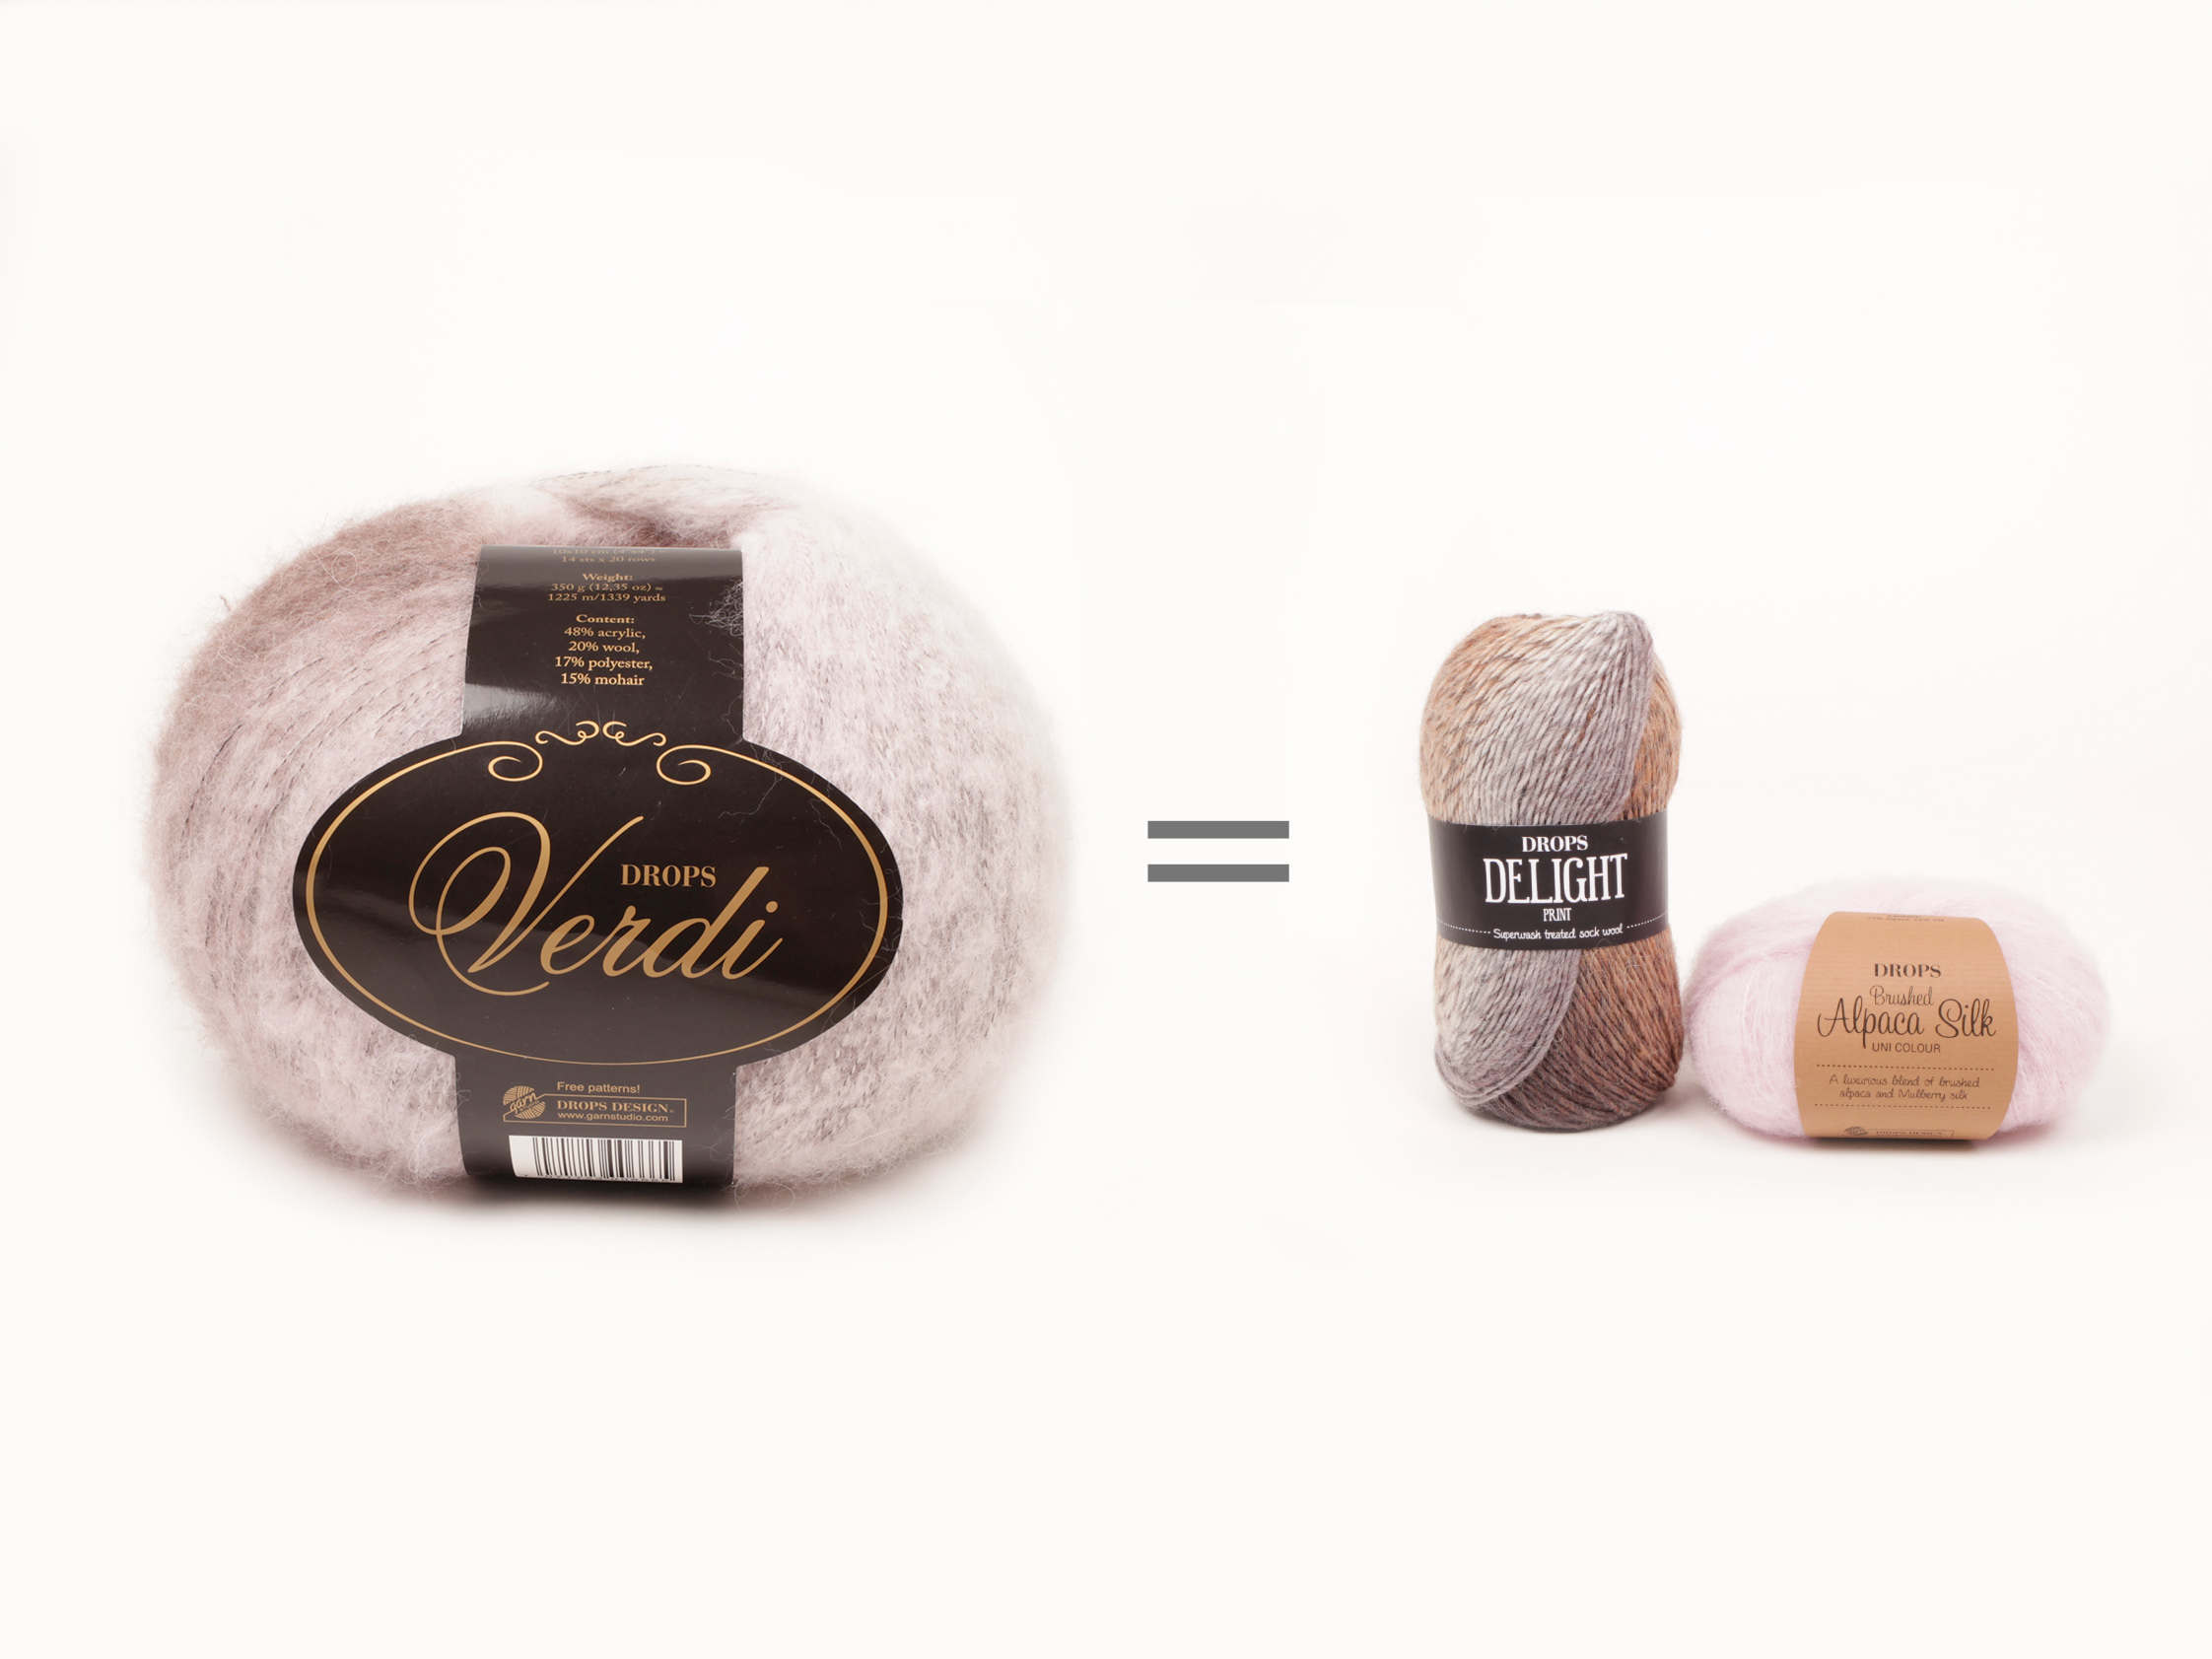
Hi :) Drops Verdi gibts nicht mehr, sehr sehr schade. Existiert eine gute Alternative oder kommt zum Herbst etwas Ähnliches? Vielen Dank!
26.04.2015 - 23:37DROPS Design answered:
Die Alternativen der Garngruppe D, in die auch Verdi gehört, werden auch aus dem Programm genommen. Aber Sie können stattdessen die Garne der Gruppe B 2-fädig oder die Garne der Gruppe A 3-fädig verwenden. Für einen Flauscheffekt würde sich 3-fädige Kid-Silk (Gruppe A) anbieten. Möglich wäre auch, je 1 Faden der Gruppe C und A zu kombinieren - als Flauschgarne z.B. Brushed Alpaca Silk (C) und Kid-Silk (A), mit beiden Varianten haben Sie die Möglichkeit, Farben zu kombinieren. Und es gibt natürlich innerhalb dieser Gruppen noch viele weitere Kombinationsmöglichkeiten. Beachten Sie, dass Sie die benötigte Garnmenge anhand der Lauflänge neu berechnen müssen.
16.05.2015 - 16:37
![]() Ludmilla wrote:
Ludmilla wrote:
Den här modellen ska ha masktäthet 11m x 16 v på stickor nr 6 i slätst. Modellen 137-19 ska ha 14m x 16 v med stickor nr 6 i slätst. Båda modellerna använder samma garn. Det måste vara fel angivelse i en av dem.
11.02.2014 - 14:53DROPS Design answered:
Hej Ludmilla, stickfastheten på denna ska vara i mönster och inte i slätst. Vi rättar, tack :)
11.02.2014 - 19:47Sia wrote:
In the second row from the RS there shouldn't be the final YO I believe. With the final YO you suggest at the pattern it ends up with one more stitch.
01.02.2014 - 13:26DROPS Design answered:
Dear Sia, diagram has been now edited so that all dec are compensated with 1 YO and number of sts keep constant. Thank you. Happy knitting!
01.02.2014 - 16:32Sia wrote:
Is the pattern A1 correct? When I knit the second row from the RS there is one more stitch appearing...any suggestions what am I doing wrong? Thank you in advance for your help.
31.01.2014 - 23:37DROPS Design answered:
Dear Sia, number of sts in A1 should be always the same, ie on 1st row repeat *K2 tog, YO, K2 tog, YO*, so that each dec is compensated by 1 YO. Happy knitting!
01.02.2014 - 16:00
![]() Froufy wrote:
Froufy wrote:
Très bien pour la forme enveloppante. je le fermerai avec une broche ou une pique.
09.01.2014 - 15:24
![]() Christel Jahnke wrote:
Christel Jahnke wrote:
Gleder meg til den nye kollektionen
30.12.2013 - 05:00
![]() Gisele wrote:
Gisele wrote:
Une veste au coloris tonique qui donne envie de s'y glisser dedans
12.12.2013 - 18:18
![]() Martine wrote:
Martine wrote:
Jolie couleur pour une veste longue qui doit être très agréable à porter.
10.12.2013 - 18:29
|
||||||||||
So Berry#soberrycardigan |
||||||||||
|
|
||||||||||
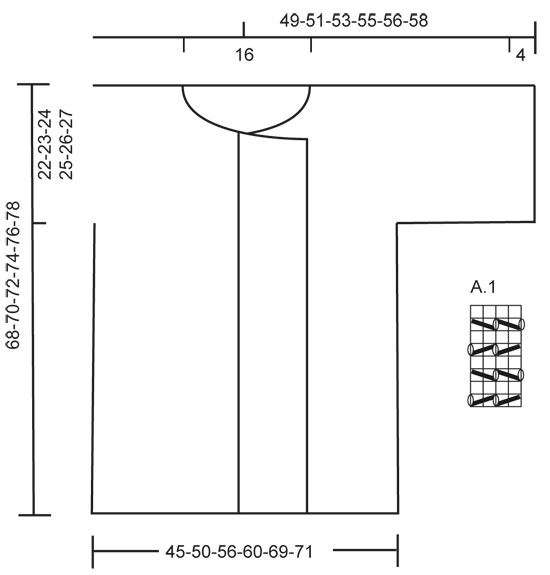
Knitted DROPS jacket with lace pattern in ”Verdi”. Size: S - XXXL.
DROPS 155-19 |
||||||||||
|
PATTERN: See diagram A.1, diagram shows all rows in pattern seen from RS. 1st row = RS. GARTER ST (back and forth on needle): K all rows. 1 ridge = 2 rows K. ---------------------------------------------------------- JACKET: Work first back piece, then cast on in each side for sleeves, work up to shoulder and down on each front piece. Worked back and forth on a circular needle to make room for all the sts. BACK PIECE: Cast on 52-58-64-68-78-80 sts (incl 1 edge st in each side) on circular needle size 6 mm with Verdi. K 3 rows (1st row = WS). Then work LACE PATTERN - according to diagram A.1 with 1 edge st in each side in GARTER ST - see explanation above! When piece measures 46-47-48-49-50-51 cm (adjust so that next row is worked from RS), cast on 28-27-26-26-23-24 new sts at the end of row for sleeve. Turn and K the first 4 sts, P the rest of row, then cast on 28-27-26-26-23-24 new sts at the end of row for sleeve in the other side = 108-112-116-120-124-128 sts in total. Continue as follows: 4 sts in garter st, A.1 over 100-104-108-112-116-120 sts and 4 sts in garter st (make sure that pattern fits over sts in the middle, edge st from body is worked in pattern). When piece measures 66-68-70-72-74-76 cm, work 2 rows in garter st over the middle 20 sts (work the other sts as before). Cast off the middle 16 sts on next row from RS. Then work piece in 2 parts – AT THE SAME TIME cast off 1 more st in each side on next row from neck = 45-47-49-51-53-55 sts remain on each shoulder. Work A.1 with 1 st in garter st towards the neck and 4 sts in garter st at the edge of sleeve until piece measures 68-70-72-74-76-78 cm insert a marker(= mid on top of shoulder). NOW MEASURE PIECE FROM HERE! FIRST FRONT PIECE: = 45-47-49-51-53-55 sts. Work A.1 with 1 st in garter st towards the neck and 4 sts in garter st at the edge of sleeve until piece measures 4-4-5-5-6-6 cm from marker on shoulder. Then cast on new sts towards mid front, work the new sts in A.1. Cast on 3 sts 2 times, 4 sts 1 time and 11 sts 1 time (= 21 sts cast on in total) = 66-68-70-72-74-76 sts on needle. Then work the 12 sts towards the middle in garter st (= band), work A.1 over the next 50-52-54-56-58-60 sts and 4 sts in garter st towards the sleeve. Continue to work like this until piece measures 22-23-24-25-26-27 cm from marker on shoulder. On next row from the side cast off the first 27-27-25-25-25-23 sts (different no of sts cast off than sts inc on back piece in some sizes so that pattern fits)= 39-41-45-47-49-53 sts remain on needle. Continue with 1 st in garter st towards the side, A.1 over 26-28-32-34-36-40 sts and in garter st over 12 sts towards mid front. When piece measures 67-69-71-73-75-77 cm from shoulder (adjust so that front and back piece have the same no of holes), K 3 rows, beg from WS, over all sts before LOOSELY casting off. SECOND FRONT PIECE: Slip sts from stitch holder back on needle and work as first front piece. ASSEMBLY: Sew sleeve and side seams in one inside 1 edge st. |
||||||||||
Diagram explanations |
||||||||||
|
||||||||||
 |
||||||||||
Have you finished this pattern?Tag your pictures with #dropspattern #soberrycardigan or submit them to the #dropsfan gallery. Do you need help with this pattern?You'll find 17 tutorial videos, a Comments/Questions area and more by visiting the pattern on garnstudio.com. © 1982-2026 DROPS Design A/S. We reserve all rights. This document, including all its sub-sections, has copyrights. Read more about what you can do with our patterns at the bottom of each pattern on our site. |
||||||||||


With over 40 years in knitting and crochet design, DROPS Design offers one of the most extensive collections of free patterns on the internet - translated to 17 languages. As of today we count 324 catalogues and 12290 patterns translated into English (UK/cm).
We work hard to bring you the best knitting and crochet have to offer, inspiration and advice as well as great quality yarns at incredible prices! Would you like to use our patterns for other than personal use? You can read what you are allowed to do in the Copyright text at the bottom of all our patterns. Happy crafting!
Post a comment to pattern DROPS 155-19
We would love to hear what you have to say about this pattern!
If you want to leave a question, please make sure you select the correct category in the form below, to speed up the answering process. Required fields are marked *.