
Popular categories
Looking for a yarn?


Comments / Questions (352)
![]() Jette Andersen wrote:
Jette Andersen wrote:
Hej Mette. Tusind - Tusind tak for hjælpen, er nu færdig med rygstykkerne, startede i uge 10 :(, men har strikket andet i mellemtiden, da jeg var knust over ikke at kunne komme videre. Så igen tak for hjælpen Jette
26.11.2014 - 11:25
![]() Trine Rasmussen wrote:
Trine Rasmussen wrote:
Hej Mette. Det virker! Tusind tak for hjælpen! En strikkeven i nøden... /Trine
12.10.2014 - 16:12
![]() Mette wrote:
Mette wrote:
(fortsat) Sørg for at garnet sidder bag på arb. Tag 2 m fra højre p over på venstre pind. Strik med det andet garn hen over de 4 m på venstre p. Vend arb og strik 4 m tilbage. Vend arb. Sørg for at garnet sidder bag på arb. Tag 2 m fra højre p over på venstre pind. Strik med det første garn hen over de 6 m på venstre pind. Vend arb og strik 6 m tilbage. Fortsæt på denne måde, indtil alle 54 m er strikket. Strik så lige op i striber, sådan som opskrifter beskriver i afsnit 8.
11.10.2014 - 18:59
![]() Mette wrote:
Mette wrote:
Jeg har samme problem med afsnit 4, som mange andre. Og til trods for Drops mange forsikringer om, at opskriften er rettet i on-line versionen, er det stadig galt. Men jeg har løst problemet således: (str. L:) Efter afsnit 3 brydes garnet. 52 m skubbes over på højre pind. Du har så 2 m på venstre pind. Strik med det ene garn over de 2 m, vend arb. og strik tilbage. Vend.
11.10.2014 - 18:58
![]() Trine Rasmussen wrote:
Trine Rasmussen wrote:
Hejsa. Jeg har også læst den opdaterede version MANGE gange, men forstår ikke hvordan jeg i afsnit 4 på højre bagstykke ender op med at have 38 m på højre pind. Desuden står der i afsnit 3 at man skal tage ud i starten af pinden ved at strikke 2 masker i den sidste maske. Har virkelig brug for hjælp fra én der har knækket koden. Pft tak.
09.10.2014 - 19:32DROPS Design answered:
Hej Trine, På samme måde som afsnit 7 til venstre rygstykke. Du flytter maskerne over på højre pind og følger forklaringen fra 1.p osv. God fornøjelse!
30.10.2014 - 10:02
![]() Ewy Bode wrote:
Ewy Bode wrote:
I skriver under "rettelser" i opskriften, at der ikke er fejl i opskriften, men i afsnit 4 og 7 skal man starte med 34 masker på højre pind! Eftersom der er sluttet af med en hel pind hvor der er 44 masker kan det ikke passe. Det må da være en fejl !! Ivrigt forstår jeg stadig ikke afsnit 4 på højre bagsmækken.
07.10.2014 - 16:20
![]() Ewy wrote:
Ewy wrote:
Jeg kan ikke se hvor jeg finder rettelserne til hhv afs.7 og afs.4 på venstre og højre bagstykke i netversionen
01.10.2014 - 14:11DROPS Design answered:
Hej Ewy. Mönstret her online er korrekt. Online mönstret du finder her er altsaa inklusiv alle tilföjelser - ogsaa i afsnittene du naevner her.
01.10.2014 - 16:51
![]() Courtot wrote:
Courtot wrote:
Modèle ravissant ! ce sera mon prochain
05.09.2014 - 01:39
![]() Andersen wrote:
Andersen wrote:
Det glæder mig at se at det ikke kun er mig, der har problemer med opskriften Efter at have trævlet det hele op tre gange har jeg også opgivet. Jeg har strikket i mange år, så det er ikke mangel på erfaring jeg har. Synd, for det er en sød model
29.08.2014 - 12:23
![]() Anette M.Christensen wrote:
Anette M.Christensen wrote:
Opskrift fra nettet hø.rygstyk afsnit 2:indtagning:der tages ind i starten osv..Prøv lige at tjekke.Det bør skrives om.Ligeledes afsnit 4.Vh Anette
11.08.2014 - 09:21
|
||||
Cross My Heart#crossmyheartjacket |
||||
 |
 |
|||
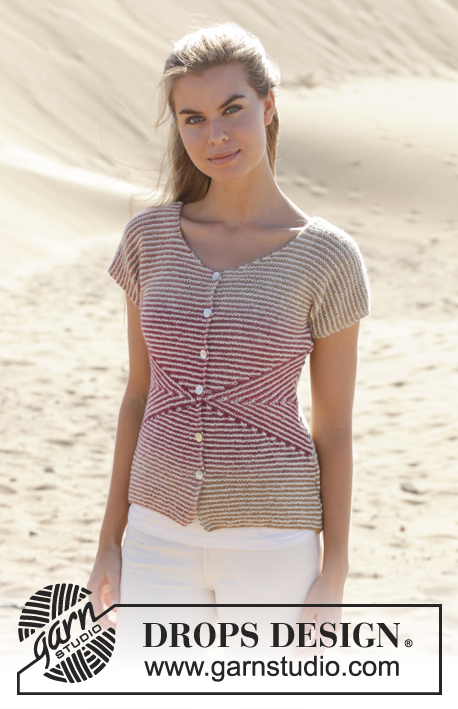
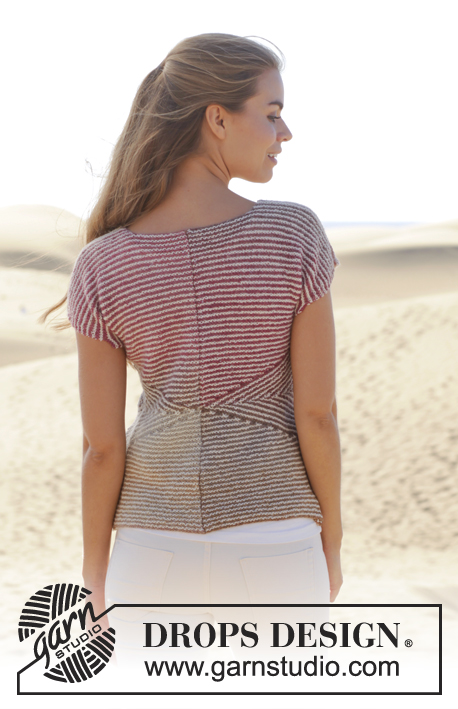
Knitted DROPS jacket in garter st with short sleeves, short rows and stripes in ”Delight” and ”Alpaca”. Size: S - XXXL.
DROPS 155-1 |
||||
|
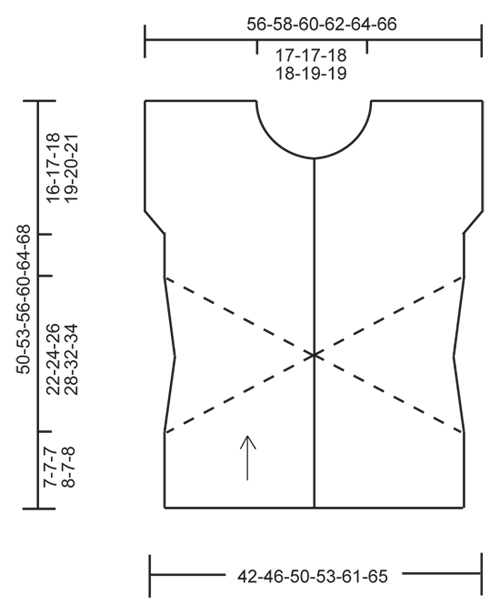
GARTER ST (back and forth on needle): K all rows. 1 ridge = 2 rows K. STRIPES: * 1 ridge in GARTER ST - see explanation above - (= 2 rows) Delight, 1 ridge (= 2 rows) Alpaca *, repeat from *-*. NOTE: Make sure that the strands always are on WS of piece. TIP FOR CHANGING YARN: To make the colour transitions in Delight pretty when switching ball, it is important to find a ball that starts with the same colour last ball ended with. BUTTONHOLES: Dec for buttonholes on right front piece from RS. 1 buttonhole = K tog 3rd and 4th st from mid front, then make 1 YO. Dec for buttonholes when piece measures: SIZE S: 7, 13, 19, 25, 31 and 37 cm. SIZE M: 10, 16, 22, 28, 34 and 40 cm. SIZE L: 7, 14, 21, 28, 35 and 42 cm. SIZE XL: 10, 16, 22, 28, 34, 40 and 46 cm SIZE XXL: 7, 14, 21, 28, 35, 42 and 49 cm SIZE XXXL: 11, 18, 25, 32, 39, 46 and 53 cm ---------------------------------------------------------- JACKET: Worked in 4 parts, left and right back piece are sewn tog mid back when finished. LEFT BACK PIECE: Worked back and forth on needle. Cast on 44-48-52-56-64-68 sts on circular needle size 4 mm with Delight. Work in STRIPES - see explanation above. When piece measures 7-7-7-8-7-8 cm, continue with stripes (adjust so that last row is from WS and that next stripe is with Alpaca) AT THE SAME TIME continue as follows: Section 5 SHORT ROWS: Row 1: Work until 2 st remains, turn piece. Row 2: Work back. Row 3: Work back but do not work the last 4 sts, turn piece. Row 4: Work back. Continue like this by working 2 sts less for every other row until the last 2 sts on row have been worked back and forth. Work one ridge in garter st over all sts. Section 6 READ ALL OF THE FOLLOWING SECTION BEFORE CONTINUING – WORK SHORT ROWS AND DEC AT THE SAME TIME. Row 1: Slip the first 2 sts loosely over on to right needle, pull yarn behind the 2 sts, work the remaining sts on row, turn piece. Row 2: Work back but do not work the last 2 sts, turn piece. Row 3: Slip the first 2 sts loosely over on to right needle, pull yarn behind the 2 sts, work the remaining sts on row, turn piece. Row 4: Work back but do not work the last 4 sts, turn piece. Continue like this with 2 sts less for every other row until 2 sts remain on left needle. DECREASE: Dec at the end of every row from RS with Delight (NOTE: Do not dec on first stripe with Delight in all sizes. In size S and XXL K tog the first 2 sts on last stripe with short rows so that 2 sts remain on row and in size L do not dec on last stripe with Delight) by K tog the last 2 sts until there are 36-40-44-46-52-56 sts on row (= 8-8-8-10-12-12 sts dec). Section 7 READ ALL OF THE FOLLOWING SECTION BEFORE CONTINUING – WORK SHORT ROWS AND INC AT THE SAME TIME. The first 34-38-42-44-50-54 sts are on the right needle. Then work as follows: Row 1: Work 2 sts, turn piece. Row 2: Work back over the 2 sts. Row 3: Slip 2 sts from right needle over on needle, work the 4 sts, turn piece. Row 4: Work back over the 4 sts. Continue like this with 2 sts more for every other row until all sts have been slipped on to same needle and 1 ridge has been worked over all sts. INCREASE: Inc at the end of every row from RS with Delight (NOTE: Inc the same way as dec. Do not inc on first stripe with Delight in all sizes. In size L do not inc on last stripe Delight) by working 2 sts in the last st until there are 44-48-52-56-64-68 sts on needle (= 8-8-8-10-12-12 sts inc). Section 8 Row 1: Work the first 2 sts, turn piece. Row 2: Work back over these 2 sts, turn piece. Row 3: Work the first 4 sts, turn piece. Row 4: Work back over these 4 sts, turn piece. Continue like this with 2 sts more for every other row - repeat until 1 ridge has been worked over all sts. Now work stripes over all sts until finished measurements. Work until piece measures 34-36-38-41-44-47 cm. Then inc for sleeve at the end of every row from RS in the left side of piece (seen from RS) as follows: Inc 1 st 0-1-2-3-3-1 time, then 2 sts 5-4-3-2-0-0 times. On next row from RS, inc 5-4-3-2-0-0 sts = 59-61-63-65-67-69 sts on needle. NOTE! Shorter measurements in the larger sizes because of wider shoulders. When piece measures 48-51-54-58-62-66 cm, cast off for neck at the beg of first row from RS in right side of piece (seen from RS) as follows: Cast off 17-17-18-18-19-19 sts = 42-44-45-47-48-50 sts remain on needle, then on next row from RS cast off 1 st = 41-43-44-46-47-49 sts remain on needle. Cast off when piece measures 50-53-56-60-64-68 cm. RIGHT BACK PIECE: TIP FOR CHANGING YARN - above. Work as left back piece but reversed. Inc for sleeve in right side of piece (seen from RS). Cast off for neck in left side of piece (seen from RS). Work short rows as follows: Section 1 Row 1: Slip the first 2 sts loosely over on to right needle, pull yarn behind the 2 sts, work the remaining sts on row, turn piece. Row 2: Work back but do not work the last 2 sts, turn piece. Row 3: Slip the first 2 sts loosely over on to right needle, pull yarn behind the 2 sts, work the remaining sts on row, turn piece. Row 4: Work back but do not work the last 4 sts, turn piece. Continue like this by working 2 sts less for every other row until 2 rows have been worked over the last 2 sts. Cut the yarn. Then work 1 ridge over all sts with 1st row = RS. Section 2 READ ALL OF THE FOLLOWING SECTION BEFORE CONTINUING – WORK SHORT ROWS AND DEC AT THE SAME TIME. SHORT ROWS: Row 1: Work until 2 st remains, turn piece. Row 2: Work back. Row 3: Work back but do not work the last 4 sts, turn piece. Row 4: Work back. Continue like this with 2 sts less for every other row until 2 sts remain on right needle. DECREASE: Dec at the beg of every row from RS with Delight (NOTE: Do not dec on first stripe with Delight in all sizes. In size S and XXL K tog the first 2 sts on last stripe with short rows so that 2 sts remain on row and in size L do not dec on last stripe with Delight) by K tog the last 2 sts until there are 36-40-44-46-52-56 sts on row (= 8-8-8-10-12-12 sts dec). Section 3 READ ALL OF THE FOLLOWING SECTION BEFORE CONTINUING – WORK SHORT ROWS AND INC AT THE SAME TIME. SHORT ROWS: Row 1: Work the first 2 sts, turn piece. Row 2: Work back over these 2 sts, turn piece. Row 3: Work the first 4 sts, turn piece. Row 4: Work back over these 4 sts, turn piece. Continue like this with 2 sts more for every other row - repeat until 1 ridge has been worked over all sts. INCREASE: Inc at the beg of every row from RS with Delight (NOTE: Inc the same way as dec. Do not inc on first stripe with Delight in all sizes. In size L do not inc on last stripe Delight) by working 2 sts in the last st until there are 44-48-52-56-64-68 sts on needle (= 8-8-8-10-12-12 sts inc). Cut the yarn. Section 4 The first 34-38-42-44-50-54 sts are on the right needle. Then work as follows: Row 1 (= RS): Work 2 sts, turn piece. Row 2: Work back over the 2 sts. Row 3: Slip 2 sts from right needle over on needle, work the 4 sts, turn piece. Row 4: Work back over the 4 sts. Continue like this with 2 sts more for every other row until all sts have been slipped on to same needle and 1 ridge has been worked over all sts. LEFT FRONT PIECE: Cast on and work as right back piece. When piece measures 38-41-43-47-50-54 cm, cast off for neck at beg of every row from WS in left side of piece (seen from RS) as follows: Cast off 7 sts 1 time, then 2 sts 3 times, then 1 st 5-5-6-6-7-7 times = 41-43-44-46-47-49 sts remain on needle. AT THE SAME TIME inc for sleeve as on right back piece. Cast off when piece measures 50-53-56-60-64-68 cm. RIGHT FRONT PIECE: Cast on and work as left back piece but dec for BUTTONHOLES - see explanation above. When piece measures 38-41-43-47-50-54 cm, cast off for neck at beg of every row from RS in right side of piece (seen from RS) as follows: Cast off 7 sts 1 time, then 2 sts 3 times, then 1 st 5-5-6-6-7-7 times = 41-43-44-46-47-49 sts remain on needle. AT THE SAME TIME inc for sleeve as on left back piece. Cast off when piece measures 50-53-56-60-64-68 cm. ASSEMBLY: Sew right back piece to left back piece. Sew shoulder and side seams. Sew the buttons on to left front piece. |
||||
Diagram explanations |
||||
|
||||
 |
||||
Have you finished this pattern?Tag your pictures with #dropspattern #crossmyheartjacket or submit them to the #dropsfan gallery. Do you need help with this pattern?You'll find 19 tutorial videos, a Comments/Questions area and more by visiting the pattern on garnstudio.com. © 1982-2026 DROPS Design A/S. We reserve all rights. This document, including all its sub-sections, has copyrights. Read more about what you can do with our patterns at the bottom of each pattern on our site. |
||||


With over 40 years in knitting and crochet design, DROPS Design offers one of the most extensive collections of free patterns on the internet - translated to 17 languages. As of today we count 325 catalogues and 12298 patterns translated into English (UK/cm).
We work hard to bring you the best knitting and crochet have to offer, inspiration and advice as well as great quality yarns at incredible prices! Would you like to use our patterns for other than personal use? You can read what you are allowed to do in the Copyright text at the bottom of all our patterns. Happy crafting!
Post a comment to pattern DROPS 155-1
We would love to hear what you have to say about this pattern!
If you want to leave a question, please make sure you select the correct category in the form below, to speed up the answering process. Required fields are marked *.