
Popular categories
Looking for a yarn?


|
||||
Cross My Heart |
||||
 |
 |
|||
Knitted DROPS jacket in garter st with short sleeves, short rows and stripes in ”Delight” and ”Alpaca”. Size: S - XXXL.
DROPS 155-1 |
||||
|
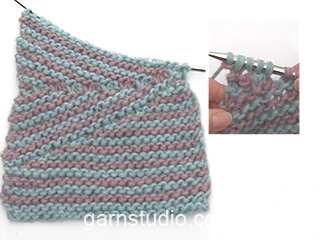
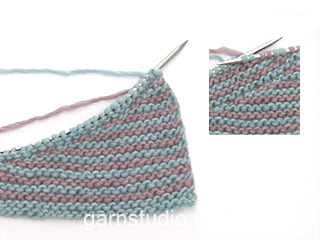
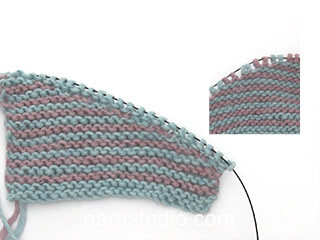
GARTER ST (back and forth on needle): K all rows. 1 ridge = 2 rows K. STRIPES: * 1 ridge in GARTER ST - see explanation above - (= 2 rows) Delight, 1 ridge (= 2 rows) Alpaca *, repeat from *-*. NOTE: Make sure that the strands always are on WS of piece. TIP FOR CHANGING YARN: To make the colour transitions in Delight pretty when switching ball, it is important to find a ball that starts with the same colour last ball ended with. BUTTONHOLES: Dec for buttonholes on right front piece from RS. 1 buttonhole = K tog 3rd and 4th st from mid front, then make 1 YO. Dec for buttonholes when piece measures: SIZE S: 7, 13, 19, 25, 31 and 37 cm. SIZE M: 10, 16, 22, 28, 34 and 40 cm. SIZE L: 7, 14, 21, 28, 35 and 42 cm. SIZE XL: 10, 16, 22, 28, 34, 40 and 46 cm SIZE XXL: 7, 14, 21, 28, 35, 42 and 49 cm SIZE XXXL: 11, 18, 25, 32, 39, 46 and 53 cm ---------------------------------------------------------- JACKET: Worked in 4 parts, left and right back piece are sewn tog mid back when finished. LEFT BACK PIECE: Worked back and forth on needle. Cast on 44-48-52-56-64-68 sts on circular needle size 4 mm with Delight. Work in STRIPES - see explanation above. When piece measures 7-7-7-8-7-8 cm, continue with stripes (adjust so that last row is from WS and that next stripe is with Alpaca) AT THE SAME TIME continue as follows: Section 5 SHORT ROWS: Row 1: Work until 2 st remains, turn piece. Row 2: Work back. Row 3: Work back but do not work the last 4 sts, turn piece. Row 4: Work back. Continue like this by working 2 sts less for every other row until the last 2 sts on row have been worked back and forth. Work one ridge in garter st over all sts. Section 6 READ ALL OF THE FOLLOWING SECTION BEFORE CONTINUING – WORK SHORT ROWS AND DEC AT THE SAME TIME. Row 1: Slip the first 2 sts loosely over on to right needle, pull yarn behind the 2 sts, work the remaining sts on row, turn piece. Row 2: Work back but do not work the last 2 sts, turn piece. Row 3: Slip the first 2 sts loosely over on to right needle, pull yarn behind the 2 sts, work the remaining sts on row, turn piece. Row 4: Work back but do not work the last 4 sts, turn piece. Continue like this with 2 sts less for every other row until 2 sts remain on left needle. DECREASE: Dec at the end of every row from RS with Delight (NOTE: Do not dec on first stripe with Delight in all sizes. In size S and XXL K tog the first 2 sts on last stripe with short rows so that 2 sts remain on row and in size L do not dec on last stripe with Delight) by K tog the last 2 sts until there are 36-40-44-46-52-56 sts on row (= 8-8-8-10-12-12 sts dec). Section 7 READ ALL OF THE FOLLOWING SECTION BEFORE CONTINUING – WORK SHORT ROWS AND INC AT THE SAME TIME. The first 34-38-42-44-50-54 sts are on the right needle. Then work as follows: Row 1: Work 2 sts, turn piece. Row 2: Work back over the 2 sts. Row 3: Slip 2 sts from right needle over on needle, work the 4 sts, turn piece. Row 4: Work back over the 4 sts. Continue like this with 2 sts more for every other row until all sts have been slipped on to same needle and 1 ridge has been worked over all sts. INCREASE: Inc at the end of every row from RS with Delight (NOTE: Inc the same way as dec. Do not inc on first stripe with Delight in all sizes. In size L do not inc on last stripe Delight) by working 2 sts in the last st until there are 44-48-52-56-64-68 sts on needle (= 8-8-8-10-12-12 sts inc). Section 8 Row 1: Work the first 2 sts, turn piece. Row 2: Work back over these 2 sts, turn piece. Row 3: Work the first 4 sts, turn piece. Row 4: Work back over these 4 sts, turn piece. Continue like this with 2 sts more for every other row - repeat until 1 ridge has been worked over all sts. Now work stripes over all sts until finished measurements. Work until piece measures 34-36-38-41-44-47 cm. Then inc for sleeve at the end of every row from RS in the left side of piece (seen from RS) as follows: Inc 1 st 0-1-2-3-3-1 time, then 2 sts 5-4-3-2-0-0 times. On next row from RS, inc 5-4-3-2-0-0 sts = 59-61-63-65-67-69 sts on needle. NOTE! Shorter measurements in the larger sizes because of wider shoulders. When piece measures 48-51-54-58-62-66 cm, cast off for neck at the beg of first row from RS in right side of piece (seen from RS) as follows: Cast off 17-17-18-18-19-19 sts = 42-44-45-47-48-50 sts remain on needle, then on next row from RS cast off 1 st = 41-43-44-46-47-49 sts remain on needle. Cast off when piece measures 50-53-56-60-64-68 cm. RIGHT BACK PIECE: TIP FOR CHANGING YARN - above. Work as left back piece but reversed. Inc for sleeve in right side of piece (seen from RS). Cast off for neck in left side of piece (seen from RS). Work short rows as follows: Section 1 Row 1: Slip the first 2 sts loosely over on to right needle, pull yarn behind the 2 sts, work the remaining sts on row, turn piece. Row 2: Work back but do not work the last 2 sts, turn piece. Row 3: Slip the first 2 sts loosely over on to right needle, pull yarn behind the 2 sts, work the remaining sts on row, turn piece. Row 4: Work back but do not work the last 4 sts, turn piece. Continue like this by working 2 sts less for every other row until 2 rows have been worked over the last 2 sts. Cut the yarn. Then work 1 ridge over all sts with 1st row = RS. Section 2 READ ALL OF THE FOLLOWING SECTION BEFORE CONTINUING – WORK SHORT ROWS AND DEC AT THE SAME TIME. SHORT ROWS: Row 1: Work until 2 st remains, turn piece. Row 2: Work back. Row 3: Work back but do not work the last 4 sts, turn piece. Row 4: Work back. Continue like this with 2 sts less for every other row until 2 sts remain on right needle. DECREASE: Dec at the beg of every row from RS with Delight (NOTE: Do not dec on first stripe with Delight in all sizes. In size S and XXL K tog the first 2 sts on last stripe with short rows so that 2 sts remain on row and in size L do not dec on last stripe with Delight) by K tog the last 2 sts until there are 36-40-44-46-52-56 sts on row (= 8-8-8-10-12-12 sts dec). Section 3 READ ALL OF THE FOLLOWING SECTION BEFORE CONTINUING – WORK SHORT ROWS AND INC AT THE SAME TIME. SHORT ROWS: Row 1: Work the first 2 sts, turn piece. Row 2: Work back over these 2 sts, turn piece. Row 3: Work the first 4 sts, turn piece. Row 4: Work back over these 4 sts, turn piece. Continue like this with 2 sts more for every other row - repeat until 1 ridge has been worked over all sts. INCREASE: Inc at the beg of every row from RS with Delight (NOTE: Inc the same way as dec. Do not inc on first stripe with Delight in all sizes. In size L do not inc on last stripe Delight) by working 2 sts in the last st until there are 44-48-52-56-64-68 sts on needle (= 8-8-8-10-12-12 sts inc). Cut the yarn. Section 4 The first 34-38-42-44-50-54 sts are on the right needle. Then work as follows: Row 1 (= RS): Work 2 sts, turn piece. Row 2: Work back over the 2 sts. Row 3: Slip 2 sts from right needle over on needle, work the 4 sts, turn piece. Row 4: Work back over the 4 sts. Continue like this with 2 sts more for every other row until all sts have been slipped on to same needle and 1 ridge has been worked over all sts. LEFT FRONT PIECE: Cast on and work as right back piece. When piece measures 38-41-43-47-50-54 cm, cast off for neck at beg of every row from WS in left side of piece (seen from RS) as follows: Cast off 7 sts 1 time, then 2 sts 3 times, then 1 st 5-5-6-6-7-7 times = 41-43-44-46-47-49 sts remain on needle. AT THE SAME TIME inc for sleeve as on right back piece. Cast off when piece measures 50-53-56-60-64-68 cm. RIGHT FRONT PIECE: Cast on and work as left back piece but dec for BUTTONHOLES - see explanation above. When piece measures 38-41-43-47-50-54 cm, cast off for neck at beg of every row from RS in right side of piece (seen from RS) as follows: Cast off 7 sts 1 time, then 2 sts 3 times, then 1 st 5-5-6-6-7-7 times = 41-43-44-46-47-49 sts remain on needle. AT THE SAME TIME inc for sleeve as on left back piece. Cast off when piece measures 50-53-56-60-64-68 cm. ASSEMBLY: Sew right back piece to left back piece. Sew shoulder and side seams. Sew the buttons on to left front piece. |
||||
Diagram explanations |
||||
|
||||

|
||||
|
Have you made this or any other of our designs? Tag your pictures in social media with #dropsdesign so we can see them! Do you need help with this pattern?You'll find tutorial videos, a Comments/Questions area and more by visiting the pattern on garnstudio.com. © 1982-2024 DROPS Design A/S. We reserve all rights. This document, including all its sub-sections, has copyrights. Read more about what you can do with our patterns at the bottom of each pattern on our site. |
||||


With over 40 years in knitting and crochet design, DROPS Design offers one of the most extensive collections of free patterns on the internet - translated to 17 languages. As of today we count 304 catalogues and 11422 patterns - 11422 of which are translated into English (UK/cm).
We work hard to bring you the best knitting and crochet have to offer, inspiration and advice as well as great quality yarns at incredible prices! Would you like to use our patterns for other than personal use? You can read what you are allowed to do in the Copyright text at the bottom of all our patterns. Happy crafting!
Comments / Questions (359)
Bonjour et merci pour ce beau modèle très ludique à tricoter ! Il me semble que la section 4 comporte une erreur. Pour la taille L par exemple, il est indiqué que 42 m sont sur l'aiguille droite et que je dois tricoter sur l'endroit 2 m - sur l'aiguille gauche donc. Or, la section 3 comporte des augmentations, je débute donc le travail avec 52 m et non pas 44, je devrais donc avoir 50 m sur mon aiguille droite et 2 m sur mon aiguille gauche. N'est-ce pas plutôt ainsi ?Cordialement
23.02.2016 - 19:53DROPS Design answered:
Bonjour Nathalie H, votre question a été soumise à nos stylistes, merci d'avance pour votre patience.
24.02.2016 - 10:06Vous auriez noté les n° des sections sur le schéma ça m'aurait permis de mieux visualiser le travail. Je l'ai commencé et les réponses aux commentaires vont m'aider
16.02.2016 - 20:00Bedankt Dropsdesign. :-)
23.10.2015 - 22:55De voorpanden hebben hetzelfde patroon als de achterpanden. Omdat de voorkant knopen en hierdoor een overslag heeft, zouden de voorpanden breder moeten zijn de achterpanden? Klopt dit? Vr.Gr.
16.10.2015 - 20:45DROPS Design answered:
Hoi Marije. Het patroon klopt, de overslag is vrij klein en het model moet ook redelijk strak zitten. Kijk ook eventueel bij de projecten op Ravelry hier
23.10.2015 - 13:40Bonjour, je suis au même niveau que madame Mocquart, je suis les explications mais cela fait des trous "énormes". De plus faut-il vraiment tricoter les 2 premières mailles restées sur l'aiguille gauche ? Merci
18.06.2015 - 08:32DROPS Design answered:
Bonjour Aurélie B, la vidéo ci-dessous pourra probablement vous aider - adaptez votre tension pour éviter de gros trous, serrez le fil mais pas trop. Bon tricot!
18.06.2015 - 09:04Bonjour, j'ai commencé le 1/2 dos gauche et je reste bloquée par la 2ème partie de rgs raccourcis ( en fait le retour) partie 3 de l'explication pour que les lignes se rejoignent et forme au visuel "une pince". J'ai cherché dans les vidéos mais je n'en ai trouvé aucune qui présente les rgs raccourcis dans le sens gauche-> droite et surtout que cela fasse des lignes. J'espère m'être exprimé correctement mais c'est pas facile. D'avance merci. Et félicitations pour vos modèles.
30.05.2015 - 12:57DROPS Design answered:
Bonjour Mme Mocquard, passez souplement le fil derrière les mailles en veillant à ne pas trop serrer pour continuer les rangs raccourcis. Bon tricot!
30.05.2015 - 14:51Bonjour Je ne comprends pas la section 6. Comment diminue-t-on? En faisant les rangs raccourcis simplement ou bien hormis les explications pour les tailles S , XXL doit-on tricoter ensemble des mailles à la fin des rangs en delight?
29.04.2015 - 08:20DROPS Design answered:
Bonjour Sylvie, dans la section 6, on diminue 1 m à la fin de chaque rang endroit en Delight avec 2 m ens à l'end SAUF au 1er rang raccourci en Delight pour toutes les tailles. En taille L, on ne diminue pas au dernier rang raccourci en Delight. Bon tricot!
29.04.2015 - 09:49Bij het minderen en verkorte toeren breien bij het rechter achterpand, gaat het bij mij mis. Naarmate ik vorder ziet de rechter kant van het werk er uit als de verkeerde kant en andersom. Wat doe ik verkeerd?
04.04.2015 - 15:38DROPS Design answered:
Helaas kunnen we daar op afstand niet goed over oordelen. U kunt de video's bekijken bij het patroon (tabblad video's) over het meerderen en de verkorte toeren of met uw werk naar een Drops verkooppunt gaan.
04.04.2015 - 19:45Hej.vilken stl ska Jeg välge,Jeg måleri 104 i brystmål.tack
28.01.2015 - 01:43DROPS Design answered:
Du finder målen nederst i opskriften. Str L måler 106 cm i brystmål. God fornøjele!
28.01.2015 - 10:50How can I print out just the pattern? It doesn't print, just takes me to a page that says continue to pattern. Then goes back to pattern page and does nothing. If I print another way, it prints everything on page including all the countries. I don't want all of this info, only the pattern and the picture. Thanks
21.12.2014 - 23:52DROPS Design answered:
Hi Ellen, does this link not open for you? https://www.garnstudio.com/lang/no/includes/pattern-print.php?id=6447
22.12.2014 - 07:56