
Popular categories
Looking for a yarn?


Comments / Questions (35)
![]() Carole JOUSSEINS wrote:
Carole JOUSSEINS wrote:
Bonjour, je suis débutante, est il possible de réaliser ce modèle avec des aiguilles droites? Merci.
30.04.2014 - 14:11DROPS Design answered:
Bonjour Mme Jousseins, chaque pièce se tricote ici en allers et retours sur aiguille circulaire pour avoir suffisamment de place pour y loger toutes les mailles, vous pouvez donc tricoter sur aiguilles droites, vos mailles seront plus serrées, pensez à bien conserver la bonne tension (pour le col, cousez 1 seule épaule avant de relever les mailles, puis faites la couture de la 2ème épaule et du col)- ou pensez à consulter nos vidéos pour apprendre à utiliser les aiguilles circulaire. Bon tricot!
30.04.2014 - 15:10
![]() Monica wrote:
Monica wrote:
Grazie mille!
18.01.2014 - 12:51
![]() Monica wrote:
Monica wrote:
Salve, sto provando a realizzare questo modello ma non riesco a capire bene che cosa devo fare precisamente quando arrivo ad intrecciare per il collo sul davanti del lavoro, in particolare, dopo la messa in attesa delle 10 maglie per il collo che cosa significa lavorare "2 maglie una volta e una maglia due volte"?come si fa? e questo lo devo fare per quanti ferri (per ogni spalla)?
16.01.2014 - 17:26DROPS Design answered:
Buonasera Monica, quando ha messo in sospeso le 10 m per il collo, deve lavorare le 2 spalle in modo separato; su ogni spalla deve intrecciare delle m verso il collo per completare la scollatura, sul 1° f deve intrecciare 2 m, sul 2° e 3° f una m sempre verso il collo, da ripetere su entrambe le spalle. Ci riscriva se non è chiaro. Buon lavoro!!
16.01.2014 - 18:15
![]() Susan England wrote:
Susan England wrote:
I have just started to knit this and on reading I can find no instructions for the neck/collar. Can you help?
12.12.2013 - 16:21DROPS Design answered:
Dear Mrs England, you'll find instructions for collar at the very end of the pattern. Happy knitting!
12.12.2013 - 20:48
![]() Hanna Fenner wrote:
Hanna Fenner wrote:
Ich würde gerne den Pullover Lighthouse in Grösse M stricken. Leider kann ich nicht entdecken wieviel Wolle bzw. Knäule dafür benötige. Danke Hanna Fenne r
24.11.2013 - 22:53DROPS Design answered:
Liebe Hanna, für Grösse M gilt die 2. Angabe, Sie benötigen also 800 g.
25.11.2013 - 08:30
![]() Hanneke Triebel wrote:
Hanneke Triebel wrote:
Ik draag maat 48/50 in welke maat moet ik dit model breien?
23.09.2013 - 04:42DROPS Design answered:
Hoi Hanneke. Onderaan het patroon vind je de maattekening met de afmetingen in cm per maat. Vergelijk deze met je eigen afmetingen om de goede maat te kiezen.
24.09.2013 - 10:38
![]() Gunnel wrote:
Gunnel wrote:
Ser väldigt mjuk och sjön ut
13.06.2013 - 14:28
![]() Marine wrote:
Marine wrote:
Modèle facile et on peut en faire plus !!!!!
12.06.2013 - 14:12
![]() Tatjana wrote:
Tatjana wrote:
Facile da realizzare. Molto bello per l'inverno.
10.06.2013 - 20:03
![]() Antje wrote:
Antje wrote:
TOLLE farbe!! Freu' mich schon auf die Kuschelzeit.
10.06.2013 - 13:47
|
|
Lighthouse#lighthousesweater |
|
|
|
|
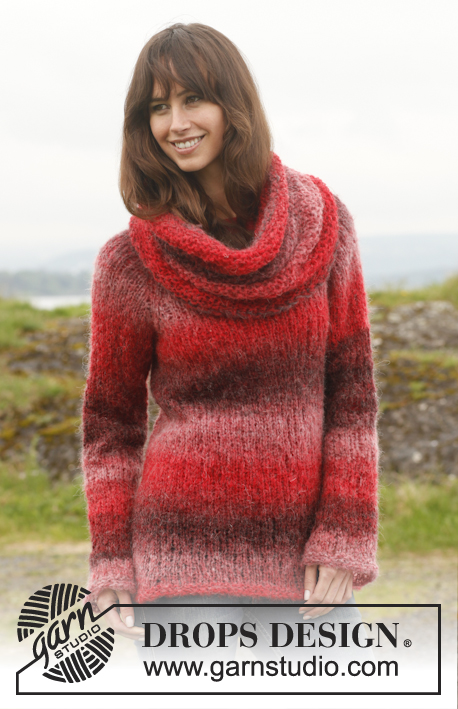
Knitted DROPS jumper in garter st with high collar in ”Snow”. Size: S - XXXL.
DROPS 150-53 |
|
|
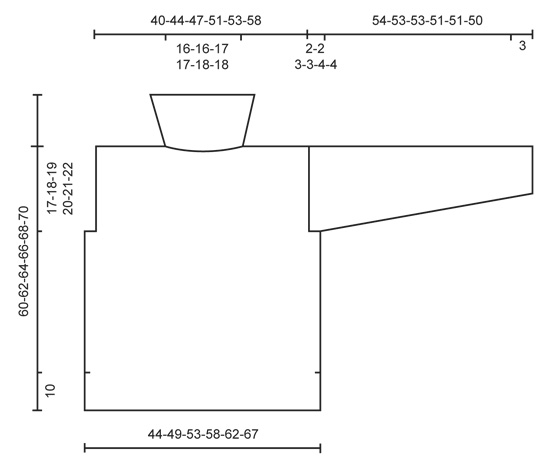
GARTER ST (back and forth on needle): K all rows. 1 ridge = 2 rows K. GARTER ST (in the round on circular needle): * K 1 round and P 1 round *, repeat from *-*. 1 ridge = 2 rounds. MEASURING TIP: Because of the weight of the yarn all measurements must be done by holding the piece up otherwise the garment will be too long when worn. INCREASE TIP: Inc 1 st in the side by working 2 sts in the first and last st on needle. ---------------------------------------------------------- BACK PIECE: Worked back and forth on circular needle. Loosely cast on 48-54-58-64-68-74 sts on circular needle size 8 mm with Snow. Work in GARTER ST - see explanation above. When piece measures 10 cm, insert 1 marker in each side (marks height of vent). REMEMBER THE KNITTING TENSION! When piece 12 cm - READ MEASURING TIP, work stripes in garter st and in stocking st (with 1 edge st in garter st in each side) as follows: Work 5 cm in stocking st, 6-6-6-7-7-7 cm in garter st, 3 cm in stocking st, 3 cm in garter st, 5 cm in stocking st. Continue in garter st. When piece measures 43-44-45-46-47-48 cm, cast off 2-3-3-4-5-5 sts at beg of the next two rows for armholes = 44-48-52-56-58-64 sts. Continue in garter st. When piece measures 58-60-62-64-66-68 cm, cast off the middle 16-16-18-18-18-18 sts for neck and finish each shoulder separately. Continue to cast off 1 st on next row from neck = 13-15-16-18-19-22 sts remain on the shoulder. Cast off when piece measures 60-62-64-66-68-70 cm. FRONT PIECE: Cast on and work as back piece. Cast off for armhole as on back piece and continue until piece measures 55-57-58-60-61-63 cm. Slip the middle 10-10-12-12-12-12 sts on a stitch holder for neck and finish each shoulder separately. Then cast off on every row from neck as follows: 2 sts 1 time, 1 st 2 times = 13-15-16-18-19-22 sts remain on shoulder. Cast off when piece measures 60-62-64-66-68-70 cm. SLEEVE: Worked back and forth on circular needle. Cast on 25-26-28-28-29-30 sts on circular needle size 7 mm with Snow. Work 3 cm in garter st - see explanation above. Switch to circular needle size 8 mm and work in stocking st. When piece measures 8 cm, inc 1 st in each side - READ INCREASE TIP! Repeat inc every 8-6½-6½-5-4-4 cm 5-6-6-7-8-8 more times (= 6-7-7-8-9-9 inc in total) = 37-40-42-44-47-48 sts. When piece measures 52-51-50-48-47-46 cm, insert 1 marker in each side (marks where to sew in sleeve in body). Continue to work until piece measures 54-53-53-51-51-50 cm and loosely cast off. ASSEMBLY: Sew the shoulder seams. Sew sleeves in body. Marks on sleeve should fit towards the side of body. Sew underarm seams and sides in one. Sew seams in front loop of outermost st but leave approx. 10 cm for vent in each side at the bottom. COLLAR: Beg mid back and pick up approx. 70 to 80 sts around the neck (incl sts on stitch holder at the front) on circular needle size 7 mm with Snow. Work in garter st in the round - see explanation above - until collar measures approx. 16-16-17-17-18-18 cm. LOOSELY cast off. |
|
 |
|
Have you finished this pattern?Tag your pictures with #dropspattern #lighthousesweater or submit them to the #dropsfan gallery. Do you need help with this pattern?You'll find 19 tutorial videos, a Comments/Questions area and more by visiting the pattern on garnstudio.com. © 1982-2026 DROPS Design A/S. We reserve all rights. This document, including all its sub-sections, has copyrights. Read more about what you can do with our patterns at the bottom of each pattern on our site. |


With over 40 years in knitting and crochet design, DROPS Design offers one of the most extensive collections of free patterns on the internet - translated to 17 languages. As of today we count 324 catalogues and 12290 patterns translated into English (UK/cm).
We work hard to bring you the best knitting and crochet have to offer, inspiration and advice as well as great quality yarns at incredible prices! Would you like to use our patterns for other than personal use? You can read what you are allowed to do in the Copyright text at the bottom of all our patterns. Happy crafting!
Post a comment to pattern DROPS 150-53
We would love to hear what you have to say about this pattern!
If you want to leave a question, please make sure you select the correct category in the form below, to speed up the answering process. Required fields are marked *.