
Popular categories
Looking for a yarn?


Comments / Questions (135)
![]() Shiravila wrote:
Shiravila wrote:
Ok I cant understand the front piece part, do I have to increase in row 1before marker and decrease in the end of the row 1?? What about the row 2 I start with decreasing how im going to increase in the mark stitch?? Im confused
12.04.2015 - 23:20DROPS Design answered:
Dear Shiravila, when working front piece you will inc 1 st at each marker (2 inc per row) alternately before and after the markers and at the same time decrease according to "Decrease tip 1" each side of front piece. So every row you will decrease at the beg and end of row and increase at each marker. Happy crocheting!
13.04.2015 - 09:45
![]() Marijke wrote:
Marijke wrote:
Bedankt! Ik snap het, ik zie het nu voor me als bij een naai- of breipatroon.
29.03.2015 - 21:10
![]() Marijke wrote:
Marijke wrote:
Dank voor de tips begin maart; het is gelukt. Nu heb ik een vraag over de mouwen. Gezien het aantal lossen waarmee je begint, krijg ik de indruk dat iedere mouw uit 2 helften in de lengte bestaat. Want met een mouwkop van 22 stokjes krijg ik het armsgat niet gevuld. Klopt dat? Dus 2 naden per mouw? Vriendelijk gegroet, Marijke
29.03.2015 - 17:43DROPS Design answered:
U begint met de mouwkop, dus de 22 stk is alleen de bovenkant van de mouwkop. Als u het patroon verder volgt krijgt u een ronde mouwkop die in het armsgat past. Succes!
29.03.2015 - 20:07
![]() Marie wrote:
Marie wrote:
Je ne comprends pas les diminutions pour le devant. Comment crocheter en B jusqu'a ce qu'il reste 3 B, etc. Merci pour plus de precisions. Je suis bloquee a ce niveau.
08.03.2015 - 05:52DROPS Design answered:
Bonjour Marie, chaque devant se crochète de chaque côté des 30-42 B en haut et en bas du dos (placez un marqueur si nécessaire pour délimiter le 1er rang), vous diminuez ensuite comme indiqué sous "Diminutions 1": vous crochetez le 1er rang du 1er devant sur les mailles que vous avez repérées jusqu'à ce qu'il reste 3 m et commencez les diminutions de *-*. Bon crochet!
09.03.2015 - 09:27
![]() Daniëlle wrote:
Daniëlle wrote:
Hallo, Ik vroeg me af of ik dit patroon ook zonder de mouwtjes zou kunnen maken. Of lijkt dat nergens naar? Groet Daniëlle
07.03.2015 - 00:44DROPS Design answered:
Hoi Daniëlle. Je kan dat wel proberen. Toch zou ik de armsgaten afsluiten met een mooi randje of zo. Kijk wat jij het mooiste vindt. Veel haakplezier.
12.03.2015 - 16:56
![]() Marijke wrote:
Marijke wrote:
Bij dit leuke patroon ben ik nu toe aan de voorpanden. Maat 3/5. Ik heb markeerders geplaatst links en rechts op 18 st boven en onder midden voor. Daar zitten dan 36 st tussen. Wat wordt bedoeld met 24 st tussen de markeerders? Tussen welke markeerders? Is er een tekening waar de markeerders op zijn aangegeven? Vriendelijke groet, Marijke
21.02.2015 - 18:01DROPS Design answered:
Hoi Marijke. Je hebt 180 st in totaal en 60 stk voor elk voorpand: 30 stk boven en 30 stk beneden. Je kan de voorpanden ook markeren met een draad of markeerder. De twee markeerders volgens het patroon komen in het voorpand: tel 18 stk van boven en 18 stk van beneden en plaats hier de markeerders. Je zou nu 24 stk hebben tussen deze 2 markeerders. Ik heb geen tekening, maar hoop dat het zo duidelijker is.
03.03.2015 - 13:52Jacky Weber wrote:
Hi, I'm making this beautiful cardigan for my grand daughter. I'm having trouble understanding the front sides. It says to increase at both ends and also do the decrease tip 1 but I can't end on a slip stitch and increase a dc into that stitch as well? If someone can explain this please. Thanks. Jacky.
26.01.2015 - 20:22DROPS Design answered:
Dear Mrs Weber, when working front piece, you first place 2 markers then inc 1 dc at each marker and at the same time dec at the end/beg of every row - so you will dec each side of front pieces and inc at each marker. Happy crocheting!
27.01.2015 - 09:54
![]() Maria wrote:
Maria wrote:
Maria 11.01.2015 kl. 23:40: Ställer frågan igen! Om jag vill virka koftan enfärgad, hur mycket garn behöver jag till storlek 6/8år?
19.01.2015 - 08:22DROPS Design answered:
Hei Maria. Det kan jeg desvaerre ikke hjaelpe dig med. Men gaa ud fra totalen i de naevnte farver i opskriften. Saa er du paa den sikre side!
19.01.2015 - 13:24
![]() Nina Bøjer wrote:
Nina Bøjer wrote:
Hjææælp! Jeg forstår virkelig ikke de forstykker :-( Kan ikke finde ud af, hvor det lige er de der markører skal sidde. Har sat nogen i så de 60 m i hver side ligesom er afgrænset, men den der, der skal sættes 18 m inde forstår jeg ikke hvor skal sidde eller hvordan jeg kommer videre :-( Håber virkelig I kan hjælpe mig :-)
12.01.2015 - 12:19DROPS Design answered:
Hej Nina. Du har 60 m til forstykket. Saa saetter du en markör 18 fra hver side. Dvs, du taeller 18 m ind oven paa forstykket og 18 m ind fra neden (forstykket er de 60 m). Du har saa 24 m i mellem de to markörer.
13.01.2015 - 13:49
![]() Maria wrote:
Maria wrote:
Ställer frågan igen! Om jag vill virka koftan enfärgad, hur mycket garn behöver jag till storlek 6/8år?
11.01.2015 - 23:40
|
|
Princess Petal#princesspetalcardigan |
|
 |
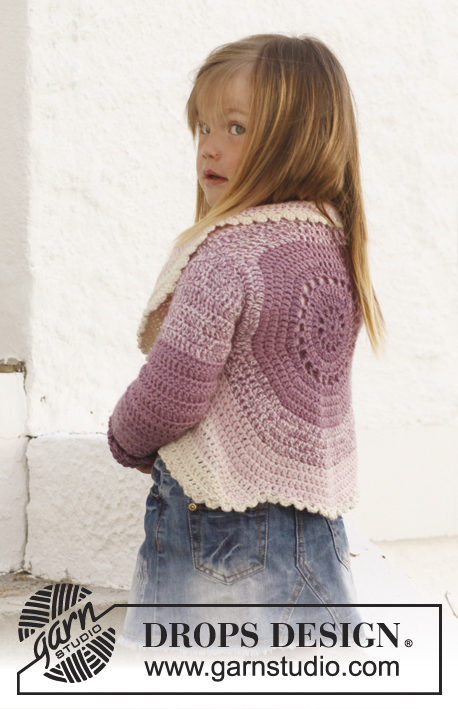 |
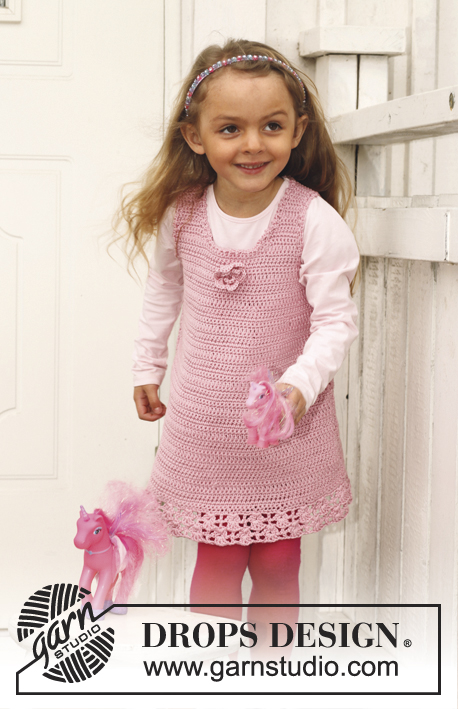
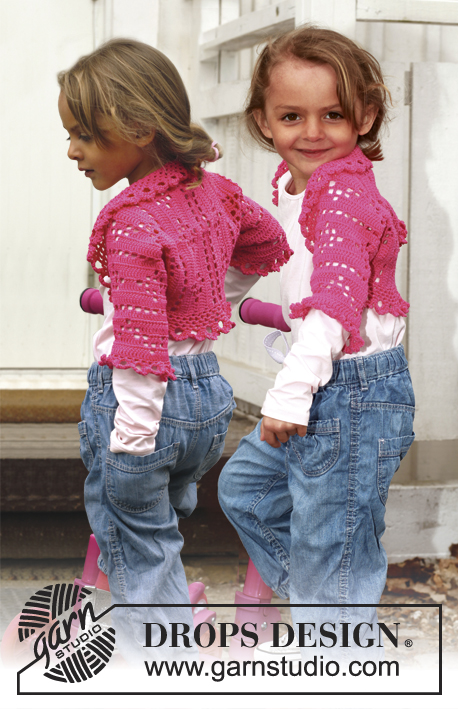
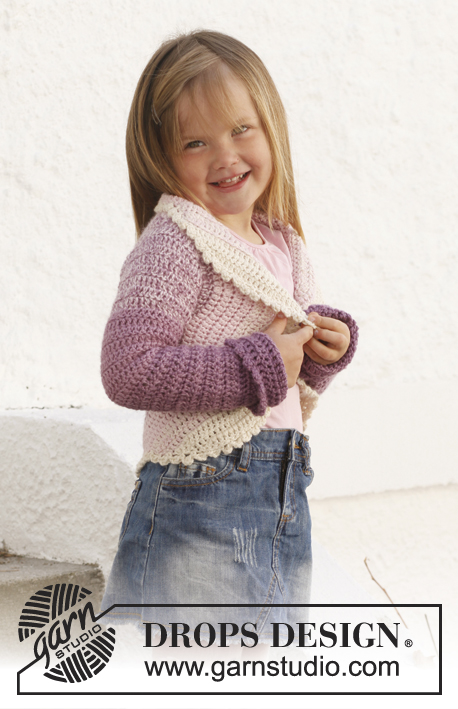
Circle jacket crocheted in 2 threads DROPS BabyAlpaca Silk. Size children 3 - 12 years.
DROPS Children 24-1 |
|
|
STRIPES - BODY: Worked in a circle from mid back. Beg with 2 strands of colour 4088. Continue as follows: 3-3-4-4 rounds with 2 strands of colour 4088. 3-3-4-4 rounds with 1 strand of colour 4088 + 1 strand of colour 3250. 3-4-4-4 rounds with 2 strands of colour 3250. 4-4-4-5 rounds with 1 strand of colour 3250 + 1 strand of colour 3125. 4-4-4-5 rounds with 2 strands of colour 3125. 3-4-4-4 rounds/rows with 1 strand of colour 3125 + 1 strand of colour 0100. 3-3-5-5 rows with 2 strands of colour 0100. STRIPES - SLEEVE: Worked from sleeve cap and down in stripes as follows: Beg with 1 strand of colour 3250 + 1 strand of colour 3125. Work 9-10-11-12 cm with this colour combination. Continue with 9-10-11-12 cm with 2 strands of colour 3250 and 10-10-11-12 cm with 1 strand of colour 4088 + 1 strand of colour 3250. Then finish the sleeve with 2 strands of colour 4088 = approx. 10-11-12-12 cm. CROCHET INFO: Replace first tr on every round/row with 3 ch. Finish every round with 1 sl st in 3rd ch from beg of round. DECREASE TIP 1 (applies to body): Dec as follows: Work tr until 3 tr remain, * in the first of these work 1 htr, in the next 1 dc and in the last 1 sl st, turn with 1 ch, skip sl st, work 1 sl st in dc, 1 dc in htr, 1 htr in first tr, continue with tr until 3 tr remain at the end of row *, repeat from *-* until 6-7-7-7 rows have been worked in total. DECREASE TIP 2 (applies to sleeves): Dec 1 tr at beg and end of row by working the second and third tr tog and the 2 next to last tr tog, this is done as follows: Work 1 tr in first tr but wait with last pull through, work 1 tr in next tr but on last pull through, pull thread through all 3 loops on hook. -------------------------------------------------------- BODY: Worked in the round in a circle from mid back with 2 strands and STRIPES – see explanation above. Crochet 5 ch on hook size 5 mm and form a ring with 1 sl st in first ch. READ CROCHET INFO! ROUND 1: 12 tr in ch-ring. ROUND 2: 1 tr, * 2 ch, 1 tr in next tr *, repeat from *-* the entire round, finish with 2 ch and 1 sl st in 1st tr = 12 tr with 2 ch between each. ROUND 3: 1 tr in every tr and 2 tr in every ch-space the entire round = 36 tr. ROUND 4: * 1 tr in each of the first 2 tr, 2 tr in next tr *, repeat from *-* the entire round = 48 tr. ROUND 5: 1 tr, * 2 ch, skip 1 tr, 1 tr in next tr *, repeat from *-* the entire round, finish with 2 ch and 1 sl st in 1st tr = 24 tr with 2 ch between each. ROUND 6: 1 tr in every tr and 2 tr in every ch-space the entire round = 72 tr. ROUND 7: Work 1 tr in every tr but in every 6th tr work 2 tr = 84 tr. ROUND 8: Work 1 tr in every tr but in every 7th tr work 2 tr = 96 tr. ROUND 9: Work 1 tr in every tr but in every 8th tr work 2 tr = 108 tr. ROUND 10: Work 1 tr in every tr but in every 9th tr work 2 tr = 120 tr. ROUND 11: Work 1 tr in every tr but in every 10th tr work 2 tr = 132 tr. Piece measures approx. 14 cm from centre and outwards. SIZE 3/5 YEARS: ROUND 12: Work 1 tr in each of the first 30 tr (= up towards neck), work 22 loose ch, skip the next 20 tr (= armhole), then work 1 tr in each of the next 62 tr (= down towards back), work 22 loose ch, skip the next 20 tr (= armhole) and fasten with 1 sl st in first tr at beg of round. ROUND 13: Work 1 tr in each of the first 30 tr but inc 2 tr evenly (= 32 tr), then work 22 tr in ch-row over armhole, work 1 tr in each of the next 62 tr but inc 2 tr evenly (= 64 tr), work 22 tr in ch-row over armhole, and fasten with 1 sl st in first tr at beg of round = 140 tr. ROUND 14 to 17: Continue with tr – at the same time inc 10 tr evenly on every round. After 17th round there are 180 tr on round and piece measures approx. 21 cm from centre and outwards. Fasten off. Then work only over 60 tr in each side - i.e. the 30 tr at the top by neck and the 30 tr at the bottom of back are no longer worked. Continue with explanation below front piece. SIZE 6/8 YEARS: ROUND 12: Work 1 tr in every tr but in every 11th tr work 2 tr = 144 tr. ROUND 13: Work 1 tr in each of the first 35 tr (= up towards neck), work 23 loose ch, skip the next 21 tr (= armhole), then work 1 tr in each of the next 67 tr (= down towards back), work 23 loose ch, skip the next 21 tr (= armhole) and fasten with 1 sl st in first tr at beg of round. ROUND 14: Work 1 tr in each of the first 35 tr but inc 3 tr evenly (= 38 tr), then work 23 tr in ch-row over armhole, work 1 tr in each of the next 67 tr but inc 3 tr evenly (= 70 tr), work 23 tr in ch-row over armhole, and fasten with 1 sl st in first tr at beg of round = 154 tr. ROUND 15 to 19: Continue with tr – at the same time inc 10 tr evenly on every round. After 19th round there are 204 tr on round and piece measures approx. 23 cm from centre and outwards. Fasten off. Then work only over 68 tr in each side - i.e. the 34 tr at the top by neck and the 34 tr at the bottom of back are no longer worked. Continue with explanation below front piece. SIZE 9/10 YEARS: ROUND 12: Work 1 tr in every tr but in every 11th tr work 2 tr = 144 tr. ROUND 13: Work 1 tr in every tr but in every 12th tr work 2 tr = 156 tr. ROUND 14: Work 1 tr in each of the first 38 tr (= up towards neck), work 25 loose ch, skip the next 23 tr (= armhole), then work 1 tr in each of the next 72 tr (= down towards back), work 25 loose ch, skip the next 23 tr (= armhole) and fasten with 1 sl st in first tr at beg of round. ROUND 15: Work 1 tr in each of the first 38 tr but inc 3 tr evenly (= 41 tr), then work 25 tr in ch-row over armhole, work 1 tr in each of the next 72 tr but inc 3 tr evenly (= 75 tr), work 25 tr in ch-row over armhole, and fasten with 1 sl st in first tr at beg of round = 166 tr. ROUND 16 to 21: Continue with tr – at the same time inc 10 tr evenly on every round. After 21st round there are 226 tr on round and piece measures approx. 26 cm from centre and outwards. Fasten off. Then work only over 74 tr in each side - i.e. the 39 tr at the top by neck and the 39 tr at the bottom of back are no longer worked. Continue with explanation below front piece. SIZE 11/12 YEARS: ROUND 12: Work 1 tr in every tr but in every 11th tr work 2 tr = 144 tr. ROUND 13: Work 1 tr in every tr but in every 12th tr work 2 tr = 156 tr. ROUND 14: Work 1 tr in every tr but in every 13th tr work 2 tr = 168 tr. ROUND 15: Work 1 tr in each of the first 42 tr (= up towards neck), work 27 loose ch, skip the next 25 tr (= armhole), then work 1 tr in each of the next 76 tr (= down towards back), work 27 loose ch, skip the next 25 tr (= armhole) and fasten with 1 sl st in first tr at beg of round. ROUND 16: Work 1 tr in each of the first 42 tr but inc 4 tr evenly (= 46 tr), then work 27 tr in ch-row over armhole, work 1 tr in each of the next 76 tr but inc 4 tr evenly (= 80 tr), work 27 tr in ch-row over armhole, and fasten with 1 sl st in first tr at beg of round = 180 tr. ROUND 17 to 23: Continue with tr – at the same time inc 10 tr evenly on every round. After 23rd round there are 250 tr on round and piece measures approx. 28 cm from centre and outwards. Fasten off. Then work only over 83 tr in each side - i.e. the 42 tr at the top by neck and the 42 tr at the bottom of back are no longer worked. Continue with explanation below front piece. LEFT FRONT PIECE - ALL SIZES: = 60-68-74-83 tr. Insert 1 marker after 18-20-22-24 sts in from each side (= 24-28-30-35 sts between markers). Then work stripes and tr back and forth while AT THE SAME TIME inc 1 st at each marker on every row (i.e. inc 2 tr on row - inc alternately before and after each marker outwards) until a total of 6-6-8-8 rows have been worked back and forth AT THE SAME TIME work according to DECREASE TIP 1. Fasten off. RIGHT FRONT PIECE: Work same way as on left front piece over 60-68-74-83 tr in right side. SLEEVE: Worked back and forth from sleeve cap and down - see STRIPES - SLEEVE above. Work 24-27-28-34 LOOSE ch with 1 strand of colour 3250 + 1 strand of colour 3125. ROW 1: Turn and work 1 tr in 4th ch from hook (the first 3 ch = 1 tr), then work 1 tr in every ch the entire row = 22-25-26-32 tr. Turn piece. ROW 2: Work 3 ch + 2 tr in first tr, 1 tr in every tr until last tr and 3 tr in last tr = 26-29-30-36 tr. Turn piece. ROW 3: Work 3 ch + 1 tr in first tr, 1 tr in every tr until 1 tr remains and 2 tr in last tr. Turn piece. Work 1-1-2-2 more rows as 3rd row = 30-33-36-42 tr. NEXT ROW: Work 3 ch + 2 tr in first tr, 1 tr in every tr until last tr and 3 tr in last tr = 34-37-40-46 tr. Turn piece. Now work 1 tr in every tr until piece measures 7-8-9-10 cm. Continue with tr while AT THE SAME TIME dec 1 tr in each side - SEE DECREASE TIP! Repeat dec every 8th-6th-5th-4th row 2-3-4-6 more times = 28-29-30-32 tr. Continue with 1 tr in every tr until sleeve measures 38-41-45-48 cm. Fasten off. ASSEMBLY: Sew sleeve seams edge to edge to avoid a chunky seam. Work 1 round around the entire body as follows with 2 strands of colour 0100: 1 sl st in first st, * 3 ch, 1 tr in first ch (= 1 picot), skip 1 tr, fasten with 1 dc in next st *, repeat from *-* the entire round and finish with 1 sl st in first sl st. Sew sleeves in body - make sure that sleeve cap is sewn in at the top of armholes, i.e. where the distance is shortest. Work an edge around the sleeves the same way as around body but with 2 strands of colour 4088. |
|
 |
|
Have you finished this pattern?Tag your pictures with #dropspattern #princesspetalcardigan or submit them to the #dropsfan gallery. Do you need help with this pattern?You'll find 8 tutorial videos, a Comments/Questions area and more by visiting the pattern on garnstudio.com. © 1982-2026 DROPS Design A/S. We reserve all rights. This document, including all its sub-sections, has copyrights. Read more about what you can do with our patterns at the bottom of each pattern on our site. |
|


With over 40 years in knitting and crochet design, DROPS Design offers one of the most extensive collections of free patterns on the internet - translated to 17 languages. As of today we count 324 catalogues and 12278 patterns translated into English (UK/cm).
We work hard to bring you the best knitting and crochet have to offer, inspiration and advice as well as great quality yarns at incredible prices! Would you like to use our patterns for other than personal use? You can read what you are allowed to do in the Copyright text at the bottom of all our patterns. Happy crafting!
Post a comment to pattern DROPS Children 24-1
We would love to hear what you have to say about this pattern!
If you want to leave a question, please make sure you select the correct category in the form below, to speed up the answering process. Required fields are marked *.