
Popular categories
Looking for a yarn?


Comments / Questions (32)
![]() Thüring Margrit wrote:
Thüring Margrit wrote:
Ich stricke das Modell Nr. li-001-bi in Grösse 7/8. Nach 27 cm 40 M stricken die letzten 2 gestrickten M auf eine Hilfsnadel legen, restliche 116 M stricken. Ab nun soll in Hin- und Rückreihen gestrickt werden beginnend in der vorderen Mitte. Wenn ich die 116 M gestrickt habe bin ich aber nicht bei den 2 stillgelegten Maschen. Könnten Sie mir bitte erklären wo mein Denkfehler ist. Vielen Dank und freundliche Grüsse
26.04.2026 - 18:11DROPS Design answered:
Liebe Frau Thüring, stricken Sie die ersten 40 Maschen und legen Sie die 2 letzten Maschen still = es sind noch 40-2=38 Maschen auf der Nadel, die restlichen 116 Maschen stricken (= es waren 156 Maschen - 40=116 Maschen). So sind es noch auf der Nadel: 116+38=154 Maschen Viel Spaß beim Stricken!
27.04.2026 - 13:18
![]() Mariagrazia wrote:
Mariagrazia wrote:
Salve, ho terminato il gilet seguendo le istruzioni, il risultato è bellissimo! Mi piacerebbe postare la foto, come posso fare? Grazie
26.08.2024 - 22:58DROPS Design answered:
Buonasera Mariagrazia, a questo link può trovare le istruzioni per condividere le foto. Buon lavoro!
29.08.2024 - 22:24
![]() Mariagrazia wrote:
Mariagrazia wrote:
Salve, nelle istruzioni DAVANTI &DIETRO è scritto: lavorare 34-36-40-42-46 m, mettere le ultime 2 m lavorate in attesa su un ferma maglie e lavorare le rimanenti 98-104-116-122-134 m. Vorrei sapere gentilmente quando devo riprendere le 2 maglie lavorate in attesa sul fermamaglie, forse sono le 2 maglie che devo intrecciare al giro successivo pet lo scollo a V? Molte grazie
20.07.2024 - 23:30DROPS Design answered:
Buongiorno Mariagrazia, queste 2 maglie vengono riprese durante la lavorazione del collo. Buon lavoro!
29.07.2024 - 15:49
![]() Mariagrazia wrote:
Mariagrazia wrote:
Nelle istruzioni DAVANTI & DIETRO è scritto: ALLO STESSO TEMPO, quando il lavoro misura 9-10-11-12-12 cm, lavorare 6-7-8-8-8 m dopo il segno al centro sul davanti. Vorrei capire cosa significa lavorare le 6-7 ecc. maglie dopo il segno al centro sul davanti, devo lavorare soltanto quel numero di maglie? Le altre maglie dopo il segno davanti non vanno lavorate? Grazie
18.07.2024 - 00:02DROPS Design answered:
Buongiorno Mariagrazia, esatto deve lavorare solo su quelle maglie e mettere le altre in sospeso. Buon lavoro!
18.07.2024 - 07:52
![]() Danièle Delahaie wrote:
Danièle Delahaie wrote:
Bonjour. Je recherche le modèle d'un pull jacquard avec un renard. J'ai l'image du tricot mais je ne sais pas la mettre ici . Merci par avance pour votre réponse.
07.03.2023 - 16:20DROPS Design answered:
Bonjour Mme Delahaie, voici notre pull jacquard avec renard: Little Fox; et retrouvez tous nos modèles avec un renard ici. Bon tricot!
07.03.2023 - 16:29
![]() Renette wrote:
Renette wrote:
Guten Tag, wo setze ich neu an für das rechte bzw. linke Vorderteil? Ist mit \"rechts\" von vorne aus gesehen gemeint? Wenn ich in der Mitte jeweils neu ansetze, stricke ich dann die Abnahmen für den V-Auschnitt ein Mal auf der linken Seite, damit die Abnahmen für die Armausschnitte gleich sind? Oder fange ich einmal an der Seite am und dann beim anderen Teil in der Mitte an und stricke ich bei einem Teil \"eine Reihe zu viel\" und nehme für den Armausschnitt auf der Rückreihe ab?
03.02.2023 - 07:39DROPS Design answered:
Liebe Renette, Sie können bei einer Hinreihe die Maschen von beiden Vorderteil (aber separat) stricken, dh an der Seite für das linke Vorderteil (dann nehmen Sie für Halsausschnitt am Ende einer Hinreihe ab) und in der Mitte für das rechte Vorderteil (dann nehmen Sie für Halsauschnitt am Anfang einer Hinreihe ab) - die Armausschnitt nicht vergessen. Viel Spaß beim stricken!
03.02.2023 - 08:44
![]() Renette wrote:
Renette wrote:
Guten Tag, ich stricke diese Anleitung auf einem Nadelspiel statt auf einer Rundnadel. Bei der Zunahme, die vor und hinter dem Markierungsfaden gemacht werden soll, habe nicht direkt vor und nach dem Markierungsfaden zugenommen sondern 1 Masche aus dem Querfaden herausgestrickt, 1 M gestrickt, dann kam der Rundenanfang (bzw. die Seite) und wieder 1 M gestr, 1 M aus dem Querfaden herausgstr, ist das schlimm? Die Zunahmen sind somit nicht direkt an den Seiten sondern um 1 M versetzt.
01.02.2023 - 09:12DROPS Design answered:
Liebe Renette, so stimmt es auch, das wichtigste ist, daß die Zunahmen beidseitig von den Markierungsfäden gearbeitet sind. Viel Spaß beim stricken!
01.02.2023 - 14:09
![]() Marie wrote:
Marie wrote:
Hallo, ich habe vor diese Anleitung in einer Größe zu stricken, die leider nicht aufgeführt ist. Ich möchte dieses Oberteil in Größe 176 stricken. Was ist dabei zu beachten, wenn ich die Anleitung für die genannte Größe (176) umrechnen möchte? Können Sie mir bitte behilflich sein? Vielen Dank für Ihre Mühe im voraus. Mit freundlichen Grüßen Marie
14.02.2021 - 20:36DROPS Design answered:
Liebe Marie, leider können wir jeder Anleitung nach jedem individuellen Frage anpassen und einzelne Modelle auf individuellen Wunsch hin umrechnen. Wenn sie Hilfe damit brauchen, wenden Sie sich bitte an dem Laden wo Sie die Wolle gekauft haben, dort hilft man Ihnen gerne weiter. Viel Spaß beim stricken!
15.02.2021 - 09:10
![]() Luciana Luciani wrote:
Luciana Luciani wrote:
Sto eseguendo il gilet per tg, 3 anni. Sono arrivata a 22 cm ho lavorato il ferro successivo come descritto 34 m mettere le ultime 2 m in attesa, proseguire per le rimanenti 98 m, ma a me ne risultano di più fino all'inizio del lavoro. Inoltre se torno indietro mi trovo delle maglie lavorate per metà un giro in più. Attendo ulteriore spiegazione grazie.
03.12.2020 - 12:41DROPS Design answered:
Buongiorno Luciana, nel passaggio precedente le maglie dovevano essere 132. Ha messo in sospeso le 16 maglie per la tasca e avviato 16 maglie? Buon lavoro!
03.12.2020 - 13:56
![]() Skopa Effi wrote:
Skopa Effi wrote:
I am knitting the 3/4 sise and my piece measures now 22 cm . The pattern says: work34 sts , slip 2 sts ... ,work 98 sts 34+2+98=134 sts I have only 132 sts in my needle .(148-28=120. 120+12=132 ) Where am I wrong ? Thank you in advance .
27.12.2019 - 10:56DROPS Design answered:
Dear Mrs Skoppa, work the 132 sts as follows from the beg of the round: work 34 stitches, slip the last 2 sts worked on a thread (mid front, will be worked later for the neck edge) (= there are now 32 sts on the needle) and work the next 98 sts = 98+32= 130 sts on needle. Happy knitting!
02.01.2020 - 11:23
|
|||||||
Paul#paulvest |
|||||||
 |
 |
||||||
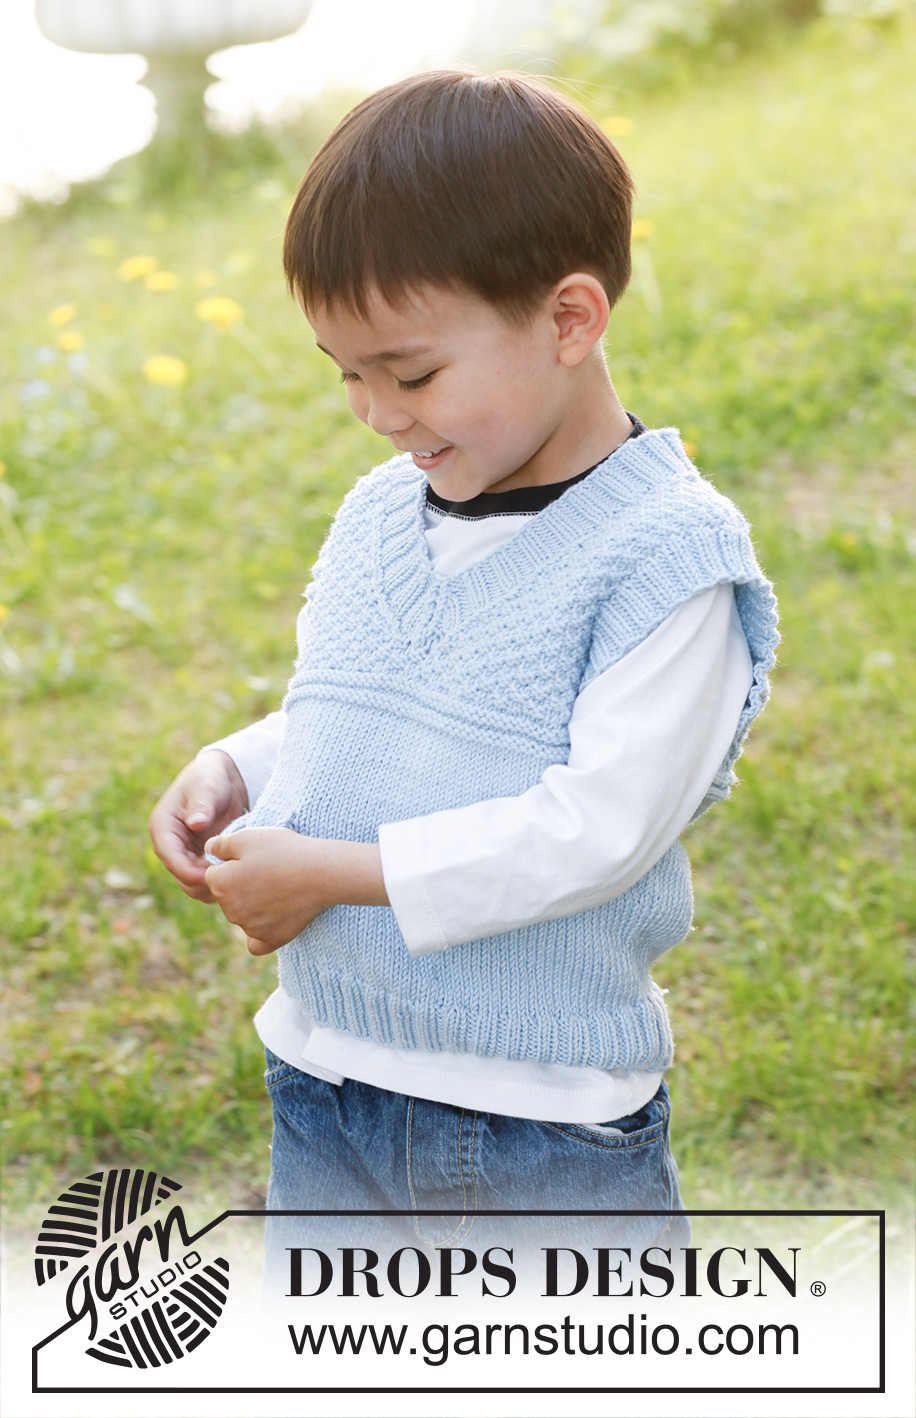
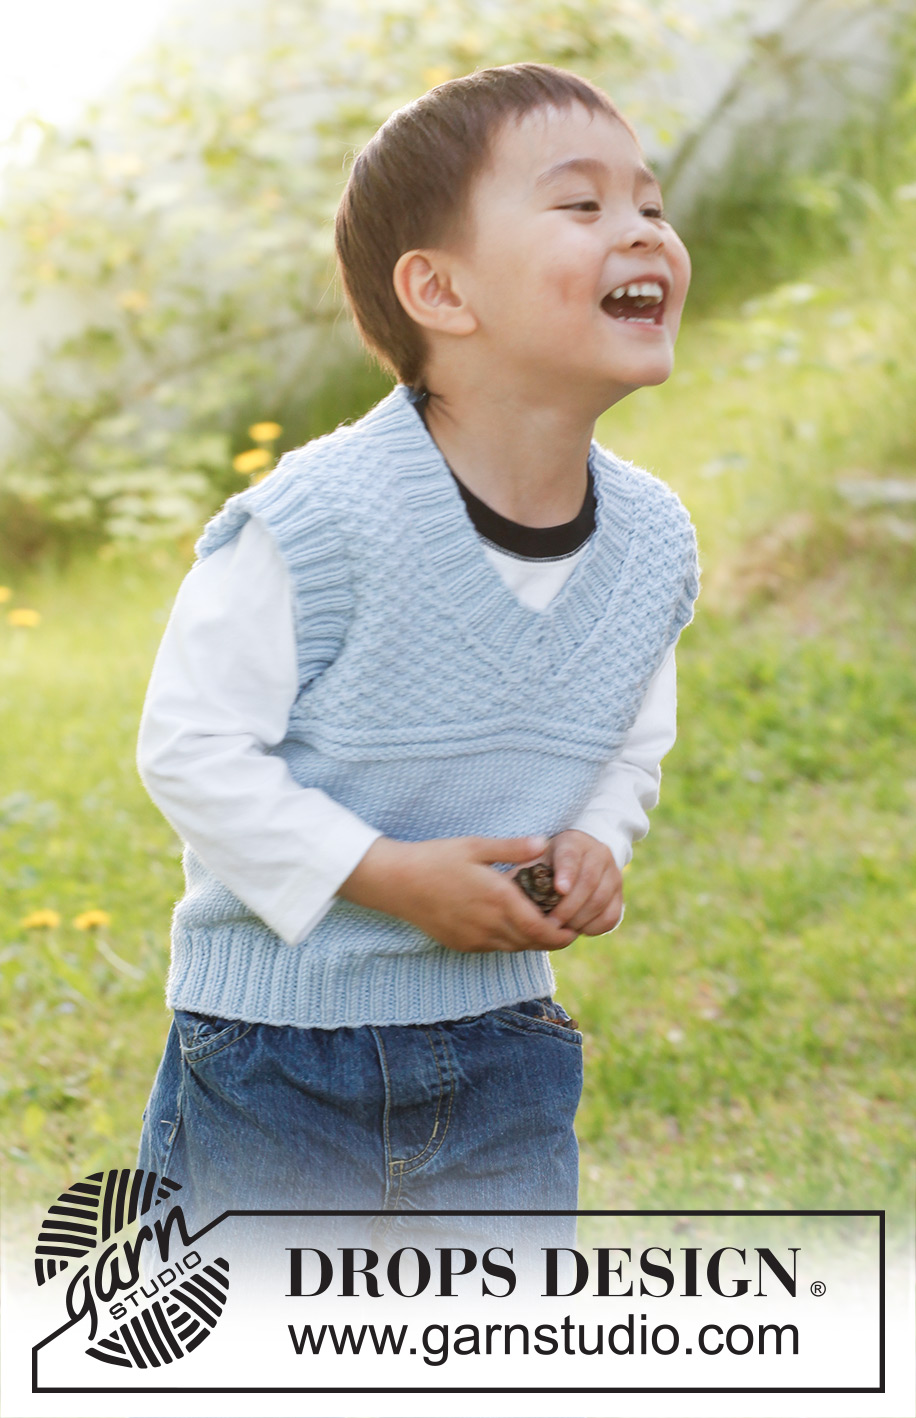
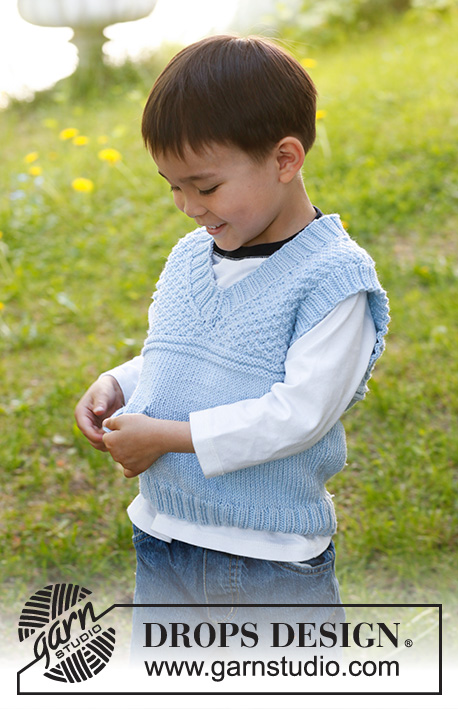
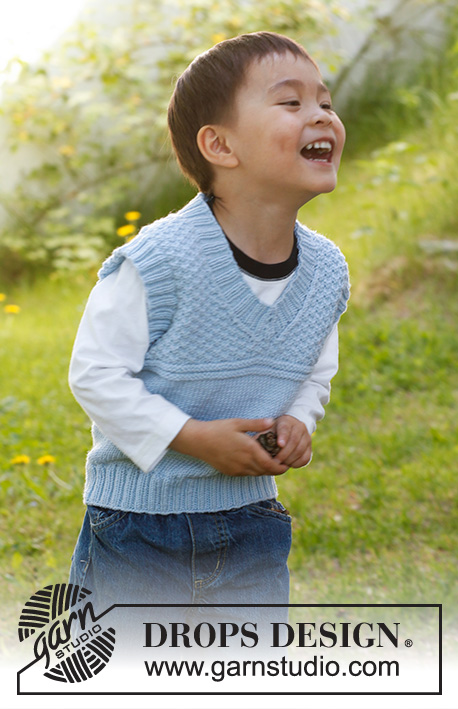
Knitted vest / slipover with V-neck and double moss st in DROPS Lima. Size children 3 to 12 years.
DROPS Children 23-8 |
|||||||
|
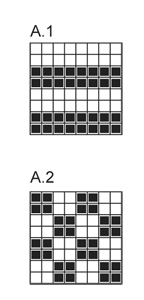
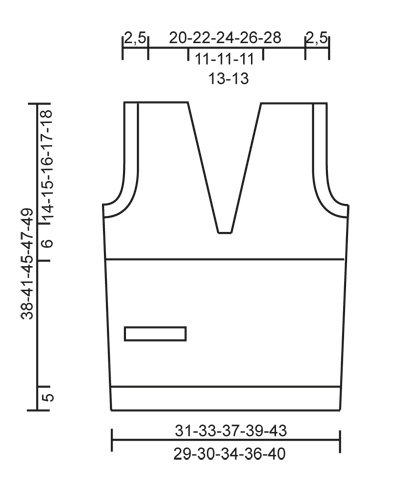
GARTER ST (back and forth on needle): K all rows. PATTERN: See diagrams A.1 and A.2. Diagrams show pattern from RS. DECREASE TIP 1 (applies to V-neck): Dec inside 1 edge st which is worked K on all rows. All dec are done from RS! DEC AFTER 1 EDGE ST AS FOLLOWS: Slip 1 st as if to K, K 1, psso. DEC BEFORE 1 EDGE ST AS FOLLOWS: K 2 tog. DECREASE TIP 2 (applies to neck edge): Dec on each side of the 2 K sts mid front of neck as follows: Work until 1 st remains before the 2 K sts, K 2 tog, slip 1 st as if to K, K 1, psso. ---------------------------------------------------------- BODY: Worked in the round on circular needle. Cast on 148-156-176-184-204 sts on circular needle size 3 mm with Lima. K 1 round, then work rib = K 2/P 2. When rib measures 5 cm, K 1 round while AT THE SAME TIME dec 28-28-32-32-36 sts evenly = 120-128-144-152-168 sts. Switch to circular needle size 4 mm and work in stocking st. AT THE SAME TIME insert a marker at beg of round and a marker after 60-64-72-76-84 sts (these marks the sides). Insert in addition a marker mid front (i.e. after 30-32-36-38-42 sts). When piece measures 6-7-8-9-8 cm, inc 1 st on each side of both markers in the sides (= 4 sts inc). Repeat inc in the sides every 5½-6-7-7-8 cm 2 more times = 132-140-156-164-180 sts. AT THE SAME TIME when piece measures 9-10-11-12-12 cm, work 6-7-8-8-8 sts past marker mid front. Slip the next 16-20-20-24-24 sts on a stitch holder for pocket slit, cast on 16-20-20-24-24 new sts on needle and then continue in the round over all sts as before (remove the marker mid front). When piece measures 18-20-23-24-25 cm, work diagram A.1. When A.1 has been worked 1 time vertically, continue with diagram A.2 until finished measurements. AT THE SAME TIME when piece measures 22-24-27-28-29 cm, work next round as follows: Work 34-36-40-42-46 sts, slip the last 2 sts worked on a stitch holder and work the remaining 98-104-116-122-134 sts. Then work back and forth on needle from mid front. AT THE SAME TIME on next row from RS, dec 1 st at the beg and end of row for V-neck - read DECREASE TIP 1. Repeat dec every other row (i.e. every row from RS) 5 more times and then every 4th row (i.e. every other row from RS) 5-5-5-7-7 times. AT THE SAME TIME when piece measures 24-26-29-30-31 cm, cast off 6 sts in each side for armholes (i.e. 3 sts on each side of both markers) and finish front and back piece separately. BACK PIECE: = 60-64-72-76-84 sts. Continue pattern as before. AT THE SAME TIME cast off for armholes at beg of every row in each side as follows: 3 sts 1 time, 2 sts 2 times and 1 st 1-1-3-3-5 times = 44-48-52-56-60 sts. Continue pattern with 1 edge st in GARTER ST - see explanation above - in each side. When piece measures 36-39-43-45-47 cm, cast off the middle 20-20-20-24-24 sts for neck and finish each shoulder separately. Then cast off 2 sts on next row from neck = 10-12-14-14-16 sts remain on shoulder. When piece measures 38-41-45-47-49 cm, cast off with K over K and P over P. RIGHT FRONT PIECE: Continue pattern and dec for V-neck as before. AT THE SAME TIME cast off for armhole at beg of every row from the side as on back piece. After all dec and cast offs, 10-12-14-14-16 sts remain on shoulder. When piece measures 38-41-45-47-49 cm, cast off with K over K and P over P - adjust so that front and back piece are the same length. LEFT FRONT PIECE: Work as right front piece but reversed. ASSEMBLY: Sew the shoulder seams. POCKET SLIT: Slip the 16-20-20-24-24 sts from stitch holder on circular needle size 3 mm and work rib (= K 2/P 2) back and forth on needle with 1 edge st in garter st and 2 K sts in each side seen from RS. When pocket slit measures approx. 2.5 cm, loosely cast off with K over K and P over P. Sew pocket slit neatly to front piece with duplicate sts in each side. Sew pocket opening to bottom of pocket slit (where sts were put on a stitch holder) on the back of piece. If a pocket is desired, work pocket slit as explained above and fasten in each side but do not fasten at the bottom. Then knit up on circular needle size 4 mm: 1 new st in each of the 16-20-20-24-24 sts cast on over pocket opening. Work in stocking st back and forth on needle (work top down) until pocket measures approx. 4-5-6-7-7 cm, loosely cast off. Sew pocket to the back of front piece with neat little loose stitches. ARMHOLE EDGE: Knit up from RS approx. 65 to 80 sts around one armhole on a short circular needle size 3 mm. K 1 round while AT THE SAME TIME inc evenly to 80-84-88-96-100 sts. Work rib = K 2/P 2 until armhole edge measures approx. 2.5 cm. Loosely cast off sts with K over K and P over P. Repeat around the other armhole. NECK EDGE: Knit up from RS approx. 90 to 112 sts (incl the 2 sts from stitch holder mid front) on a short circular needle size 3 mm. K 1 round while AT THE SAME TIME inc evenly to 112-120-124-136-140 sts (do not inc over the middle 2 sts at the front). Work rib = K 2/P 2 – adjust so that 2 K sts are mid front. AT THE SAME TIME on 2nd round, dec 1 st on each side of the 2 K sts mid front – SEE DECREASE TIP 2. Repeat dec every other round 3 more times. When neck edge measures approx. 2.5 cm, loosely cast off with K over K and P over P. |
|||||||
Diagram explanations |
|||||||
|
|||||||
 |
|||||||
 |
|||||||
Have you finished this pattern?Tag your pictures with #dropspattern #paulvest or submit them to the #dropsfan gallery. Do you need help with this pattern?You'll find 16 tutorial videos, a Comments/Questions area and more by visiting the pattern on garnstudio.com. © 1982-2026 DROPS Design A/S. We reserve all rights. This document, including all its sub-sections, has copyrights. Read more about what you can do with our patterns at the bottom of each pattern on our site. |
|||||||


With over 40 years in knitting and crochet design, DROPS Design offers one of the most extensive collections of free patterns on the internet - translated to 17 languages. As of today we count 324 catalogues and 12290 patterns translated into English (UK/cm).
We work hard to bring you the best knitting and crochet have to offer, inspiration and advice as well as great quality yarns at incredible prices! Would you like to use our patterns for other than personal use? You can read what you are allowed to do in the Copyright text at the bottom of all our patterns. Happy crafting!
Post a comment to pattern DROPS Children 23-8
We would love to hear what you have to say about this pattern!
If you want to leave a question, please make sure you select the correct category in the form below, to speed up the answering process. Required fields are marked *.