
Popular categories
Looking for a yarn?


Comments / Questions (50)
![]() Cova wrote:
Cova wrote:
En el borde, que quiere decir Rem? Vuelta 5: Rem 2 pts (tenemos ahora 1 pt en la ag derecha), 1d, 1 HEB, 2 pjd, 1 HEB, 5d = 10 pts. Repetir la 2ª a la 5ª vta hacia arriba.
26.04.2019 - 21:31DROPS Design answered:
Hola Cova. Rem = rematar = cerrar.
28.04.2019 - 20:48
![]() Plüschappel wrote:
Plüschappel wrote:
Hallo! Auf dem Foto sieht es aus als hätte die Jacke zwei Knöpfe. In der Anleitung wird nur einer verwendet. Was ist richtig? Geht ein Knopf allein nicht schnell von allein auf? LG!
26.06.2018 - 15:20DROPS Design answered:
Liebe Frau Plüschappel, also wenn Sie möchten können Sie noch 1 Druckknof 7 cm oben den Knopf annähen, damit die Jacke besser geschlossen wird. Viel Spaß beim stricken!
26.06.2018 - 15:51
![]() Isabella Kraus wrote:
Isabella Kraus wrote:
Liebes DROPS-Team, täusche ich mich oder hat die Anleitung bei linken Vorderteil einen Fehler an der Stelle, wo es um die Falte geht? Wenn beide Vorderteile symmetrisch sind und die Falte von der Vorderseite aus gearbeitet wird muss man die Maschen doch auf eine Hilfsnadel VOR die Arbeit legen statt wie beim rechten Vorderteil hinter die Nadel, oder? Viele Grüße von Isabella
18.04.2017 - 23:24DROPS Design answered:
Liebe Frau Kraus, es stimmt, Anleitung wird korrigiert, die Hilfsnadel beim linken Vorderteil muss vor die Arbeit legen. Viel Spaß beim stricken!
19.04.2017 - 10:09
![]() Debors wrote:
Debors wrote:
Liebes Drops-Team, Vielen Dank erstmal für die vielen tollen Strickmuster! Ich als Strickanfänger wollte mich an die Jacke wagen und habe vorher noch eine Frage: wozu soll ich bei dieser Jacke die Markierung machen? Nur um den Anfang der Blende zu markieren oder hat das noch einen anderen Sinn? Vielen Dank und herzliche Grüsse
31.12.2015 - 14:33DROPS Design answered:
Ja, das ist zur Markierung der Blenden-Maschen, denn Sie stricken die Blenden ja im Blendenmuster und dabei ist die Maschenzahl nicht immer gleich. Um nicht durcheinander zu kommen, ist es besser, die Blenden-M zu markieren, damit man sich nicht verzählt.
02.01.2016 - 20:06
![]() Michaela wrote:
Michaela wrote:
Fortsetzung: Die eine Reihe rechts zusaetzlich nach den Krausrippen habe ich gestrickt. Ich hoffe, ich mache irgendwas falsch, weil es sehr auffaellig anders aussieht und ich mir dann die Arbeit umsonst gemacht haette, so wuerde ich das nicht tragen wollen ...
16.08.2014 - 06:10DROPS Design answered:
Liebe Michaela, Sie haben also bei dem linken Vorderteil mit einer Rück-R begonnen? Das wäre auf jeden Fall richtig so. Das Muster dürfte auf beiden Seiten eigentlich nicht sehr unterschiedlich aussehen, da es ja auf kraus rechts basiert. Haben Sie versehentlich bei der rechten Blende die Rück-R zwischen den Loch-R (also die 2. und 4. R) li gestrickt?
16.08.2014 - 11:23
![]() Michaela wrote:
Michaela wrote:
Habe jetzt Rueckenteil und rechtes Vorderteil fertig. Und stelle jetzt beim linken Vorderteil fest, dass das Blendenmuster beim linken Vorderteil dann "von der anderen Seite" erscheint, sprich die beiden Blenden sind gut sichtbar unterschiedlich, die eine sozusagen von der glatten Seite und die andere von der verkehrten. Oder mache ich was falsch?
16.08.2014 - 06:09DROPS Design answered:
Antwort siehe oben! :-)
16.08.2014 - 11:23
![]() LEMAREC wrote:
LEMAREC wrote:
Je recherche une aide pour la bordure fantaisie. Si je suis les explications point par point je me retrouve avec des mailles supplémentaires et les jours ne sont pas alignés Merci de votre aide
19.03.2013 - 13:54DROPS Design answered:
Bonjour Madame Lemarec, pour toute aide personnalisée, je vous recommande de vous adresser à votre magasin DROPS ou sur le forum DROPS où il est plus facile d'expliquer. Bon tricot !
19.03.2013 - 15:55
![]() Rachael Johannes wrote:
Rachael Johannes wrote:
Can't wait to cast on for this today!
14.05.2012 - 21:31
![]() Angelika wrote:
Angelika wrote:
Wunderschöne Jacke stricke sie gerade in lindgrün für meine Tochter...
08.04.2012 - 08:32
![]() Ana wrote:
Ana wrote:
¿Cuantas veces tengo que aumentar puntos en cada 6ª vuelta?
15.02.2012 - 21:54
|
|
Cherry Dream#cherrydreamcardigan |
|
 |
 |
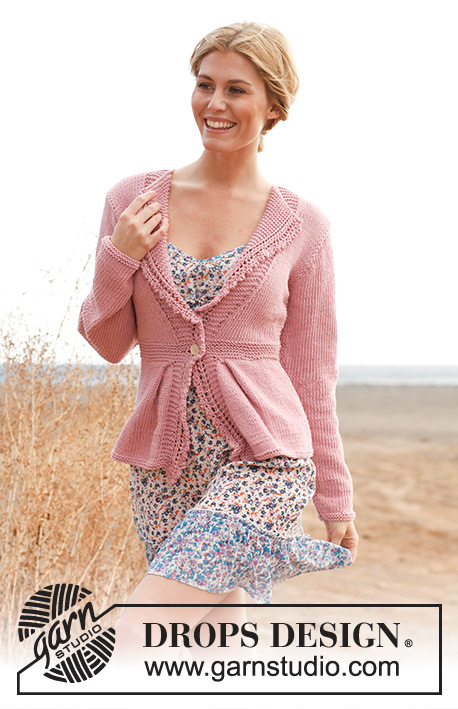
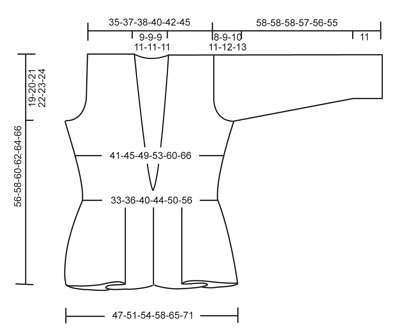
Knitted DROPS fitted jacket with garter st, lace front bands and pleats in ”Paris”. Size: S - XXXL.
DROPS 137-3 |
|
|
GARTER ST (back and forth on needle): K all rows. BAND PATTERN: Row 1: K 2, 1 YO, K 2 tog, 1 YO, K 5 = 10 sts. Row 2: K = 10 sts. Row 3: K 3, 1 YO, K 2 tog, 1 YO, K 5 = 11 sts. Row 4: K = 11 sts. Row 5: Cast off 2 sts (there is now 1 st on right needle), K 1, 1 YO, K 2 tog, 1 YO, K 5 = 10 sts. Repeat 2nd to 5th row upwards. DECREASE TIP 1 (applies to armhole): Dec from RS inside 3 sts. Dec AFTER 3 sts as follows: Slip 1 st as if to K, K 1, psso. Dec BEFORE 3 sts as follows: Work until 5 sts remain on needle, K 2 tog, K 3. DECREASE TIP 2 (applies to neck dec): Dec from RS inside all sts in band pattern + the inc sts for collar. Dec as follows AFTER all these sts: Slip 1 st as if to K, K 1, psso. Dec as follows BEFORE all these sts: K 2 tog. -------------------------------------------------------- BACK PIECE: Worked back and forth on needle. Cast on 82-88-94-102-112-122 sts (incl 1 edge st in each side) on needle size 4 mm with Paris. Work 4 rows in GARTER ST - see explanation above! Switch to needle size 5 mm and work in stocking st with 1 edge st in garter st in each side. REMEMBER THE KNITTING TENSION! When piece measures approx. 18-18-19-19-20-20 cm (adjust so that next row is worked from RS), make a pleat. This is done by working next row as follows: Work 17-20-23-27-32-37 sts, slip 12 sts on cable needle in front of piece, K tog first st that was slipped on cable needle with first st on needle, then K tog next st on cable needle with next st on needle, K tog 1 st from cable needle and 1 st from needle until all sts from cable needle have been worked. Then slip 12 sts on cable needle behind piece, K tog 1 st from needle tog with first st that was slipped on cable needle, K tog 1 st from needle and 1 st from cable needle until all sts on cable needle have been worked, K the remaining 17-20-23-27-32-37 sts = 58-64-70-78-88-98 sts on needle. Switch to needle size 4 mm and K 11 rows back and forth (= 6 ridges). Switch back to needle size 5 mm and work in stocking st. AT THE SAME TIME when piece measures 23-24-24-25-26-27 cm, inc 1 st in each side. Repeat inc every 4th row a total of 7-7-8-8-8-8 times = 72-78-86-94-104-114 sts. When piece measures 37-38-39-40-41-42 cm, cast off 3-4-5-6-7-8 sts in each side for armholes (cast off at beg of the 2 next rows). On next row from RS, dec 1 st in each side - SEE DECREASE TIP 1. Repeat dec every other row a total of 3-4-6-7-9-11 times = 60-62-64-68-72-76 sts remain on needle. When piece measures 53-55-57-59-61-63 cm, work 4 rows in garter st over the middle 26-26-26-28-28-28 sts (work the other sts as before), then cast off the middle 16-16-16-18-18-18 sts for neck. Finish each shoulder (= 22-23-24-25-27-29 sts) separately with 5 sts in garter st towards the neck. Cast off when piece measures 56-58-60-62-64-66 cm. RIGHT FRONT PIECE: Cast on 46-49-52-56-61-66 sts (incl 9 band sts towards mid front and 1 edge st in the side) on needle size 4 mm with Paris. Work 4 rows in garter st. Switch to needle size 5 mm. Then work as follows (1st row = RS): BAND PATTERN – see explanation above – over the first 9 sts (these sts become 10 on 1st row and will vary between 10 and 11 sts onwards), insert a marker, then work in stocking st with 1 edge st in garter st. Continue like this until piece measures approx. 18-18-19-19-20-20 cm (adjust so that next row is worked from RS). Work next row as follows: Band pattern as before until marker, then slip 12 sts on cable needle behind piece, K tog 1 st from needle tog with first st that was slipped on cable needle, K tog 1 st from needle and 1 st from cable needle until all sts on cable needle have been worked, K the remaining 13-16-19-23-28-33 sts. Switch to needle size 4 mm and K 11 rows back and forth over the 25-28-31-35-40-45 sts in the side, work band as before – NOTE: AT THE SAME TIME on 6th row (= from RS), cast off for 1 button hole as follows: Work the outermost 5 or 6 sts as before (5 sts in garter st remain on band), K 2 tog and make 1 YO, work the rest of row. When 11 rows K have been worked, switch back to needle size 5 mm. READ ALL OF THE FOLLOWING SECTION BEFORE CONTINUING! Continue in stocking st with band pattern as before. COLLAR: At the same time, 1 cm after the switch back to needle size 5 mm, start inc for collar. This is done as follows (from RS): Work the first 9 or 10 sts as before (1 st in garter st should now remain on band), make 1 YO, work last st in garter st and then work in stocking st the rest of row. On next row K YO twisted to avoid holes (i.e. work in back loop of st instead of front). Repeat inc every 4th row a total of 6 times, then on every 6th row until finished measurements (inc inside 1 st in garter st the entire time - work the inc sts in garter st). NECK DEC: At the same time when 3 inc for collar have been made, dec 1 st towards the neck - SEE DECREASE TIP 2! Repeat dec every 4th row a total of 9-9-9-10-10-10 times. SIDE INC: At the same time when piece measures 23-24-24-25-26-27 cm, inc in the side as on back piece. ARMHOLE: When piece measures 37-38-39-40-41-42 cm, cast off for armhole towards the side as on back piece. When piece measures approx. 56-58-60-62-64-66 cm, (adjust after 1 whole repetition of band pattern), cast off all sts. LEFT FRONT PIECE: Cast on and work as right front piece. But K the first row after the bottom 4 rows in garter st, turn and then work 1st row in BAND PATTERN from WS (this is done so that each side at the front is the same). When piece measures 18-18-19-19-20-20 cm, work next row as follows from RS: Work 13-16-19-23-28-33 sts as before, slip 12 sts on cable needle in front of piece, K tog the first st that was slipped on cable needle with first st on needle, then K tog 1 st from cable needle with 1 st from needle until all sts on cable needle have been worked, work band pattern as before the rest of row. Finish as right front piece but without button hole. SLEEVE: Cast on 40-42-44-46-48-50 sts (incl 1 edge st in each side) on needle size 4 mm with Paris. Work 4 rows in garter st, switch to needle size 5 mm. Continue in stocking st with 1 edge st in garter st in each side. When piece measures 11 cm, inc 1 st in each side. Repeat inc every 4½-4-3½-3-2½-2 cm a total of 9-10-11-12-13-14 times = 58-62-66-70-74-78 sts. When piece measures 50-49-48-46-44-42 cm (shorter measurements in the larger sizes because of longer sleeve cap and broader shoulder width) cast off for sleeve cap at beg of every row in each side: 4 sts 1 time, 2 sts 2 times and 1 st 3-4-5-6-7-8 times, then cast off 2 sts in each side until piece measures 57-57-57-56-55-54 cm, then cast off 3 sts 1 time in each side. Cast off the remaining sts, piece measures approx. 58-58-58-57-56-55 cm. ASSEMBLY: Sew shoulder seams (= 22-23-24-25-27-29 sts), the remaining sts on each front piece = collar. Sew in sleeves and sew sleeve and side seams in one inside 1 edge st. Sew on button. If desired sew on 1 press stud approx. 7 cm above the button if you want to keep the jacket more closed. |
|
 |
|
Have you finished this pattern?Tag your pictures with #dropspattern #cherrydreamcardigan or submit them to the #dropsfan gallery. Do you need help with this pattern?You'll find 12 tutorial videos, a Comments/Questions area and more by visiting the pattern on garnstudio.com. © 1982-2026 DROPS Design A/S. We reserve all rights. This document, including all its sub-sections, has copyrights. Read more about what you can do with our patterns at the bottom of each pattern on our site. |
|


With over 40 years in knitting and crochet design, DROPS Design offers one of the most extensive collections of free patterns on the internet - translated to 17 languages. As of today we count 324 catalogues and 12290 patterns translated into English (UK/cm).
We work hard to bring you the best knitting and crochet have to offer, inspiration and advice as well as great quality yarns at incredible prices! Would you like to use our patterns for other than personal use? You can read what you are allowed to do in the Copyright text at the bottom of all our patterns. Happy crafting!
Post a comment to pattern DROPS 137-3
We would love to hear what you have to say about this pattern!
If you want to leave a question, please make sure you select the correct category in the form below, to speed up the answering process. Required fields are marked *.