
Popular categories
Looking for a yarn?


Comments / Questions (59)
![]() Anjo wrote:
Anjo wrote:
Meer een vraag,. Hoe zet ik dit om naar maat 128- 132? Qua steken? Dank.
18.12.2022 - 00:36
![]() Judy Canning wrote:
Judy Canning wrote:
Is there a video showing the strap finish to the left shoulder? I do not understand how it is done. Thanks
16.11.2022 - 17:59DROPS Design answered:
Dear Mrs Canning, the strap on the left shoulder is worked with a folded hem on both front and back pieces; the both twisted cords are the straps for the buttons, insert them through the folded edge (evenly distributed) and tied them together from WS, sew the folded edge on back piece and sew the buttons on front piece matching the straps. Happy finishing!
17.11.2022 - 09:57
![]() Ruth Savard wrote:
Ruth Savard wrote:
Bonsoir Au 4e tour de M5 j’ai 168 mailles. Si je rabats 8 mailles de chaque côté des marqueurs, il me reste (168 - 16 )= 152 mailles. Comme ce n’est pas un multiple de 12 je n’arrive plus dans ma grille . Que faire? Merci
03.08.2022 - 02:01DROPS Design answered:
Bonjour Mme Savard, notez bien où vous terminez /commencez le diagramme pour chaque pièce et continuez le diagramme comme avant, autrement dit, vous ne tricoterez plus le premier motif ni le dernier motif en entier, mais le diagramme doit continuer pour ne pas être décalé. Bon tricot!
03.08.2022 - 10:21
![]() Ruth Savard wrote:
Ruth Savard wrote:
Merci infiniment de répondre si rapidement . C’est gentil de votre part. Amicalement
14.07.2022 - 12:43
![]() Ruth Savard wrote:
Ruth Savard wrote:
Bonjour J’ai 168 mailles je dois tricoter M2 M3 et M4. J’utilise 20 mailles au total En les répétant 8 fois j’utilise 160 mailles. Il reste 8 mailles non incluses dans une grille au premier rang. Comme je prendrai 16 rangs pour tricoter en hauteur toutes les grilles j’aurai une bande sans motif entre les grilles. Quel conseil me donnez-vous? Merci
13.07.2022 - 02:49DROPS Design answered:
Bonjour Ruth , vous tricotez 1 fois M2 en hauteur (14 fois tout le tour), ensuite M3 1 fois en hauteur (42 fois tout le tour) et enfin 1 fois M4 en hauteur (42 fois tout le tour). Bon tricot!
14.07.2022 - 08:55
![]() Manon Tessier wrote:
Manon Tessier wrote:
Bonjour , je suis rendu a faire le diagrame M5 il me reste 56 mailles après diminution . Le diagrams m5 est divisible par douze alors je commence ou pour que les dessins soit bon . Merci
17.12.2020 - 16:10DROPS Design answered:
Bonjour Mme Tessier, vous tricotez M.5 sur toutes les mailles = 120-132-144 (156-168) m autrement dit vous le répétez 10-11-12 (13-14) fois en rond, puis, lorsque vous divisez l'ouvrage et que vous diminuez, vous terminez le diagramme = les rangs 4 et 5 en alignant les mailles les unes au-dessus des autres, autrement dit, veillez à bien juste continuer les diagrammes en hauteur en ajustant le début/la fin du rang en fonction des motifs. Bon tricot!
17.12.2020 - 17:19
![]() Ria Edam-Dekker wrote:
Ria Edam-Dekker wrote:
Ik maak maat 12-18 maanden maar kom niet op het aangegeven aantal van 16 steken bij het voorpand. Begint met 64 st, - 14 afkanten = 50 dus 25 aan iedere kant. Minder 1x2 en 3x1 = 20 st. Dus 4 meer dan 16. Wat gaat hier niet goed?
08.11.2020 - 18:57DROPS Design answered:
Dag Ria,
Vermoedelijk zijn de 4 ribbelsteken hier niet bij gerekend. Dan kom je wel op 16 steken.
18.11.2020 - 13:15
![]() Heidi wrote:
Heidi wrote:
Ich verstehe in der Anleitung nicht ganz, wie die linke Schulter gestrickt werden soll. Soll sie gleich lang wie rechts gestrickt [47cm in der Höhe] und soll dann die Kante plus 2,5cm dazugefügt werden, oder kommt die Kante nach 45cm [grösste Größe]?
06.08.2020 - 23:12DROPS Design answered:
LIebe Heidi, die rechte Schulter (Rückenteil) mist 47 cm, bei der linken Schulter stricken Sie nach 47 cm noch 1 Rückreihe rechts, und 2,5 cm glatt rechts, dh, bei der linken Schulter hat man so eine gefalte Kante, die beide linke Schulter legen dann Kante Kante und die Ösen (als Knopflochleiste) an der Kante von der Schulter/Rückenteil nähen, die Knöpfe an der Schulter/Vorderteil nähen. Viel Spaß beim stricken!
07.08.2020 - 08:09
![]() Jette Asp Bøttcher wrote:
Jette Asp Bøttcher wrote:
Skal der strikkes bukkekant i samme side, og hvordan samler jeg den
07.04.2020 - 15:12
![]() Babsie wrote:
Babsie wrote:
Hallo, Ist mein Verständnis richtig, dass die Teile für die linke Schulter erst genauso wie für die rechte Schulter (gespiegelt mit dem Rand) gestrickt werden und dann die Kante +2,5 cm gestrickt werden? Stimmt die Angabe der Maschenzahl für das Vorderteil? Ich beginne mit 56, nehme 14 ab, macht 50 mit je 25 auf jeder Seite. Dann je Seite 1x3 und 3x1 abnehme (insgesamt also 5) bleiben bei mir auf jeder Seite noch 20 Maschen statt der angegeben 16. Was mache ich hier falsch?
28.02.2020 - 12:43DROPS Design answered:
Liebe Babsie, die linke Schulter am Vorderteil wird wie die rechte Schulter beim Rückentil gestrickt: nach 41 cm (3. Größe) die Kante über die 16 M stricken (die 16 M vom rechten Schulter beim Vorderteil werden abgekettet). Sie haben 56 M in die 3. Größe - die mittleren 14 M werden abgekettet = 21 M bleiben für jeden Schulter - 2 Masche 1 Mal + 1 Masche 3 x = 16 Maschen bleiben. Viel Spaß beim stricken!
28.02.2020 - 14:21
|
|||||||
Princess Dream#princessdreamdress |
|||||||
|
|
|||||||
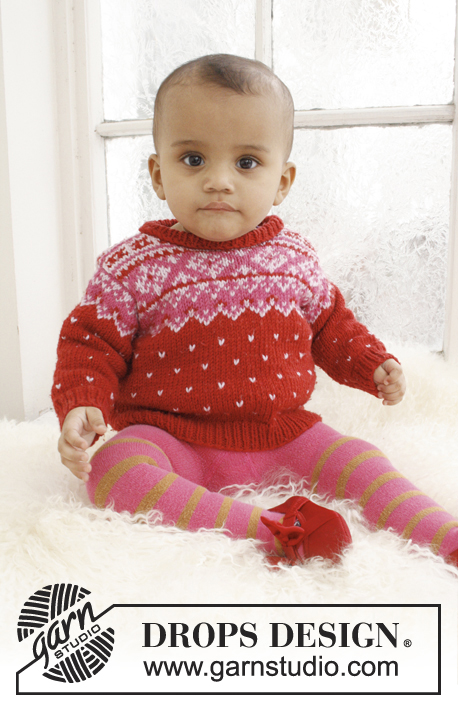
Knitted dress with Nordic pattern for baby and children in DROPS BabyMerino
DROPS Baby 21-17 |
|||||||
|
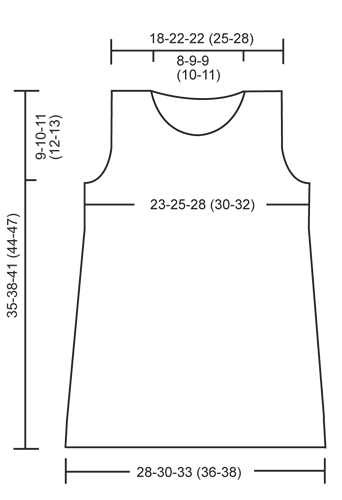
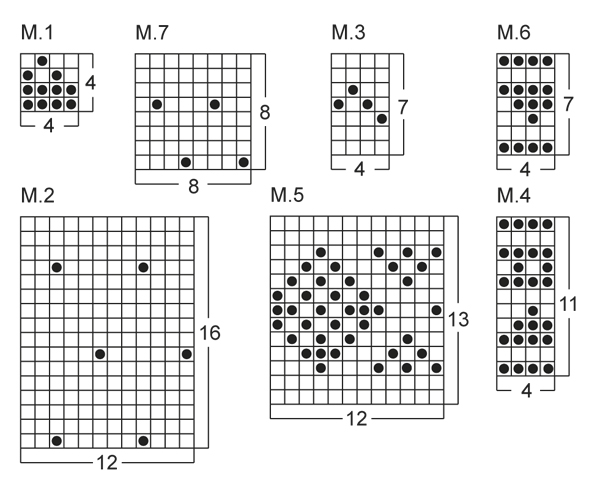
PATTERN: See diagrams M.1 - M.7. DECREASE TIP 1 (applies to body): Dec 1 st on each side of marker as follows: Work until 2 sts remain before marker, slip 1 st as if to K, K 1, psso, (marker), K tog the next 2 sts. DECREASE TIP 2 (applies to armholes): Dec 1 st in each side as follows: Work 4 sts in garter st, slip 1 st as if to K, K 1, psso, work until 6 sts remain, K the next 2 sts tog, work 4 sts in garter st. GARTER ST (back and forth on needle): K all rows. ---------------------------------------------------------- BODY: Worked in the round on circular needle. Cast on 144-156-172 (188-200) sts with cerise on circular needle size 2.5 mm. K for approx. 2.5 cm, then P 1 round = folding edge, measure piece from here and work in stocking st until finished measurements. REMEMBER THE KNITTING TENSION! K 1 more round and insert a marker in each side (= 72-78-86 (94-100) sts between markers on front and back piece). Then work diagram M.1 1 time vertically. Continue in stocking st with cerise until piece measures 3 cm. Now dec 1 st on each side of every marker - Read DECREASE TIP 1 above = 4 sts dec on round. Repeat dec like this every 2-2½-2½ (2-2½) cm a total of 6-6-7 (8-8) times = 120-132-144 (156-168) sts. READ ALL OF THE FOLLOWING SECTION BEFORE CONTINUING. When piece measures 15-17-19 (21-23) cm (all dec are now done), work diagrams M.2, M.3, and then M.4 1 time vertically. Then work rounds 1-3 in diagram M.5 (now piece measures approx. 26-28-30 (32-34) cm). On next round (= 4th round in diagram M.5), cast off 8 sts in each side (i.e. 4 sts on each side of every marker), now divide the piece and finish each part separately. BACK PIECE: = 52-58-64 (70-76) sts. The piece is worked back and forth in stocking st until finished measurements. Work next row (= RS) as follows: Work 4 sts in garter st (= edge sts), dec 1 st - Read DECREASE TIP 2 above, work 5th row in diagram M.5 until 6 sts remain, dec 1 st - Read DECREASE 2 above, finish with 4 sts in garter st. Repeat dec inside 4 sts in garter st in each side, on each row from RS like this a total of 2-1-4 (3-2) times = 48-56-56 (64-72) sts. After diagram M.5 has been worked 1 time vertically, work diagrams M.6 and M.3 1 time vertically (with 4 sts in garter st in each side). P next row from WS, and then work diagram M.7 with 4 sts in garter st in each side until finished measurements. When piece measures 33-36-39 (42-45) cm, cast off the middle 18-20-20 (22-24) sts for neck and finish each part separately. Cast off 2 sts on next row from neck = 13-16-16 (19-22) sts. When piece measures 35-38-41 (44-47) cm, cast off on right shoulder, work as follows on left shoulder: K 1 row from WS (= folding edge), then work in stocking st for another 2.5 cm. Cast off all sts. FRONT PIECE: = 52-58-64 (70-76) sts. The piece is worked back and forth in stocking st until finished measurements. Then continue with charts as on back piece with 4 sts in garter st in each side and cast off for armhole as on back piece. When piece measures 29-32-35 (37-40) cm, cast off the middle 12-12-14 (14-16) sts for neck and finish each part separately. Then cast off on next row from neck as follows: Cast off 2 sts 1 time, 1 st 3-4-3 (4-4) times = 13-16-16 (19-22) sts remain on shoulder. When piece measures 35-38-41 (44-47) cm, cast off on right shoulder, and work a folding edge on left shoulder as on back piece: ASSEMBLY: Sew right shoulder seam. Make 1 strap as follows: Twine 2 strands of 20 cm with cerise and fold them double so that they twine. Make another strap the same way. On left back shoulder fold the edge inwards at the P round, and fasten the straps in the outer edge by folding them double and then pulling the ends through the folding edge, fasten the ends and then sew the edge to the back. Fold and sew the edge to the back of left front shoulder. Knit up from RS approx. 60-80 sts along the entire neck edge (through both layers of the folding edge in each side), then P 1 row from WS while at the same time adjusting no of sts to 66-70-74 (78-82). Continue to work rib as follows: * K 2, P 2 *, repeat from *-* the entire row. Loosely cast off all sts when rib measures approx. 1 cm. Sew the buttons on to left front shoulder. Fold the bottom edge on the dress at the P round and fasten on the back. |
|||||||
Diagram explanations |
|||||||
|
|||||||
 |
|||||||
 |
|||||||
Have you finished this pattern?Tag your pictures with #dropspattern #princessdreamdress or submit them to the #dropsfan gallery. Do you need help with this pattern?You'll find 11 tutorial videos, a Comments/Questions area and more by visiting the pattern on garnstudio.com. © 1982-2026 DROPS Design A/S. We reserve all rights. This document, including all its sub-sections, has copyrights. Read more about what you can do with our patterns at the bottom of each pattern on our site. |
|||||||


With over 40 years in knitting and crochet design, DROPS Design offers one of the most extensive collections of free patterns on the internet - translated to 17 languages. As of today we count 324 catalogues and 12291 patterns translated into English (UK/cm).
We work hard to bring you the best knitting and crochet have to offer, inspiration and advice as well as great quality yarns at incredible prices! Would you like to use our patterns for other than personal use? You can read what you are allowed to do in the Copyright text at the bottom of all our patterns. Happy crafting!
Post a comment to pattern DROPS Baby 21-17
We would love to hear what you have to say about this pattern!
If you want to leave a question, please make sure you select the correct category in the form below, to speed up the answering process. Required fields are marked *.