
Popular categories
Looking for a yarn?


Comments / Questions (50)
![]() Simone wrote:
Simone wrote:
Hvordan kan det være at ud-/indtagningen for den højre og venstre øreklap er forskellig? Altså, for den højre tages der ind og ud på hver pind, hvor for den venstre er det på hver 2. og hver 4. pind. Det forstår jeg ikke. På forhånd tak!
16.09.2015 - 15:26DROPS Design answered:
Hej Simone, Jo du tager ud på hver 2.p både på højre og venstre øreklap. Bare følg opskriften så får du spidserne som på billedet. God fornøjelse!
17.09.2015 - 09:34
![]() Karoline wrote:
Karoline wrote:
Liebes Drops-Team, am 18.02.2014 hat Ariane Kosick-Albitz auf einen Fehler in der Anleitung für die Mütze hingewiesen. Meiner Meinung nach ist dieser immer noch nicht behoben. Man nimmt bei dem dunkler gefärbten teil laut Anleitung immer nur an der linken Seite Maschen auf und erhält so kein symmetrisches Ergebnis, so dass man die Mütze nicht zusammennähen kann. Oder verstehe ich es nur falsch? Mit bestem Gruß, Karoline
07.09.2015 - 19:49DROPS Design answered:
Die Anleitung müsste so korrekt sein, wie sie dort steht. In graulila gestrickten Mittelteil der Mütze arbeiten Sie bis zur Mitte wie folgt: rechte Seite 1 M in jeder 4. R zunehmen und linke Seite 1 M in jeder 2. R abnehmen. Dann, wenn die Mitte (vordere Spitze) erreicht ist, geht es umgekehrt weiter: rechte Seite 1 M in jeder 4. R abnehmen und linke Seite 1 M in jeder 2. R zunehmen.
13.09.2015 - 13:34Elena wrote:
Please advise if 50 g of grey purple will be enough for both hat and suit. Thank you.
12.08.2015 - 17:14DROPS Design answered:
Dear Elena, 50 g of grey purple may not be enough to make both hat and suit. Happy knitting!
13.08.2015 - 09:27
![]() Debbie Cottrell wrote:
Debbie Cottrell wrote:
I'm having trouble understanding when to increase and decrease once I change colours...if I count the RS as row one, and the WS one two, what does once every fourth row and once every other row mean? Is it on the forth RS row I knit, and every second RS row? Or is on the forth row, and row two, four, etc, which are actually on the WS? Thanks for your help! Debbie
19.06.2015 - 05:38DROPS Design answered:
Dear Mrs Cottrell, every 4th row = every over row from RS, and every over row = every row from RS - when inc every 4th row, work 1 inc from RS, then work 3 rows without dec and inc on next (= 4th) row and repeat these 4 rows. When dec every other row, dec on row 1 from RS, work next row from WS and repeat these 2 rows. Happy knitting!
19.06.2015 - 10:02
![]() Eva wrote:
Eva wrote:
Beste Mensen van Drops Design, In de uitleg beneden die jullie aan Isa gaven vraag ik me af hoe het nou zit. Maar dan brei je toch eigenlijk steeds 5 naalden? En het zijn toch 4 naalden? Ook halen jullie volgens mij het meerderen en minderen door elkaar. Klopt het als ik dit doe vanaf het punt dat het bewerk 11 cm meet?: naald 1: links minderen - naald 2: gewoon recht breien - naald 3: minderen links - naald 4: meerderen rechts en dan weer van voren af aan? Alvast dank voor jullie hulp!
18.05.2015 - 10:32DROPS Design answered:
Hoi Eva. Ja, dat is correct.
19.05.2015 - 15:13
![]() Rosa wrote:
Rosa wrote:
Comparando la página web en español con la original he visto que en la traducción española solo hay la explicación muy detallada de como hacer el gorro y no la del mono o vestido. Agradeceria que también hubiera la del vestido completa.
04.04.2015 - 13:43
![]() Svenja wrote:
Svenja wrote:
Hallo liebes Drops Team, ich stricke die Mütze und bin gerade bei dem Ab-und Zunehmen in der man in jeder 4. R. auf der rechten Seite 1 M. aufnehmen und bei jeder 2 R. auf der linken Seite 1 M. abk. muss, meine Frage ist nun, wie nehme ich ab und zu, also wie bei den ersten 5 1/2 cm oder wie bei den anderen 5 1/2 cm (rechte Ohrenklappe) und wo, am Anfang der Reihe oder am Ende? Vielen lieben Dank schon mal!
21.03.2015 - 19:39DROPS Design answered:
Sie machen die Zunahmen und Abnahmen wie zuvor nach bzw. vor 2 M kraus re in Hin-R. Die Zunahmen machen Sie immer an der rechten Seite der Arb, also am Anfang jeder 4. R (= jeder 2. Hin-R) nach 2 M kraus re, die Abnahmen an der linken Seite, also am Ende jeder 2. R (= jeder Hin-R) vor 2 M kraus re. Wenn Sie dann bis zur vorderen Mitte gekommen sind, dreht sich das Ganze um, dann nehmen Sie in jeder 4. R an der rechten Seite der Arbeit, also am Anfang einer Hin-R, 1 M ab (auch wieder nach 2 M kraus re) und am Ende jeder 2. R (Hin-R) 1 M vor 2 kraus-re-M zu.
25.03.2015 - 14:03
![]() Thea Lüddecke wrote:
Thea Lüddecke wrote:
Ich weiß leider auch nicht wie ich die Mütze zusammennähen soll. ich habe auch weniger spitzen als in dem video angezeigt. lg
05.07.2014 - 15:44
![]() KIM wrote:
KIM wrote:
Bonjour pour nouveau né combien de laine dois-je commander
26.05.2014 - 15:19DROPS Design answered:
Bonjour Kim, les explications de cet ensemble commencent à partir du 1/3 mois, les fournitures nécessaires à la réalisation figurent à droite de la photo, pour le bonnet 1 pelote de chacun des 2 coloris en Baby Alpaca Silk pour le bonnet et 3 pelotes gris mauve clair + 1 pelote gris mauve pour le combi-pantalon. Bon tricot!
26.05.2014 - 15:38
![]() Christiane wrote:
Christiane wrote:
Hallo ! Ich habe die Mütze gestrickt und kapiere überhaupt nicht wie ich sie zusammen nähen soll. Bei dem Video zur Teufelsmütze sind es mehr Spitzen als bei meiner hier. Habe ich falsch gestrickt?
07.04.2014 - 19:25
|
||||||||||
Wonderchild#wonderchildset |
||||||||||
 |
 |
|||||||||
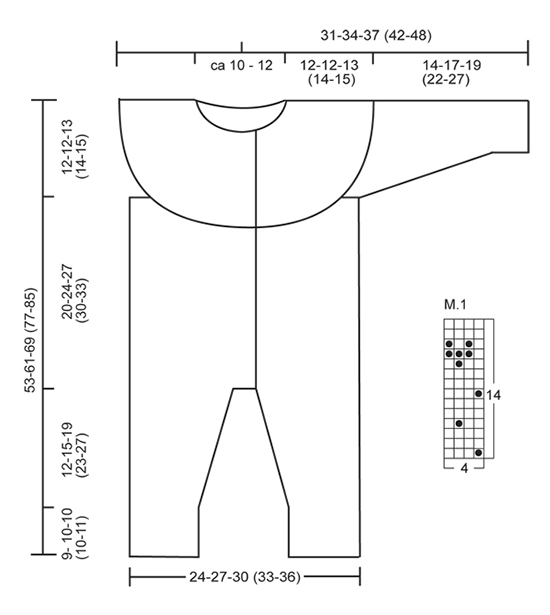
Set of knitted hat and overall with Nordic pattern for baby and children in DROPS BabyAlpaca Silk
DROPS Baby 21-4 |
||||||||||
|
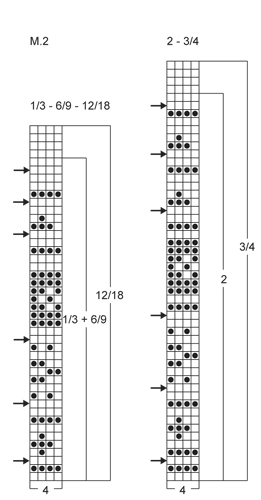
HAT: INCREASE TIP: Inc 1 st by making 1 YO, on next row K YO twisted (i.e. work in back loop of st instead front) to avoid holes. GARTER ST (back and forth on needle): K all rows. TUBE KNITTING: * K 1, place yarn in front of piece (towards you), slip 1 st as if to P, place yarn behind piece (from you) *, repeat from *-* on all rows. This becomes a ribbon worked in the round. ---------------------------------------------------------- HAT: The piece is worked sideways from mid back. Cast on 33-38-42 (46-50) sts with light grey purple on needle size 2.5 mm. Work in garter st - Read explanation above - While at the same time inc 1 st in the right side and dec 1 st in the left side as follows: Row 1 (= RS): K 2, inc 1 st - Read INCREASE TIP above, work until 4 sts remain and K 2 tog, K 2. Row 2 (= WS): K all sts. Repeat these 2 rows until piece measures 5½-6-6½ (7-8) cm. Insert a marker in the right side = right ear flap. REMEMBER THE KNITTING TENSION! Then dec 1 st in the right side and inc 1 st in the left side as follows: Row 1 (= RS): K 1, slip 1 st as if to K, K 1, psso, work until 2 sts remain, inc 1 st, K 2. Row 2 (= WS): K all sts. Repeat these 2 rows until piece measures a total of 11-12-13 (14-16) cm (= 5½-6-6½ (7-8) cm more). Then switch to grey purple and continue in garter st as follows: Inc 1 st in the right side every 4 rows and dec 1 st in the left side every other row until piece measures 15½-16½-17½ (18-19) cm (= the middle tip that goes down the forehead mid front). Then continue in garter st as follows: Dec 1 st in the right side every 4 rows and inc 1 st in the left side every other row until piece measures 20-21-22 (22-22) cm. Then switch back to light grey purple and continue in garter st as follows: Dec 1 st in the left side every other row and inc 1 st in the right side every other row until piece measures 25½ -27-28½ (29-30) cm. Insert a marker in the right side = left ear flap. Then dec 1 st in the right side on every other row and inc 1 st in the left side on every other row until finished measurements = 31-33-35 (36-38) cm. Cast off. ASSEMBLY: Sew the tips at the top of the hat (on opposite side of markers) tog edge to edge with little stitches. Sew cast on edge and cast off edge tog mid back. TIES: Cast on 4 sts with light grey purple on needle size 2.5 mm. Work tube knitting - Read explanation above. Cast off when the tie measures approx. 16-18-20 (22-24) cm. Knit a similar tie. Fasten one tie in each ear flap. ____________________________________________________________________ DRESS: MOSS ST (in the round on double pointed needles): ROUND 1: * K 1, P 1 *, repeat from *-*. ROUND 2: K over P and P over K. Repeat 2nd round. INCREASE TIP: Inc 1 st by working 2 sts in 1 st before and after the marker. GARTER ST (back and forth on needle): K all rows. PATTERN: See diagrams M.1 and M.2. BUTTON HOLES: Cast off for button holes by K 4th and 5th st from edge tog, then make 1 YO. Cast off for 5-5-5 (6-6) button holes on right band when piece measures from where legs were placed tog: 1/3 months: 6, 12, 17, 22, 27 cm. 6/9 months: 6, 12, 18, 24, 30 cm. 12/18 months: 7, 14, 21, 28, 34 cm. 2 years: 7, 14, 20, 26, 32, 38 cm 3/4 years: 7, 14, 21, 28, 35, 42 cm ---------------------------------------------------------- LEG: Worked in the round on double pointed needles. Cast on 38-44-50 (54-60) sts on double pointed needles size 2.5 mm with grey purple, work moss st for 9-10-10 (10-10) cm - Read explanation above. Insert a marker at beg of round (= inside of leg) and move the marker upwards. Then switch to light grey purple and then continue in stocking st - while at the same time inc 1 st on next round on each side of marker - Read INCREASE TIP above. Repeat inc every 2-3-4 (4-4) rounds a total of 14-15-16 (18-19) times = 66-74-82 (90-98) sts. When piece measures 21-25-29 (33-37) cm, cast off 2 sts on each side of marker (= 4 sts cast off) = 62-70-78 (86-94) sts. Put piece aside and knit another leg the same way. BODY: Slip both legs in on same circular needle size 2.5 mm with cast off sts towards each other = 124-140-156 (172-188) sts. Now measure piece from here. Continue to work back and forth from mid front with light grey purple as follows (1st row = RS): Cast on 5 new sts on needle, K over all sts and cast on 5 new sts at the end of row = 134-150-166 (182-198) sts. Insert a marker 36-40-44 (48-52) sts in from each side (= 62-70-78 (86-94) sts between markers on back piece). Move the markers upwards when working. Then work in stocking st but work the 5 outermost sts in each side towards mid front in garter st until finished measurements (= bands). AT THE SAME TIME when piece measures 6-6-7 (7-7) cm, cast off for first button hole on right band - Read explanation above. When piece measures 16-20-23 (26-29) cm, work diagram M.1 on next row from RS with 5 band sts in each side. NOTE: On last row in diagram M.1 (= WS), cast off 4-4-4 (5-5) sts on each side of every marker for armholes (= 8-8-8 (10-10) dec sts in each side) = 118-134-150 (162-178) sts. Now the piece measures approx. 20-24-27 (30-33) cm from where legs were placed tog. Put piece aside and knit the sleeves. SLEEVE: Worked in the round on double pointed needles. Cast on 38-40-42 (44-46) sts on double pointed needles size 2.5 mm with grey purple, work moss st for 5-5-5 (6-6) cm. Insert a marker at beg of round (= mid under sleeve) and move the marker upwards. Then switch to light grey purple and then continue in stocking st - while at the same time inc 1 st on next round on each side of marker. Repeat inc every 2-3-3 (4-5) rounds a total of 7-8-9 (10-11) times = 52-56-60 (64-68) sts. When piece measures 10-13-15 (18-23) cm, work diagram M.1 - On last round in diagram M.1, cast off 4-4-4 (5-5) sts on each side of marker for armhole (= 8-8-8 (10-10) sts cast off) = 44-48-52 (54-58) sts. Put piece aside and knit another sleeve the same way. YOKE: Slip sleeves on to same circular needle as body where armholes were cast off = 206-230-254 (270-294) sts. Then work diagram M.2 back and forth with 5 band sts in garter st in each side towards mid front (1st row = RS). NOTE: Dec 20-20-24 (24-28) sts evenly on row which is marked with an arrow in diagram M.2. REMEMBER TO CONTINUE TO CAST OFF FOR BUTTON HOLES ON RIGHT BAND! When diagram M.2 has been worked, there are 86-110-110 (126-126) sts on needle and piece measures approx. 12-12-13 (14-15) cm from where sleeves were placed tog (i.e. 1st row in diagram M.2). NECK EDGE: Then work back and forth in moss st with grey purple as follows: K from RS while at the same time dec 4-20-16 (30-26) sts evenly on 1st row (= RS) = 82-90-94 (96-100) sts. Then work 1 row in moss st. On next row from RS, cast off for last button hole on right band. Continue in moss st until neck edge measures 2-2-2 (3-3) cm. Loosely cast off all sts. ASSEMBLY: Sew tog the openings under the sleeves and between the legs, sew on buttons. |
||||||||||
Diagram explanations |
||||||||||
|
||||||||||
 |
||||||||||
 |
||||||||||
Have you finished this pattern?Tag your pictures with #dropspattern #wonderchildset or submit them to the #dropsfan gallery. Do you need help with this pattern?You'll find 19 tutorial videos, a Comments/Questions area and more by visiting the pattern on garnstudio.com. © 1982-2026 DROPS Design A/S. We reserve all rights. This document, including all its sub-sections, has copyrights. Read more about what you can do with our patterns at the bottom of each pattern on our site. |
||||||||||


With over 40 years in knitting and crochet design, DROPS Design offers one of the most extensive collections of free patterns on the internet - translated to 17 languages. As of today we count 324 catalogues and 12290 patterns translated into English (UK/cm).
We work hard to bring you the best knitting and crochet have to offer, inspiration and advice as well as great quality yarns at incredible prices! Would you like to use our patterns for other than personal use? You can read what you are allowed to do in the Copyright text at the bottom of all our patterns. Happy crafting!
Post a comment to pattern DROPS Baby 21-4
We would love to hear what you have to say about this pattern!
If you want to leave a question, please make sure you select the correct category in the form below, to speed up the answering process. Required fields are marked *.