DROPS BabyAlpaca Silk
70% Alpaca, 30% Silk
Discontinued
find alternatives
DROPS SS24

Wonderchild

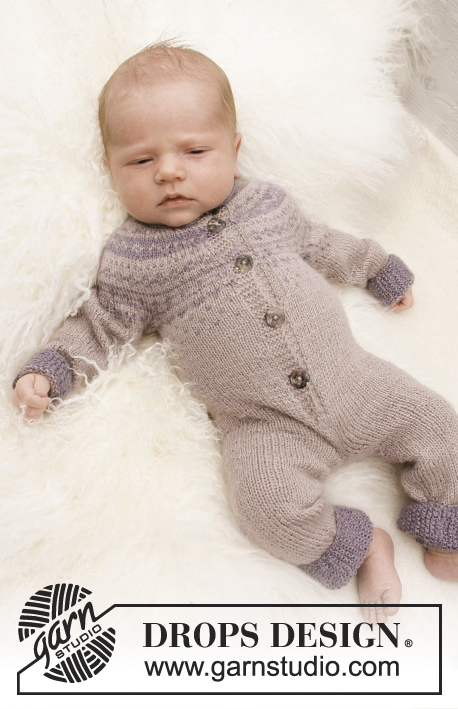
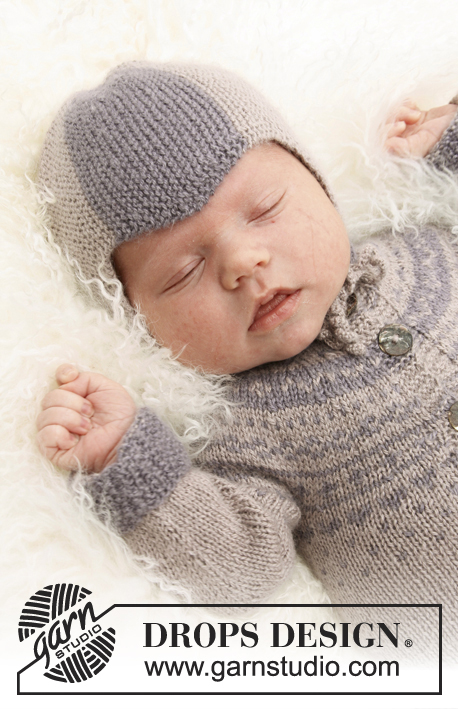
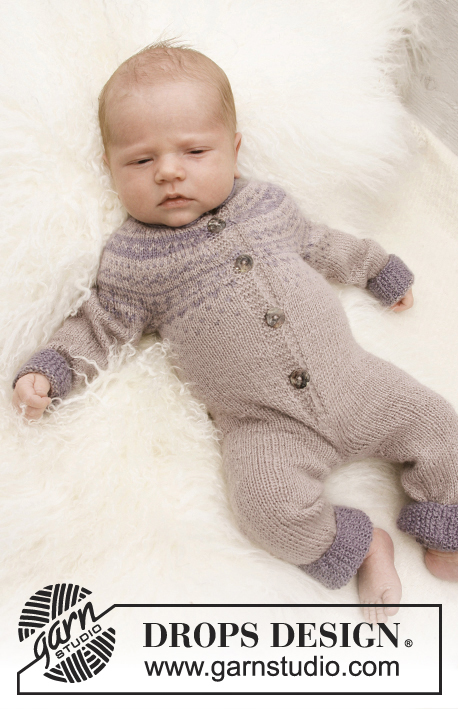
Set of knitted hat and overall with Nordic pattern for baby and children in DROPS BabyAlpaca Silk

DROPS Baby 21-4
DROPS design: Pattern no BS-004-by/BS-005-by
Yarn group A
----------------------------------------------------------
HAT:
Size: 1/3 - 6/9 - 12/18 months (2 - 3/4) years
Size in cm: 50/56-62/68-74/88 (86/92-98/104)

Materials: DROPS BABYALPACA SILK from Garnstudio
Colour no 1760, light grey purple: 50-50-50 (100-100) g
Colour no 4314, grey purple: 50-50-50 (50-50) g

DROPS STRAIGHT NEEDLES SIZE 2.5 mm - or size needed to get 26 sts x 34 rows in stocking st = 10 x 10 cm.
------------------------------------------------------

DRESS:
Size: 1/3 - 6/9 - 12/18 months (2 - 3/4) years
Size in cm: 50/56-62/68-74/88 (86/92-98/104)

Materials: DROPS BABYALPACA SILK from Garnstudio
Colour no 1760, light grey purple: 150-150-150 (200-200) g
Colour no 4314, grey purple: 50-50-50 (100-100) g

DROPS CIRCULAR NEEDLE SIZE 2.5 mm (60 cm) - or size needed to get 26 sts x 34 rows in stocking st = 10 x 10 cm.
DROPS DOUBLE POINTED NEEDLES SIZE 2.5 mm - for arms and legs.

DROPS MOTHER-OF-PEARL BUTTON, NO 521 (15 mm): 6-6-6 (7-7) pieces

-------------------------------------------------------

Alternative Yarn – See how to change yarns here
Yarn Groups A to F – Use the same pattern and change the yarn here
Yarn usage using an alternative yarn – Use our yarn converter here

-------------------------------------------------------

DROPS BabyAlpaca Silk
70% Alpaca, 30% Silk
Discontinued
find alternatives

Pattern instructions

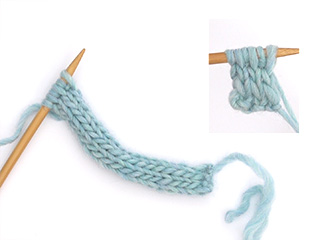
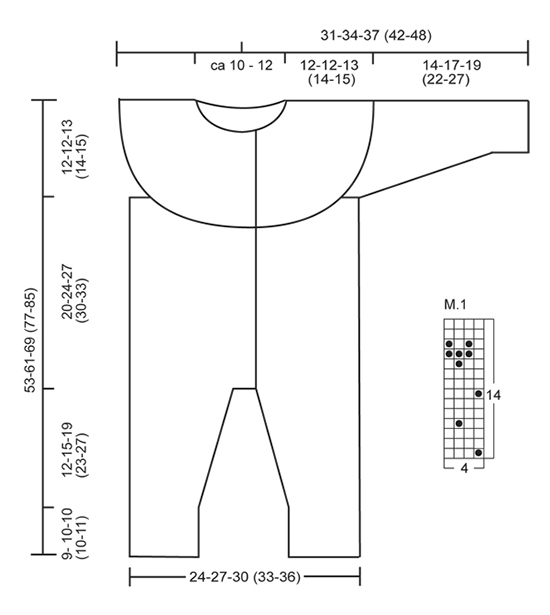
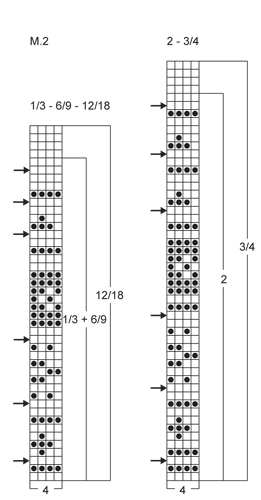
HAT:

INCREASE TIP:
Inc 1 st by making 1 YO, on next row K YO twisted (i.e. work in back loop of st instead front) to avoid holes.

GARTER ST (back and forth on needle): K all rows.

TUBE KNITTING:
* K 1, place yarn in front of piece (towards you), slip 1 st as if to P, place yarn behind piece (from you) *, repeat from *-* on all rows. This becomes a ribbon worked in the round.
----------------------------------------------------------

HAT:
The piece is worked sideways from mid back. Cast on 33-38-42 (46-50) sts with light grey purple on needle size 2.5 mm. Work in garter st - Read explanation above - While at the same time inc 1 st in the right side and dec 1 st in the left side as follows:
Row 1 (= RS): K 2, inc 1 st - Read INCREASE TIP above, work until 4 sts remain and K 2 tog, K 2.
Row 2 (= WS): K all sts.
Repeat these 2 rows until piece measures 5½-6-6½ (7-8) cm. Insert a marker in the right side = right ear flap. REMEMBER THE KNITTING TENSION!
Then dec 1 st in the right side and inc 1 st in the left side as follows:
Row 1 (= RS): K 1, slip 1 st as if to K, K 1, psso, work until 2 sts remain, inc 1 st, K 2.
Row 2 (= WS): K all sts.
Repeat these 2 rows until piece measures a total of 11-12-13 (14-16) cm (= 5½-6-6½ (7-8) cm more).
Then switch to grey purple and continue in garter st as follows: Inc 1 st in the right side every 4 rows and dec 1 st in the left side every other row until piece measures 15½-16½-17½ (18-19) cm (= the middle tip that goes down the forehead mid front).
Then continue in garter st as follows: Dec 1 st in the right side every 4 rows and inc 1 st in the left side every other row until piece measures 20-21-22 (22-22) cm.
Then switch back to light grey purple and continue in garter st as follows: Dec 1 st in the left side every other row and inc 1 st in the right side every other row until piece measures 25½ -27-28½ (29-30) cm. Insert a marker in the right side = left ear flap.
Then dec 1 st in the right side on every other row and inc 1 st in the left side on every other row until finished measurements = 31-33-35 (36-38) cm. Cast off.

ASSEMBLY:
Sew the tips at the top of the hat (on opposite side of markers) tog edge to edge with little stitches. Sew cast on edge and cast off edge tog mid back.

TIES:
Cast on 4 sts with light grey purple on needle size 2.5 mm. Work tube knitting - Read explanation above. Cast off when the tie measures approx. 16-18-20 (22-24) cm. Knit a similar tie. Fasten one tie in each ear flap.
____________________________________________________________________

DRESS:
MOSS ST (in the round on double pointed needles):
ROUND 1: * K 1, P 1 *, repeat from *-*.
ROUND 2: K over P and P over K. Repeat 2nd round.

INCREASE TIP:
Inc 1 st by working 2 sts in 1 st before and after the marker.

GARTER ST (back and forth on needle): K all rows.

PATTERN: See diagrams M.1 and M.2.

BUTTON HOLES:
Cast off for button holes by K 4th and 5th st from edge tog, then make 1 YO.
Cast off for 5-5-5 (6-6) button holes on right band when piece measures from where legs were placed tog:
1/3 months: 6, 12, 17, 22, 27 cm.
6/9 months: 6, 12, 18, 24, 30 cm.
12/18 months: 7, 14, 21, 28, 34 cm.
2 years: 7, 14, 20, 26, 32, 38 cm
3/4 years: 7, 14, 21, 28, 35, 42 cm
----------------------------------------------------------

LEG:
Worked in the round on double pointed needles. Cast on 38-44-50 (54-60) sts on double pointed needles size 2.5 mm with grey purple, work moss st for 9-10-10 (10-10) cm - Read explanation above. Insert a marker at beg of round (= inside of leg) and move the marker upwards. Then switch to light grey purple and then continue in stocking st - while at the same time inc 1 st on next round on each side of marker - Read INCREASE TIP above. Repeat inc every 2-3-4 (4-4) rounds a total of 14-15-16 (18-19) times = 66-74-82 (90-98) sts. When piece measures 21-25-29 (33-37) cm, cast off 2 sts on each side of marker (= 4 sts cast off) = 62-70-78 (86-94) sts. Put piece aside and knit another leg the same way.

BODY:
Slip both legs in on same circular needle size 2.5 mm with cast off sts towards each other = 124-140-156 (172-188) sts. Now measure piece from here. Continue to work back and forth from mid front with light grey purple as follows (1st row = RS): Cast on 5 new sts on needle, K over all sts and cast on 5 new sts at the end of row = 134-150-166 (182-198) sts. Insert a marker 36-40-44 (48-52) sts in from each side (= 62-70-78 (86-94) sts between markers on back piece). Move the markers upwards when working. Then work in stocking st but work the 5 outermost sts in each side towards mid front in garter st until finished measurements (= bands). AT THE SAME TIME when piece measures 6-6-7 (7-7) cm, cast off for first button hole on right band - Read explanation above.
When piece measures 16-20-23 (26-29) cm, work diagram M.1 on next row from RS with 5 band sts in each side. NOTE: On last row in diagram M.1 (= WS), cast off 4-4-4 (5-5) sts on each side of every marker for armholes (= 8-8-8 (10-10) dec sts in each side) = 118-134-150 (162-178) sts. Now the piece measures approx. 20-24-27 (30-33) cm from where legs were placed tog. Put piece aside and knit the sleeves.

SLEEVE:
Worked in the round on double pointed needles. Cast on 38-40-42 (44-46) sts on double pointed needles size 2.5 mm with grey purple, work moss st for 5-5-5 (6-6) cm. Insert a marker at beg of round (= mid under sleeve) and move the marker upwards. Then switch to light grey purple and then continue in stocking st - while at the same time inc 1 st on next round on each side of marker. Repeat inc every 2-3-3 (4-5) rounds a total of 7-8-9 (10-11) times = 52-56-60 (64-68) sts. When piece measures 10-13-15 (18-23) cm, work diagram M.1 - On last round in diagram M.1, cast off 4-4-4 (5-5) sts on each side of marker for armhole (= 8-8-8 (10-10) sts cast off) = 44-48-52 (54-58) sts. Put piece aside and knit another sleeve the same way.

YOKE:
Slip sleeves on to same circular needle as body where armholes were cast off = 206-230-254 (270-294) sts. Then work diagram M.2 back and forth with 5 band sts in garter st in each side towards mid front (1st row = RS). NOTE: Dec 20-20-24 (24-28) sts evenly on row which is marked with an arrow in diagram M.2. REMEMBER TO CONTINUE TO CAST OFF FOR BUTTON HOLES ON RIGHT BAND! When diagram M.2 has been worked, there are 86-110-110 (126-126) sts on needle and piece measures approx. 12-12-13 (14-15) cm from where sleeves were placed tog (i.e. 1st row in diagram M.2).

NECK EDGE:
Then work back and forth in moss st with grey purple as follows: K from RS while at the same time dec 4-20-16 (30-26) sts evenly on 1st row (= RS) = 82-90-94 (96-100) sts. Then work 1 row in moss st. On next row from RS, cast off for last button hole on right band. Continue in moss st until neck edge measures 2-2-2 (3-3) cm. Loosely cast off all sts.

ASSEMBLY:
Sew tog the openings under the sleeves and between the legs, sew on buttons.

Diagram

symbols = light grey purple
symbols = grey purple
symbols = decrease
diagram
diagram

Each of our patterns has specific tutorial videos to help you.

Do you have a question? See a list of frequently asked questions (FAQ)

Knitting tension is what determines the final measurements of your work, and is usually measured per 10 x 10 cm. It is provided like so: number of stitches in width x number of rows in height - eg: 19 stitches x 26 rows = 10 x 10 cm.

The knitting tension is very individual; some people knit/crochet loosely while others work tightly. You adjust the knitting tension with the needle size, which is why the suggested needle size is only meant as a guide! You need to adjust this (up or down) to ensure that YOUR knitting tension matches the knitting tension provided in the pattern. If you work with a different knitting tension than provided you will have a different yarn consumption, and your work will have different measurements than what the pattern suggests.

The knitting tension also determines which yarns can replace each other. As long as you achieve the same knitting tension you can replace one yarn with another.

See DROPS lesson: How to measure your tension/gauge

See DROPS video: How to make a gauge tension swatch

The required amount of yarn is provided in grams, eg: 450 g. To calculate how many balls you’ll need you first need to know how many grams are in 1 ball (25g, 50g or 100g). This information is available if you click on the individual yarn quality on our pages. Divide the amount required with the amount of each ball. For example, if each ball is 50g (the most common amount), the calculation will be as follows: 450 / 50 = 9 balls.

The important thing when changing from one yarn to another is that the knitting/crochet tension remains the same. This is so that the measurements of the finished piece will be the same as on the sketch provided. It is easier to achieve the same knitting tension using yarns from the same yarn group. It is also possible to work with multiple strands of a thinner yarn to achieve the knitting tension of a thicker one. Please try our yarn converter. We recommend you to always work a test swatch.

Please NOTE: when changing yarn the garment might have a different look and feel to the garment in the photo, due to individual properties and qualities of each yarn.

See DROPS lesson: Can I use a different yarn than the one mentioned in the pattern?

All our yarns are categorised into yarn groups (from A to F) according to thickness and knitting tension – group A contains the thinnest yarns and group F the thickest. This makes it easier for you to find alternative yarns to our patterns, should you wish to switch yarn. All yarns within the same group have a similar knitting tension and can easily replace each other. However, different yarn qualities have different structures and properties which will give the finished work a unique look and feel.

Click here for an overview of the yarns in each yarn group

At the top of all our patterns you’ll find a link to our yarn calculator, which is a helpful tool should you wish to use a different yarn than suggested. By filling in the yarn quality you wish to replace, the amount (in your size) and number of strands, the calculator will present good alternative yarns with the same knitting tension. Additionally it will tell you how much you’ll require in the new qualities and whether you’ll need to work with multiple strands. Most skeins are 50g (some are 25g or 100g).

If the pattern is worked with multiple colours, every colour will have to be calculated separately. Similarly, if the pattern is worked with several strands of different yarns (for example 1 strand Alpaca and 1 strand Kid-Silk) you will have to find alternatives for each, individually.

Click here to see our yarn calculator

Since different yarns have different qualities and textures we have chosen to keep the original yarn in our patterns. However, you can easily find options among our available qualities by using our yarn calculator, or simply pick a yarn from the same yarn group.

It is possible that some retailers still have discontinued yarns in stock, or that someone has a few skeins at home that they would like to find patterns for.

The yarn calculator will provide both alternative yarn as well as required amount in the new quality.

If you think it's hard to decide what size to make, it can be a good idea to measure a garment you own already and like the size of. Then you can pick the size by comparing those measures with the ones available in the pattern's size chart.

You'll find the size chart at the bottom of the pattern.

See DROPS lesson: How to read size chart

The needle size provided in the pattern serves only as a guide, the important thing is to follow the knitting tension. And since knitting tension is very individual, you will have to adjust the needle size to ensure that YOUR tension is the same as in the pattern – maybe you’ll have to adjust 1, or even 2 needle sizes, up or down to achieve the correct tension. For this, we recommend that you work test swatches.

Should you work with a different knitting tension than the one provided, the measurements of the finished garment might deviate from the measurement sketch.

See DROPS lesson: How to measure your tension/gauge

See DROPS video: How to make a tension/gauge swatch

Working a garment top-down provides more flexibility and room for personal adjustment. For example it is easier to try the garment on while working, as well as making adjustments to length of yoke and shoulder caps.

The instructions are carefully explaining every step, in the correct order. Diagrams are adjusted to the knitting direction and are worked as usual.

The diagram depicts all rows/rounds, and every stitch seen from the right side. It is read from bottom to top, from right to left. 1 square = 1 stitch.

When working back and forth, every other row is worked from the right side and every other row is worked from the wrong side. When working from the wrong side, the diagram will have to be worked reversed: from left to right, knit stitches are purled, purl stitches are knit etc.

When working in the round every round is worked from the right side and the diagram are worked from right to left on all rounds.

See DROPS lesson: How to read knitting diagrams

The diagram depicts all rows/rounds, and every stitch seen from the right side. It is worked from bottom to top, from right to left.

When working back and forth every other row is worked from the right side: from right to left and every other row is worked from the wrong side: from left to right.

When working in the round, every row in the diagram are worked from the right side, from right to left.

When working a circular diagram you start in the middle and work your way outwards, counter clockwise, row by row.

The rows usually start with a given number of chain stitches (equivalent to the height of the following stitch), this will either be depicted in the diagram or explained in the pattern.

See DROPS lesson: How to read crochet diagrams

Instructions for working several diagrams after each other on the same row/round, will often be written like so: “work A.1, A.2, A.3 a total of 0-0-2-3-4 times". This means you work A.1 once, then A.2 is worked once, and A.3 is repeated (in width) the number of times provided for your size – in this case like so: S = 0 times, M = 0 times, L=2 times, XL= 3 times and XXL = 4 times.

The diagrams are worked as usual: begin with the first row in A.1, then work the first row in A.2 etc.

See DROPS lesson: How to read knitting diagrams

See DROPS lesson: How to read crochet diagrams

The total width of the garment (from wrist-to-wrist) will be larger in the larger sizes, despite the actual sleeves being shorter. The larger sizes have longer sleeve caps and wider shoulders, so there will be a good fit in all sizes.

The measurement sketch/schematic drawing provides information regarding the full length of the garment. If it’s a jumper or a jacket the length is measured from the highest point on the shoulder closest to the neckline, and straight down to the bottom of the garment. It is NOT measured from the tip of shoulder. Similarly, the length of yoke is measured from the highest point on the shoulder and down to where yoke is split into body and sleeves.

On a jacket measures are never taken along bands, unless specifically stated. Always measure inside band stitches when measuring the length.

See DROPS lesson: How to read a schematic drawing

Diagrams are often repeated on the round or in height. 1 repeat is the diagram the way it appears in the pattern. If it says to work 5 repeats of A.1 in the round, then you work A.1 a total of 5 times after/next to each other in the round. If it says to work 2 repeats of A.1 vertically/in height you work the entire diagram once, then begin again at the start and work the entire diagram one more time.

Chain stitches are slightly narrower than other stitches and to avoid working the cast-on edge too tight, we simply chain more stitches to begin with. The stitch count will be adjusted on the following row to fit the pattern and measurement sketch.

The rib edge is more elastic and will contract slightly compared to, for example, stocking stitch. By increasing before the rib edge, you avoid a visible difference in width between the rib edge and the rest of the body.

It’s very easy to cast off too tightly, and by making yarn overs while casting off (and simultaneously casting these off) you avoid a too tight cast off edge.

See DROPS video: How to bind off with yarn overs (yo)

To achieve an even increase (or decrease) you can increase on, for example: every 3rd and 4th row alternately, like so: work 2 rows and increase on the 3rd row, work 3 rows and increase on the 4th. Repeat this until the increase is complete.

See DROPS lesson: Increase or decrease 1 st on every 3rd and 4th row alternately

Should you prefer to work in the round instead of back and forth, you may of course adjust the pattern. You’ll need to add steeks mid-front (usually 5 stitches), and follow the instructions. When you would normally turn and work from the wrong side, simply work across the steek and continue in the round. At the end you’ll cut the piece open, pick up stitches to work bands, and cover the cut edges.

See DROPS video: How to knit steeks and cut open

Should you prefer to work back and forth instead of in the round, you may of course adjust the pattern so you work the pieces separately and then assemble them at the end. Divide the stitches for the body in 2, add 1 edge stitch in each side (for sewing) and work the front and back pieces separately.

See DROPS lesson: Can I adapt a pattern for circular needles into straight needles?

Pattern repeats can vary slightly in the different sizes, in order to get the correct proportions. If you’re not working the exact same size as the garment in the photo, yours might deviate slightly. This has been carefully developed and adjusted so that the complete impression of the garment is the same in all sizes.

Make sure to follow instructions and diagrams for your size!

If you have found a pattern you like which is available in women’s size it’s not very difficult to convert it to men’s size. The biggest difference will be the length of sleeves and body. Start working on the women size that you think would fit across the chest. The additional length will be worked right before you cast off for the armhole/sleeve cap. If the pattern is worked top-down you can add the length right after the armhole or before the first decrease on sleeve.

Regarding additional yarn amount, this will depend on how much length you add, but it is better with a skein too many than too few.

All yarns will have excess fibres (from production) that might come off as lint or shedding. Brushed yarns (ie hairier yarns) have more of these loose, excess fibres, causing more shedding.

Shedding also depends on what is worn under or over the garment, and whether this pulls at the yarn fibres. It’s therefore not possible to guarantee that there will be no shedding

Below are some tips on how to get the best result when working with hairier yarns:

1. When the garment is finished (before you wash it) shake it vigorously so the looser hairs come off. NOTE: do NOT use a lint roller, brush or any method that pulls at the yarn.

2. Place the garment in a plastic bag and put it in your freezer - the temperature will cause the fibres to become less attached to each other, and excess fibres will come off easier.

3. Leave in the freezer for a few hours before taking it out and shaking it again.

4. Wash the garment according to the instructions on the yarn label.

Pilling is a natural process that happens to even the most exclusive of fibers. It's a natural sign of wear and tear that is hard to avoid, and that is most visible in high friction areas of your garment like a sweater's arms and cuffs.

You can make your garment look as new by removing the pilling, using a fabric comb or a pill/lint remover.

Still can't find the answer you need? Then scroll down and leave your question so one of our experts can try to help you. This will be done normally within 5 to 10 working days.
In the meantime, you can read the questions and answers that others have left to this pattern or join the DROPS Workshop on Facebook to get help from fellow knitters/crocheters!

You might also like...

Post a comment to pattern DROPS Baby 21-4

We would love to hear what you have to say about this pattern!

If you want to leave a question, please make sure you select the correct category in the form below, to speed up the answering process. Required fields are marked *.

Comments / Questions (54)

country flag Vivia wrote:

Jeg ved det er til forkant, men HVOR skal de hæftes? Skal de ovelappes helt ud over forstykkerne? Intet andet giver mening.

09.03.2024 - 20:57

country flag Vivia wrote:

Hvordan skal det hele syes sammen mellem benene? Når jeg har syet benene sammen, er der 5 masker på hver side, der overhoved ikke passer til. Jeg har strikket denne opskrift før, og fik det heller ikke at passe, så jeg måtte pille det op helt ned til benene, og finde på noget nyt. Prøv du og strik det, og fortæl mig så om du ser noget galt…

02.03.2024 - 22:31

DROPS Design answered:

Hej Vivia, jo de 5 nye masker i hver side er forkanter til knapper og knaphuller.

05.03.2024 - 14:40

country flag Delphine wrote:

Bonjour, J'ai fini de tricoter les 2 jambes mais c'est physiquement impossible de les reprendre sur les aiguilles circulaires. J'ai regardé les vidéos du tutoriel et celle-ci: "How to slip 2 legs for pants on to the same circular needle", rien n'y fait, je ne peux simplement pas assembler les jambes et poursuivre le tricot vers le dos et le devant. Est-ce que j'ai raté quelque chose?

22.06.2021 - 14:57

DROPS Design answered:

Bonjour Delphine, les premiers rangs peuvent être un peu "tricky", mais si vous utilisez la technique du magic loop et que vous placez bien vos mailles (les mailles rabattues doivent être les unes contre les autres), vous devriez y arriver. Votre magasin devrait pouvoir vous aider si besoin, ce sera plus facile pour eux en voyant ce que vous avez fait (même en photo). Bonne continuation!

22.06.2021 - 16:39

country flag Helene Hagström wrote:

Hej, hittar inte mönstret på sparkdräkten på svenska? Bara mössan är ju med?

19.03.2021 - 10:15

country flag Sandra wrote:

Gracias!! Ya me di cuenta al leer todas las instrucciones hay algún momento que se detalla :) Por cierto, me ha quedado muy bien! :D espero estrenarlo en enero :D

12.11.2019 - 23:55

country flag Sandra wrote:

Alguien puede decirme qué significasn las siglas de “MP”? Por ejemplo cuando dice en el patron “insertar un MP en el lado derecho”... ¿? Gracias de antemano a quien me responda Saludos

03.11.2019 - 00:08

DROPS Design answered:

Hola Sandra. MP es marcapuntos. Insertar un marcapuntos en el lado derecho del gorro para marcar donde se trabaja la orejera derecha.

05.11.2019 - 00:14

country flag Elizabeth Marie Knudsen wrote:

Jeg skulle gjerne hatt skissen til baby hjelmlua på alle oppskriftene slik at vi ser hvordan strikketøyet ser ut før søm. På Ready to Cheer er det f.eks skisse til voksen hjelmlue.

09.10.2019 - 13:14

DROPS Design answered:

Hej Elizabeth, Sådan her skal det se ud :)

How to knit a baby helmet hat (worked sideways) from Garnstudio Drops design on Vimeo.

09.10.2019 - 14:12

country flag Anita Holm wrote:

Oppskriften til luen er ikke bra Man legger opp 38 maske og ender opp med over 50 masker. Sidene på luen blir da ikke av samme störrelse.

22.09.2019 - 23:11

country flag Margit Mikkelsen wrote:

Jeg strikker huen og er blevet forvirret over, Hvornår skal man tage ind ved at strikke 2 masker sammen eller 1 løs maske af? Når man lægger 1 maske ud på have anden pind og 1 ind på hver 4 pind må det give flere masker på pinden ?

02.04.2019 - 12:08

DROPS Design answered:

Hej Margit, Se her hvordan du taget ud i den ene side og ind i den anden side til djævlehuen :) Hvordan strikker man en djævlehue

05.04.2019 - 14:58

country flag Malene wrote:

Hei, Jeg planlegger å strikke lua, men kun i en farge. Hvor mange gram garn trenger jeg til hele lua? Jeg forstår ikke hva det menes med 50-50-50 (100-100)g og 50-50-50 (50-50)g. På forhånd takk :)

06.03.2019 - 20:27

DROPS Design answered:

Hei Malene. Tallene som står etter hverandre med bindestrek mellom er hver sin størrelse. På toppen av oppskriften ser du størrelsesinndelingen, velg din størrelse og følg det tallet i rekken hele veien. Feks; strikker du størrelse 12/18 mnd følger du tall nummmer 3 - rett før tallene i parentes. Vi har dessverre ikke oversikt over hvor mye luen veier i hver størrelse med kun 1 farge, men vi runder alltid opp til nærmeste hele nøste når vi beregner garn til oppskriftene. God fornøyelse

08.03.2019 - 15:03