
Popular categories
Looking for a yarn?


Comments / Questions (128)
![]() Carmen Martinez wrote:
Carmen Martinez wrote:
Tienen el video de esta prenda ? O como lo puedo conseguir? Gracias
03.06.2018 - 18:17
![]() Anita wrote:
Anita wrote:
Ja , aber der Stricktipp sagt doch, das man die erste Masche nach dem umdrehen nur abheben soll, damit kein Loch entsteht, habe ich einen Denkfehler? Danke für die schnelle Antwort
31.03.2018 - 10:07DROPS Design answered:
Liebe Anita, trotzdem entstehen kleine Löcher bei den verkürtzen Reihen, versuchen Sie mit einer kleine Maschenprobe, damit Sie die gewünschten Löcher bekommen. Viel Spaß beim stricken!
03.04.2018 - 08:12
![]() Anita wrote:
Anita wrote:
Auf dem Bild sieht man 2 Lochreihen, einige cm über dem Muster und weiter oben, über dem Ärmel vorbei. Ist die Anleitung dazu irgendwo beschrieben, ich sehe es leider nicht. Gerade das schaut sehr hübsch aus. Vielen Dank für Ihre Hilfe
30.03.2018 - 16:39DROPS Design answered:
Liebe Anita, die Löcher, die Sie meinen, entstehen, wenn die verkürzten Reihen gestrickt werden. Viel Spaß beim Stricken!
31.03.2018 - 09:39
![]() Lena Ohlsson wrote:
Lena Ohlsson wrote:
Nästan klar! :-) Ett par kommentarer: - Placering av knapphål på foto av plagget stämmer inte med stickbeskrivning. Knapphål på bild glesare placerade än enligt beskrivning. - Föreslår att mönstret får namnet Neila efter min kära bonusdotterdotter som snart har en ny kofta. ;-)
13.09.2017 - 19:35
![]() Elsebeth Buxbom wrote:
Elsebeth Buxbom wrote:
Jeg forstår ikke lige hvor jeg skal måle de 16 cm fra og hvis forstykkerne hver er 16 cm, hvordan kan det så være at bredden på trøjen kun er 28 cm? Mvh Elsebeth
10.07.2017 - 09:40DROPS Design answered:
Hej Elsebeth, du skal måle lige nedenfor den første vending (lige over M.1) hvis du følger målene i opskriften får du ca 2 cm som kan overlappe til knapper på forstykkerne. God fornøjelse!
12.07.2017 - 12:19
![]() Mary wrote:
Mary wrote:
Is the M.1 to be worked from bottom to top or from top to bottom?
03.04.2016 - 23:26DROPS Design answered:
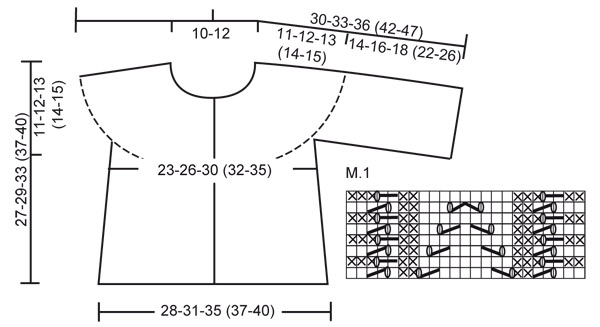
Dear Mary, diagram M.1 is to be worked from bottom up and it shows are all rows in pattern seen from RS. Happy knitting!
04.04.2016 - 06:25
![]() Linda Blixt wrote:
Linda Blixt wrote:
Jag förstår inte var jag ska mäta när det står "17,5 cm från uppläggningskanten mätt precis nedanför den första vändningen (dvs. räta över M1).
29.03.2016 - 11:36DROPS Design answered:
Hej, Så här står det: SAMTIDIGT stickas det förkortade v så här – LÄS STICKTIPS: *sticka över de första 30-32-38 (42-47) m, vänd arb och sticka tillbaka, det här är första vändningen. Lycka till!
31.03.2016 - 09:53
![]() Pia Bjærge wrote:
Pia Bjærge wrote:
Hej Jeg skal i gang med første pind i mønsteret M1. Skal der ikke strikkes nogle masker ret inden jeg starter på mønsteret M1? Det ser ud som om der er en ret kant, den kant der efterfølgende skal samles masker op på og hækles kant på. På forhånd tak for hjælpen ;-)
10.01.2016 - 20:11DROPS Design answered:
Hej Pia, Nej bare følg mønsteret nøjagtig som der står, så får du jakken som på billedet. God fornøjelse!
26.01.2016 - 14:58
![]() Wagner Brigitte wrote:
Wagner Brigitte wrote:
Habe die Anleitung nach mehrmaligen lesen und paralleler Strickprobe doch noch verstanden. solch eine Strickart kannte ich bis jetzt nicht. bin schon beim zweiten Ärmel und es sieht richtig schön aus. Danke
29.09.2015 - 10:22
![]() Wagner Brigitte wrote:
Wagner Brigitte wrote:
Problem ab hier: die ersten 23 M. in M1, die restlichen M. re. GLEICHZEITIG ... Welche Maschen stricke ich dort, immer noch kraus und wie entstehen die "Löcher" und welche Maschen lege ich auf einen Hilfsfaden und wie entsteht der ausgestellte "Rock" ? Ich hab schon Raglan oder einzelne Teile gestrickt, aber hier sehe ich leider, leider nicht durch. Bitte helfen sie mir, ich würde mich wirklich sehr freuen. Vielen Dank im Voraus
24.09.2015 - 18:52DROPS Design answered:
Sie stricken die ersten 23 M der R im Muster M.1, die restlichen M stricken Sie kraus re. Sie stricken dabei gleichzeitig die verkürzten R wie beschrieben (dadurch ergibt sich die ausgestellte Form), wenden also nach der genannten Anzahl an M mitten in der Reihe. Die M, die Sie stilllegen, sind die M für die Seite der Jacke, also die M vom unteren Rand bis zum Armausschnitt, Sie beginnen beim Stillegen mit M.1.
13.10.2015 - 12:22
|
||||||||||||||||||||||
DROPS Baby 20-12 |
||||||||||||||||||||||
 |
 |
|||||||||||||||||||||
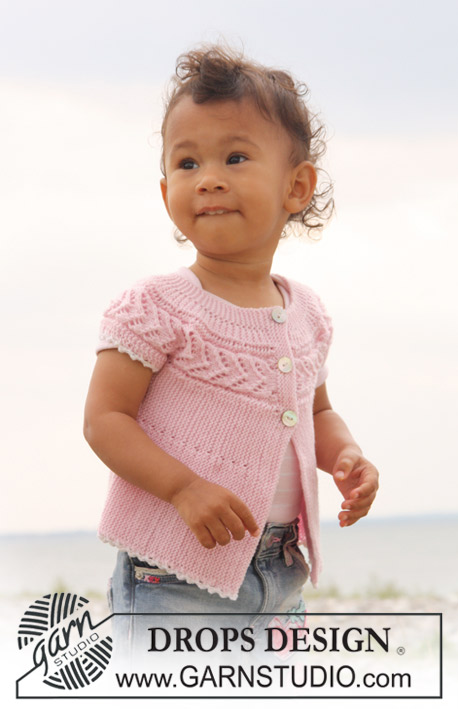
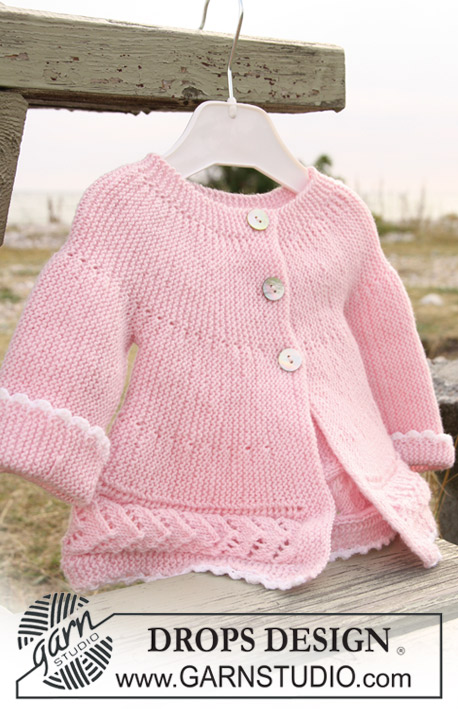
Jacket knitted from side to side in garter st and lace pattern for baby and children in DROPS BabyMerino
DROPS Baby 20-12 |
||||||||||||||||||||||
|
JACKET: PATTERN: See diagram M.1. Diagram shows the pattern from RS. KNITTING TIP: When turning mid piece, slip the first st as if to K, tighten thread and continue as before, do this to avoid a hole in transition. -------------------------------------------------------- -------------------------------------------------------- JACKET: Beg on left front piece, work towards the sleeve, back piece, the other sleeve and finish with right front piece. Loosely cast on 62-68-78 (88-96) sts on needle size 2.5 mm with Baby Merino and K 8 rows for front band (first row = RS). Work next row as follows from RS: K the first 15 sts, AT THE SAME TIME inc 8 sts evenly (inc1 st by making 1 YO), K remaining sts on needle = 70-76-86 (96-104) sts. K 1 row from WS on all sts, work YO into back of loop to avoid a hole. Continue as follows: work the first 23 sts on needle in M.1, and K remaining sts on every row. AT THE SAME TIME work shortened rows as follows – see KNITTING TIP: * work the first 30-32-38 (42-47) sts, turn piece and work return row, work the first 46-50-57 (65-70) sts, turn piece and work return row, work the first 64-70-80 (90-98) sts, turn piece and work return row, work all 70-76-86 (96-104) sts, turn and work return row *, repeat from *-* until piece measures approx 16-17.5-19.5 (20.5-22) cm from cast on row (measured just before the first turn, i.e. over M.1). Cut the thread. Now slip the first 41-45-52 (60-65) sts towards bottom edge on a stitch holder (= the side). Cast on 36-42-46 (60-70) new sts over sts on stitch holder (i.e. before the 29-31-34 (36-39) sts left on needle) for sleeve and now continue as follows (first row = from RS): * work the first 41-47-51 (65-75) sts, turn piece and work return row, work the first 59-67-74 (90-103) sts, turn piece and work return row, work all 65-73-80 (96-109) sts, turn and work return row *. Repeat from *-*. When piece measures 16-17-18 (18-20) cm from where sts for sleeve were cast on (measured where widest, i.e. along bottom edge) cast off 36-42-46 (60-70) sts from sleeve edge towards body piece. Cut the thread. Slip the 41-45-52 (60-65) sts from stitch holder at the side back on needle and insert a marker in piece. Continue from bottom of body piece as before from *-* as described for front piece (first row = from RS). When piece measures 28-31-35 (37-40) cm from marker (measured just before the first turn, i.e. over M.1) cut the thread. Slip the first 41-45-52 (60-65) sts towards bottom edge on a stitch holder (= the side). Cast on 36-42-46 (60-70) new sts over sts on stitch holder (i.e. before the 29-31-34 (36-39) sts left on needle) for sleeve and continue as before from *-* as described for the other sleeve. When sleeve measures the same as the left sleeve cast off 36-42-46 (60-70) sts from sleeve edge towards body piece. Cut the thread. Slip the 41-45-52 (60-65) sts from stitch holder at the side back on needle and continue from bottom of body piece as before from *-* as described for front piece (first row = RS). When right front piece measures the same as left front piece (less front band) work next row from RS as follows: K the first 23 sts, AT THE SAME TIME dec 8 sts evenly (dec 1 st by K2 tog) and K remaining 47-53-63 (73-81) sts on row = 62-68-78 (88-96) sts. Now work front band as follows (first row = from WS): K 3 rows on all sts, on next row from RS make 3 buttonholes as follows (i.e. from bottom edge towards neckline): K 41-45-53 (61-65) sts, 1 YO, K2 tog, K 7-8-9 (10-12) sts, 1 YO, K2 tog, K 7-8-9 (10-12) sts, 1 YO, K2 tog and finish with K1. Turn and K all sts on return row. Now K 5 rows on all sts and cast off loosely from RS. ASSEMBLY: Sew under arm seams, edge to edge. Sew on buttons. CROCHET BORDER: Crochet a border along bottom edge with crochet hook size 3 mm and white as follows: 1 dc, * 3 ch, 1 tr in the first of the 3 ch, skip approx 1 cm, 1 dc *, repeat from *-*. Crochet a similar border round both sleeves. |
||||||||||||||||||||||
Diagram explanations |
||||||||||||||||||||||
|
||||||||||||||||||||||
 |
||||||||||||||||||||||
Have you finished this pattern?Tag your pictures with #dropspattern or submit them to the #dropsfan gallery. Do you need help with this pattern?You'll find 15 tutorial videos, a Comments/Questions area and more by visiting the pattern on garnstudio.com. © 1982-2026 DROPS Design A/S. We reserve all rights. This document, including all its sub-sections, has copyrights. Read more about what you can do with our patterns at the bottom of each pattern on our site. |
||||||||||||||||||||||


With over 40 years in knitting and crochet design, DROPS Design offers one of the most extensive collections of free patterns on the internet - translated to 17 languages. As of today we count 324 catalogues and 12245 patterns translated into English (UK/cm).
We work hard to bring you the best knitting and crochet have to offer, inspiration and advice as well as great quality yarns at incredible prices! Would you like to use our patterns for other than personal use? You can read what you are allowed to do in the Copyright text at the bottom of all our patterns. Happy crafting!
Post a comment to pattern DROPS Baby 20-12
We would love to hear what you have to say about this pattern!
If you want to leave a question, please make sure you select the correct category in the form below, to speed up the answering process. Required fields are marked *.