
Popular categories
Looking for a yarn?


Comments / Questions (27)
![]() Karen wrote:
Karen wrote:
Is there a modern English written version of this pattern? Several of the terms I'm not familiar with. IE: P1 row from W and continue in rib K1/P1 with 1 edge stitch each side.?? Also the bind off instruction for the arm hole, not sure how many stitch over how many rows I suppose to do?? Also, on the Right Front piece "from mid front and RX: 2 GARTER STS- see above, however there is NO ABOVE? I'm not sure if the pattern is the lace section or M1 repeat?? please help Thank-you
24.02.2026 - 00:34DROPS Design answered:
Hi Karen, There is no other version of this pattern at the moment. Purl 1 row from the wrong side. Work rib (knit 1, purl 1), edge stitch in garter stitch which is described under Pattern Instructions under the photos. You bind off equally at the beginning of each row the number of stitches for your size (so x 1 will be 2 rows, etc.). The pattern on the back piece is M1 repeated on the row. Regards, Drops Team.
24.02.2026 - 06:58
![]() Elly Slierings wrote:
Elly Slierings wrote:
Goedendag, Ik wil graag model 115-15 maken maar zie bij het doorlezen van het patroon niet hoe de V- hals wordt gebreid. Ik hoop dat u mij kunt uitleggen hoe de V- hals in dit patroon ontstaat. Hartelijke groet, Elly Slierings
09.10.2021 - 09:43DROPS Design answered:
Dag Elly,
Er is niet echt een v-hals in dit patroon, dus de voorpanden worden niet 'afgeschuind' door minderingen, maar de v-lijn ontstaat (optisch) doordat de kraag een beetje opstaat bij de hals.
16.10.2021 - 13:57
![]() Hilde wrote:
Hilde wrote:
Ik wil l115-15 breien, en zie een uitleg voor het telpatroon, maar geen schema van het telpatroon. De eerste naald is duidelijk, maar hoe verder?
28.09.2019 - 16:34DROPS Design answered:
Dag Hilde,
De teltekening staat onder de matentekening (onder de mouw). Veel breiplezier!
29.09.2019 - 17:53
![]() Schenckbecher wrote:
Schenckbecher wrote:
Bonjour, je suis en train de réaliser la taille xl et je ne sais pas trop comment répartir les boutonnières, pouvez vous m'aider s'il vous plait, Merci
10.07.2019 - 20:52DROPS Design answered:
Bonjour Mme Schenckbecher, les boutonnières se font à la même hauteur pour toutes les tailles, mesurez à partir du rang de montage et ouvrez 4 boutonnières au total, à 10, 18, 26 et 34 cm de hauteur totale - cf BOUTONNIÈRES. Bon tricot!
11.07.2019 - 08:21
![]() Jen wrote:
Jen wrote:
On Fronts: Is the edge stitch knitted on RS and purled on WS? Or do you slip the edge st. on RS? Thankyou.
27.12.2014 - 18:38DROPS Design answered:
Dear Jen, there are different ways to work the edge sts, you can work here them as you are used to, they are then used for seams. Happy knitting!
30.12.2014 - 13:33
![]() Jen wrote:
Jen wrote:
Question: ON FRONTS: Do you slip the edge stitch on RS rows? Or is it just a single knitted stitch, purled on WS? ie: K1, Garter, M1 pattern on RS; M1 pattern, 2st Garter, Purl 1 on ws?
27.12.2014 - 16:53DROPS Design answered:
Dear Jen, on right front piece, you will start from RS with: 2 sts in garter st (towards mid front), *K1/P1*, then M1, and finish with 1 edge st (towards back piece). Happy knitting!
30.12.2014 - 14:45
![]() Alice wrote:
Alice wrote:
Dank voor het patroon. Er staat volgens mij wel een fout in. Er wordt aangegeven dat het telpatroon m.1 de goede kant van het werk weergeeft. In dat geval zou m.1 bestaan uit 8 naalden en krijg je niet het gewenste gaatjespatroon. Ervan uitgaande dat ook de verkeerde kant (de rij met blanco hokjes) is weergegeven, klopt het patroon wel. Vriendelijke groet, Alice
26.12.2013 - 18:50DROPS Design answered:
Hoi Alice. Het patroon klopt. De teltekening geeft het motief aan van de goede kant, maar beide naalden zijn weergegeven. Dus rij 1 is de goede kant (recht aan de goede kant) en rij 2 is de verkeerde kant (averecht aan de verkeerde kant)
29.12.2013 - 10:16
![]() Lucia wrote:
Lucia wrote:
Ho realizzato questo modello e sono molto soddisfatta del risultato ottenuto. mi e' rimasta della lana e vorrei fare una sciarpa da indossare col giacchino: potreste darmi un'idea su come farla? grazie.
12.01.2013 - 19:46DROPS Design answered:
Potrebbe fare il 141-10 oppure semplicemente fare una sciarpa simile al giacchino, con la maglia rasata e i bordi ad ogni estremità come sul giacchino.
27.01.2013 - 16:42
![]() NICOLAS wrote:
NICOLAS wrote:
Bonjour C'est bien votre diagramme mais il faudrait le faire sur plusieurs mailles car je voudrais savoir comment faire entre les deux points soit : deux mailles ensemble un jeté une maille un jeté un surjet simple et après on fait deux mailles et on reprend deux mailles ensemble etc...merci
21.09.2012 - 14:35DROPS Design answered:
Bonjour Madame Nicolas, le rang 1 de M.1 se tricote ainsi : 1 m end, 2 m ens à l'end, 1 jeté, 1 m end, 1 surjet simple, 1 m end. Le rang 3 se tricote ainsi : 2 m ens à l'end, 1 jeté, 3 m end, 1 jeté, 1 surjet simple. Vous répétez ces 7 mailles et ces 4 rangs. Bon tricot !
21.09.2012 - 14:40
![]() Ludmila wrote:
Ludmila wrote:
Moc moc se mi líbí, pustím se do něj co nevidět :o)
21.06.2010 - 15:17
|
|||||||||||||
Warm Cocoa |
|||||||||||||
|
|
|||||||||||||
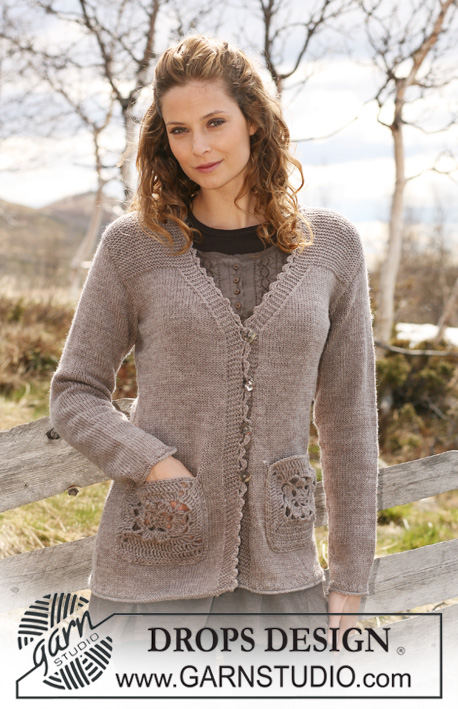
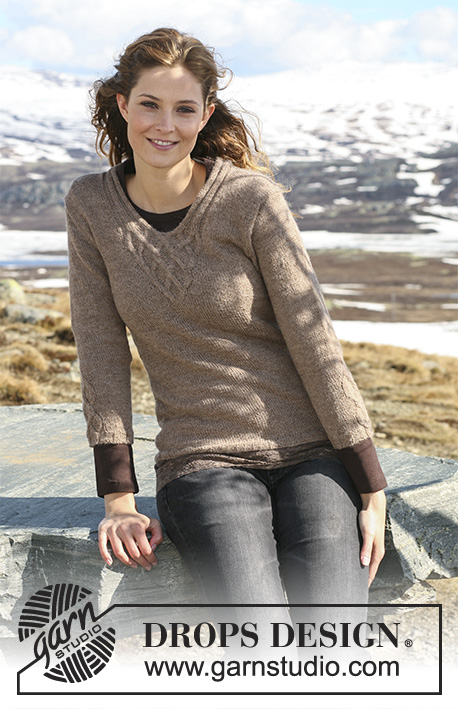
Knitted DROPS Jacket with rib and lace pattern in ”Karisma”. Size S – XXXL.
DROPS 115-15 |
|||||||||||||
|
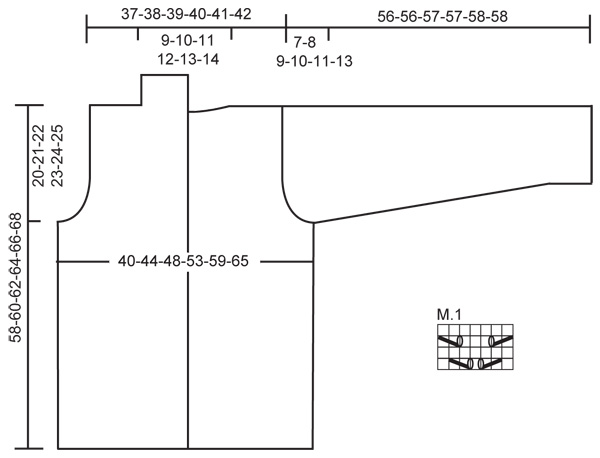
GARTER ST (back and forth on needle): K all rows. PATTERN: See diagram M.1. Diagram shows the pattern from RS. BUTTONHOLES: Make buttonholes on right front band. 1 buttonhole = cast off 7th st from mid front and cast on 1 new st on return row. Make buttonholes when piece measures: ALL SIZES: 10, 18, 26 and 34 cm. -------------------------------------------------------- BACK PIECE: Worked back and forth on needle. Cast on 100-114-121-135-156-170 sts (includes 1 edge st each side) on circular needle size 4 mm with Karisma. K 4 rows and continue in M.1 with 1 edge st each side (row 1 = RS). REMEMBER THE KNITTING TENSION! When piece measures 26 cm K 1 row from RS, AT THE SAME TIME inc 14-12-15-15-12-14 sts evenly = 114-126-136-150-168-184 sts. P 1 row from WS and continue in rib K1/P1 with 1 edge st each side. When piece measures 38-39-40-41-42-43 cm cast off for armhole each side at the beg of every row: 4 sts 0-0-0-1-1-1 times, 3 sts 1-1-1-1-2-2 times, 2 sts 0-2-3-4-6-8 times and 1 st 2-3-4-4-5-7 times = 104-106-110-112-114-118 sts. When piece measures 56-58-60-62-64-66 cm cast off the middle 24-26-28-30-32-36 sts for neck and complete each shoulder separately. On next row cast off 1 st on neckline = 39-39-40-40-40-40 sts left on shoulder. Cast off when piece measures 58-60-62-64-66-68 cm. RIGHT FRONT PIECE: Worked back and forth on needle. Cast on 64-71-78-85-92-99 sts (includes 1 edge st at the side) on circular needle size 4 mm with Karisma. K 4 rows and continue as follows – from mid front and RS: 2 GARTER STS – see above, * K1, P1 *, repeat from *-* on the next 12 sts, M.1 on the next 49-56-63-70-77-84 sts, and finish with 1 edge st. Continue in pattern like this. Remember BUTTONHOLES – see above. When piece measures 26 cm K 1 row from RS, AT THE SAME TIME inc 7-6-4-4-6-7 sts evenly = 71-77-82-89-98-106 sts. P 1 row from WS and continue as follows – from RS: 2 garter sts, rib K1/P1 on the next 68-74-79-86-95-103 sts, finish with 1 edge st. When piece measures 38-39-40-41-42-43 cm cast off for armhole at the side as described for back piece = 66-67-69-70-71-73 sts. When piece measures 58-60-62-64-66-68 cm cast off 39-39-40-40-40-40 sts from shoulder towards neckline = 27-28-29-30-31-33 sts left for collar. Continue in shortened rows and rib on collar as follows: * work 2 rows on all sts, work 2 rows on the 13-13-14-14-15-15 sts towards mid front only *, repeat from *-*. Continue in rib until collar measures 6-7-7-8-8-9 cm (measured where shortest) from shoulder. Cast off with K over K and P over P. LEFT FRONT PIECE: Like right front piece, but mirrored and without buttonholes. SLEEVE: Worked back and forth on circular needle. Cast on 66-68-70-72-74-76 sts (includes 1 edge st each side) on circular needle size 4 mm. Work rib K1/P1 with 1 edge st each side. When piece measures 8 cm continue in stocking st, AT THE SAME TIME on row 1 dec 18 sts evenly = 48-50-52-54-56-58 sts. When piece measures 10 cm inc 1 st each side, and repeat the inc on every 3-2.5-2.5-2-1.5-1.5 cm a total of 12-14-15-18-20-21 times = 72-78-82-90-96-100 sts. When piece measures 49-48-48-47-47-45 cm (less for the larger sizes because of longer sleeve cap and wider shoulder) cast off for sleeve cap each side at the beg of every row: 3 sts 1 time, 2 sts 4-4-4-4-4-5 times, 1 st 0-1-3-4-5-6 times, then 2 sts each side until piece measures 55-55-56-56-57-57 cm, now cast off 3 sts each side 1 time and cast off remaining sts. Piece measures approx 56-56-57-57-58-58 cm. ASSEMBLY: Sew shoulder seams. Set in sleeves. Sew side and sleeve seams inside 1 edge st. Sew collar tog mid back and sew collar to neckline. Sew on buttons to fit buttonholes. |
|||||||||||||
Diagram explanations |
|||||||||||||
|
|||||||||||||
 |
|||||||||||||
Have you finished this pattern?Tag your pictures with #dropspattern or submit them to the #dropsfan gallery. Do you need help with this pattern?You'll find 21 tutorial videos, a Comments/Questions area and more by visiting the pattern on garnstudio.com. © 1982-2026 DROPS Design A/S. We reserve all rights. This document, including all its sub-sections, has copyrights. Read more about what you can do with our patterns at the bottom of each pattern on our site. |
|||||||||||||


With over 40 years in knitting and crochet design, DROPS Design offers one of the most extensive collections of free patterns on the internet - translated to 17 languages. As of today we count 324 catalogues and 12290 patterns translated into English (UK/cm).
We work hard to bring you the best knitting and crochet have to offer, inspiration and advice as well as great quality yarns at incredible prices! Would you like to use our patterns for other than personal use? You can read what you are allowed to do in the Copyright text at the bottom of all our patterns. Happy crafting!
Post a comment to pattern DROPS 115-15
We would love to hear what you have to say about this pattern!
If you want to leave a question, please make sure you select the correct category in the form below, to speed up the answering process. Required fields are marked *.