
Popular categories
Looking for a yarn?


Comments / Questions (17)
![]() José Snijders wrote:
José Snijders wrote:
Hallo, ik snap een stukje bij de voorpanden niet. Er staat het volgende voor het linkervoorpand: Zet bij een hoogte van 35-38-40-43 cm 8-10-12-13 st middenvoor op een hulpdraad voor de hals en kant af etc... Welke 10 steken zijn dat? In het midden of bij de halskant? Want ik neem aan dat het niet bij de bies kant is.
05.07.2025 - 21:55DROPS Design answered:
Dag José
Dit zijn de steken aan de kant van midden voor, dus inderdaad bij de halskant.
08.07.2025 - 21:03
![]() Gerda Radtke wrote:
Gerda Radtke wrote:
Was bedeutet 5-0-5-0?
29.10.2024 - 17:55DROPS Design answered:
Liebe Frau Radtke, je nach der Grösse wird man entweder 5 Maschen Glatt rechts (1. und 3. Grösse), oder überhaupt keine Masche Glatt rechts (2. und 4. Grösse) innerhalb die Blenden-Maschen. Viel Spaß beim Stricken!
30.10.2024 - 07:43
![]() Annette Sahlquist wrote:
Annette Sahlquist wrote:
Undrar hur jag mäter framstycket. Första knapphålet 15 cm har jag mätt längs framkants-maskirna. Hur mäter jag sen? Längs från spetsduken?
14.04.2023 - 10:16DROPS Design answered:
Hej Annette, ja du fortsætter med at måle langs med framkantsmaskerne :)
18.04.2023 - 09:44
![]() Inger Pound wrote:
Inger Pound wrote:
Hi, I am just starting this project in size 7/8. After casting on 201 st and working the first row of M1 I can't get the stich count to work out!! I end up with 10 stiches less. I am an experienced knitter but must be missing something!!! Please help! thank you.
05.01.2022 - 23:45Inger Pound answered:
Hi again. As it relates to my question earlier....I solved the problem. Thank you
06.01.2022 - 02:12
![]() Siegrid Münch wrote:
Siegrid Münch wrote:
Vielen Dank für Ihre Antwort. Leider erklärt diese nicht, wie es zu diesem Größenunterschied kommt; die Blendmaschen sind zu wenige, um diesen großen Unterschied zu erklären. Haben Sie noch eine andere Erklärung? Danke und Gruß
10.03.2020 - 12:19DROPS Design answered:
Liebe Frau Münch, mit 183 M (nach M.1) und 23 M = 10 cm sollten Sie haben ca 79 cm haben - 12 BlendMaschen = ca 74 cm. Viel Spaß beim stricken!
10.03.2020 - 13:14
![]() Siegrid Muench wrote:
Siegrid Muench wrote:
Obwohl die Maschenprobe stimmt, ist das Strickstück zu breit, wenn ich das Muster M1 und M2 stricke - ca. 88 cm anstelle von ca 74 cm (Größe 2). Woran kann das liegen? Ich habe es schon mit engen Umschlägen versucht, es hilft aber nichts. Danke
10.03.2020 - 08:16DROPS Design answered:
Liebe Frau Muench, mit 23 M im Muster = 10 cm sollten die 183 Maschen ca 74 cm messen - vergessen Sie nicht es sind Blendemaschen dazu. Viel Spaß beim stricken!
10.03.2020 - 10:35
![]() Jessica wrote:
Jessica wrote:
Sitter och stickar på sista armen och har ca 30 cm garn kvar och ca 10 cm kvar att sticka. Så ett litet tips köp ett extra garn. Min stickfastighet stämmer men ändå så räcker inte garnet 🤔
04.03.2020 - 09:08
![]() Heike wrote:
Heike wrote:
Ärmel: Da steht "bei jeder 1. Reihe verteilt 6 M aufnehmen." Was bedeutet 'bei jeder(!) 1.Reihe'? In der ersten glatt re Reihe 1x bei jedem Ärmel (nach den Krausrippen)? Oder direkt schon in der ersten Krausrippreihe??
05.02.2020 - 20:02DROPS Design answered:
Liebe Heike, bei den Ärmeln nehmen Sie 6 Maschen bei der 1. Reihe glatt rechts nach den Krausrippen (Anleitung wird korrigiert). Viel Spaß beim stricken!
06.02.2020 - 09:42
![]() Heike wrote:
Heike wrote:
Ich habe gleich mehrere Fragen: 1) Wie reduziere ich die 190 M beim Anschlag durch das Muter 1 die Maschenanzahl auf die angegebene 174. D.h. warum sind in der ersten Reihe von Muster 1 21 M aufgemalt und in der Rückreihe nur noch 19. Was passiert mit den beiden Randkästchen? 2) Der Umschlag in Muster 2 wird ja immer in eine neue Masche bei der Rückreihe verwandelt, d.h. es werden immer mehr und mehr Maschen von Umschlagreihe zu Umschlagreihe? Sorry für die vermutlich banalen Fragen.
05.02.2020 - 18:28DROPS Design answered:
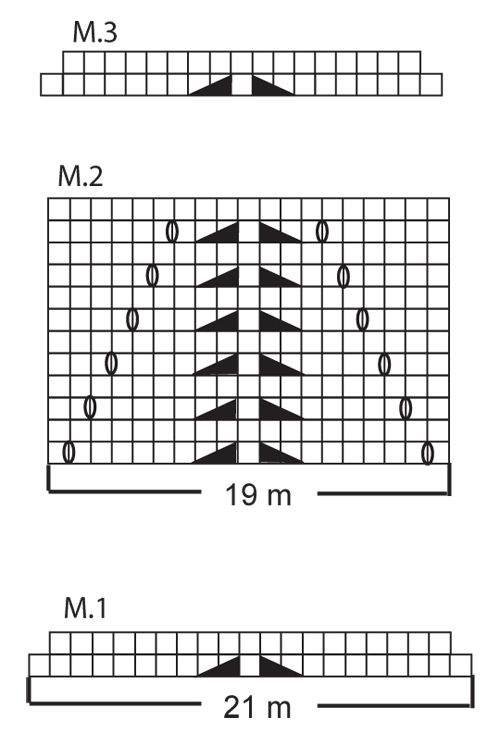
Liebe Heike, hier lesen Sie wie man gleichmäßig verteilt abnimmt. Im Diagram M.1 (sowie in M.3) werden 2 Maschen abgenommen (siehe 2. und 3. Symbol unter Diagramtext), dh nachdem Sie die 1. Reihe in M.1 und in M.3 gestrickt haben, haben Sie 2 Maschen in jedem Rapport abgenommen. In M.2 nehmen Sie 3 Maschen ab aber bei der gleichen Reihe stricken Sie 2 Umschläge = die Maschenanzahl bleibt gleich = keine Ab- nor Zunahmen. Viel Spaß beim stricken!
06.02.2020 - 09:40Sophie wrote:
Ich bin inzwischen bei den Ärmeln. Verstehe ich es richtig (für 9/10 J): nach 3 cm beidseitig 1 M. aufnehmen (= 62 M.) und das in jeder 3. Reihe wiederholen, bis 70 M. auf der Nadel sind. Dann nach 9 cm abketten. Vielen Dank für Ihre stets schnelle Antwort.
22.06.2016 - 21:46DROPS Design answered:
Liebe Sophie, ja es wird genau so gestrickt, wie Sie es schreiben.
06.07.2016 - 10:14
|
|||||||||||||
Sally Belle#sallybellecardigan |
|||||||||||||
|
|
|||||||||||||
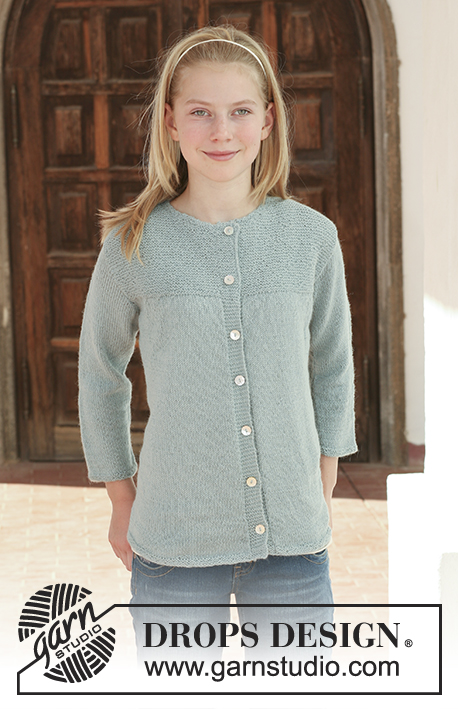
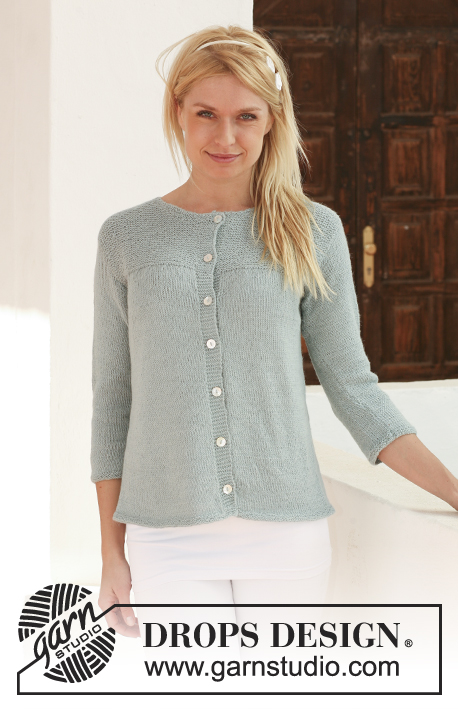
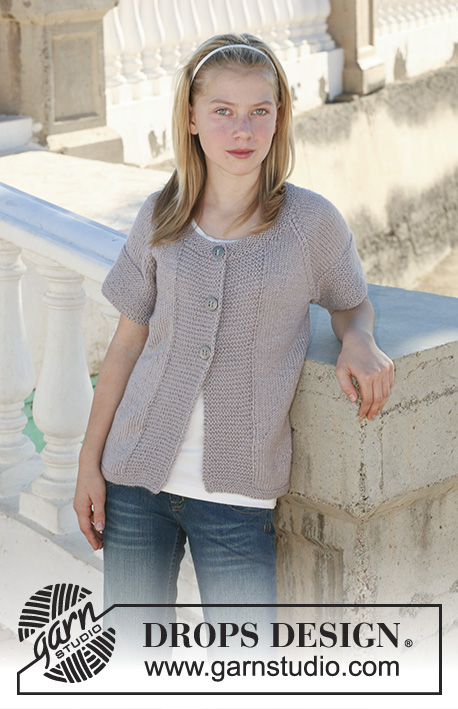
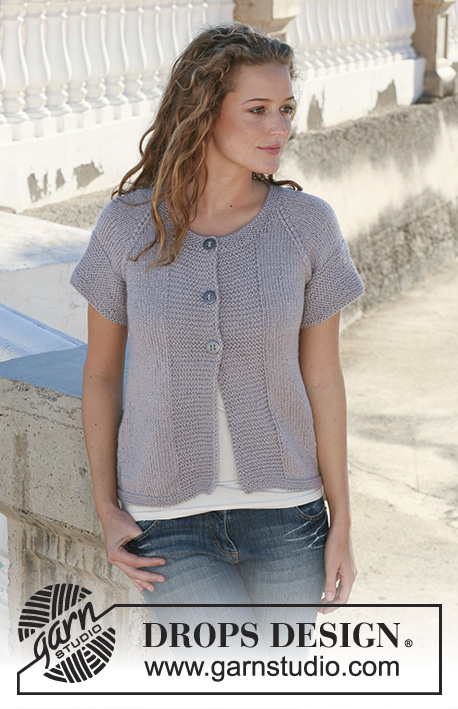
DROPS jacket in ”Muskat” with pattern and short sleeves. Size 7 – 14 years.
DROPS Extra 0-537 |
|||||||||||||
|
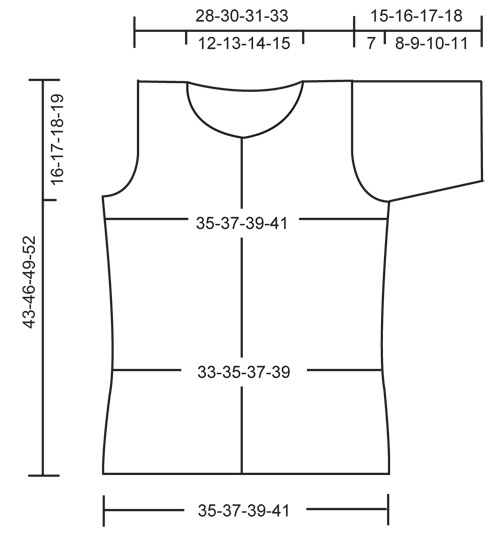
PATTERN: See diagram M.1, M.2 and M.3. The diagrams show the pattern from the RS. GARTER ST (back and forth on needle): K all sts. BUTTONHOLES: Make buttonholes on right front band. 1 buttonhole = K tog 3rd and 4th st from mid front and make 1 YO. Make buttonholes when piece measures: SIZE 7/8 YEARS: 14, 19, 24, 29 and 34 cm. SIZE 9/10 YEARS: 15, 21, 26, 32 and 37 cm. SIZE 11/12 YEARS: 15, 21, 27, 33 and 39 cm. SIZE 13/14 YEARS: 16, 23, 29, 36 and 42 cm. ---------------------------------------------------------- ---------------------------------------------------------- JACKET: Worked back and forth on circular needle from mid front. LOOSELY cast on 190-201-211-222 sts (includes 6 front band sts each side) on circular needle size 3.5 mm with Muskat. Continue as follows: 6 front band sts in garter st – see above - 5-0-5-0 stocking sts, M.1 on the next 168-189-189-210 sts, 5-0-5-0 stocking sts and 6 front band sts in garter st. After 1 vertical repeat of M.1 there are 174-183-193-202 sts on needle. Continue as follows: 6 garter sts, 5-0-5-0 stocking sts, M.2 on the next 152-171-171-190 sts, 5-0-5-0 stocking sts and 6 garter sts. After 3 vertical repeats of M.2, work M.3 over M.2 (remaining sts as before). After M.3 there are 158-165-175-182 sts on needle. Now continue in stocking st with front bands in garter st as before. REMEMBER THE KNITTING TENSION! Insert a marker 42-44-47-49 sts in from each side (back piece = 74-77-81-84 sts). NOTE: When piece measures 14-15-15-16 cm make BUTTONHOLES – see above. AT THE SAME TIME when piece measures 18-20-22-24 cm inc 1 st on each side of both markers and repeat the inc when piece measures 22-24-26-28 cm = 166-173-183-190 sts. When piece measures 27-29-31-33 cm cast off 6 sts each side for armhole (= 3 sts on each side of marker) and complete front and back pieces separately. BACK PIECE: = 72-75-79-82 sts. Continue in stocking st. Cast off for armhole each side at the beg of every row: 2 sts 1 time and 1 st 3 times = 62-65-69-72 sts. When piece measures 41-44-47-50 cm cast off the middle 22-25-27-28 sts for neck and complete each shoulder separately. Cast off 2 sts on neckline on next row = 18-18-19-20 sts left on shoulder. Cast off when piece measures 43-46-49-52 cm. LEFT FRONT PIECE: = 41-43-46-48 sts. Continue in stocking st with 6 front band sts in garter st. AT THE SAME TIME cast off for armhole at the side as described for back piece = 36-38-41-43 sts. When piece measures 35-38-40-43 cm slip 8-10-12-13 sts towards mid front on a stitch holder for neck and cast off to shape the neckline at the beg of every row from mid front: 3 sts 1 time, 2 sts 2 times and 1 st 3 times = 18-18-19-20 sts left on shoulder. Cast off when piece measures 43-46-49-52 cm. RIGHT FRONT PIECE: Like left front piece, but mirrored. SLEEVE: Worked back and forth on circular needle. Cast on 52-54-56-60 sts (includes 1 edge st each side) on needle size 3.5 mm with Muskat. Work 6 rows garter st and continue in stocking st, AT THE SAME TIME inc 6 sts evenly on first row = 58-60-62-66 sts. When piece measures 3 cm inc 1 st each side and repeat the inc on every 3rd row a total of 4-5-6-7 times = 66-70-74-80 sts. When piece measures 8-9-10-11 cm cast off for sleeve cap each side at the beg of every row: 4 sts 1 time, 2 sts 3 times and 1 st 3 times, then 2 sts each side until piece measures 14-15-16-17 cm, now cast off 3 sts each side 1 time. Cast off remaining sts, piece measures approx 15-16-17-18 cm. ASSEMBLY: Sew shoulder seams. NECKLINE: Pick up approx 80 to 100 sts (incl sts on stitch holders at front) on needle size 3.5 mm. Work 5 rows stocking st back and forth on needle and cast off loosely FURTHER ASSEMBLY: Sew sleeve seams inside 1 edge st. Set in sleeves and sew on buttons. |
|||||||||||||
Diagram explanations |
|||||||||||||
|
|||||||||||||
 |
|||||||||||||
 |
|||||||||||||
Have you finished this pattern?Tag your pictures with #dropspattern #sallybellecardigan or submit them to the #dropsfan gallery. Do you need help with this pattern?You'll find 22 tutorial videos, a Comments/Questions area and more by visiting the pattern on garnstudio.com. © 1982-2026 DROPS Design A/S. We reserve all rights. This document, including all its sub-sections, has copyrights. Read more about what you can do with our patterns at the bottom of each pattern on our site. |
|||||||||||||


With over 40 years in knitting and crochet design, DROPS Design offers one of the most extensive collections of free patterns on the internet - translated to 17 languages. As of today we count 324 catalogues and 12290 patterns translated into English (UK/cm).
We work hard to bring you the best knitting and crochet have to offer, inspiration and advice as well as great quality yarns at incredible prices! Would you like to use our patterns for other than personal use? You can read what you are allowed to do in the Copyright text at the bottom of all our patterns. Happy crafting!
Post a comment to pattern DROPS Extra 0-537
We would love to hear what you have to say about this pattern!
If you want to leave a question, please make sure you select the correct category in the form below, to speed up the answering process. Required fields are marked *.