
Popular categories
Looking for a yarn?


Comments / Questions (127)
![]() LMamieFlo wrote:
LMamieFlo wrote:
Merci pour les 2 réponses j’ai terminé la veste hier soir j’ai tout inversé pour le côté gauche pour que le point mousse soit sur l’endroit. J’ai regardé la vidéo mais je ne tiens pas le fil dans la main gauche mais dans la main droite. MamieFlo et Mamiey par erreur d’écriture.
15.10.2025 - 08:32
![]() Mamiey wrote:
Mamiey wrote:
Je ne sais pas trop bien comment faire le jeter, puis le tricoter en torse. Et je vois d’après les modèles qui sont donnés les utilisatrice, elles n’ont pas fait de la même façon pour que ça fasse vraiment joli. Merci pour la réponse.
11.10.2025 - 22:13DROPS Design answered:
Bonjour Mamiey, pour faire un jeté, passez le fil devant l'aiguille puis tricotez la maille suivante à l'endroit = le fil va passer automatiquement autour de l'aiguille droite; au rang suivant, tricotez le jeté dans le brin arrière pour le tricoter torse, dans cette vidéo, nous montrons (pour un modèle différent) comment augmenter dans du point mousse avec 1 jeté (en début de rang dans la vidéo) tricoté torse au rang suivant. Cela devrait pouvoir vous aider. Bon tricot!
15.10.2025 - 07:53
![]() MamieFlo wrote:
MamieFlo wrote:
Bonjour, grâce à vous,j’ai enfin terminé le côté droit. Vous écrivez c’est pareil pour le côté gauche sans les boutonnières, mais quand on voit tricoter un rang sur l’endroit en fin de rang et monter 41 mailles, il va falloir lire, tricoter un rang sur l’envers sans doute ? Et pareil pour tout le reste. Merci
11.10.2025 - 17:22DROPS Design answered:
Bonjour MamieFlo, en fait le côté gauche se fait exactement comme le côté droit, mais on le retourne à la suite sur l'envers pour avoir l'autre côté; la seule différence sera qu'à la fin du devant, vous ne tricotez pas le rang de boutonnières. Bon tricot!
15.10.2025 - 07:46
![]() Mamieflo wrote:
Mamieflo wrote:
Merci beaucoup, je vais recommencer pour la troisième fois, j’avais fait les augmentations côté dos, ce qui m’avait perdue c’est le point mousse endroit et envers que ’je ne différencie, pas à chaque fois, c’était bizarre car je n’avais pas le devant !
09.10.2025 - 09:19
![]() Mamieflo wrote:
Mamieflo wrote:
Bonjour,deux fois que je recommence, je suis perdue déjà dans l’endroit à l’envers. Est-cela manche droite et la 1/2 côté droit que l’on tricote ? Ma diagonale s’en va dans l’autre sens, elle ne va pas vers la partie manche mais vers l’extérieur, vers la droite Je bloque et n’avance pas je tricote la seconde
08.10.2025 - 19:24DROPS Design answered:
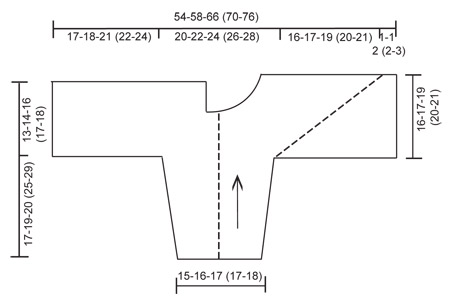
Bonjour Mamieflo, on commence par la moitié droite (cf schéma), donc la manche droite puis on va monter les mailles du dos en fin de rang sur l'endroit (= à gauche, vu sur l'endroit), et on va augmenter pour le devant en début de rang sur l'endroit (= à droite, vu sur l'endroit), la maille avec le marqueur va donc suivre la diagonale en pointillé dans le schéma = vos mailles augmentées avant celle avec le marqueur vont créer un angle droit au niveau de celle avec le marqueur qui va former cette diagonale. Bon tricot!
09.10.2025 - 08:37
![]() Anne wrote:
Anne wrote:
Kan ikke rigtig se hvordan bukserne sidder øverst, er der elastik i ? Eller er de bare afsluttede med en enkelt kant ? (ikke nedbukket dobbelt kant ?) Jeg tænker bare om de kan sidde godt bare med enkelt afsluttet kant ?
02.09.2025 - 08:45
![]() Sara wrote:
Sara wrote:
Varðandi útaukningu á fram- og bakstykki. Er ég þá í rauninni alltaf að auka út á réttunni (í annarri hverri umferð) sitt hvorum megin við sömu lykkjuna sem ég setti upphaflega prjónamerkið í? Þannig að útaukningin er alltaf að færast í verkinu sjálfu og helst ekki á sama stað (við 2. lykkju á prjóni frá réttu)? Er ég að skilja þetta rétt?
02.09.2025 - 00:36DROPS Design answered:
Blessuð Sara. Þú átt að auka út um 1 lykkju hvoru megin við lykkju með merkinu í (frá réttu). Þú eykur alltaf út frá réttu sitt hvoru megin við sömu lykkjuna sem merkið er í. Gangi þér vel.
06.09.2025 - 12:05
![]() Anette Kuhlmann wrote:
Anette Kuhlmann wrote:
Im Strickmuster steht bei VORDERTEIL folgendes: VORDERTEIL: Die M. auf dem Hilfsfaden wieder auf die Nadel legen, jedoch 9-10-10 (10-12) M. gegen das Rückenteil für den Halsausschnitt auf dem Hilfsfaden liegen lassen. Mit den Aufnahmen bei jeder 2. R. weiterfahren – GLEICHZEITIG gegen den Hals (gegen die M. auf dem Hilfsfaden) 1 M. abk. und bei jeder 4. R. total 6-7-7 (7-7) Mal wiederholen. Können Sie das genauer ausführen? Liebe Grüße Anette
15.08.2025 - 19:47DROPS Design answered:
Liebe Frau Kuhlmann, wenn Sie die Maschen vom Rückenteil stricken sollen, dann lassen Sie die 9 - 10 Maschen (siehe Größe) gegen das Rückenteil stilllegen für den Halsausschnitt, dann stricken Sie weiter wie zuvor, gleichzeitig ketten Sie 1 Masche am Anfang jeder 2. Reihe ab Halsausschnitt (= jeder 4. Reihe) insgesamt. 6 - 7 Mal ab. Viel Spaß beim Stricken!
18.08.2025 - 08:10
![]() Kirsten Plass wrote:
Kirsten Plass wrote:
Jeg er kommet til venstre halvdel der står at det skal strikkes magen til højre, og så skal man montere fra vrangen, jeg strikker i striber, normalt strikker man modsat , hvis jeg skal vende kommer vrang siden ud og den er anderledes når man strikker i striber.
30.05.2025 - 09:34DROPS Design answered:
Hej Kirsten, ja hvis du strikker i striber, så kan du lade samme side være retsiden og tage ud/ind i modsat side, så forstykket bliver spejlvendt :)
03.06.2025 - 07:22
![]() Truus wrote:
Truus wrote:
Ik heb de Kilian broek gemaakt maar hij valt nogal groot uit op de taille. Als ik hem toch nu al wil laten dragen, heeft u dan tips om de taille strakker te krijgen. Bijv koord of ??
28.05.2025 - 14:44DROPS Design answered:
Dag Truus,
Je zou bij een fourniturenwinkel kunnen vragen naar een band waarin elastiek verwerkt zit en dit er losjes (zodat je het er later weer afkunt halen.) op naaien met de naaimachine.
28.05.2025 - 20:31
|
||||
Killian#killianset |
||||
|
|
||||
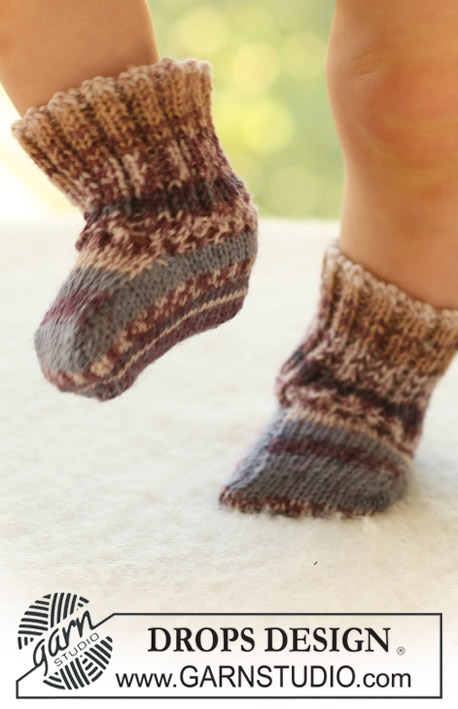
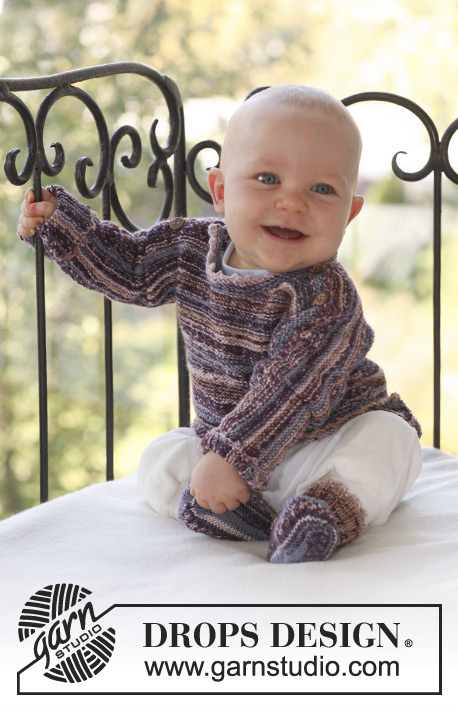
Set of knitted domino jacket in garter st in DROPS Fabel and pants in rib st in DROPS Alpaca for baby and children
DROPS Baby 18-25 |
||||
|
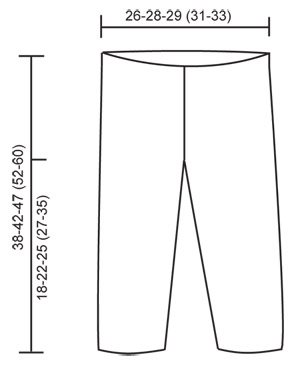
JACKET: INCREASING TIP: Inc 1 st on each side of st with marker by making 1 YO. On return row work YO into back of st in order to avoid a hole. ---------------------------------------------------------- JACKET: Worked from side to side from sleeve towards the middle of jacket, in 2 pieces sewn tog mid back afterwards. RIGHT HALF: Worked back and forth on circular needle in garter st. Cast on 36-38-40 (40-42) sts on circular needle size 3 mm with Fabel and work garter st. REMEMBER THE KNITTING TENSION! When piece measures 6-6-5 (5-6) cm inc 1 st each side and repeat the inc on every 8th row a total of 6-7-9 (11-13) times = 48-52-58 (62-68) sts. Continue until piece measures 17-19-20 (25-29) cm – adjust so that next row is from RS. BODY PIECE: K 1 row from RS, at the end of row cast on 41-43-50 (53-58) sts (= towards back piece) = 89-95-108 (115-126) sts. NOW MEASURE PIECE FROM HERE! Work return row. Insert a marker from RS in the second st on row (= right side of piece) and continue in garter st, AT THE SAME TIME inc 1 st on each side of st with marker on every other row a total of 38-40-46 (48-50) times – SEE INCREASING TIP. AT THE SAME TIME when piece measures 8½-9-10½ (11-12) cm continue on the last 60-65-74 (79-86) sts only on the left side of piece as seen from the RS (= back piece). Slip remaining sts on a stitch holder. BACK PIECE: Continue until piece measures 13-14-16 (17-18) cm (from where sts were cast on for back piece), and cast off. FRONT PIECE: Slip sts from stitch holder back on needle, but leave 9-10-10 (10-12) sts towards back piece on stitch holder for neckline. Continue to inc on every other row, AT THE SAME TIME cast off 1 st towards neckline on every 4th row a total of 6-7-7 (7-7) times. AT THE SAME TIME when piece measures 14-15-17 (18-19) cm (from where inc for front pieces beg) cast off for 3-4-4 (5-5) buttonholes as follows (from neckline, i.e. from WS): work 2 sts, cast off 2 sts, * work 12-9-11 (9-10) sts, cast off 2 sts *, repeat from *-* a total of 2-3-3 (4-4) times, and then work remaining sts on row. On return row cast on 2 new sts over the cast off sts. After dec and inc are complete there are 90-93-109 (115-121) sts on row. Now cast off 51-52-62 (66-70) sts from WS from neckline and down along front band = 39-41-47 (49-51) sts left on row. Continue in garter st back and forth on these sts for approx 1-1-2 (2-3) cm (fold piece double by shoulder to measure front piece to back piece) and cast off. LEFT HALF: Like right half, but without buttonholes – this half is assembled with WS out. ASSEMBLY: Place the 2 halves towards each other and sew tog mid back – edge to edge in order to avoid a chunky seam. Fold jacket double and sew under arm and side seams in outer loops of sts. Sew on buttons. NECKLINE: Pick up 55 to 75 sts (incl sts on stitch holders) round neckline on circular needle size 3 mm with Fabel. Work 3 rows garter st back and forth on needle and cast off. ---------------------------------------------------------- PANTS: INCREASING TIP: Inc 1 st on each side of the 2 K sts mid back (marker sits between these 2 sts). Inc by working 2 sts in 1 st and incorporate inc sts in rib as you go along. DECREASING TIP: Dec 1 st on each side of marker mid front. Dec as follows before marker: K2 tog. Dec as follows after marker: slip 1 st as if to K, K1, psso. LEG: Worked in the round on double pointed needles. Cast on 56-60-64 (68-72) sts on double pointed needles size 3 mm with Alpaca. Insert a marker at beg of round = inside of leg. Continue as follows: K1, * P2 / K2 *, repeat from *-* and finish with P2 and K1. When piece measures 4-6-4 (4-5) cm inc 1 st on each side of marker by K 2 sts in 1 st on every 5-6-8 (9-12) round a total of 8 times = 72-76-80 (84-88) sts. When leg measures 16-20-23 (25-33) cm divide the piece by marker and continue back and forth on needle (to make it easier to slip both legs on the same circular needle afterwards), AT THE SAME TIME cast on 1 new st each side for seam = 74-78-82 (86-90) sts. When piece measures 18-22-25 (27-35) cm cast off 5 sts each side (= 1 edge st, K1, P2 and K1) = 64-68-72 (76-80) sts. Put piece aside and knit the other leg in the same way. PANTS: Slip both legs on the same circular needle size 3 mm = 128-136-144 (152-160) sts. Insert 1 marker mid front and 1 marker mid back (both markers should sit between 2 K sts). Continue in rib, K2 / P2, AT THE SAME TIME inc mid back and dec mid front as follows: INC MID BACK: Inc 2 sts – SEE INCREASING TIP. Repeat the inc on every 4th round a total of 4 times. DEC MID FRONT: Dec 2 sts – SEE DECREASING TIP. Repeat the dec on every 4th round a total of 8 times. After all inc and dec are complete there are 120-128-136 (144-152) sts on round. Continue in rib until piece measures 38-42-47 (52-60) cm, cast off. ASSEMBLY: Sew inside of legs at the top inside 1 edge st. Sew opening between legs, front of leg towards back of leg. |
||||
Diagram explanations |
||||
|
||||
 |
||||
 |
||||
Have you finished this pattern?Tag your pictures with #dropspattern #killianset or submit them to the #dropsfan gallery. Do you need help with this pattern?You'll find 14 tutorial videos, a Comments/Questions area and more by visiting the pattern on garnstudio.com. © 1982-2026 DROPS Design A/S. We reserve all rights. This document, including all its sub-sections, has copyrights. Read more about what you can do with our patterns at the bottom of each pattern on our site. |
||||


With over 40 years in knitting and crochet design, DROPS Design offers one of the most extensive collections of free patterns on the internet - translated to 17 languages. As of today we count 325 catalogues and 12298 patterns translated into English (UK/cm).
We work hard to bring you the best knitting and crochet have to offer, inspiration and advice as well as great quality yarns at incredible prices! Would you like to use our patterns for other than personal use? You can read what you are allowed to do in the Copyright text at the bottom of all our patterns. Happy crafting!
Post a comment to pattern DROPS Baby 18-25
We would love to hear what you have to say about this pattern!
If you want to leave a question, please make sure you select the correct category in the form below, to speed up the answering process. Required fields are marked *.