
Popular categories
Looking for a yarn?


Comments / Questions (101)
![]() Lynn wrote:
Lynn wrote:
In pattern Elias what is gauge for this pattern using Fabel?
03.10.2025 - 21:13DROPS Design answered:
Dear Lynn, the gauge is indicated next to the recommended needle size: "DROPS circular needle size (80 cm) 3 mm [US 2or3] - or size needed to obtain 24 sts x 48 rows in garter st = 4" x 4". " Happy knitting!
06.10.2025 - 00:03
![]() Degraeve Vera wrote:
Degraeve Vera wrote:
Waar vind ik de matentabel
31.08.2025 - 14:53DROPS Design answered:
Dag Vera,
Helemaal onderaan de beschrijving van het patroon vind je de maattekening.
04.09.2025 - 22:05
![]() ColetteDundas wrote:
ColetteDundas wrote:
I have completed bottom piece and now am forming sleeves on back piece. Once complete Is there meant to be an overlap on bottom piece? on mine there is a 7cm overlap on bottom piece. I was going to add a panel on each side of back up to sleeves, unfortunately the fan pieces on edge wud not be on my sides. Look forward to yr reply
25.06.2025 - 15:39DROPS Design answered:
Dear Mrs Dundas, I'm afraid I don't understand your question, but you might get helped from the chart, there will be an overlap on mid front for the buttonbands. Happy knitting!
26.06.2025 - 16:32
![]() Kathy Gallant wrote:
Kathy Gallant wrote:
When doing increase for sleeves on arm side it says to increase as back. pattern says you should have 132 stitches how can this be. you start with 62 stiches then increase 10 on each side and then 3 on each side 15 times and then 15 on each side. so that is 20+90 +30 +62=202. How do you get 132 stitches?
21.08.2019 - 20:50DROPS Design answered:
Dear Mrs Gallant, on back piece you cast on the new stitches on each side for both sleeves while on each front piece you will increase for sleeve only one one side, ie 10 sts 1 time + 3 sts 15 times + 15 sts 1 time = 10+45+15= 70sts + 62 sts = 132sts. Happy knitting!
22.08.2019 - 09:38
![]() Kathleen Pleasants wrote:
Kathleen Pleasants wrote:
I am a beginner so apologies if this is a silly question! The instructions for the back say: 'Then cast on new sts for sleeve each side on every other row: 4-3-3-3-2-2 sts 12-15-15-17-17-19 times and 15-15-11-3-14-5 sts 1 time = 244-248-250-252-254-258 sts.' My question is, should it be: 15-15-11-13-14-15 sts 1 time? Thank you.
24.06.2019 - 09:55DROPS Design answered:
Dear Mrs Pleasants, the last cast on will be depending on the size 15 sts in the first, 2nd and last sti, 11 sts in the 3rd size, a4 sts in the 4th size and 14 sts in the 5th size. Happy knitting!
24.06.2019 - 11:01
![]() Françoise Reix wrote:
Françoise Reix wrote:
Bonjour, j'ai tricotée les 27 cm au point mousse, mais ensuite je ne comprend pas comment on fait les rangs raccourcis. Si vous pouviez m'aiguiller. Merci à vous
27.04.2019 - 12:25DROPS Design answered:
Bonjour Mme Reix, suivez attentivement les explications pas à pas: au rang suivant, tricotez les 20 premières mailles seulement, tournez et tricotez le rang retour, tournez et tricotez les 30 premières mailles seulement, tournez et tricotez le rang retour, continuez comme expliqué jusqu'à ce que vous ayez tricoté 2 rangs sur les 60 premières mailles. Tricotez ensuite 1 rang sur toutes les mailles et tricotez maintenant les rangs raccourcis de l'autre côté: 2 rangs sur les 60 premières mailles, 2 rangs sur les 50 premières mailles et ainsi de suite (n'oubliez pas les marqueurs). Bon tricot!
29.04.2019 - 08:47
![]() Katharina Haber wrote:
Katharina Haber wrote:
Beim Unterteil sowie Rückenteil wird plötzlich von zwei Markierungsfäden gesprochen. In der anleitung wird nur angegeben, 1 Markierungfaden. Wo also genau gehören die beiden Markierungen hin? Danke für die Hilfe
07.07.2018 - 08:26DROPS Design answered:
Liebe Katharina Haber, diese Markierungsfäden haben Sie, bei den verkürtzten Reihen eingesetzt: nach den 2 Reihen über die 60 M für den 1. Markierer und genauso für den 2. in der Mitte den verküzten Reihen (= nach 60) nach 42-66 cm von 1. Markierr gemessen. Viel Spaß beim stricken!
09.07.2018 - 07:50
![]() Begoña wrote:
Begoña wrote:
No entiendo cuando dice insertar un mp en el último punto ( para marcar el lado. Me lo podrias explicar. Gracias por todos los patrones. un saludo.
09.01.2018 - 08:00DROPS Design answered:
Hola Begoña, quiere decir que insertamos un marcapuntos en el último punto para saber donde se encuentra el lado y tenerlo como referencia posteriormente para evitar confusiones y errores.
13.01.2018 - 20:38
![]() Trish wrote:
Trish wrote:
In the instructions for the back piece it says to "cast off when piece measures (for my size) 34 cm from where sts were picked up for back piece, width of sleeve = approx 14 cm". My sleeve width is measuring 25 cm!! Is the 34 cm correct? I have knitted the left front and when the sleeve width measures 14 cm the front piece armpit to top of shoulder measures 24 cm. This looks correct and I am wondering if there was a typo with the numbers for the back piece?
23.08.2017 - 18:10DROPS Design answered:
Dear Mrs Trish, in 2nd size, you are casting on new sts for sleeve when piece measures 13 cm from picked up sts and cast off for shoulder/sleeve when piece measures 34 cm from picked up sts = you should have 21 cm for sleeve towards armhole and 14 cm for sleeve towards sleeve edge - see also measurement chart. Happy knitting!
28.08.2017 - 12:43
![]() Lydia wrote:
Lydia wrote:
Hallo, ich würde diese Jacke gerne mit 2 verschiedenen Farben des Garnes stricken, immer jeweils 2 Reihen im Wechsel. Ist das machbar? Oder bekomme ich dann Probleme bei den verkürzten Reihen? Bin leider noch relativ unerfahren... Liebe Grüße, Lydia
21.05.2017 - 20:06
|
|
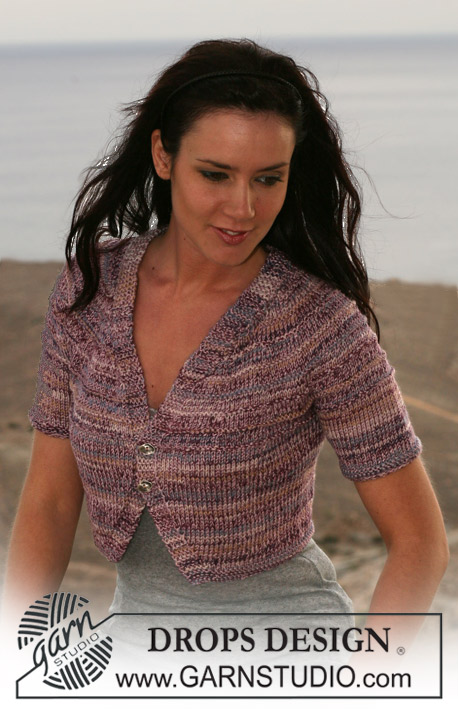
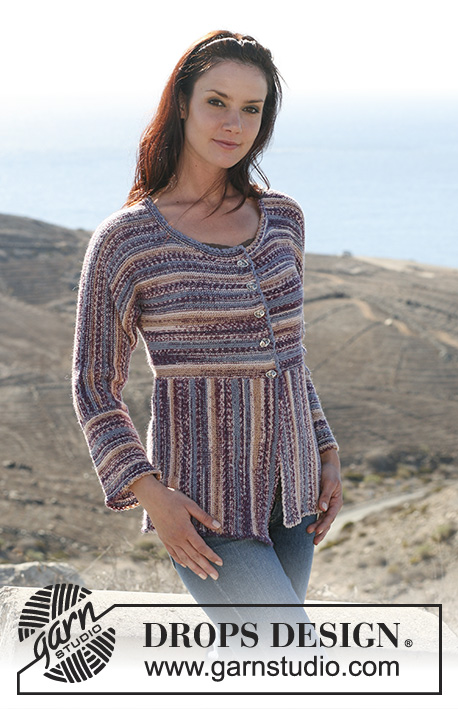
Elaia#elaia |
|
 |
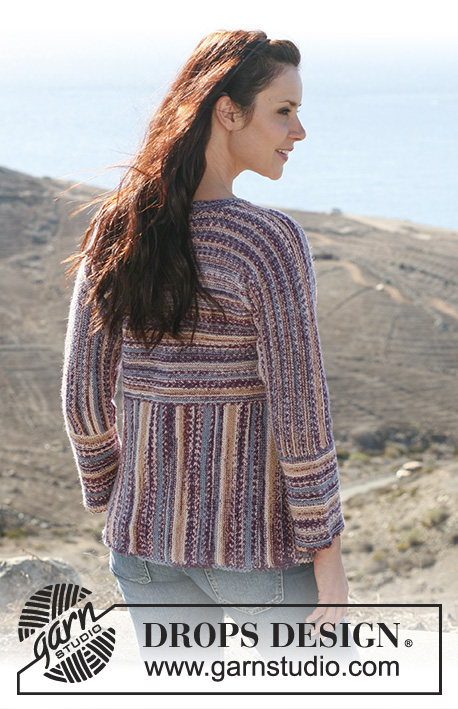 |
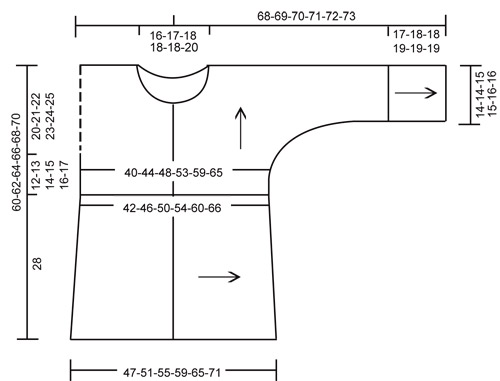
DROPS jacket, knitted in different directions in garter st in “Fabel”. Size S – XXXL
DROPS 107-3 |
|
|
Garter st, back and forth on needle: K all rows Buttonholes: Make buttonholes on right front piece. 1 buttonhole = cast off 4th st from mid front and cast on 1 new st on return row. Cast off for buttonholes when right front piece measures (measured from where sts were picked up): Size S: 1, 6, 10, 15 and 19 cm. Size M: 1, 6, 11, 16 and 21 cm. Size L: 1, 6, 11, 16 and 21 cm. Size XL: 1, 5, 10, 14, 19 and 23 cm. Size XXL: 1, 5, 10, 14, 19 and 23 cm. Size XXXL: 1, 6, 11, 16, 21 and 25 cm. The jacket is knitted in different directions. The arrows in diagram show the different knitting directions. Bottom part: Knitted back and forth on circular needle. The entire jacket is worked in garter st, e.i. K all rows. Cast on 67 sts on circular needle size 3 mm with Fabel. Work all sts back and forth on needle in garter st until piece measures 23-25-27-29-32-35 cm. Remember the knitting tension! Now work shortened rows as follows: Work 20 sts, turn piece and work return row Work 30 sts, turn piece and work return row Work 40 sts, turn piece and work return row Work 50 sts, turn piece and work return row Work 60 sts, turn piece and work return row Work all sts on row, insert a Marking Thread (MT) in the last st (marks the side), turn piece and work return row Work 60 sts, turn piece and work return row Work 50 sts, turn piece and work return row Work 40 sts, turn piece and work return row Work 30 sts, turn piece and work return row Work 20 sts, turn piece and work return row Continue back and forth on all sts. When piece measures 42-46-50-54-60-66 cm from MT work shortened rows again as described above. Continue on all sts until piece measures 23-25-27-29-32-35 cm from MT-2 and cast off loosely. The piece measures approx 88-96-104-112-124-136 cm at one side and 97-105-113-121-133-145 cm at the other. Back piece: From the RS pick up 1 st in each garter st on back piece, i.e. between the two MT. On next row adjust number of sts to 96-106-116-128-142-156. Work garter st back and forth on needle, at the same time inc 1 st each side (edge st) = 98-108-118-130-144-158 sts. Continue until piece measures 12-13-14-15-16-17 cm from where sts were picked up, and now cast on 10-10-10-7-7-7 new sts each side for sleeve. Then cast on new sts for sleeve each side on every other row: 4-3-3-3-2-2 sts 12-15-15-17-17-19 times and 15-15-11-3-14-5 sts 1 time = 244-248-250-252-254-258 sts. Work all sts back and forth on needle until piece measures 30-32-34-36-38-40 cm. Now cast off the middle 36-38-40-40-42-46 sts for neck and dec 1 st each side towards neckline on next row = 103-104-104-105-105-105 sts left on each shoulder. Cast off loosely when piece measures 32-34-36-38-40-42 cm from where sts were picked up for back piece, width of sleeve at sleeve edge = approx 14-14-15-15-16-16 cm. Left front piece: From the RS pick up 1 st in each garter st on left front piece, i.e. from MT at side towards mid front. Work garter st back and forth on needle, at the same time inc 1 st each side (edge st) = 56-62-66-72-80-87 sts. Continue until piece measures 12-13-14-15-16-17 cm from where sts were picked up, and now cast on sts for sleeve as described for back piece = 129-132-132-133-135-137 sts. Work all sts back and forth on needle until piece measures 20-22-22-24-24-26 cm. Now cast off 18-18-18-18-20-22 sts towards mid front for neck and dec to shape the neckline on every other row: 2 sts 4-5-5-5-5-5 times = 103-104-104-105-105-105 sts left on shoulder. Cast off loosely when piece measures 32-34-36-38-40-42 cm from where sts were picked up, make sure that width of sleeve at sleeve edge = measurements on back piece. Right front piece: Worked like left front piece, but mirrored. NB! Remember buttonholes – see explanation above. Assembly: Sew shoulder/upper sleeve seam, sew in edge sts to avoid a chunky seam. Neckline: From RS pick up 100-140 sts on needle size 3 mm with Fabel. Work 6 rows garter st and cast off loosely. Cuffs: Pick up 1 st in each garter st along bottom edge of sleeve. On next row adjust number of sts to 68-68-72-72-78-78. Work garter st back and forth on needle and cast off loosely when cuff measures 17-18-18-19-19-19 cm (or desired length). Assembly: Sew side seams, under arm and cuff seams in one, inside 1 edge st. Sew on buttons 1 cm from edge on left front piece to fit buttonholes on right front piece. Crochet border: Beg mid back and crochet a border on crochet hook size 3.5 mm with Fabel round the neck, down along left front piece, along bottom edge, up along right front piece and round the other half of neck as follows: 1 dc, *3 ch, skip approx 1 cm, 1 dc*, repeat from *-*. Finish round with a sl st in first dc from beg of round. Crochet a similar border round cuffs at sleeve edges. |
|
 |
|
Have you finished this pattern?Tag your pictures with #dropspattern #elaia or submit them to the #dropsfan gallery. Do you need help with this pattern?You'll find 14 tutorial videos, a Comments/Questions area and more by visiting the pattern on garnstudio.com. © 1982-2026 DROPS Design A/S. We reserve all rights. This document, including all its sub-sections, has copyrights. Read more about what you can do with our patterns at the bottom of each pattern on our site. |
|


With over 40 years in knitting and crochet design, DROPS Design offers one of the most extensive collections of free patterns on the internet - translated to 17 languages. As of today we count 325 catalogues and 12298 patterns translated into English (UK/cm).
We work hard to bring you the best knitting and crochet have to offer, inspiration and advice as well as great quality yarns at incredible prices! Would you like to use our patterns for other than personal use? You can read what you are allowed to do in the Copyright text at the bottom of all our patterns. Happy crafting!
Post a comment to pattern DROPS 107-3
We would love to hear what you have to say about this pattern!
If you want to leave a question, please make sure you select the correct category in the form below, to speed up the answering process. Required fields are marked *.